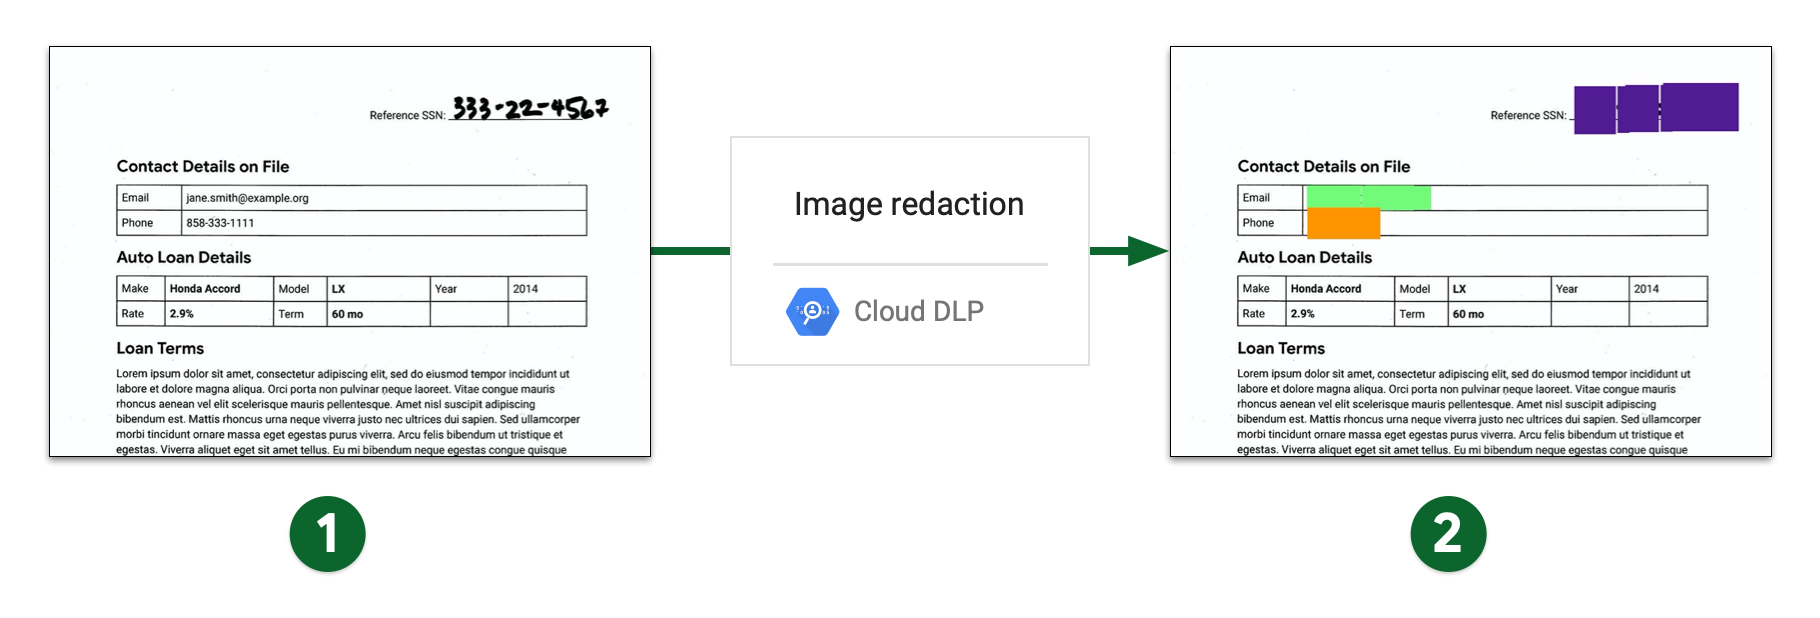
Sensitive Data Protection può oscurare il testo sensibile da un'immagine. Utilizzando i rilevatori di infoType e Cloud Vision, la protezione dei dati sensibili esamina un'immagine alla ricerca di testo, rileva i dati sensibili all'interno del testo e restituisce un'immagine con tutti i dati sensibili corrispondenti oscurati da un rettangolo opaco.
Ad esempio, considera le seguenti immagini "prima" e "dopo". L'immagine originale è un esempio di un tipico file immagine generato dalla scansione di un documento cartaceo. In questo esempio, la protezione dei dati sensibili è stata configurata in modo da oscurare i codici fiscali, gli indirizzi email e i numeri di telefono degli Stati Uniti utilizzando rettangoli di colori diversi, a seconda dei contenuti.
- Immagine scansionata prima dell'oscuramento dell'immagine
- Immagine scansionata dopo l'oscuramento dell'immagine
Limitazioni e considerazioni
Tieni presente i seguenti punti durante l'oscuramento dei contenuti nelle immagini.
Tipi di file supportati
Sensitive Data Protection può oscurare i dati sensibili da molti tipi di immagini, tra cui JPEG, BMP e PNG. Per ulteriori informazioni, vedi Tipi di file supportati.
L'oscuramento dei contenuti non è supportato per i file SVG, PDF, XLSX, PPTX o DOCX.
Limiti relativi ai risultati
Quando ometti i dati nelle immagini, i limiti di trovare non si applicano. Possono causare risultati imprevisti o potenzialmente incoerenti, laddove vengono oscurati solo alcuni dati. Se includi FindingLimits nella richiesta, Sensitive Data Protection
genera un errore.
Prima di iniziare
-
In the Google Cloud console, on the project selector page, select or create a Google Cloud project.
-
Make sure that billing is enabled for your Google Cloud project.
-
Enable the DLP API.
-
Create a service account:
-
In the Google Cloud console, go to the Create service account page.
Go to Create service account - Select your project.
-
In the Service account name field, enter a name. The Google Cloud console fills in the Service account ID field based on this name.
In the Service account description field, enter a description. For example,
Service account for quickstart. - Click Create and continue.
-
Grant the Project > Owner role to the service account.
To grant the role, find the Select a role list, then select Project > Owner.
- Click Continue.
-
Click Done to finish creating the service account.
Do not close your browser window. You will use it in the next step.
-
-
Create a service account key:
- In the Google Cloud console, click the email address for the service account that you created.
- Click Keys.
- Click Add key, and then click Create new key.
- Click Create. A JSON key file is downloaded to your computer.
- Click Close.
-
Set the environment variable
GOOGLE_APPLICATION_CREDENTIALSto the path of the JSON file that contains your credentials. This variable applies only to your current shell session, so if you open a new session, set the variable again. - Install the Google Cloud CLI.
-
Configure the gcloud CLI to use your federated identity.
For more information, see Browser-based sign-in with the gcloud CLI.
-
To initialize the gcloud CLI, run the following command:
gcloud init
Oscuramento di tutti gli infoType predefiniti da un'immagine
Per oscurare i dati sensibili in un'immagine, inviala al metodo
image.redact dell'API DLP.
A meno che tu non specifichi tipi specifici di informazioni (infoTypes) da cercare, Sensitive Data Protection cerca gli infoType più comuni.
Per oscurare gli infoType predefiniti da un'immagine:
Codifica l'immagine come stringa base64.
Se prevedi di utilizzare una delle librerie client di Sensitive Data Protection per eseguire questa attività, salta questo passaggio.
Invia una richiesta tramite il metodo
image.redact.Se vuoi oscurare gli infoType predefiniti, la richiesta richiede solo l'immagine con codifica Base64.
Ad esempio, considera l'immagine riportata di seguito. Questo è un esempio di un tipico file immagine generato dalla scansione di un documento cartaceo.
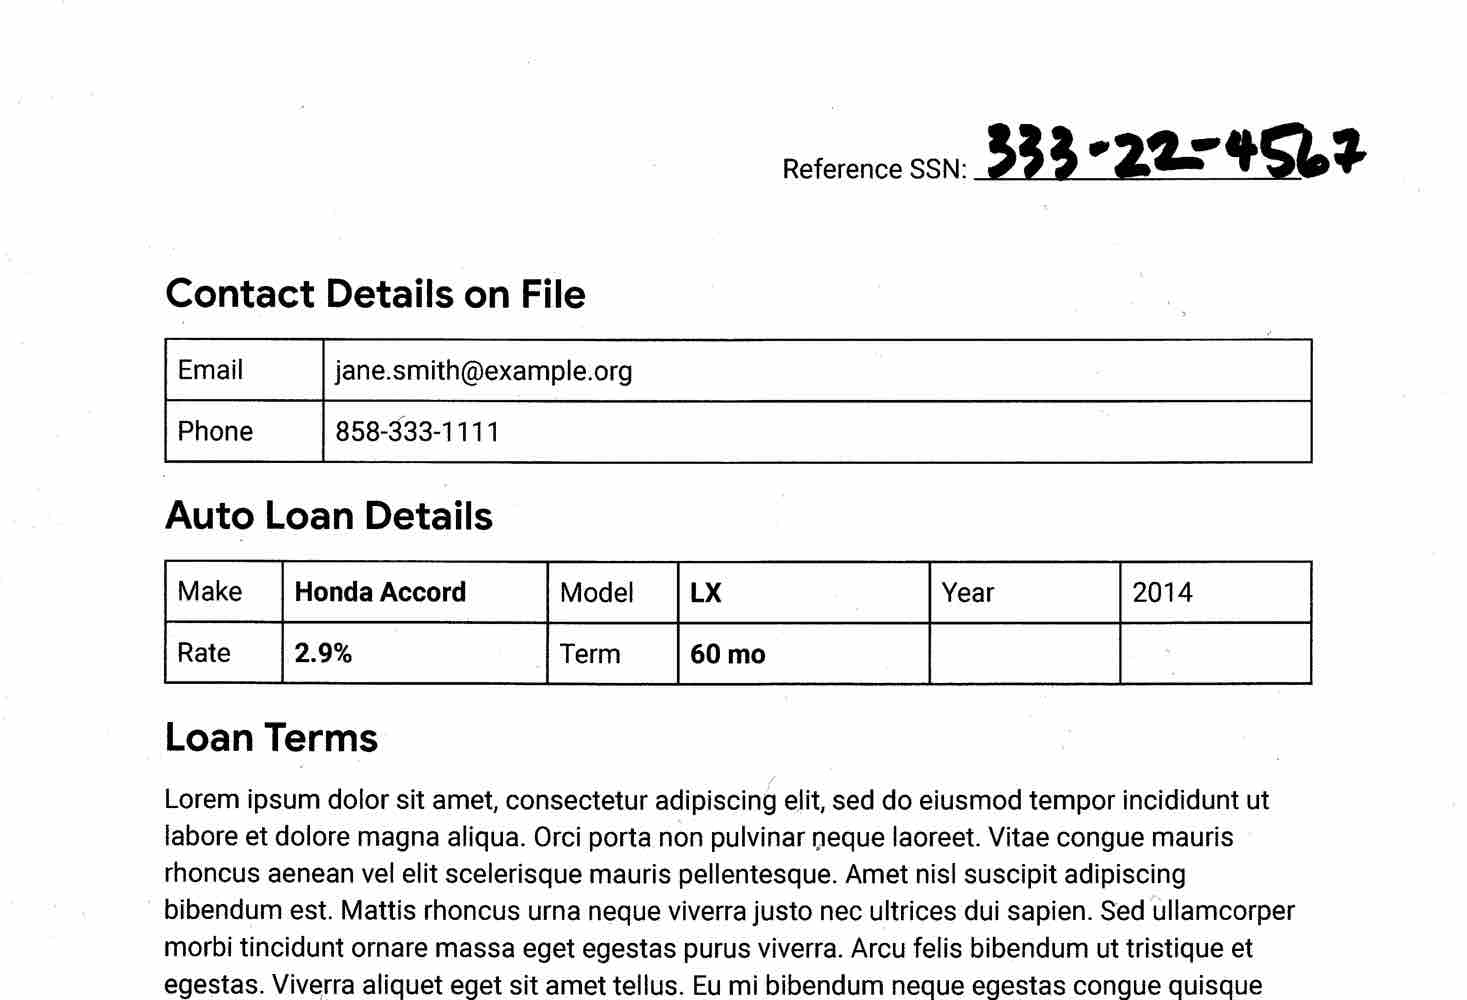
Per oscurare gli infoType predefiniti da questa immagine, invia la seguente richiesta al metodo image.redact dell'API DLP:
C#
Per scoprire come installare e utilizzare la libreria client per Sensitive Data Protection, consulta Librerie client di Sensitive Data Protection.
Per eseguire l'autenticazione in Sensitive Data Protection, configura Credenziali predefinite dell'applicazione. Per maggiori informazioni, consulta Configurare l'autenticazione per un ambiente di sviluppo locale.
Go
Per scoprire come installare e utilizzare la libreria client per Sensitive Data Protection, consulta Librerie client di Sensitive Data Protection.
Per eseguire l'autenticazione in Sensitive Data Protection, configura Credenziali predefinite dell'applicazione. Per maggiori informazioni, consulta Configurare l'autenticazione per un ambiente di sviluppo locale.
Java
Per scoprire come installare e utilizzare la libreria client per Sensitive Data Protection, consulta Librerie client di Sensitive Data Protection.
Per eseguire l'autenticazione in Sensitive Data Protection, configura Credenziali predefinite dell'applicazione. Per maggiori informazioni, consulta Configurare l'autenticazione per un ambiente di sviluppo locale.
Node.js
Per scoprire come installare e utilizzare la libreria client per Sensitive Data Protection, consulta Librerie client di Sensitive Data Protection.
Per eseguire l'autenticazione in Sensitive Data Protection, configura Credenziali predefinite dell'applicazione. Per maggiori informazioni, consulta Configurare l'autenticazione per un ambiente di sviluppo locale.
PHP
Per scoprire come installare e utilizzare la libreria client per Sensitive Data Protection, consulta Librerie client di Sensitive Data Protection.
Per eseguire l'autenticazione in Sensitive Data Protection, configura Credenziali predefinite dell'applicazione. Per maggiori informazioni, consulta Configurare l'autenticazione per un ambiente di sviluppo locale.
Python
Per scoprire come installare e utilizzare la libreria client per Sensitive Data Protection, consulta Librerie client di Sensitive Data Protection.
Per eseguire l'autenticazione in Sensitive Data Protection, configura Credenziali predefinite dell'applicazione. Per maggiori informazioni, consulta Configurare l'autenticazione per un ambiente di sviluppo locale.
REST
{
  "byteItem": {
    "data": "[BASE64-ENCODED-IMAGE]",
    "type": "IMAGE_JPEG"
  }
}
Sensitive Data Protection restituisce quanto segue:
    {
      "redactedImage": "[BASE64-ENCODED-IMAGE]"
    }
Decodifica l'immagine con codifica Base64.
L'immagine risultante appare come segue:

Tieni presente che, oltre a mascherare il numero di previdenza sociale scritto a mano, l'indirizzo email e il numero di telefono, Sensitive Data Protection ha anche oscurato l'anno. La sezione successiva illustra come oscurare solo determinati infoType.
Oscuramento di infoType specifici in un'immagine
Se vuoi oscurare solo alcuni dati sensibili in un'immagine, specifica gli infoType integrati corrispondenti.
Per oscurare infoType specifici da un'immagine, invia una richiesta al metodo image.redact dell'API DLP. La richiesta deve includere quanto segue:
- L'immagine.
- Uno o più rilevatori di infoType.
Considera l'immagine originale della sezione precedente. Per oscurare solo i codici fiscali, gli indirizzi email e i numeri di telefono degli Stati Uniti, invia il seguente JSON al metodo image.redact dell'API DLP:
C#
Per scoprire come installare e utilizzare la libreria client per Sensitive Data Protection, consulta Librerie client di Sensitive Data Protection.
Per eseguire l'autenticazione in Sensitive Data Protection, configura Credenziali predefinite dell'applicazione. Per maggiori informazioni, consulta Configurare l'autenticazione per un ambiente di sviluppo locale.
Go
Per scoprire come installare e utilizzare la libreria client per Sensitive Data Protection, consulta Librerie client di Sensitive Data Protection.
Per eseguire l'autenticazione in Sensitive Data Protection, configura Credenziali predefinite dell'applicazione. Per maggiori informazioni, consulta Configurare l'autenticazione per un ambiente di sviluppo locale.
Java
Per scoprire come installare e utilizzare la libreria client per Sensitive Data Protection, consulta Librerie client di Sensitive Data Protection.
Per eseguire l'autenticazione in Sensitive Data Protection, configura Credenziali predefinite dell'applicazione. Per maggiori informazioni, consulta Configurare l'autenticazione per un ambiente di sviluppo locale.
Node.js
Per scoprire come installare e utilizzare la libreria client per Sensitive Data Protection, consulta Librerie client di Sensitive Data Protection.
Per eseguire l'autenticazione in Sensitive Data Protection, configura Credenziali predefinite dell'applicazione. Per maggiori informazioni, consulta Configurare l'autenticazione per un ambiente di sviluppo locale.
PHP
Per scoprire come installare e utilizzare la libreria client per Sensitive Data Protection, consulta Librerie client di Sensitive Data Protection.
Per eseguire l'autenticazione in Sensitive Data Protection, configura Credenziali predefinite dell'applicazione. Per maggiori informazioni, consulta Configurare l'autenticazione per un ambiente di sviluppo locale.
Python
Per scoprire come installare e utilizzare la libreria client per Sensitive Data Protection, consulta Librerie client di Sensitive Data Protection.
Per eseguire l'autenticazione in Sensitive Data Protection, configura Credenziali predefinite dell'applicazione. Per maggiori informazioni, consulta Configurare l'autenticazione per un ambiente di sviluppo locale.
REST
    {
      "byteItem": {
        "data": "[BASE64-ENCODED-IMAGE]",
        "type": "IMAGE_JPEG"
      },
      "imageRedactionConfigs": [
        {
          "infoType": {
            "name": "US_SOCIAL_SECURITY_NUMBER"
          }
        },
        {
          "infoType": {
            "name": "EMAIL_ADDRESS"
          }
        },
        {
          "infoType": {
            "name": "PHONE_NUMBER"
          }
        }
      ]
    }
Sensitive Data Protection restituisce quanto segue:
    {
      "redactedImage": "[BASE64-ENCODED-IMAGE]"
    }
Decodifica l'immagine con codifica Base64.
L'immagine risultante appare come segue:
Puoi assegnare un codice colore alle informazioni oscurate in base all'infoType per capire a colpo d'occhio che cosa è stato oscurato. Per saperne di più, consulta la sezione seguente.
Oscuramento degli infoType in un'immagine con codifica a colori
Per assegnare un colore alle informazioni oscurate in base all'infoType, devi accoppiare i rilevatori infoType ai valori dello spazio colore RGB.
Per assegnare un codice colore agli infoType oscurati in un'immagine, invia una richiesta al metodo image.redact dell'API DLP. La richiesta deve includere quanto segue:
- L'immagine.
- Uno o più rilevatori di infoType, a ognuno dei quali è stato assegnato un colore utilizzando i valori dello spazio colore RGB.
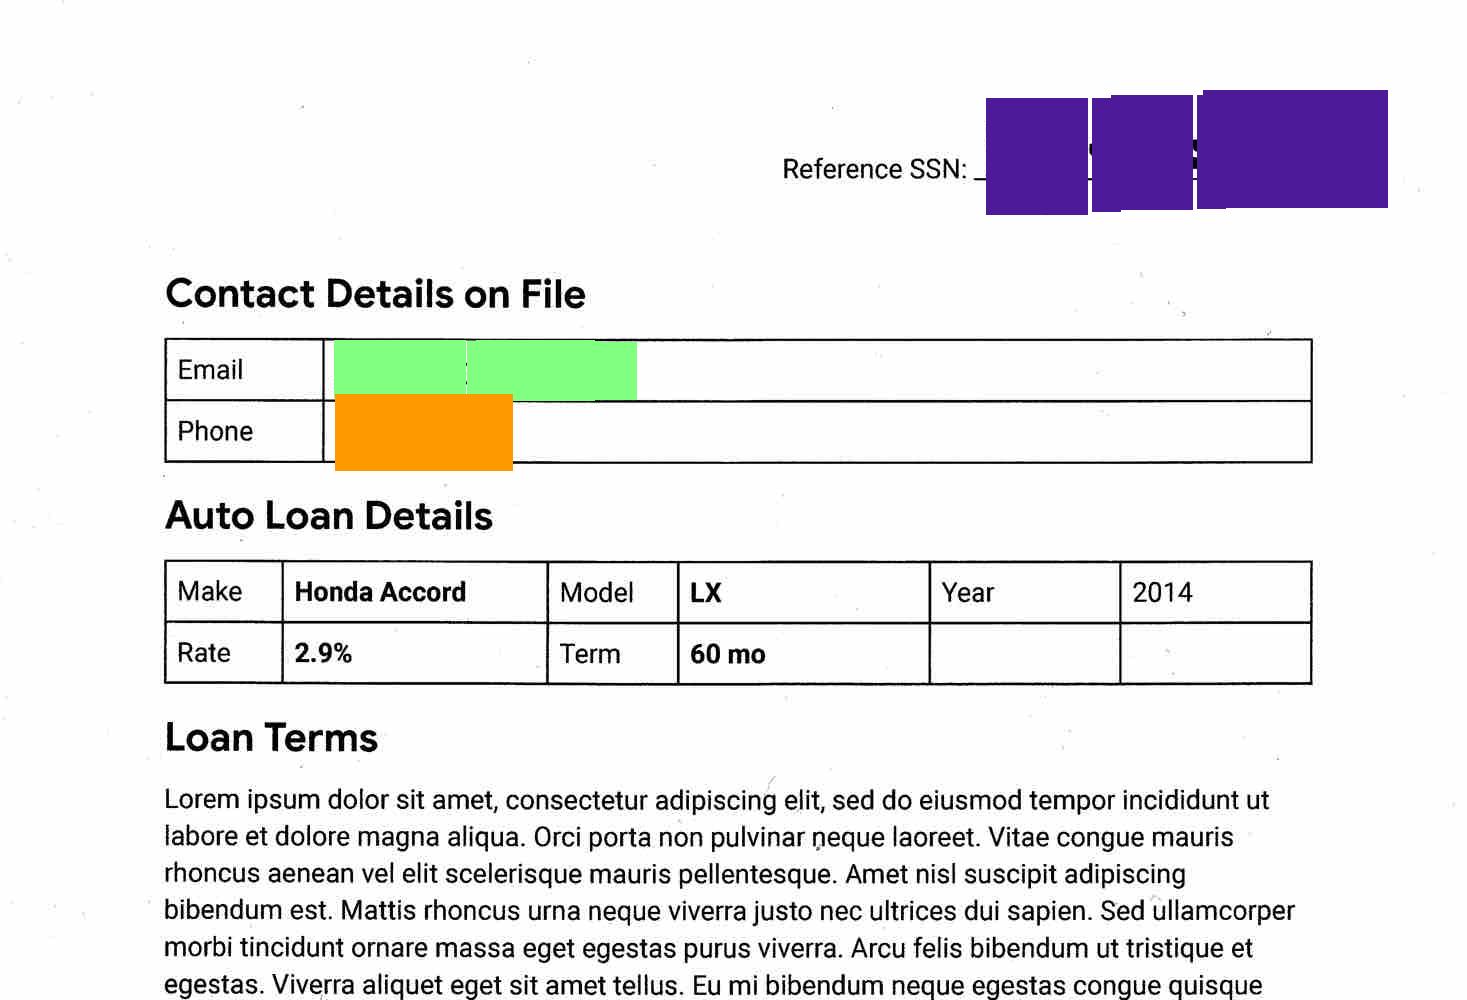
Considera l'immagine originale della prima sezione. Per oscurare i codici fiscali degli Stati Uniti in un riquadro viola, gli indirizzi email con un riquadro verde e i numeri di telefono con una casella arancione, invia il seguente JSON al metodo image.redact dell'API DLP:
C#
Per scoprire come installare e utilizzare la libreria client per Sensitive Data Protection, consulta Librerie client di Sensitive Data Protection.
Per eseguire l'autenticazione in Sensitive Data Protection, configura Credenziali predefinite dell'applicazione. Per maggiori informazioni, consulta Configurare l'autenticazione per un ambiente di sviluppo locale.
Go
Per scoprire come installare e utilizzare la libreria client per Sensitive Data Protection, consulta Librerie client di Sensitive Data Protection.
Per eseguire l'autenticazione in Sensitive Data Protection, configura Credenziali predefinite dell'applicazione. Per maggiori informazioni, consulta Configurare l'autenticazione per un ambiente di sviluppo locale.
Java
Per scoprire come installare e utilizzare la libreria client per Sensitive Data Protection, consulta Librerie client di Sensitive Data Protection.
Per eseguire l'autenticazione in Sensitive Data Protection, configura Credenziali predefinite dell'applicazione. Per maggiori informazioni, consulta Configurare l'autenticazione per un ambiente di sviluppo locale.
Node.js
Per scoprire come installare e utilizzare la libreria client per Sensitive Data Protection, consulta Librerie client di Sensitive Data Protection.
Per eseguire l'autenticazione in Sensitive Data Protection, configura Credenziali predefinite dell'applicazione. Per maggiori informazioni, consulta Configurare l'autenticazione per un ambiente di sviluppo locale.
PHP
Per scoprire come installare e utilizzare la libreria client per Sensitive Data Protection, consulta Librerie client di Sensitive Data Protection.
Per eseguire l'autenticazione in Sensitive Data Protection, configura Credenziali predefinite dell'applicazione. Per maggiori informazioni, consulta Configurare l'autenticazione per un ambiente di sviluppo locale.
Python
Per scoprire come installare e utilizzare la libreria client per Sensitive Data Protection, consulta Librerie client di Sensitive Data Protection.
Per eseguire l'autenticazione in Sensitive Data Protection, configura Credenziali predefinite dell'applicazione. Per maggiori informazioni, consulta Configurare l'autenticazione per un ambiente di sviluppo locale.
REST
    {
      "byteItem": {
        "data": "[BASE64-ENCODED-IMAGE]",
        "type": "IMAGE_JPEG"
      },
      "imageRedactionConfigs": [
        {
          "infoType": {
            "name": "US_SOCIAL_SECURITY_NUMBER"
          },
          "redactionColor": {
            "red": 0.3,
            "green": 0.1,
            "blue": 0.6
          }
        },
        {
          "infoType": {
            "name": "EMAIL_ADDRESS"
          },
          "redactionColor": {
            "red": 0.5,
            "blue": 0.5,
            "green": 1
          }
        },
        {
          "infoType": {
            "name": "PHONE_NUMBER"
          },
          "redactionColor": {
            "red": 1,
            "blue": 0,
            "green": 0.6
          }
        }
      ]
    }
Sensitive Data Protection restituisce quanto segue:
    {
      "redactedImage": "[BASE64-ENCODED-IMAGE]"
    }
Decodifica l'immagine con codifica Base64.
L'immagine risultante appare come segue:
Oscuramento di tutto il testo in un'immagine
Sensitive Data Protection contiene anche un'opzione per oscurare tutto il testo rilevato in un'immagine.
Per oscurare tutto il testo di un'immagine, invia una richiesta al metodo image.redact dell'API DLP. La richiesta deve includere quanto segue:
- L'immagine.
- Opzione
redactAllTextimpostata sutrue.
Considera l'immagine originale della prima sezione. Per oscurare tutto il testo, invia il seguente JSON al metodo image.redact dell'API DLP:
C#
Per scoprire come installare e utilizzare la libreria client per Sensitive Data Protection, consulta Librerie client di Sensitive Data Protection.
Per eseguire l'autenticazione in Sensitive Data Protection, configura Credenziali predefinite dell'applicazione. Per maggiori informazioni, consulta Configurare l'autenticazione per un ambiente di sviluppo locale.
Go
Per scoprire come installare e utilizzare la libreria client per Sensitive Data Protection, consulta Librerie client di Sensitive Data Protection.
Per eseguire l'autenticazione in Sensitive Data Protection, configura Credenziali predefinite dell'applicazione. Per maggiori informazioni, consulta Configurare l'autenticazione per un ambiente di sviluppo locale.
Java
Per scoprire come installare e utilizzare la libreria client per Sensitive Data Protection, consulta Librerie client di Sensitive Data Protection.
Per eseguire l'autenticazione in Sensitive Data Protection, configura Credenziali predefinite dell'applicazione. Per maggiori informazioni, consulta Configurare l'autenticazione per un ambiente di sviluppo locale.
Node.js
Per scoprire come installare e utilizzare la libreria client per Sensitive Data Protection, consulta Librerie client di Sensitive Data Protection.
Per eseguire l'autenticazione in Sensitive Data Protection, configura Credenziali predefinite dell'applicazione. Per maggiori informazioni, consulta Configurare l'autenticazione per un ambiente di sviluppo locale.
PHP
Per scoprire come installare e utilizzare la libreria client per Sensitive Data Protection, consulta Librerie client di Sensitive Data Protection.
Per eseguire l'autenticazione in Sensitive Data Protection, configura Credenziali predefinite dell'applicazione. Per maggiori informazioni, consulta Configurare l'autenticazione per un ambiente di sviluppo locale.
Python
Per scoprire come installare e utilizzare la libreria client per Sensitive Data Protection, consulta Librerie client di Sensitive Data Protection.
Per eseguire l'autenticazione in Sensitive Data Protection, configura Credenziali predefinite dell'applicazione. Per maggiori informazioni, consulta Configurare l'autenticazione per un ambiente di sviluppo locale.
REST
    {
      "byteItem": {
        "data": "[BASE64-ENCODED-IMAGE]",
        "type": "IMAGE_JPEG"
      },
      "imageRedactionConfigs": [
        {
          "redactAllText": true
        }
      ]
    }
Sensitive Data Protection restituisce quanto segue:
    {
      "redactedImage": "[BASE64-ENCODED-IMAGE]"
    }
Decodifica l'immagine con codifica Base64.
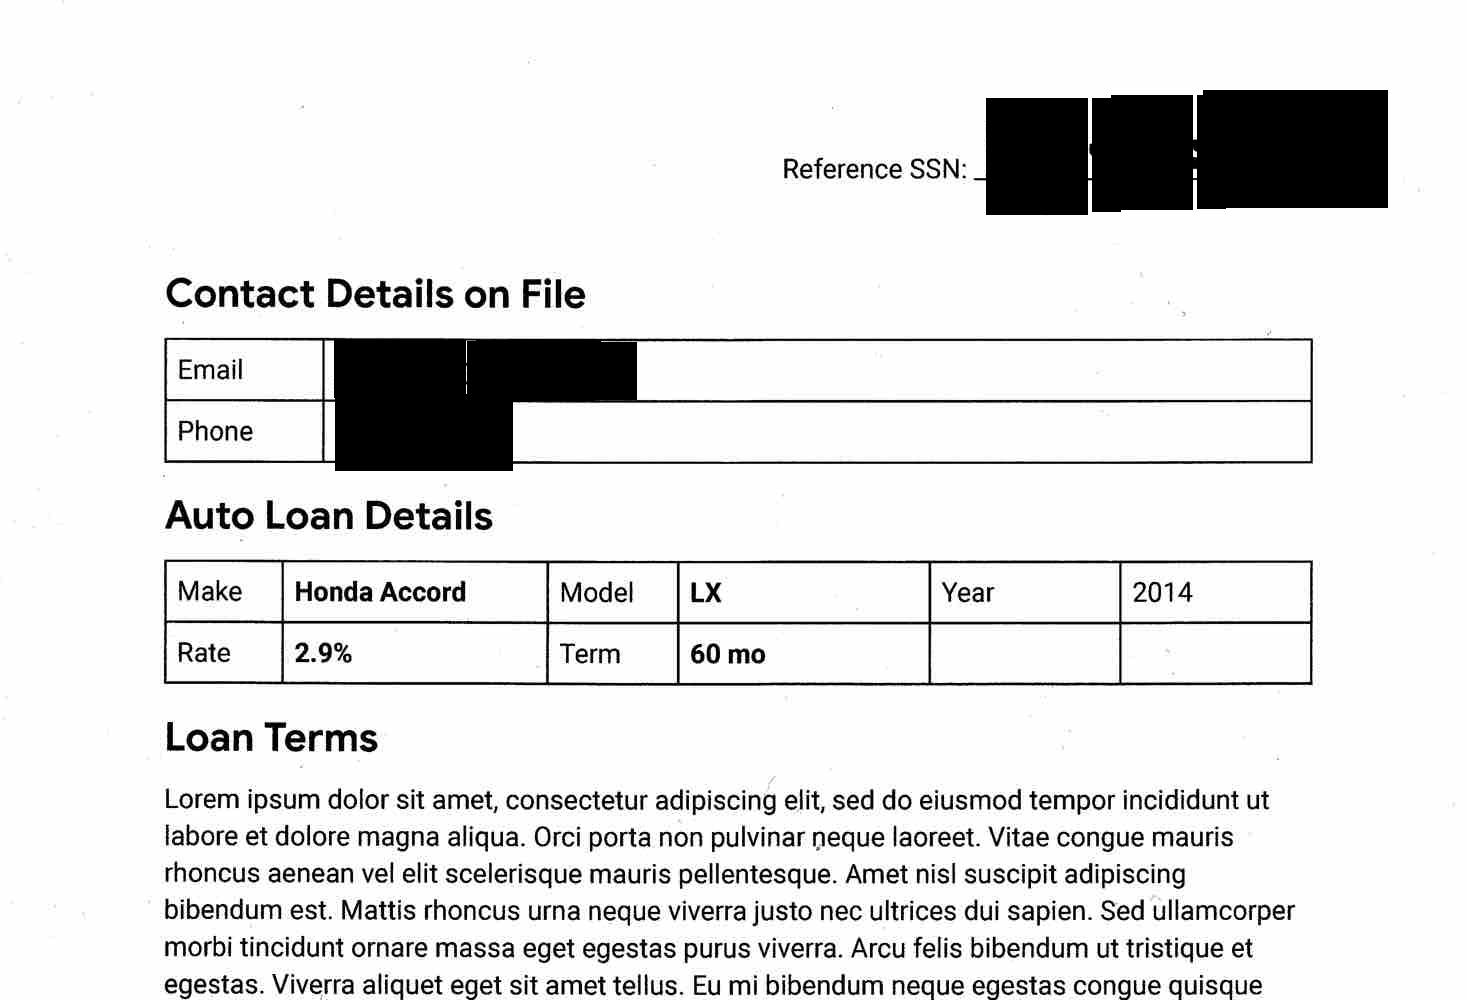
L'API restituisce le stesse immagini che le hai fornito, ma qualsiasi testo identificato come contenente informazioni sensibili in base ai tuoi criteri è stato oscurato.
L'immagine risultante appare come segue:
Esempio di codice con impostazione della probabilità
Questo esempio è simile a Oscuramento di infoType specifici da un'immagine. Dimostra inoltre come specificare la probabilità minima.
C#
Per scoprire come installare e utilizzare la libreria client per Sensitive Data Protection, consulta Librerie client di Sensitive Data Protection.
Per eseguire l'autenticazione in Sensitive Data Protection, configura Credenziali predefinite dell'applicazione. Per maggiori informazioni, consulta Configurare l'autenticazione per un ambiente di sviluppo locale.
Go
Per scoprire come installare e utilizzare la libreria client per Sensitive Data Protection, consulta Librerie client di Sensitive Data Protection.
Per eseguire l'autenticazione in Sensitive Data Protection, configura Credenziali predefinite dell'applicazione. Per maggiori informazioni, consulta Configurare l'autenticazione per un ambiente di sviluppo locale.
Java
Per scoprire come installare e utilizzare la libreria client per Sensitive Data Protection, consulta Librerie client di Sensitive Data Protection.
Per eseguire l'autenticazione in Sensitive Data Protection, configura Credenziali predefinite dell'applicazione. Per maggiori informazioni, consulta Configurare l'autenticazione per un ambiente di sviluppo locale.
Node.js
Per scoprire come installare e utilizzare la libreria client per Sensitive Data Protection, consulta Librerie client di Sensitive Data Protection.
Per eseguire l'autenticazione in Sensitive Data Protection, configura Credenziali predefinite dell'applicazione. Per maggiori informazioni, consulta Configurare l'autenticazione per un ambiente di sviluppo locale.
PHP
Per scoprire come installare e utilizzare la libreria client per Sensitive Data Protection, consulta Librerie client di Sensitive Data Protection.
Per eseguire l'autenticazione in Sensitive Data Protection, configura Credenziali predefinite dell'applicazione. Per maggiori informazioni, consulta Configurare l'autenticazione per un ambiente di sviluppo locale.
Python
Per scoprire come installare e utilizzare la libreria client per Sensitive Data Protection, consulta Librerie client di Sensitive Data Protection.
Per eseguire l'autenticazione in Sensitive Data Protection, configura Credenziali predefinite dell'applicazione. Per maggiori informazioni, consulta Configurare l'autenticazione per un ambiente di sviluppo locale.
Fai una prova
Puoi provare personalmente ciascuno degli esempi in questa pagina oppure sperimentare con le tue immagini in Explorer API nella pagina di riferimento di image.redact:
Passaggi successivi
- Scopri di più su ispezione e oscuramento delle immagini.
- Svolgi il codelab Oscuramento dei dati sensibili con Sensitive Data Protection.
- Scopri come controllare le immagini per individuare dati sensibili.
- Scopri di più sulla creazione di una copia anonimizzata dei dati nello spazio di archiviazione.