You can use the Cloud Data Loss Prevention API to detect sensitive text and objects within an image and then get a redacted version of that image. In the returned image, the detected sensitive data elements are obscured by an opaque rectangle. You use infoType detectors to specify the types of information that you want to detect and redact.
By default, Sensitive Data Protection uses black rectangles to obscure the redacted content, but you can specify a color for each infoType in your image redaction configuration.
Text redaction
Sensitive Data Protection uses object character recognition (OCR) to detect text in images. You can redact the following in an image:
- Text that matches any of the default infoTypes
- Text that matches any of the infoTypes that you list in your image redaction configuration
- All detected text
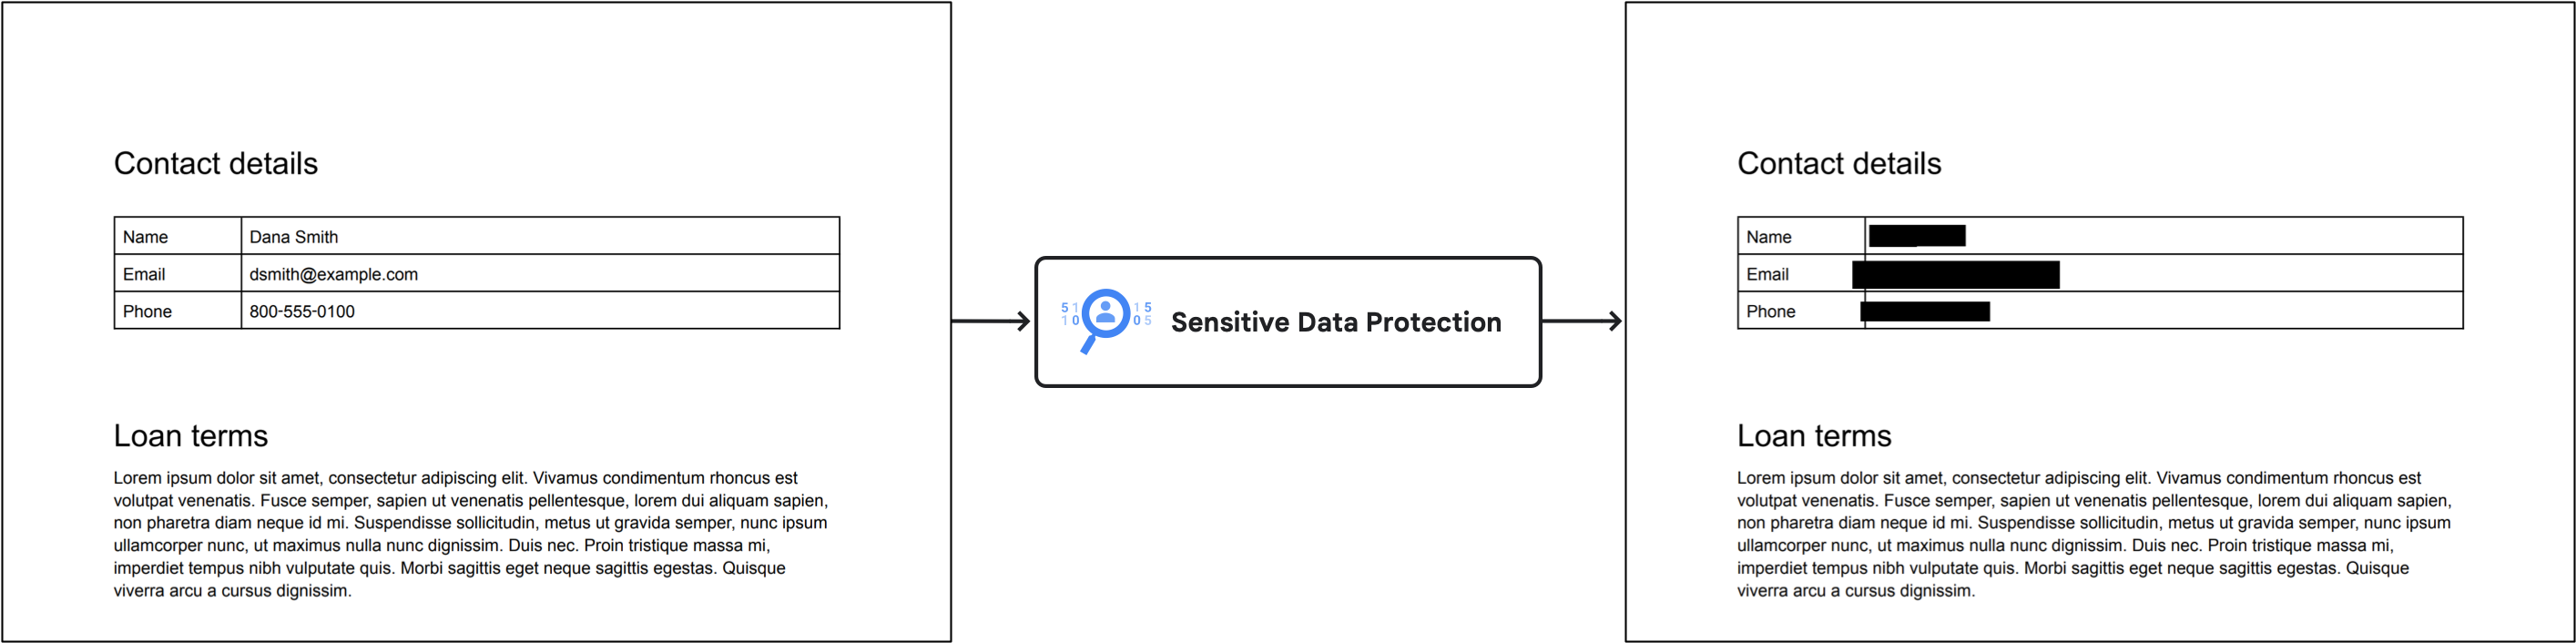
For example, consider the following images. The original image is a picture of a
document that contains contact information. In this example,
Sensitive Data Protection was configured to redact any text that matches the
PERSON_NAME, EMAIL_ADDRESS, and PHONE_NUMBER infoTypes. The resulting
image has black rectangles covering the detected sensitive text.
Object redaction
You can configure Sensitive Data Protection to redact objects that typically contain sensitive information.
For example, consider the following images. The original image is an
AI-generated picture that contains a barcode, a license plate, and a whiteboard.
In this example, Sensitive Data Protection was configured to redact objects that
match the OBJECT_TYPE/BARCODE, OBJECT_TYPE/LICENSE_PLATE, and
OBJECT_TYPE/WHITEBOARD infoTypes. The resulting image has colored rectangles
covering the detected sensitive objects. One color is assigned to each
infoType.

For a complete list of object infoType detectors that are available, see Objects in images.
Limitations and considerations
Consider the following points when redacting content from images.
Supported file types
Sensitive Data Protection can redact sensitive data from many image types, including JPEG, BMP, and PNG. For more information, see Supported file types.
Content redaction is not supported for SVG, PDF, XLSX, PPTX, or DOCX files.
Inspection configuration limits
When you redact data from images, you can't include
limits in your inspection
configuration. Limits can cause unexpected or potentially inconsistent
results where only some data is redacted. If you set the limits field in
your request, Sensitive Data Protection generates an error.
Before you begin
Before you begin the tasks on this page, set up authentication and obtain the
required IAM permissions. You can use your Google Cloud
user account or a service account. In either case, make sure the account you use
has a role with the serviceusage.services.use
permission, such as DLP Administrator (roles/dlp.admin), DLP
User (roles/dlp.user), or a custom role.
-
Select the tab for how you plan to use the samples on this page:
C#
To use the .NET samples on this page in a local development environment, install and initialize the gcloud CLI, and then set up Application Default Credentials with your user credentials.
Install the Google Cloud CLI.
If you're using an external identity provider (IdP), you must first sign in to the gcloud CLI with your federated identity.
If you're using a local shell, then create local authentication credentials for your user account:
gcloud auth application-default login
You don't need to do this if you're using Cloud Shell.
If an authentication error is returned, and you are using an external identity provider (IdP), confirm that you have signed in to the gcloud CLI with your federated identity.
For more information, see Set up ADC for a local development environment in the Google Cloud authentication documentation.
Go
To use the Go samples on this page in a local development environment, install and initialize the gcloud CLI, and then set up Application Default Credentials with your user credentials.
Install the Google Cloud CLI.
If you're using an external identity provider (IdP), you must first sign in to the gcloud CLI with your federated identity.
If you're using a local shell, then create local authentication credentials for your user account:
gcloud auth application-default login
You don't need to do this if you're using Cloud Shell.
If an authentication error is returned, and you are using an external identity provider (IdP), confirm that you have signed in to the gcloud CLI with your federated identity.
For more information, see Set up ADC for a local development environment in the Google Cloud authentication documentation.
Java
To use the Java samples on this page in a local development environment, install and initialize the gcloud CLI, and then set up Application Default Credentials with your user credentials.
Install the Google Cloud CLI.
If you're using an external identity provider (IdP), you must first sign in to the gcloud CLI with your federated identity.
If you're using a local shell, then create local authentication credentials for your user account:
gcloud auth application-default login
You don't need to do this if you're using Cloud Shell.
If an authentication error is returned, and you are using an external identity provider (IdP), confirm that you have signed in to the gcloud CLI with your federated identity.
For more information, see Set up ADC for a local development environment in the Google Cloud authentication documentation.
Node.js
To use the Node.js samples on this page in a local development environment, install and initialize the gcloud CLI, and then set up Application Default Credentials with your user credentials.
Install the Google Cloud CLI.
If you're using an external identity provider (IdP), you must first sign in to the gcloud CLI with your federated identity.
If you're using a local shell, then create local authentication credentials for your user account:
gcloud auth application-default login
You don't need to do this if you're using Cloud Shell.
If an authentication error is returned, and you are using an external identity provider (IdP), confirm that you have signed in to the gcloud CLI with your federated identity.
For more information, see Set up ADC for a local development environment in the Google Cloud authentication documentation.
PHP
To use the PHP samples on this page in a local development environment, install and initialize the gcloud CLI, and then set up Application Default Credentials with your user credentials.
Install the Google Cloud CLI.
If you're using an external identity provider (IdP), you must first sign in to the gcloud CLI with your federated identity.
If you're using a local shell, then create local authentication credentials for your user account:
gcloud auth application-default login
You don't need to do this if you're using Cloud Shell.
If an authentication error is returned, and you are using an external identity provider (IdP), confirm that you have signed in to the gcloud CLI with your federated identity.
For more information, see Set up ADC for a local development environment in the Google Cloud authentication documentation.
Python
To use the Python samples on this page in a local development environment, install and initialize the gcloud CLI, and then set up Application Default Credentials with your user credentials.
Install the Google Cloud CLI.
If you're using an external identity provider (IdP), you must first sign in to the gcloud CLI with your federated identity.
If you're using a local shell, then create local authentication credentials for your user account:
gcloud auth application-default login
You don't need to do this if you're using Cloud Shell.
If an authentication error is returned, and you are using an external identity provider (IdP), confirm that you have signed in to the gcloud CLI with your federated identity.
For more information, see Set up ADC for a local development environment in the Google Cloud authentication documentation.
REST
To use the REST API samples on this page in a local development environment, you use the credentials you provide to the gcloud CLI.
Install the Google Cloud CLI.
If you're using an external identity provider (IdP), you must first sign in to the gcloud CLI with your federated identity.
For more information, see Authenticate for using REST in the Google Cloud authentication documentation.
The
image.redactmethod also supports API keys. If you want to use API keys for authentication, you do not need to set up a local Application Default Credentials file. For more information, see Create an API key in the Google Cloud authentication documentation.For information about setting up authentication for a production environment, see Set up Application Default Credentials for code running on Google Cloud in the Google Cloud authentication documentation.
-
To get the permissions that you need to inspect, redact, and de-identify content, ask your administrator to grant you the DLP User (
roles/dlp.user) IAM role on your project. For more information about granting roles, see Manage access to projects, folders, and organizations.You might also be able to get the required permissions through custom roles or other predefined roles.
Redact all default infoTypes from an image
To redact sensitive data from an image, submit the image to the
DLP API's
image.redact method.
Unless you specify specific information types (infoTypes)
to search for, Sensitive Data Protection searches for the most common infoTypes.
Default infoTypes don't include objects in images.
To redact default infoTypes from an image, do the following:
Encode the image as a base64 string.
If you plan to use one of the Sensitive Data Protection client libraries to perform this task, skip this step.
Submit a request to the
image.redactmethod.If you want to redact default infoTypes, the request requires only the base64-encoded image.
For example, consider the following image of a document.
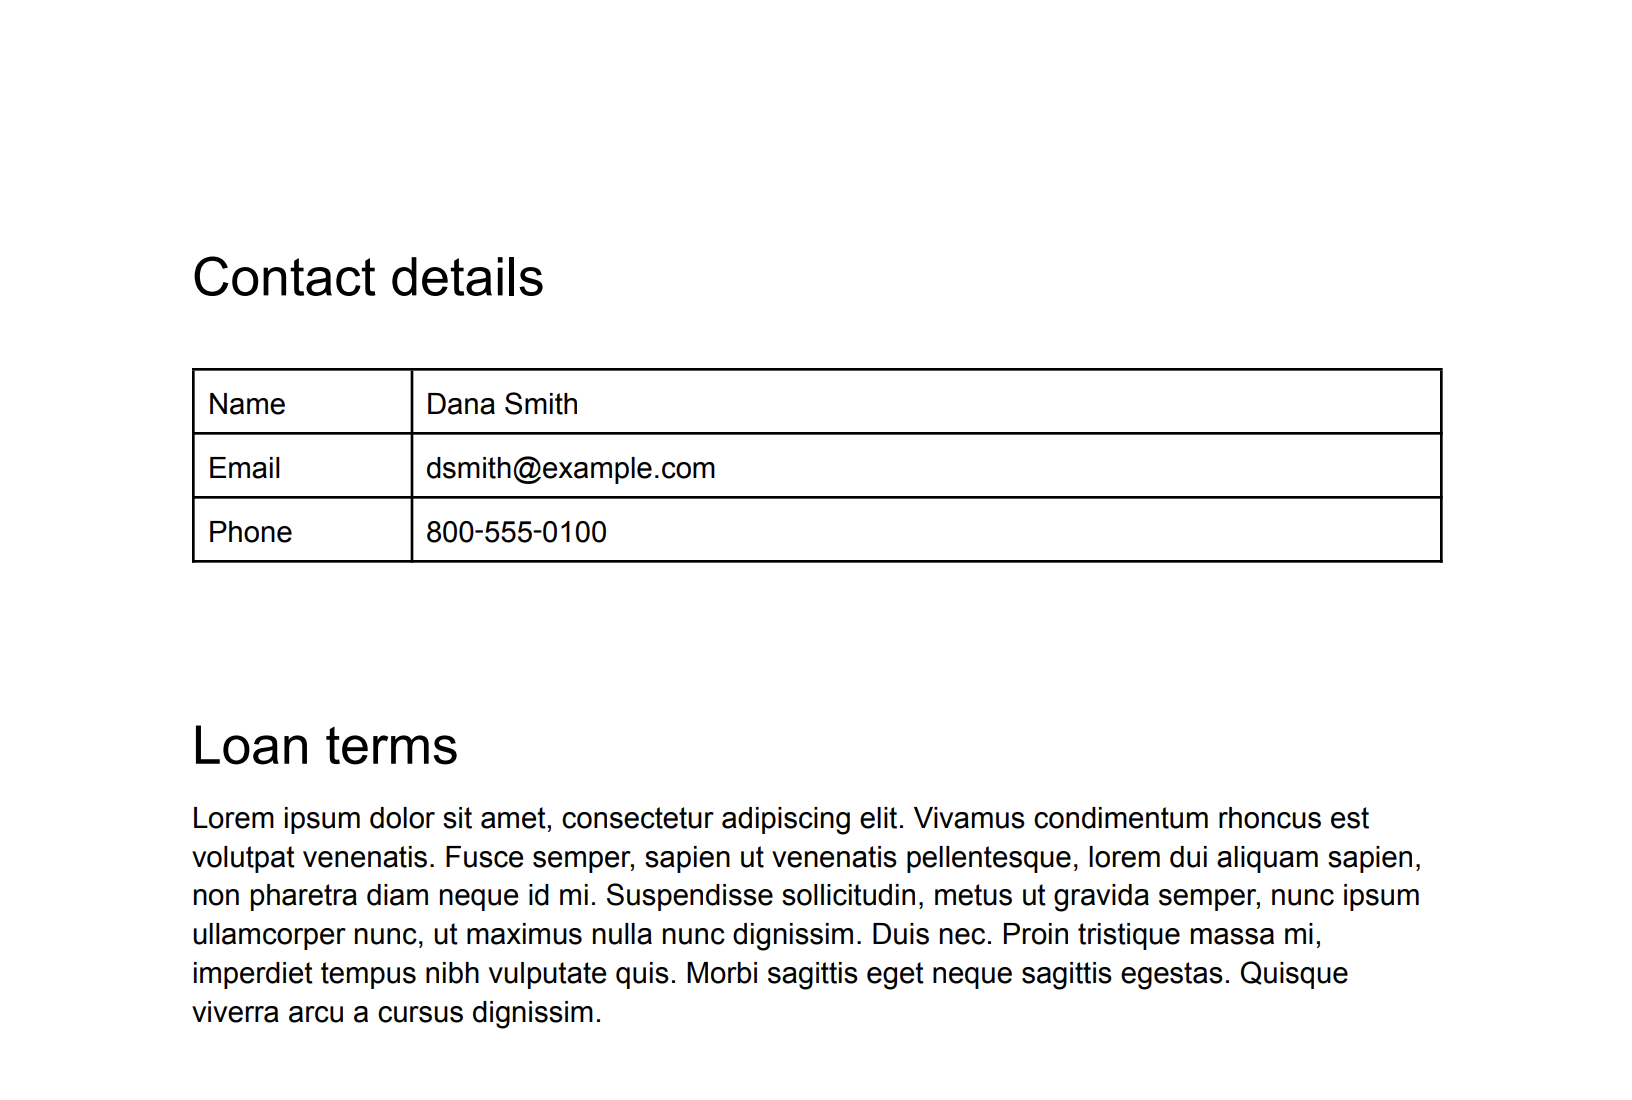
To redact the default infoTypes from this image, send the following request to
the DLP API's
image.redact method:
C#
To learn how to install and use the client library for Sensitive Data Protection, see Sensitive Data Protection client libraries.
To authenticate to Sensitive Data Protection, set up Application Default Credentials. For more information, see Set up authentication for a local development environment.
Go
To learn how to install and use the client library for Sensitive Data Protection, see Sensitive Data Protection client libraries.
To authenticate to Sensitive Data Protection, set up Application Default Credentials. For more information, see Set up authentication for a local development environment.
Java
To learn how to install and use the client library for Sensitive Data Protection, see Sensitive Data Protection client libraries.
To authenticate to Sensitive Data Protection, set up Application Default Credentials. For more information, see Set up authentication for a local development environment.
Node.js
To learn how to install and use the client library for Sensitive Data Protection, see Sensitive Data Protection client libraries.
To authenticate to Sensitive Data Protection, set up Application Default Credentials. For more information, see Set up authentication for a local development environment.
PHP
To learn how to install and use the client library for Sensitive Data Protection, see Sensitive Data Protection client libraries.
To authenticate to Sensitive Data Protection, set up Application Default Credentials. For more information, see Set up authentication for a local development environment.
Python
To learn how to install and use the client library for Sensitive Data Protection, see Sensitive Data Protection client libraries.
To authenticate to Sensitive Data Protection, set up Application Default Credentials. For more information, see Set up authentication for a local development environment.
REST
{
  "byteItem": {
    "data": "[BASE64-ENCODED-IMAGE]",
    "type": "IMAGE_PNG"
  }
}
Sensitive Data Protection returns the following:
    {
      "redactedImage": "[BASE64-ENCODED-IMAGE]"
    }
Decode the base64-encoded image.
The resulting image appears as follows:
Note that in addition to masking the handwritten Social Security number, the email address, and the phone number, Sensitive Data Protection also redacted the year. The next section demonstrates how to redact only certain infoTypes.
Redact specific infoTypes from an image
If you want to redact only certain sensitive data from an image, specify their corresponding built-in infoTypes.
To redact specific infoTypes from an image, submit a request to the
DLP API's image.redact method. The request must include the
following:
- The image.
- One or more infoType detectors.
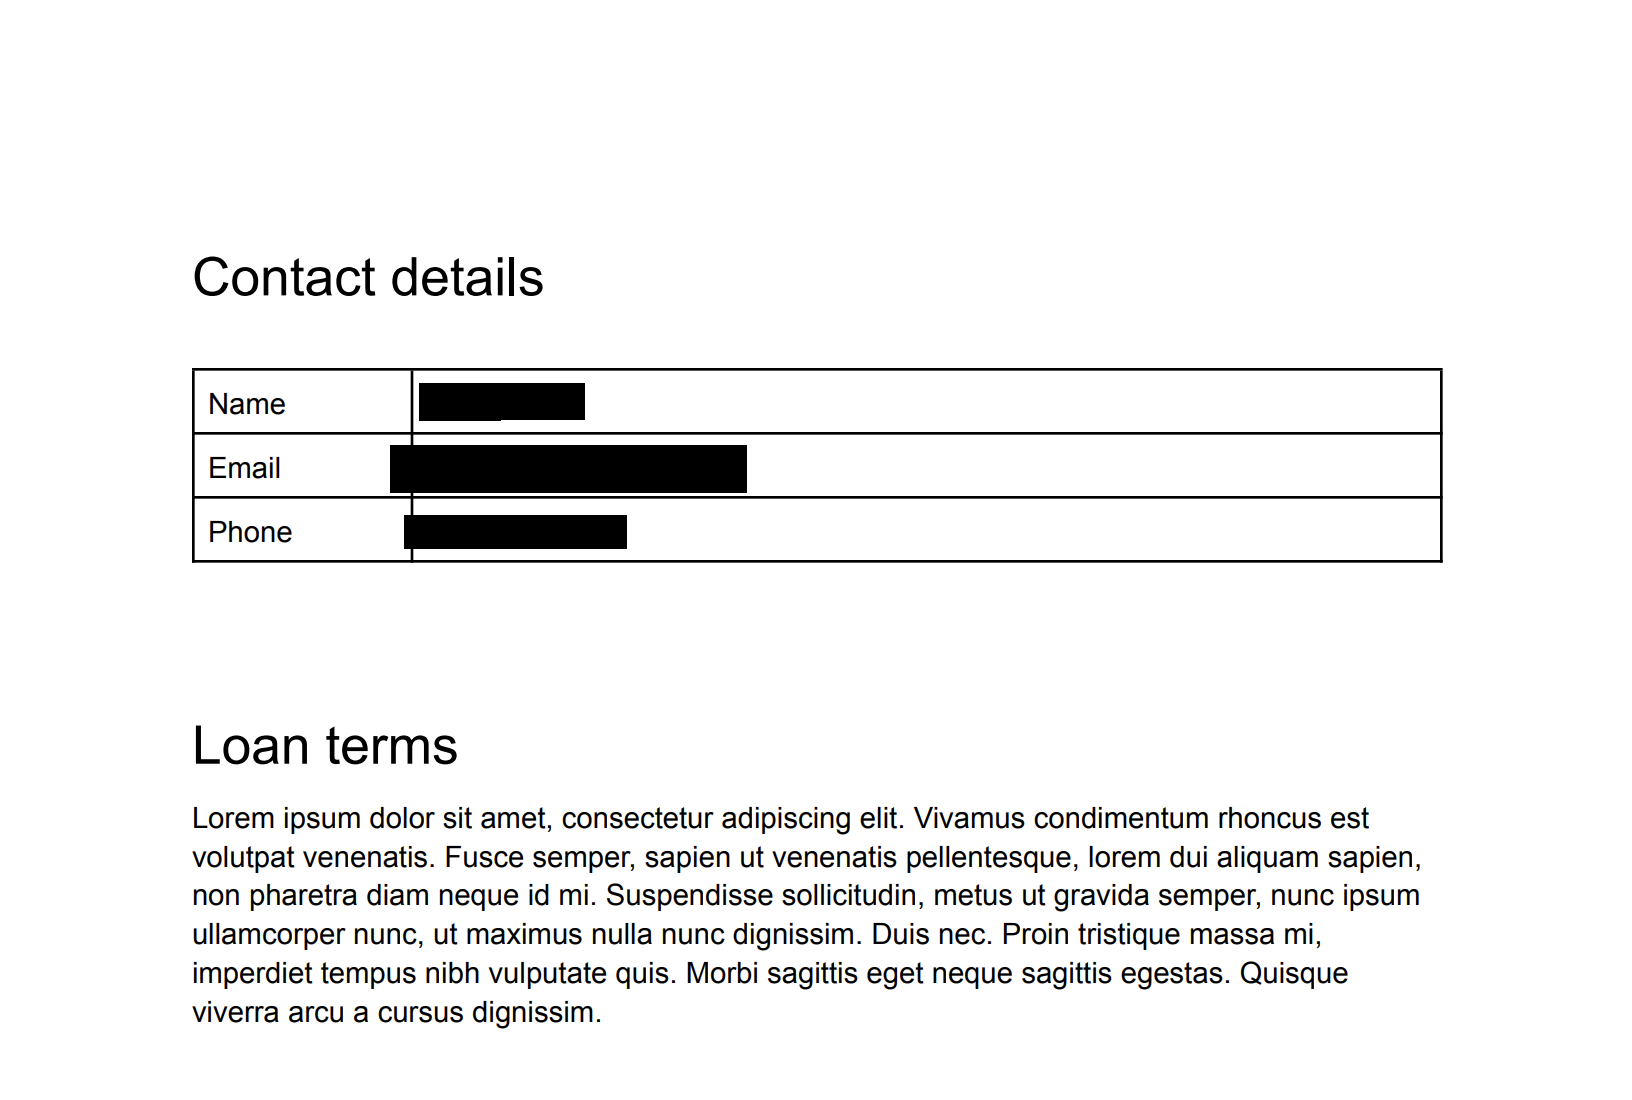
Consider the original image from the previous section. To redact only
US Social Security numbers, email addresses, and telephone numbers, send the
following JSON to the DLP API's
image.redact method:
C#
To learn how to install and use the client library for Sensitive Data Protection, see Sensitive Data Protection client libraries.
To authenticate to Sensitive Data Protection, set up Application Default Credentials. For more information, see Set up authentication for a local development environment.
Go
To learn how to install and use the client library for Sensitive Data Protection, see Sensitive Data Protection client libraries.
To authenticate to Sensitive Data Protection, set up Application Default Credentials. For more information, see Set up authentication for a local development environment.
Java
To learn how to install and use the client library for Sensitive Data Protection, see Sensitive Data Protection client libraries.
To authenticate to Sensitive Data Protection, set up Application Default Credentials. For more information, see Set up authentication for a local development environment.
Node.js
To learn how to install and use the client library for Sensitive Data Protection, see Sensitive Data Protection client libraries.
To authenticate to Sensitive Data Protection, set up Application Default Credentials. For more information, see Set up authentication for a local development environment.
PHP
To learn how to install and use the client library for Sensitive Data Protection, see Sensitive Data Protection client libraries.
To authenticate to Sensitive Data Protection, set up Application Default Credentials. For more information, see Set up authentication for a local development environment.
Python
To learn how to install and use the client library for Sensitive Data Protection, see Sensitive Data Protection client libraries.
To authenticate to Sensitive Data Protection, set up Application Default Credentials. For more information, see Set up authentication for a local development environment.
REST
    {
      "byteItem": {
        "data": "[BASE64-ENCODED-IMAGE]",
        "type": "IMAGE_PNG"
      },
      "imageRedactionConfigs": [
        {
          "infoType": {
            "name": "PERSON_NAME"
          }
        },
        {
          "infoType": {
            "name": "EMAIL_ADDRESS"
          }
        },
        {
          "infoType": {
            "name": "PHONE_NUMBER"
          }
        }
      ]
    }
Sensitive Data Protection returns the following:
    {
      "redactedImage": "[BASE64-ENCODED-IMAGE]"
    }
Decode the base64-encoded image.
The resulting image appears as follows:

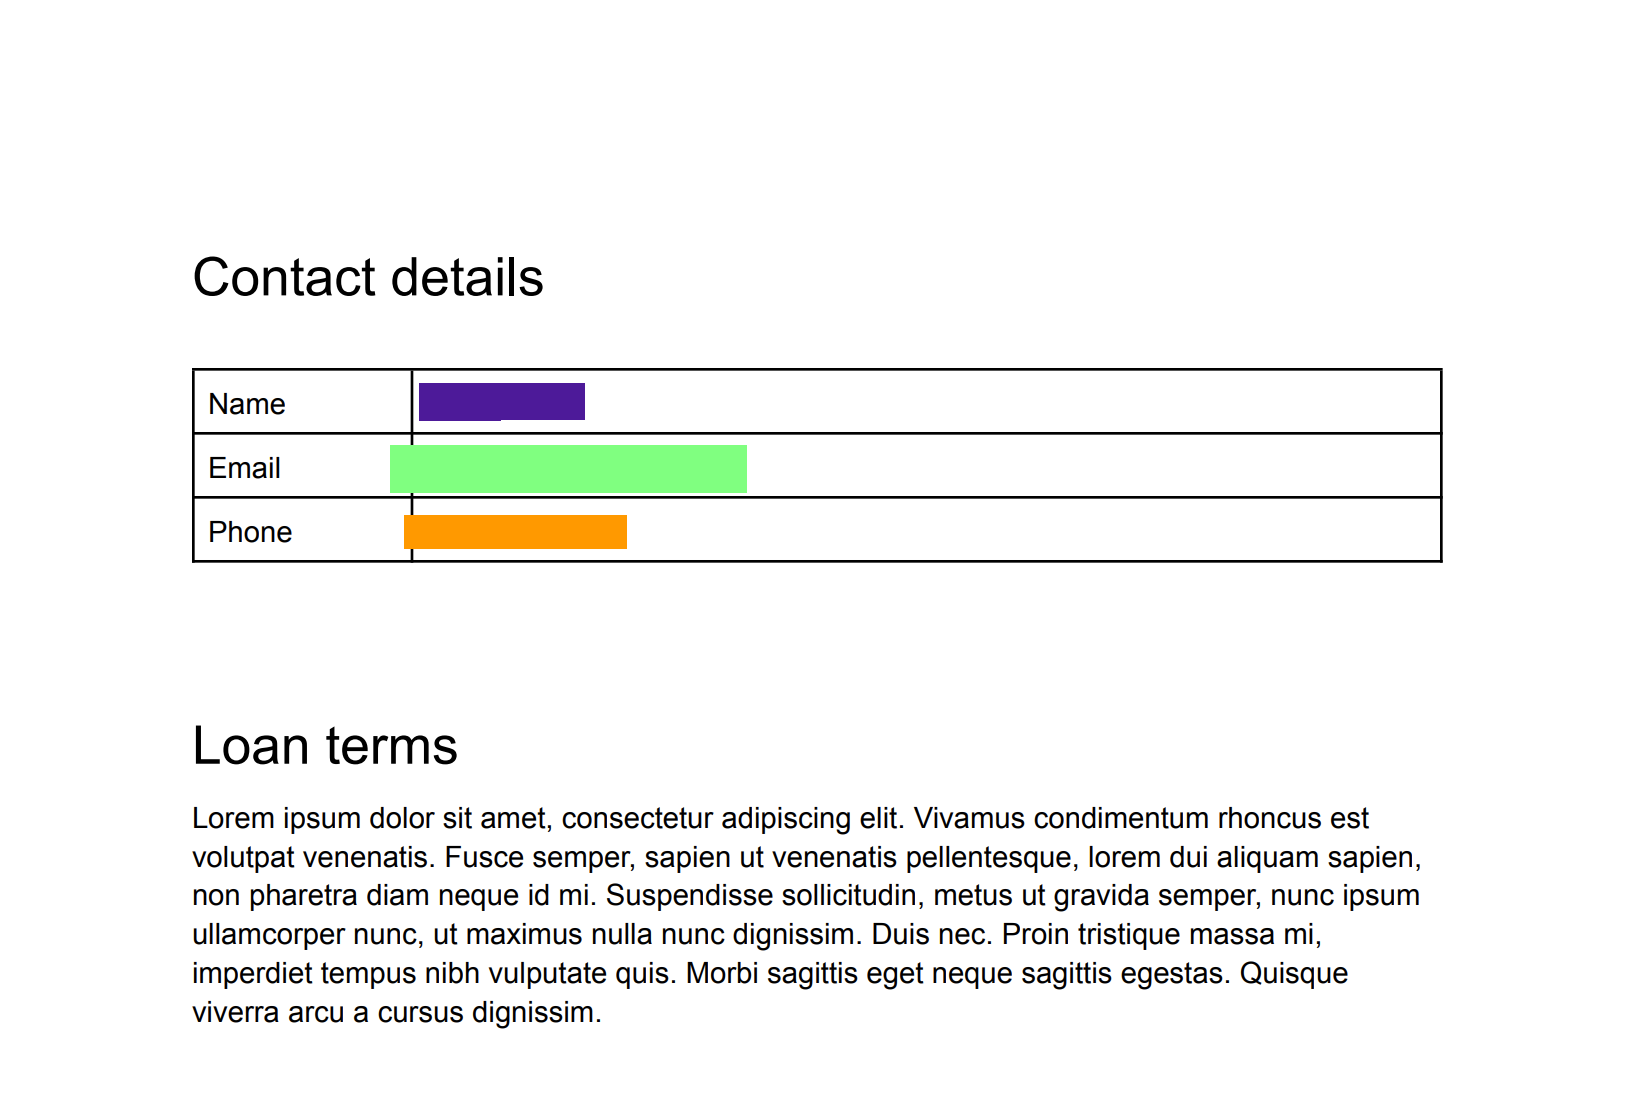
You can color code redacted information by infoType when you want to tell at a glance what's been redacted. See the following section for more information.
Redact infoTypes from an image with color coding
To color code redacted information by infoType, you pair infoType detectors with RGB color space values.
To color-code infoTypes redacted from an image, submit a request to the
DLP API's image.redact method. The request must include the
following:
- The image.
- One or more infoType detectors, each of which is assigned a color using RGB color space values.
Consider the original image from the first section. To redact
US Social Security numbers with a purple box, email addresses with a green box,
and telephone numbers with an orange box, send the following JSON to the
DLP API's
image.redact method:
C#
To learn how to install and use the client library for Sensitive Data Protection, see Sensitive Data Protection client libraries.
To authenticate to Sensitive Data Protection, set up Application Default Credentials. For more information, see Set up authentication for a local development environment.
Go
To learn how to install and use the client library for Sensitive Data Protection, see Sensitive Data Protection client libraries.
To authenticate to Sensitive Data Protection, set up Application Default Credentials. For more information, see Set up authentication for a local development environment.
Java
To learn how to install and use the client library for Sensitive Data Protection, see Sensitive Data Protection client libraries.
To authenticate to Sensitive Data Protection, set up Application Default Credentials. For more information, see Set up authentication for a local development environment.
Node.js
To learn how to install and use the client library for Sensitive Data Protection, see Sensitive Data Protection client libraries.
To authenticate to Sensitive Data Protection, set up Application Default Credentials. For more information, see Set up authentication for a local development environment.
PHP
To learn how to install and use the client library for Sensitive Data Protection, see Sensitive Data Protection client libraries.
To authenticate to Sensitive Data Protection, set up Application Default Credentials. For more information, see Set up authentication for a local development environment.
Python
To learn how to install and use the client library for Sensitive Data Protection, see Sensitive Data Protection client libraries.
To authenticate to Sensitive Data Protection, set up Application Default Credentials. For more information, see Set up authentication for a local development environment.
REST
    {
      "byteItem": {
        "data": "[BASE64-ENCODED-IMAGE]",
        "type": "IMAGE_PNG"
      },
      "imageRedactionConfigs": [
        {
          "infoType": {
            "name": "PERSON_NAME"
          },
          "redactionColor": {
            "red": 0.3,
            "green": 0.1,
            "blue": 0.6
          }
        },
        {
          "infoType": {
            "name": "EMAIL_ADDRESS"
          },
          "redactionColor": {
            "red": 0.5,
            "blue": 0.5,
            "green": 1
          }
        },
        {
          "infoType": {
            "name": "PHONE_NUMBER"
          },
          "redactionColor": {
            "red": 1,
            "blue": 0,
            "green": 0.6
          }
        }
      ]
    }
Sensitive Data Protection returns the following:
    {
      "redactedImage": "[BASE64-ENCODED-IMAGE]"
    }
Decode the base64-encoded image.
The resulting image appears as follows:
Redact all text from an image
Sensitive Data Protection also contains an option to redact all detected text in an image.
To redact all text from an image, submit a request to the DLP API's
image.redact method. The request must include the following:
- The image.
- The
redactAllTextoption set totrue.
Consider the original image from the first section. To redact all text, send the
following JSON to the DLP API's
image.redact method:
C#
To learn how to install and use the client library for Sensitive Data Protection, see Sensitive Data Protection client libraries.
To authenticate to Sensitive Data Protection, set up Application Default Credentials. For more information, see Set up authentication for a local development environment.
Go
To learn how to install and use the client library for Sensitive Data Protection, see Sensitive Data Protection client libraries.
To authenticate to Sensitive Data Protection, set up Application Default Credentials. For more information, see Set up authentication for a local development environment.
Java
To learn how to install and use the client library for Sensitive Data Protection, see Sensitive Data Protection client libraries.
To authenticate to Sensitive Data Protection, set up Application Default Credentials. For more information, see Set up authentication for a local development environment.
Node.js
To learn how to install and use the client library for Sensitive Data Protection, see Sensitive Data Protection client libraries.
To authenticate to Sensitive Data Protection, set up Application Default Credentials. For more information, see Set up authentication for a local development environment.
PHP
To learn how to install and use the client library for Sensitive Data Protection, see Sensitive Data Protection client libraries.
To authenticate to Sensitive Data Protection, set up Application Default Credentials. For more information, see Set up authentication for a local development environment.
Python
To learn how to install and use the client library for Sensitive Data Protection, see Sensitive Data Protection client libraries.
To authenticate to Sensitive Data Protection, set up Application Default Credentials. For more information, see Set up authentication for a local development environment.
REST
    {
      "byteItem": {
        "data": "[BASE64-ENCODED-IMAGE]",
        "type": "IMAGE_PNG"
      },
      "imageRedactionConfigs": [
        {
          "redactAllText": true
        }
      ]
    }
Sensitive Data Protection returns the following:
    {
      "redactedImage": "[BASE64-ENCODED-IMAGE]"
    }
Decode the base64-encoded image.
The API returns the same image(s) you gave it, but any text identified as containing sensitive information according to your criteria has been redacted.
The resulting image appears as follows:
Code example with likelihood setting
This example is similar to Redacting specific infoTypes from an image. It additionally demonstrates how to specify a minimum likelihood.
C#
To learn how to install and use the client library for Sensitive Data Protection, see Sensitive Data Protection client libraries.
To authenticate to Sensitive Data Protection, set up Application Default Credentials. For more information, see Set up authentication for a local development environment.
Go
To learn how to install and use the client library for Sensitive Data Protection, see Sensitive Data Protection client libraries.
To authenticate to Sensitive Data Protection, set up Application Default Credentials. For more information, see Set up authentication for a local development environment.
Java
To learn how to install and use the client library for Sensitive Data Protection, see Sensitive Data Protection client libraries.
To authenticate to Sensitive Data Protection, set up Application Default Credentials. For more information, see Set up authentication for a local development environment.
Node.js
To learn how to install and use the client library for Sensitive Data Protection, see Sensitive Data Protection client libraries.
To authenticate to Sensitive Data Protection, set up Application Default Credentials. For more information, see Set up authentication for a local development environment.
PHP
To learn how to install and use the client library for Sensitive Data Protection, see Sensitive Data Protection client libraries.
To authenticate to Sensitive Data Protection, set up Application Default Credentials. For more information, see Set up authentication for a local development environment.
Python
To learn how to install and use the client library for Sensitive Data Protection, see Sensitive Data Protection client libraries.
To authenticate to Sensitive Data Protection, set up Application Default Credentials. For more information, see Set up authentication for a local development environment.
Try it out
You can try out each of the examples on this page yourself—or experiment
with your own images—in the APIs Explorer on the reference page for
image.redact:
What's next
- Learn more about image inspection and redaction.
- Work through the Redacting Sensitive Data with Sensitive Data Protection codelab.
- Learn how to inspect images for sensitive data.
- Learn more about creating a de-identified copy of data in
storage.