本页面介绍如何仅使用托管产品和流行的 GitOps 方法在 Google Cloud 上创建持续集成和交付 (CI/CD) 流水线。
Google 工程师长期以来一直在我们的主要源代码库中存储配置和部署文件。这种方法在《站点可靠性工程》(Beyer 等人著,2016 年出版)一书第 8 章中有所介绍,并由 Kelsey Hightower 在他的 Google Cloud Next '17 主旨演讲中进行了演示。
GitOps 的一个关键部分是“环境即代码”的概念:使用存储在 Git 代码库中的文件(例如 Kubernetes 清单)以声明的方式描述 Deployment。
在本教程中,您将创建一个 CI/CD 流水线。该流水线根据所提交的代码自动构建容器映像,将映像存储在 Artifact Registry 中,更新 Git 代码库中的 Kubernetes 清单,并使用该清单将应用部署到 Google Kubernetes Engine (GKE)。

本教程使用两个 Git 代码库:
- app 代码库:包含应用本身的源代码
- env 代码库:包含 Kubernetes 部署的清单
当您将更改推送到 app 代码库时,Cloud Build 流水线会运行测试、构建容器映像,并将其推送到 Artifact Registry。推送映像后,Cloud Build 会更新 Deployment 清单并将其推送到 env 代码库。这会触发另一个 Cloud Build 流水线,该流水线将清单应用于 GKE 集群,如果成功,则将清单存储在 env 代码库的另一个分支中。
我们将 app 代码库和 env 代码库分开,是因为它们具有不同的生命周期和用途。app 代码库的主要用户是真人,此代码库专用于特定应用。env 代码库的主要用户是自动化系统(例如 Cloud Build),并且此代码库可能由多个应用共享。env 代码库可以有多个分支,每个分支映射到特定环境(您在本教程中仅使用生产环境)并引用特定的容器映像,而 app 代码库则不会如此。
完成本教程后,您将拥有一个可助您轻松实现以下操作的系统:
- 通过查看 Cloud Build 历史记录来区分失败和成功的部署
- 通过查看 env 代码库的生产分支来访问当前使用的清单
- 通过重新执行相应的 Cloud Build 构建,回滚到以前的任何版本

关于本教程
本教程使用 Cloud Source Repositories 来托管 Git 代码库,但您可以使用其他第三方产品(如 GitHub、Bitbucket 或 GitLab)实现同样的结果。
此流水线未实现在部署之前先进行验证的机制。如果您使用 GitHub、Bitbucket 或 GitLab,则可以修改流水线以使用拉取请求实现此目的。
虽然我们向希望实现高级部署模式(蓝/绿、Canary 分析、多云端等)的团队推荐 Spinnaker,但对于较小的组织和项目,可能不需要这么多功能也能成功实施 CI/CD 策略。在本教程中,您将学习如何使用工具创建适用于 GKE 上托管的应用的 CI/CD 流水线。
为简单起见,本教程在 env 代码库中使用单一环境(即生产环境),但如果需要,您也可以将其扩展为部署到多个环境。
目标
- 在 Cloud Source Repositories 中创建 Git 代码库
- 您可以通过 Cloud Build 创建容器映像并将其存储在 Artifact Registry 中。
- 创建 CI 流水线。
- 创建 CD 流水线。
- 测试 CI/CD 流水线。
费用
在本文档中,您将使用 Google Cloud 的以下收费组件:
您可使用价格计算器根据您的预计使用情况来估算费用。
完成本文档中描述的任务后,您可以通过删除所创建的资源来避免继续计费。如需了解详情,请参阅清理。
准备工作
选择或创建 Google Cloud 项目。
为您的项目启用结算功能。
打开 Cloud Shell 以执行本教程中列出的命令。Cloud Shell 是 Google Cloud 的交互式 Shell 环境,可让您通过网络浏览器管理项目和资源。
如果
gcloud config get-value project命令未返回您选择的项目的 ID,请配置 Cloud Shell 以使用您的项目。gcloud config set project [PROJECT_ID]
在 Cloud Shell 中,启用所需的 API。
gcloud services enable container.googleapis.com \
    cloudbuild.googleapis.com \
    sourcerepo.googleapis.com \
    artifactregistry.googleapis.com
在
us-central1区域中创建一个名为my-repository的 Artifact Registry Docker 代码库以存储您的容器映像。gcloud artifacts repositories create my-repository \ --repository-format=docker \ --location=us-central1在 Cloud Shell 中,创建一个 GKE 集群,您将用它来部署本教程的示例应用。
Autopilot
创建名为
hello-cloudbuild的 Autopilot 集群:gcloud container clusters create-auto hello-cloudbuild \ --region us-central1标准
创建名为
hello-cloudbuild的单节点标准集群:gcloud container clusters create hello-cloudbuild \ --num-nodes 1 --region us-central1如果您从未在 Cloud Shell 中使用过 Git,请使用您的姓名和电子邮件地址对其进行配置。Git 将使用它们来识别您将在 Cloud Shell 中创建的提交的作者。
git config --global user.email "YOUR_EMAIL_ADDRESS"
git config --global user.name "YOUR_NAME"
完成本教程后,您可以通过删除您创建的资源来避免继续计费。如需了解详情,请参阅清理。
在 Cloud Source Repositories 中创建 Git 代码库
在本部分中,您将创建本教程中使用的两个 Git 代码库(app 和 env),并使用一些示例代码初始化 app 代码库。
在 Cloud Shell 中,创建两个 Git 代码库。
gcloud source repos create hello-cloudbuild-app
gcloud source repos create hello-cloudbuild-env
从 GitHub 克隆示例代码。
cd ~
git clone https://github.com/GoogleCloudPlatform/gke-gitops-tutorial-cloudbuild \
    hello-cloudbuild-app
将 Cloud Source Repositories 配置为远程代码库。
cd ~/hello-cloudbuild-app
PROJECT_ID=$(gcloud config get-value project)
git remote add google \
    "https://source.developers.google.com/p/${PROJECT_ID}/r/hello-cloudbuild-app"
您克隆的代码包含一个“Hello World”应用。
使用 Cloud Build 创建容器映像
您克隆的代码包含以下 Dockerfile。
使用此 Dockerfile,您可以通过 Cloud Build 创建容器映像并将其存储在 Artifact Registry 中。
在 Cloud Shell 中,使用以下命令基于最近提交的代码创建 Cloud Build 构建作业。
cd ~/hello-cloudbuild-app
COMMIT_ID="$(git rev-parse --short=7 HEAD)"
gcloud builds submit --tag="us-central1-docker.pkg.dev/${PROJECT_ID}/my-repository/hello-cloudbuild:${COMMIT_ID}" .
您执行此命令时,Cloud Build 会将容器映像创建过程中生成的日志流式传输到终端。
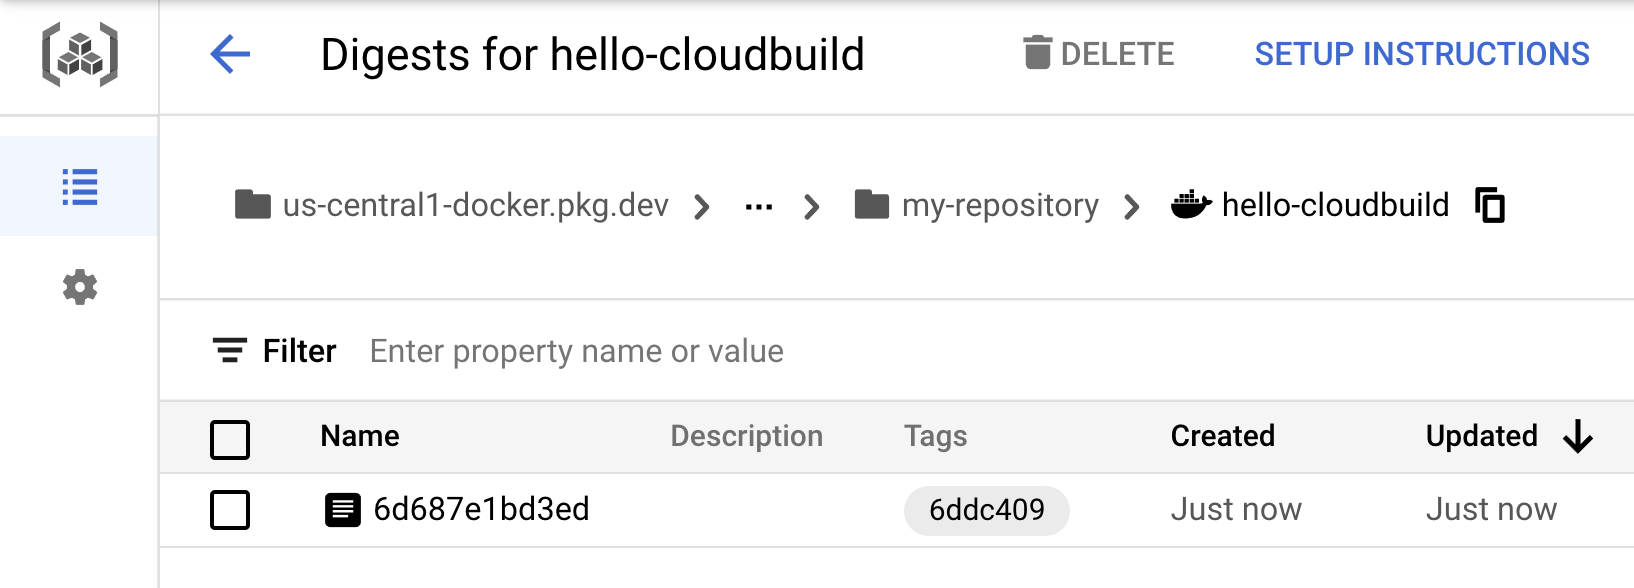
构建完成后,验证您的新容器映像在 Artifact Registry 中可用。
创建持续集成流水线
在本部分中,您将 Cloud Build 配置为自动运行小型单元测试、构建容器映像,然后将其推送到 Artifact Registry。将新提交推送到 Cloud Source Repositories 会自动触发此流水线。包含在代码中的 cloudbuild.yaml 文件是流水线的配置。
打开 Cloud Build 触发器页面。
点击创建触发器。
填写以下选项:
- 在名称字段中,输入
hello-cloudbuild。 - 在事件下,选择推送到分支。
- 在来源下,选择
hello-cloudbuild-app作为您的代码库,选择^master$作为您的分支。 - 在构建配置下,选择 Cloud Build 配置文件。
- 在 Cloud Build 配置文件位置字段中的
/后面,输入cloudbuild.yaml。
- 在名称字段中,输入
点击创建以保存您的构建触发器。
提示:如果您需要为多个项目创建构建触发器,则可以使用 Build Triggers API。
在 Cloud Shell 中,将应用代码推送到 Cloud Source Repositories 以在 Cloud Build 中触发 CI 流水线。
cd ~/hello-cloudbuild-app
git push google master
打开 Cloud Build 控制台。
此时将显示您最近运行和已完成的构建。您可以点击构建作业以跟踪其执行情况并检查其日志。
创建持续交付流水线
Cloud Build 也用于持续交付流水线。每次将提交推送到 hello-cloudbuild-env 代码库的“候选”(candidate) 分支时,该流水线都会运行。该流水线会将新版本的清单应用于 Kubernetes 集群,如果成功,则将清单复制到“生产”(production) 分支。此过程具有以下属性:
- “候选”分支是部署尝试的历史记录。
- “生产”分支是成功部署的历史记录。
- 您可以在 Cloud Build 中查看成功和失败的部署。
- 您可以通过在 Cloud Build 中重新执行相应的构建,回滚到任何先前的部署。回滚还会更新“生产”分支,以真实地反映部署的历史记录。
您将修改持续集成流水线以更新 hello-cloudbuild-env 代码库的“候选”(candidate) 分支,从而触发持续交付流水线。
为 Cloud Build 授予 GKE 的访问权限
为了在 Kubernetes 集群中部署应用,Cloud Build 需要 Kubernetes Engine Developer Identity and Access Management 角色。
Shell
在 Cloud Shell 中,执行以下命令:
PROJECT_NUMBER="$(gcloud projects describe ${PROJECT_ID} --format='get(projectNumber)')"
gcloud projects add-iam-policy-binding ${PROJECT_NUMBER} \
    --member=serviceAccount:${PROJECT_NUMBER}@cloudbuild.gserviceaccount.com \
    --role=roles/container.developer
控制台
在 Google Cloud 控制台中,打开 Cloud Build 设置页面:
屏幕上会出现服务账号权限页面:
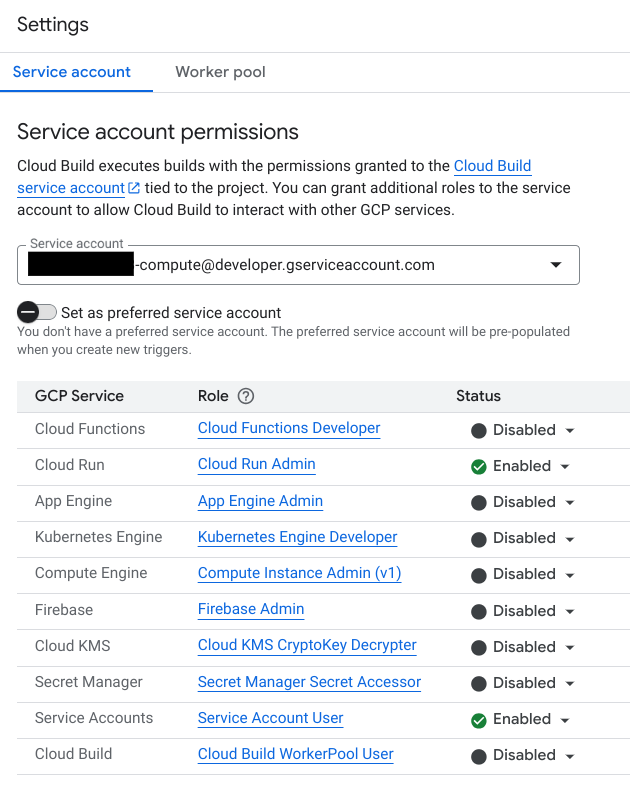
将 Kubernetes Engine Developer 角色的状态设置为启用。
初始化 hello-cloudbuild-env 代码库
您需要使用两个分支(生产和候选)以及描述部署过程的 Cloud Build 配置文件来初始化 hello-cloudbuild-env 代码库。
在 Cloud Shell 中,克隆 hello-cloudbuild-env 代码库并创建“生产”分支。
cd ~
gcloud source repos clone hello-cloudbuild-env
cd ~/hello-cloudbuild-env
git checkout -b production
复制 hello-cloudbuild-app 代码库中提供的
cloudbuild-delivery.yaml文件,并提交更改。cd ~/hello-cloudbuild-env cp ~/hello-cloudbuild-app/cloudbuild-delivery.yaml ~/hello-cloudbuild-env/cloudbuild.yaml git add . git commit -m "Create cloudbuild.yaml for deployment"
cloudbuild-delivery.yaml文件描述了要在 Cloud Build 中运行的部署过程。它有两个步骤:Cloud Build 在 GKE 集群上应用清单。
如果成功,Cloud Build 将清单复制到“生产”分支。
创建“候选”分支并推送两个分支,使其在 Cloud Source Repositories 中可用。
git checkout -b candidate
git push origin production
git push origin candidate
将“源代码库写入者”IAM 角色授予 hello-cloudbuild-env 代码库的 Cloud Build 服务账号。
PROJECT_NUMBER="$(gcloud projects describe ${PROJECT_ID} \
    --format='get(projectNumber)')"
cat >/tmp/hello-cloudbuild-env-policy.yaml <<EOF
bindings:
- members:
  - serviceAccount:${PROJECT_NUMBER}@cloudbuild.gserviceaccount.com
  role: roles/source.writer
EOF
gcloud source repos set-iam-policy \
    hello-cloudbuild-env /tmp/hello-cloudbuild-env-policy.yaml
为持续交付流水线创建触发器
在本部分中,您将 Cloud Build 配置为在向 hello-cloudbuild-env 代码库的“候选”分支推送代码时触发。
打开 Cloud Build 的触发器页面。
点击创建触发器。
填写以下选项:
- 在名称字段中,输入
hello-cloudbuild-deploy。 - 在事件下,选择推送到分支。
- 在来源下,选择
hello-cloudbuild-env作为您的代码库,选择^candidate$作为您的分支。 - 在配置下,选择 Cloud Build 配置文件(yaml 或 json)。
- 在 Cloud Build 配置文件位置字段中的
/后面,输入cloudbuild.yaml。
- 在名称字段中,输入
点击创建。
修改持续集成流水线以触发持续交付流水线
在本部分中,您将向持续集成流水线添加一些步骤,这些步骤将生成新版本的 Kubernetes 清单并将其推送到 hello-cloudbuild-env 代码库以触发持续交付流水线。
将
cloudbuild.yaml文件替换为cloudbuild-trigger-cd.yaml文件中的扩展示例。cd ~/hello-cloudbuild-app cp cloudbuild-trigger-cd.yaml cloudbuild.yaml
cloudbuild-trigger-cd.yaml是cloudbuild.yaml文件的扩展版本。它添加了以下步骤:生成新的 Kubernetes 清单并触发持续交付流水线。提交修改并将其推送到 Cloud Source Repositories。
cd ~/hello-cloudbuild-app
git add cloudbuild.yaml
git commit -m "Trigger CD pipeline"
git push google master
这会触发 Cloud Build 中的持续集成流水线。
检查持续集成构建作业。
您会看到最近运行的构建,以及已为 hello-cloudbuild-app 代码库完成的构建。您可以点击构建作业以跟踪其执行情况并检查其日志。此流水线的最后一步将新清单推送到 hello-cloudbuild-env 代码库,以触发持续交付流水线。
检查持续交付构建作业。
您会看到最近运行的构建,以及已为 hello-cloudbuild-env 代码库完成的构建。您可以点击构建作业以跟踪其执行情况并检查其日志。
测试完整的流水线
完整的 CI/CD 流水线现已完成配置。在本部分中,您将从头到尾对其进行测试。
转到 GKE 服务页面。
转到“Google Kubernetes Engine 服务”
该列表包含名为 hello-cloudbuild 的单项服务,它是由最近完成的持续交付构建作业创建的。
点击 hello-cloudbuild 服务的端点。屏幕上会显示“Hello World!”。如果没有端点,或者如果您看到负载均衡器错误,您可能需要等待几分钟时间,让负载均衡器完成初始化。如果需要,可点击刷新以更新页面。
在 Cloud Shell 中,在应用和单元测试中将“Hello World”替换为“Hello Cloud Build”。
cd ~/hello-cloudbuild-app
sed -i 's/Hello World/Hello Cloud Build/g' app.py
sed -i 's/Hello World/Hello Cloud Build/g' test_app.py
提交更改,并将其推送到 Cloud Source Repositories。
git add app.py test_app.py
git commit -m "Hello Cloud Build"
git push google master
这会触发完整的 CI/CD 流水线。
几分钟后,在浏览器中重新加载应用。屏幕上会出现“Hello Cloud Build!”。
测试回滚
在本部分中,您将回滚到显示“Hello World!”的应用版本。
为 hello-cloudbuild-env 代码库打开 Cloud Build 控制台。
点击所列出的第二新的构建作业。
点击重建。
构建完成后,在浏览器中重新加载应用。屏幕上会再次显示“Hello, World!”。
清除数据
为避免因本教程中使用的资源导致您的 Google Cloud 账号产生费用,请删除包含这些资源的项目,或者保留项目但删除各个资源。
- In the Google Cloud console, go to the Manage resources page.
- In the project list, select the project that you want to delete, and then click Delete.
- In the dialog, type the project ID, and then click Shut down to delete the project.
删除资源
如果您希望保留在本教程中使用的 Google Cloud 项目,请删除单个资源:
删除本地 Git 代码库。
cd ~
rm -rf ~/hello-cloudbuild-app
rm -rf ~/hello-cloudbuild-env
删除 Cloud Source Repositories 中的 Git 代码库。
gcloud source repos delete hello-cloudbuild-app --quiet
gcloud source repos delete hello-cloudbuild-env --quiet
删除 Cloud Build 触发器。
打开 Cloud Build 的触发器页面。
对于每个触发器,请点击更多 more_vert,然后点击删除。
删除 Artifact Registry 中的 Docker 代码库。
gcloud artifacts repositories delete my-repository \
    --location=us-central1
撤消 Cloud Build 连接到 GKE 的权限。
PROJECT_NUMBER="$(gcloud projects describe ${PROJECT_ID} \
    --format='get(projectNumber)')"
gcloud projects remove-iam-policy-binding ${PROJECT_NUMBER} \
    --member=serviceAccount:${PROJECT_NUMBER}@cloudbuild.gserviceaccount.com \
    --role=roles/container.developer
删除 GKE 集群。
gcloud container clusters delete hello-cloudbuild \
   --region us-central1