This page applies to Apigee and Apigee hybrid.
View
Apigee Edge documentation.

This section describes how to create and edit environment groups, which includes adding environments or host names to a group, or removing them, with Apigee. For more information about what an environment group is and how it works, see Environments and environment group overview.
Creating environment groups
You can create new environment groups using the Apigee UI or the Apigee API. This section describes how to do both.
When you first create an environment group, it does not contain any environments. It does, however, define a default hostname: example.group-name. To add environments to an environment group, see Adding environments to an environment group.
Apigee in Cloud console
To create a new environment group in Apigee in Cloud console:
- Open https://console.cloud.google.com/apigee in a browser.
- Select Management > Environments in the left navigation pane.
- In the Environments pane, select Environment Groups.
- Click + Create Environment Group.
- Enter the following:
- Environment group name: A name for the environment group. The name must start and end with an alphanumeric character. It can have up to 63 characters consisting of alphanumeric characters and hyphens. The name must be different from any existing environment group name in your organization.
Hostames: A list of host names that can be used to call proxies. Each host name must be on a separate line.
You also have the option to click Configure Google Load Balancer with these domains. This opens the Load balancing page in the Cloud console, where you can configure load balancing for the host names.
- Environments: An optional list of environments to include in the environment group.
- Click Create.
Classic Apigee
To create a new environment group in the classic Apigee UI:
- In the Apigee UI, select Admin > Environments > Groups.
- Click +Environment Group:

The Add an Environment Group dialog displays.
- Enter a name for your new environment group:
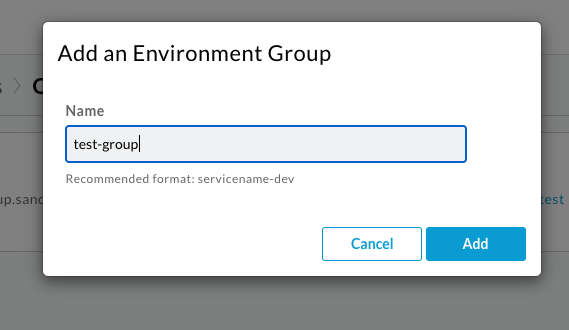
The name can contain only lower case letters, numbers, and hyphens. In addition, it must start with a letter, be at least two characters long, and cannot end with a hyphen. Valid names include
my-env-groupandprod2. - Click Add.
Apigee creates a new environment group. This is usually a very quick operation.
On a successful operation, Apigee confirms that the group has been created with a banner that looks like the following:
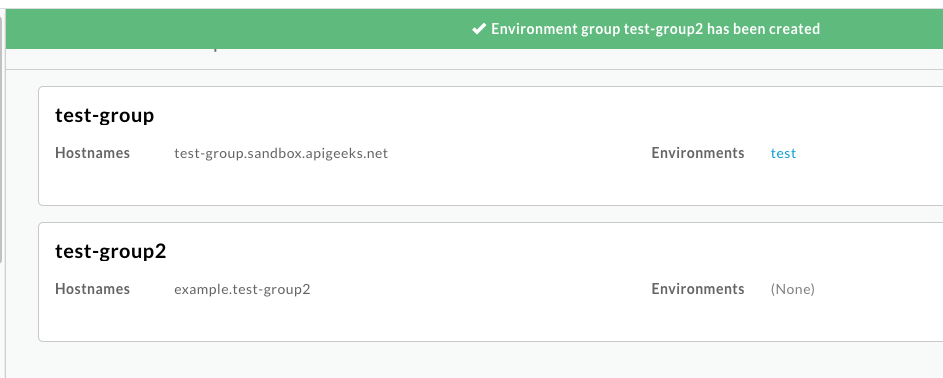
Apigee also assigns a default host name to the new group.
-
(Optional) Assign additional host names to the new group by clicking for that group.
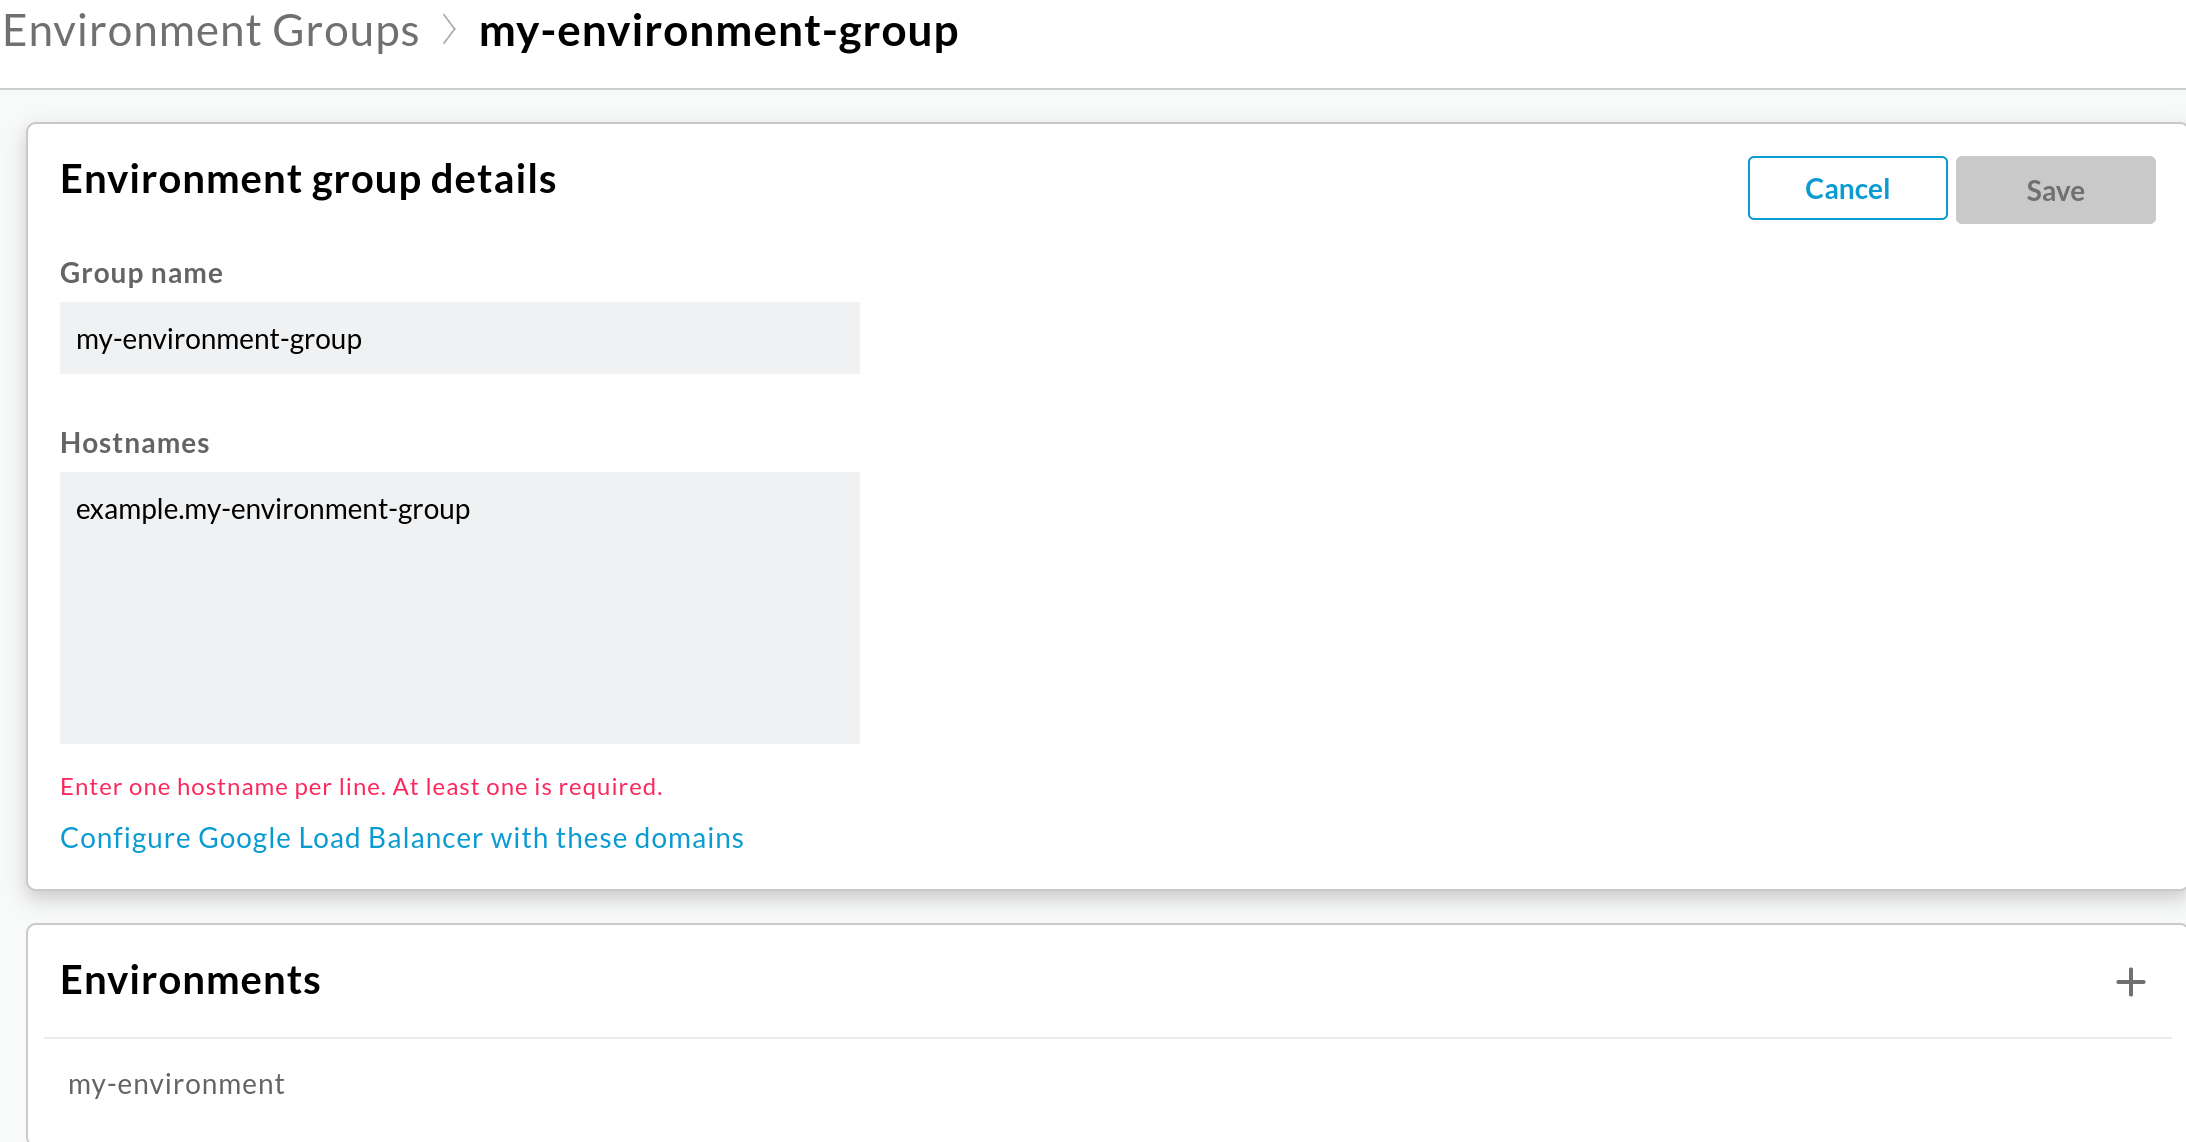
Apigee displays the Environment group details pane:
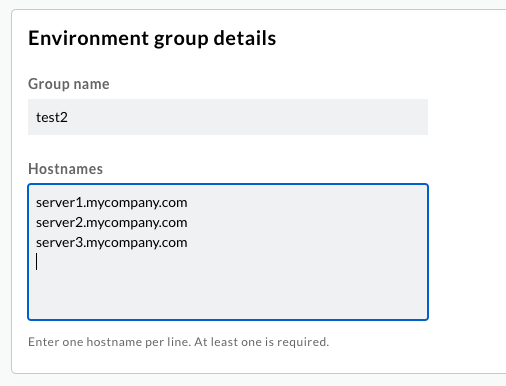
- Add host names to the Hostnames field. Each host name must be on a separate line.
-
Click Save when you're done.
You can add and remove host names to this list at any time using the same procedure.
Apigee API
To create a new environment group using the Apigee API, send a POST request to the
Create environment groups API. Before calling the API, be sure that you have a valid token, as described
in Obtaining an OAuth 2.0 access token.
The following example curl command shows the syntax to create a new group:
curl -i $TOKEN -X POST \
  https://apigee.googleapis.com/v1/organizations/ORG_NAME/envgroups?name=new-group-name
When specifying the new group's name, you must use only lower case letters, numbers, and hyphens
(a-z, A-Z, and -). You cannot use upper case letters or any
special characters other than hyphens. You must also start the name with a lower case letter.
If you don't specify any additional parameters, this command creates a new group with no host names assigned to it.
You can also assign host names when you create the group by specifying them as an array in the body of the request.
The following example creates a new group my-group and assigns three new host names to
the new group:
curl -i $TOKEN -X POST \
  https://apigee.googleapis.com/v1/organizations/org_name/envgroups?name=my-group \
  -d '{ \
    "hostnames": ["server1.mycompany.com", "server2.mycompany.com", "10.1.142.8"] \
  }'
You can later change the host names in the list by sending a PATCH request to the
Patch environment groups API.
Adding environments to an environment group
Environments that are not in a group cannot be accessed because there is no host name associated with them. Host names are defined on the environment group, not the environment. When you create an environment using the Apigee UI in Google Cloud console, you have the option to assign the environment to an existing environment group. For more information, see Creating a new environment in the UI.
If you did not assign your environment to a group during environment creation, this section describes how to add an unassigned environment to an environment group using the Apigee UI or the Apigee API.
Apigee in Cloud console
To add an environment to an environment group in the Apigee in Cloud console:
- Create the environment, as described in Creating environments.
- In the https://console.cloud.google.com/apigee, select Management > Environments in the left navigation pane.
- In the Environments pane, select Environment Groups.
- In the row for the environment group, click the three-dot menu under Actions and select Edit.
- In the Edit Environment Group pane, under Environments (Optional), select the environment you want to add to the environment group.
- Click Update.
Classic Apigee
To add an environment to an environment group in the classic Apigee UI:
- Create the environment, as described in Creating environments.
- In the Apigee UI, select Admin > Environments > Groups.
- Look under Unassigned to see a list of environments that are not part of an
environment group:
Note which environments are unassigned as you want to assign them.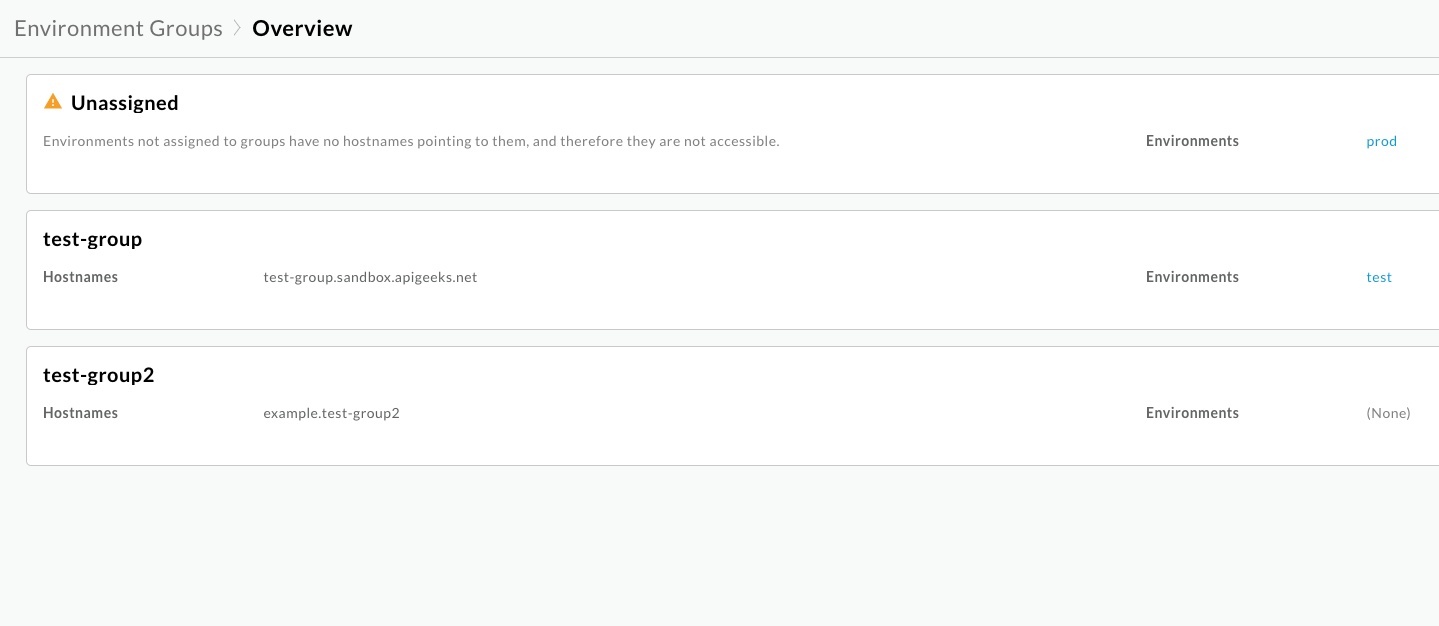
-
Click next to the environment group to which you want to add environments.
The Environment Group Details pane displays:
-
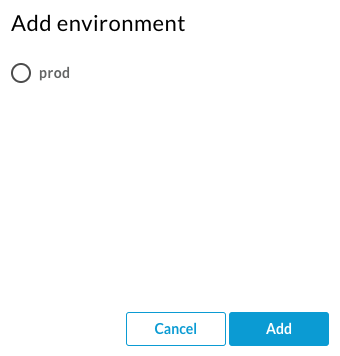
To add a new environment to this group, click + in the Environments list.
The Add environment pane displays:
-
Select the environment you want to add to the group and click Add.
Apigee adds the environment to the group.
Apigee API
To add a new environment to an environment group using the Apigee API, send a POST request to the
Environment group attachment API, as the following example shows:
curl -H "Authorization: Bearer $TOKEN" -X POST
  "https://apigee.googleapis.com/v1/organizations/my-org/envgroups/test-group/attachments"
  -d '{
    "name": "my-attachment",
    "environment": "test"
  }'
Where:
$TOKENis set to your OAuth 2.0 access token, as described in Obtaining an OAuth 2.0 access token.- The body of the request contains the name of the attachment as well as the name of the new environment.
The body of the request contains an instance of an EnvironmentGroupAttachment resource, which is a simple wrapper around a single environment.
If successful, the response contains details about the new attachment, including the timestamp at which it was created; for example:
{
  "name": "my-attachment",
  "environment": "test"
  "createdAt": "42"
}
Removing an environment from an environment group
You can remove an environment from an environment group with the Apigee UI or the Apigee API.
Apigee in Cloud console
To remove an environment from an environment group in the Apigee in Cloud console:
- In the https://console.cloud.google.com/apigee, select Management > Environments in the left navigation pane.
- In the Environments pane, select Environment Groups.
- In the row for the environment group, click the three-dot menu under Actions and select Edit.
- In the Edit Environment Group pane, under Environments (Optional), deselect the environment you want to remove from the environment group.
- Click Update.
Classic Apigee
To remove an environment from an environment group in the classic Apigee UI:
- In the Apigee UI, select Admin > Environments > Overview.
- Select the environment you want to remove.
- In the Groups pane, move the cursor to the end of the
row for the group from which you want to remove the environment
and click
 .
.
Apigee API
To remove an environment from an environment group using the Apigee API,
use the delete method in the
EnvironmentGroupAttachment resource to delete the attachment corresponding to
the environment.
Deleting an environment group
You can delete an environment group using either the Apigee UI or the API.
Apigee in Cloud console
To delete an environment group in the Apigee in Cloud console:
- In the https://console.cloud.google.com/apigee, select Management > Environments in the left navigation pane.
- In the Environments pane, select Environment Groups.
- In the row for the environment group, click the three-dot menu under Actions and select Delete.
Classic Apigee
To delete an environment group in the classic Apigee UI:
- In the Apigee UI, select Admin > Environments > Groups.
- Move the cursor to the pane for the group you want to delete.
- Click the
icon.
Apigee API
To delete an environment group using the Apigee API, use the delete
method in the
EnvironmentGroup resource.
Adding host names to a group
When you create a group, Apigee adds the default hostname
example.GROUP_NAME. You
can add your host names to the group using the instructions in this section.
The hostnames that you define on an environment group:
- Must be unique across all environment groups in an organization; they cannot be used by more than one group
- Do not support wildcards
- Base paths must be unique within a host (no two proxies can have the same base path within a host)
Apigee in Cloud console
To add a host name to an environment group in the Apigee in Cloud console:
- In the https://console.cloud.google.com/apigee, select Management > Environments in the left navigation pane.
- In the Environments pane, select Environment Groups.
- In the row for the environment group, click the three-dot menu under Actions and select Edit.
- In the Edit Environment Group pane, under Hostnames, enter the host name name you want to add to the environment group.
- Click Update.
Classic Apigee
To add a host name to an environment group in the classic Apigee UI:
- In the Apigee UI, select Admin > Environments > Groups.
-
Hover over the group's card and select .
The Environment group details pane displays:
- In the Hostnames field, enter your new hosts.
- Click Save to add the new hosts to the group.
Apigee API
To add host names to an environment group using the Apigee API, send a
PATCH request
to the Patch environment groups API. Be sure to set the updateMask parameter to
hostnames and specify the entire list of host names that you want: the value of that
field in your request replaces the existing list.
The following example sets the host names for the test environment:
curl -H "Authorization: Bearer $TOKEN" -X PATCH
  "https://apigee.googleapis.com/v1/organizations/my-org/envgroups/test-group?hostnames=updateMask"
  -d '{
    "name": "my-hostnames",
    "hostnames": [
      "test-1.example.com",
      "test-2.example.com",
      "test-3.example.com"
    ]
  }'
Where:
$TOKENis set to your OAuth 2.0 access token, as described in Obtaining an OAuth 2.0 access token.- The payload of the request specifies a name for the array of hostname attachments, plus the array of names themselves.
If the request was successful, the response contains an Operation resource.
Determining whether the Cloud Load Balancer is configured for a hostname
You can call a proxy with the following command:
curl -v https://YOUR_ENV_GROUP_HOSTNAME/myproxy
where YOUR_ENV_GROUP_HOSTNAME is the hostname of an environment group
that contains the environment in which the proxy is deployed. To do so, the
Cloud Load Balancer
must be configured for the environment group hostname. Usually, the Load Balancer is configured when
Apigee is first provisioned.
To determine whether the Load Balancer is configured for the hostname:
- In the Admin > Environments > Groups view, click the edit icon to the right of the environment group for the hostname.
- Click Configure Google Load Balancer with these domains. This takes you to the
Google Cloud Platform Load balancing page.
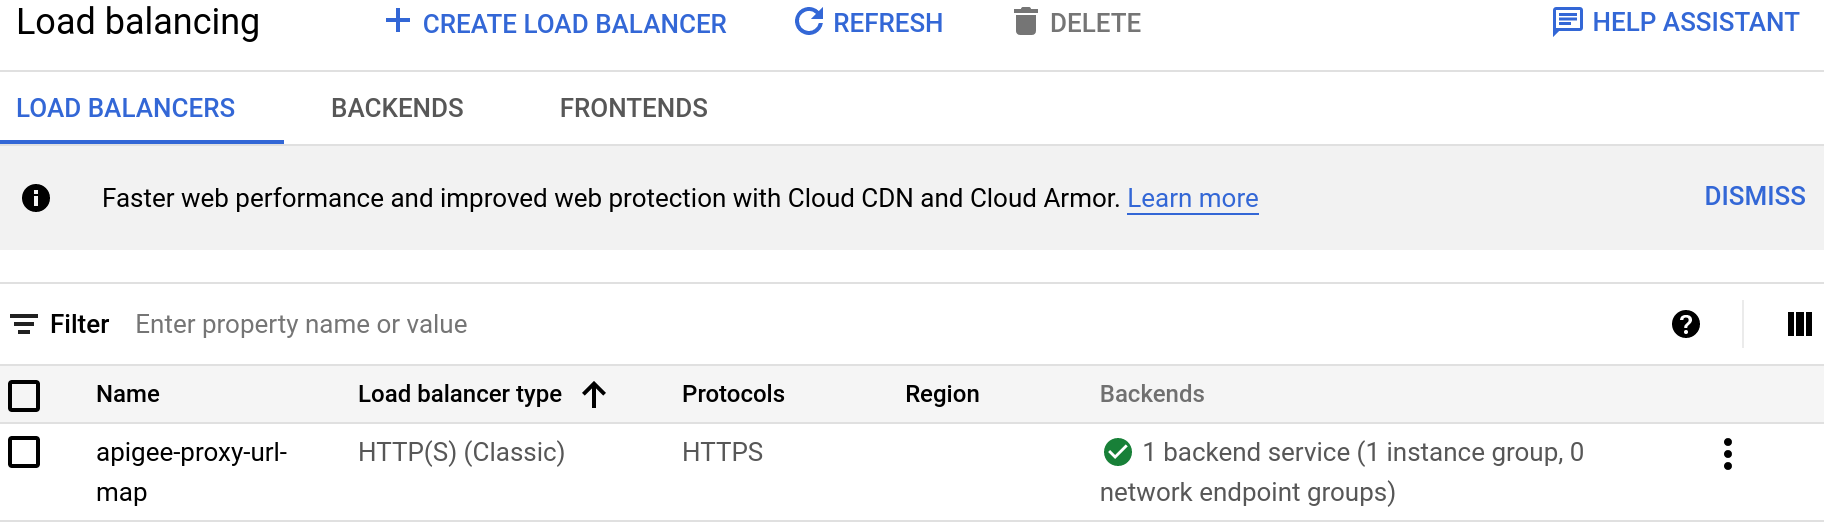
Click the name of the load balancer in the Name column. If Apigee was provisioned with the Provisioning Wizard, the name of the load balancer will be
apigee-proxy-url-map. If you don't see that name, contact the system administrator in your organization who provisioned Apigee.When you click the name, the Load balancer details page is displayed:
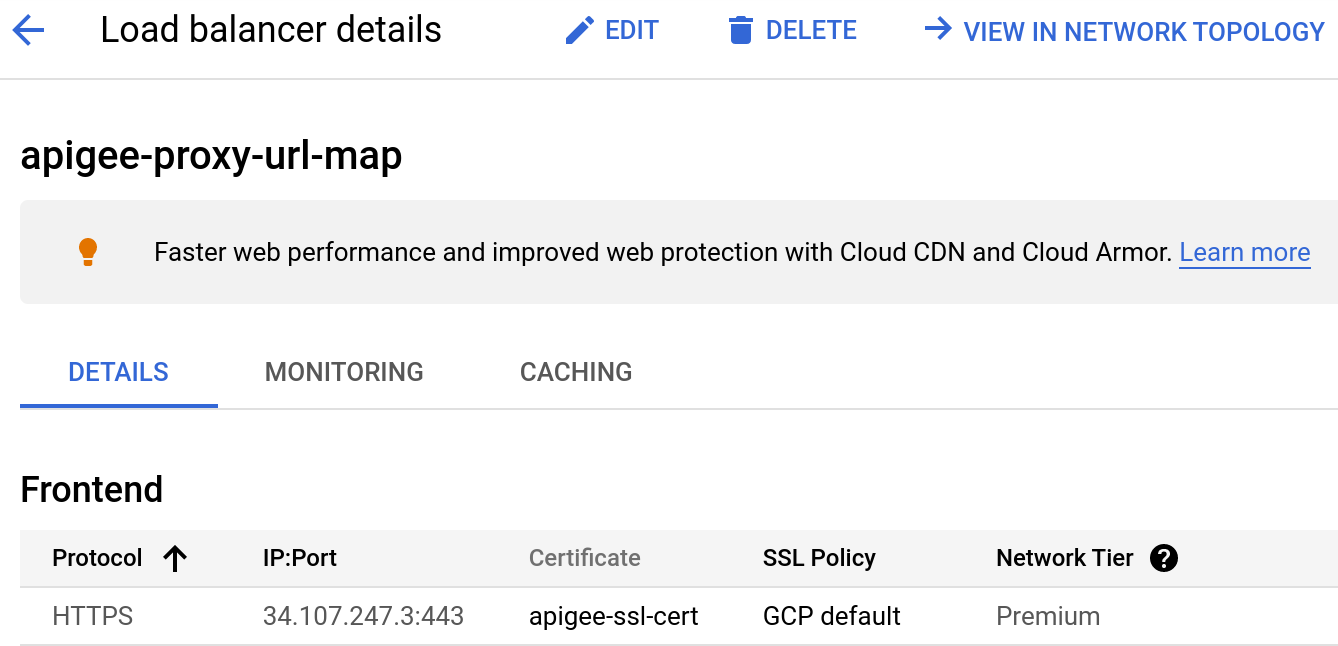
- In the Frontend table, click through the SSL certificates in the Certificate
column and look for an SSL certificate that matches the hostname:
- If the Certificate type is MANAGED, check whether the DNS Hostnames field of the certificate matches the hostname.
- If the certificate is not managed, you may need to download the certificate and check whether its Common Name matches the hostname.
If you don't find the hostname in any certificate, contact your system administrator for further assistance.