This page applies to Apigee, but not to Apigee hybrid.
View
Apigee Edge documentation.

This document explains how to use Private Service Connect (PSC) to create a private connection between Apigee and backend target services. Note that API proxy traffic that flows between Apigee and a backend target service is referred to as "southbound" traffic.
The southbound networking configuration steps described in this document apply to both VPC-peered and non-VPC peered Apigee instances.
Privately connecting Apigee to backend targets
To privately connect Apigee to a backend target, you must create two entities: a service attachment in the VPC network where the target is deployed and an endpoint attachment in the Apigee VPC. These two entities allow Apigee to connect to the target service.
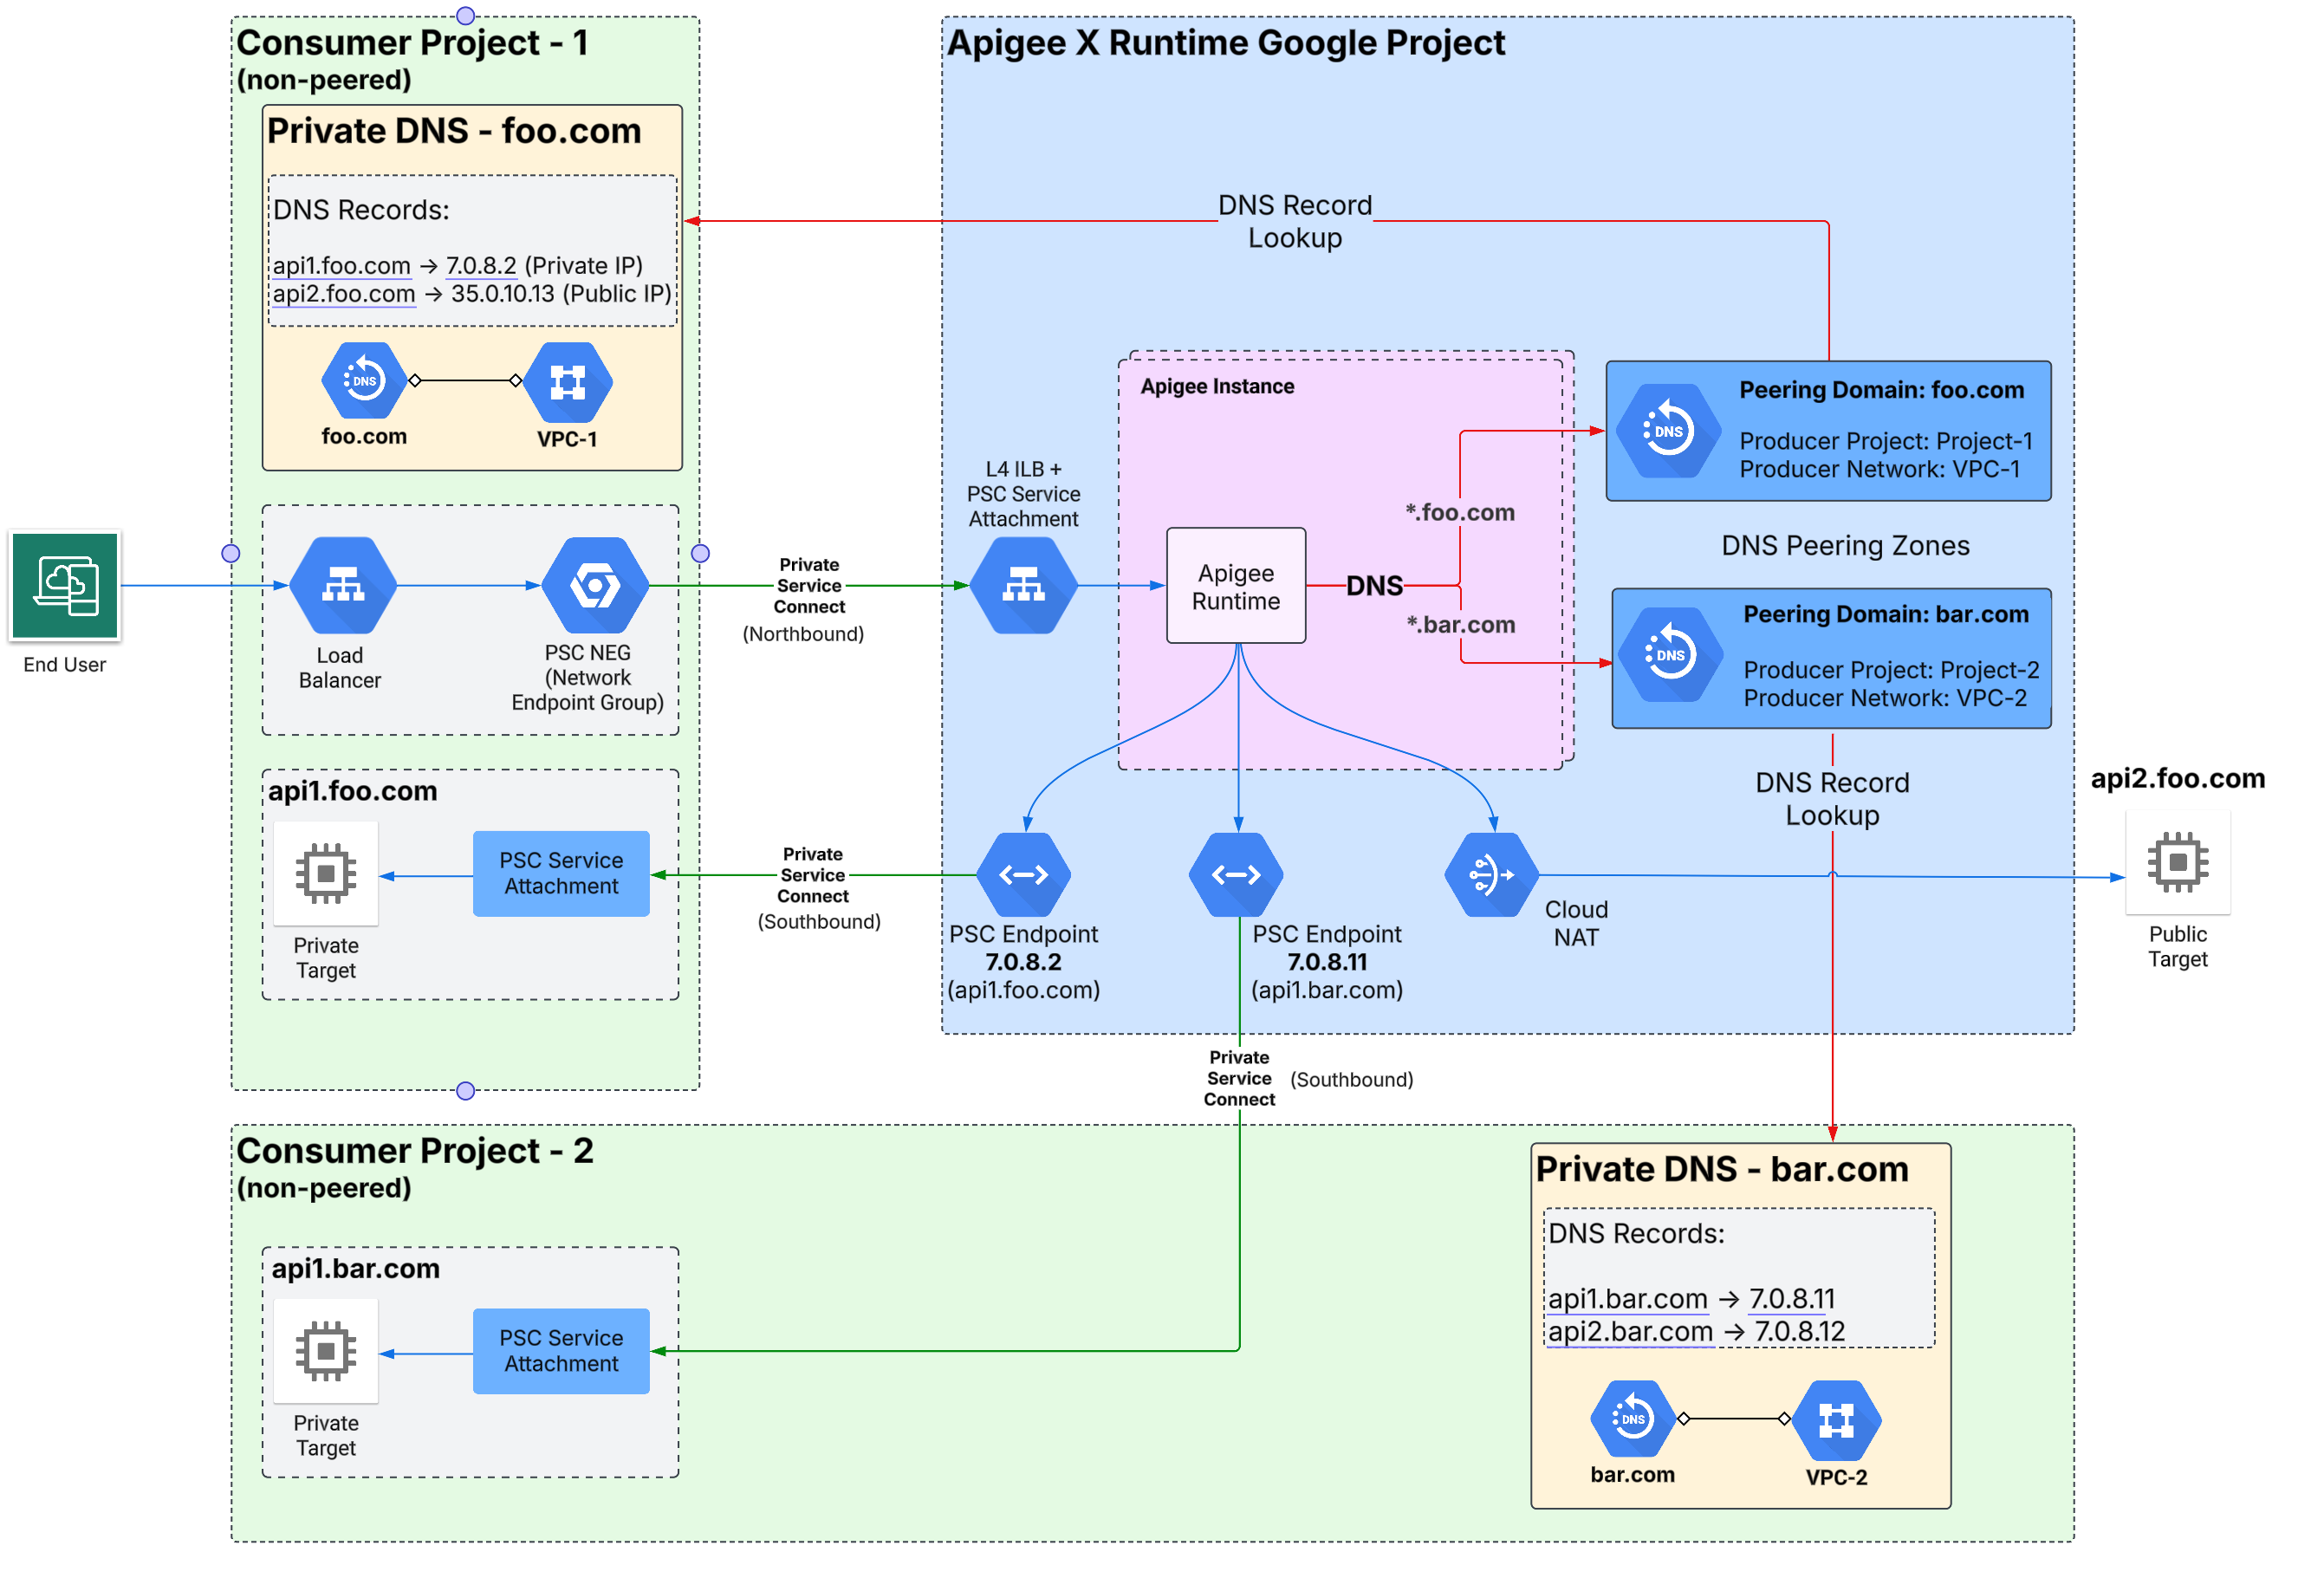
Figure 1 illustrates the Apigee networking architecture that supports global access for southbound connections across multiple regions with PSC:

Limitations
In an Apigee organization, one endpoint attachment is allowed for a given service attachment. For example, assume you have 10 service attachments that expose target services. You can create 10 endpoint attachments in your Apigee organization, one for each service attachment.
Example: Exposing a target service to Apigee with PSC
This example shows how to use PSC to enable Apigee to communicate with a target service running
in a VPC network that is not directly peered with Apigee. The steps in this example use gcloud
and Apigee API calls to set up and configure a service attachment in the VPC network where
the target is deployed and an endpoint attachment in the Apigee VPC.
Example scenario
This example considers a case where you have an Apache web server deployed on a Managed Instance Group (MIG) running in your VPC. To be able to communicate with Apigee in this context, we expose the services through an ingress gateway.
Set up a load balancer
Set up a load balancer in your VPC where the microservices you wish to expose are located:
- Create these environment variables:
export PROJECT_ID=YOUR_PROJECT_IDexport IMAGE_PROJECT=debian-cloudexport IMAGE_FAMILY=debian-12export BACKEND=fooexport REGION=us-west1export ZONE=us-west1-aexport NETWORK=defaultexport SUBNET_NAME=default - Create an instance template:
gcloud compute instance-templates create "$BACKEND" \ --tags=psc-demo,http-server,https-server \ --image-family "$IMAGE_FAMILY" --image-project "$IMAGE_PROJECT" \ --network "$NETWORK" --subnet "$SUBNET_NAME" --region "$REGION" \ --project "$PROJECT_ID" \ --metadata startup-script="#! /bin/bash sudo apt-get update sudo apt-get install apache2 -y sudo service apache2 restart echo '<!doctype html><html><body><h1>foo[/]: '\`/bin/hostname\`'</h1></body></html>' | sudo tee /var/www/html/index.html sudo mkdir /var/www/html/foo echo '<!doctype html><html><body><h1>foo[/foo]: '\`/bin/hostname\`'</h1></body></html>' | sudo tee /var/www/html/foo/index.html" - Create a managed instance group:
gcloud compute instance-groups managed create $BACKEND \ --project $PROJECT_ID --base-instance-name $BACKEND \ --size 1 --template $BACKEND --region $REGION - Create a health check:
gcloud compute instance-groups managed set-named-ports $BACKEND \
    --project $PROJECT_ID --region $REGION --named-ports http:80
gcloud compute health-checks create tcp hc-tcp-$BACKEND \ --region=$REGION \ --description="health check for psc backend" \ --port-name=http --project=$PROJECT_ID
- Create a load balancer:
- Create a backend service:
gcloud compute backend-services create be-ilb \ --load-balancing-scheme=internal \ --protocol=tcp \ --region=$REGION \ --network=$NETWORK \ --health-checks=hc-tcp-$BACKEND \ --health-checks-region=$REGION \ --project=$PROJECT_ID - Add the managed instance group to the backend service:
gcloud compute backend-services add-backend be-ilb \ --region=$REGION \ --instance-group=$BACKEND \ --instance-group-zone=$ZONE \ --project=$PROJECT_ID - Create a forwarding rule:
gcloud compute forwarding-rules create fr-ilb \
    --region=$REGION \
    --load-balancing-scheme=internal \
    --network=$NETWORK \
    --subnet=$SUBNET_NAME \
    --ip-protocol=TCP \
    --ports=80 \
    --backend-service=be-ilb \
    --backend-service-region=$REGION \
    --project=$PROJECT_ID
- Create a backend service:
Create a service attachment
Create a PSC service attachment in the VPC network where the target services are deployed.
- To perform this task, you must have the
compute.subnetworks.createpermission or the Compute Network Admin IAM role (roles/compute.networkAdmin). - Create a PSC subnet with the
purposeparameter set toPRIVATE_SERVICE_CONNECT:gcloud compute networks subnets create PSC_SUBNET_NAME \ --network NETWORK --region=REGION --purpose=PRIVATE_SERVICE_CONNECT --range=RANGE
gcloud compute --project=$PROJECT_ID firewall-rules create allow-psc-nat-80 \
  --direction=INGRESS --priority=1000 --network NETWORK --action=ALLOW --rules=tcp:80 \
  --source-ranges=RANGE --target-tags=psc-demo
For a detailed description of the command parameters, see the Google Cloud CLI reference. You can also perform this step in the Console or with an API.
For example:
gcloud compute networks subnets create psc-subnet --network default \
--region=us-west1 --purpose=PRIVATE_SERVICE_CONNECT --range=10.100.0.0/28
- Create a service attachment in your VPC network:
- Get the forwarding rule of the
internal load balancer.
You will use this rule in a later step:
gcloud compute forwarding-rules list --project=PROJECT_ID
Where PROJECT_ID is a Google Cloud project ID. For example:
Example output:
NAME                                                  REGION    IP_ADDRESS    IP_PROTOCOL  TARGET
k8s2-tcp-e61tta3j-apps-istio-ingressgateway-0kl92frk  us-west1  10.138.0.53   TCP
- Create the service attachment:
gcloud compute service-attachments create PSC_NAME \
    --region=REGION --producer-forwarding-rule=PRODUCER_FORWARDING_RULE \
    --connection-preference=ACCEPT_AUTOMATIC --nat-subnets=PSC_SUBNET_NAME --project=PROJECT_ID
The PSC_NAME parameter must be a string 1-63 characters long, consisting of lowercase letters, numbers and hyphens only. It cannot have leading numbers and hyphens. Also, it cannot have trailing hyphens. For a detailed description of the parameters for this command, see the Google Cloud CLI reference.
For example:
gcloud compute service-attachments create gkebackend \
    --region=us-west1 --producer-forwarding-rule=k8s2-tcp-e62tta1j-apps-istio-ingressgateway-0kl92frk \
    --connection-preference=ACCEPT_AUTOMATIC --nat-subnets=psc-subnet --project=my-project
You can also perform this step in the Console UI. See, for example, Publish a service with automatic project approval.
- Get the forwarding rule of the
internal load balancer.
You will use this rule in a later step:
Create an endpoint attachment
Create an endpoint attachment in the Apigee organization. You can perform this step from the command line or the Apigee Endpoint attachment UI.
Prerequisite: Before you create an endpoint attachment, you must publish the services you wish to expose using Private Service Connect (PSC) by creating a load balancer and a service attachment, as explained previously in this example. For more information on exposing services with PSC, see Publish managed services using Private Service Connect. Note that the service attachment must be configured to accept new connections.
Command line
Create an endpoint attachment in the Apigee VPC from the command line:
- Get the service attachment resource:
gcloud compute service-attachments list
The command returns the service attachment information. You will use this information in the next step. For example:
NAME       REGION   TARGET_SERVICE                                       CONNECTION_PREFERENCE
gkebackend us-west1 k8s2-tcp-tgysilgj-apps-istio-ingressgateway-fzdhwstg ACCEPT_AUTOMATIC
- Get the authentication token for the Apigee API:
TOKEN="$(gcloud auth print-access-token)"
- Use this Apigee API to create the endpoint attachment. Use values returned from the
gcloud compute service-attachments listcommand in the body of the request:curl -X POST -H "Authorization: Bearer $TOKEN" -H "Content-Type:application/json" \ "https://apigee.googleapis.com/v1/organizations/ORGANIZATION/endpointAttachments?endpointAttachmentId=EA_NAME" \ -d '{ "location": "REGION", "serviceAttachment": "projects/PROJECT_ID/regions/REGION/serviceAttachments/SA_NAME" }'Where:
- REGION is the region of the service attachment. For example:
us-west1 - ORGANIZATION is your Apigee organization name.
- PROJECT_ID is the Google Cloud project where the service attachment was created.
- EA_NAME is the name of the endpoint attachment. The name must be unique. There can be no other endpoint attachments with the same name, and you cannot change the name later. The name must start with a lowercase letter followed by up to 31 lowercase letters, numbers, or hyphens, but it cannot end with a hyphen. The minimum length is 2.
- SA_NAME is the name of the service attachment.
Apigee starts a long-running operation. When the operation is complete, you will see a response similar to the following:
{
  "name": "organizations/my-organization/operations/6e249895-e78e-48f0-a28f-7140e15e1676",
  "metadata": {
    "@type": "type.googleapis.com/google.cloud.apigee.v1.OperationMetadata",
    "operationType": "INSERT",
    "targetResourceName": "organizations/my-organization/endpointAttachments/gkebackend",
    "state": "FINISHED"
  },
  "done": true,
  "response": {
    "@type": "type.googleapis.com/google.cloud.apigee.v1.EndpointAttachment",
    "name": "organizations/my-organization/endpointAttachments/gkebackend",
    "location": "us-west1",
    "host": "7.0.3.4",
    "serviceAttachment": "projects/my-project/regions/us-west1/serviceAttachments/gkebackend"
  }
}
- REGION is the region of the service attachment. For example:
- To check if the new endpoint is active:
curl -X GET -H "Authorization: Bearer $TOKEN" \
"https://apigee.googleapis.com/v1/organizations/ORGANIZATION/endpointAttachments/EA_NAME"
Look for
"state": "ACTIVE"in the response.To connect to the services behind the service attachment, you can use the IP address returned in the response (in the
hostfield), or you can use a DNS record that you have created in your private DNS zone. For more information, see the following sections. -
Use the IP address
You can use the IP Address
Use the service attachment host IP as the target of an API proxy. For example:7.0.3.4returned in the response to connect to the services behind the service attachment, as shown in the next step. Note that7.0.3.4is a privately used public IP (PUPI) assigned by Apigee to the ingress gateway. It is not advertised on the internet and no Google services use IPs in this range internally.<TargetEndpoint name="default"> <HTTPTargetConnection> <URL>http://7.0.3.4/orders</URL> </HTTPTargetConnection> </TargetEndpoint>
Use a DNS record
If you configured a private DNS zone in your Google Cloud project, you can use a DNS record to connect to the services behind the service attachment. The basic steps are as follows.
- As a prerequisite, DNS peering must be configured in your Google Cloud project, as explained in Connecting with private DNS peering zones.
- Create a DNS record (A record ) for the PSC endpoint attachment IP in your private DNS zone.
- Configure your Apigee API proxy to use the PSC endpoint DNS record as the target of the API proxy. For example:
<TargetEndpoint name="default">
  <HTTPTargetConnection>
    <URL>http://my-private-dns-zone.example.com/orders</URL>
  </HTTPTargetConnection>
</TargetEndpoint>
Apigee UI
Create an endpoint attachment in the Apigee organization in the Apigee UI:
In the Google Cloud console, go to the Management > Endpoint attachments page.
- Click + Endpoint Attachment. The Endpoint attachment dialog appears.
- Enter a name for the endpoint attachment. The name must be unique. There can be no other endpoint attachments with the same name, and you cannot change the name later. The name must start with a lowercase letter followed by up to 31 lowercase letters, numbers, or hyphens, but it cannot end with a hyphen. The minimum length is 2.
- Click Next.
- From the Service Attachment dropdown list, choose the service attachment to connect to.
The behavior of the UI depends on your permissions. If you have permission to list regions and service attachments, you can simply select your service attachment from the dropdown list. If you do not have permission to list regions, then a static list of regions is shown, and you can select from the list. If you do not have permission to list service attachments, you have to enter the name manually. located and the name of the service attachment. Note that if you do not have permission to list regions, a static list of regions will be displayed for you to choose from.

- Verify that the service endpoint can accept connections. For steps, see Check and manage attachment connectivity.
- Click Next.
- Click Create. The operation typically takes one or two minutes to complete.
- To check the current creation status, click Refresh in the list page.
- Use the service attachment host IP as the target of an API proxy.
The host IP appears in the Endpoint Attachments UI when the creation process completes, as shown
in the following screenshot:
For example:
<TargetEndpoint name="default">
    <HTTPTargetConnection>
        <URL>http://7.0.5.2/orders</URL>
    </HTTPTargetConnection>
</TargetEndpoint>
Check and manage attachment connectivity
This section explains how to verify that a service attachment can access an endpoint attachment in your Apigee project, and how to change the connection preference if you wish to change it.
- Follow the steps in List published services to view the list of service attachments in your project.
- Select the service attachment you wish to connect to as explained in View details for a published service.
- Choose a connection preference for your published service attachment. Private Service Connect offers two options
described below. If you wish to change the current connection preference, follow the steps in
Change the connection preference for a published service.
- Automatically accept all connections: The service attachment accepts endpoint attachments from any project. If you choose this option, the service attachment will be able to accept a connection from an endpoint attachment in the Apigee project. No further configuration is required.
- Accept connections from selected projects: You specify the projects from which the
service attachment will accept connections. If you choose this option, you must add the
project ID of the Apigee project to the service attachment. You can find
the Apigee project ID in the Verify project connection step in the Endpoint attachment UI, as shown in this
screenshot:

You can also retrieve the Apigee project ID using the Apigee Organizations API, which returns the ID in a field named
apigeeProjectId.
- If you made changes to the connection preferences, save your changes.
In the Google Cloud console, go to the Management > Endpoint attachments page.
You can also list the endpoint attachments with the Apigee Endpoints API.- In the list of attachments, verify the PSC Connection Status is now
ACCEPTED. If the field shows a status other thanACCEPTED, see Troubleshooting PSC connection state issues.
Managing endpoint attachments
The Apigee endpointAttachments API provides methods to create, delete, get, and list endpoint attachments.
Listing endpoint attachments
You can see a list of endpoint attachments in the Apigee Endpoint attachment UI or by calling the Apigee Endpoints API.
To list an endpoint attachment in the Apigee UI:
In the Google Cloud console, go to the Management > Endpoint attachments page.
- View the list of endpoint attachments.
Creating an endpoint attachment
To create an endpoint attachment in the UI or with the Apigee Endpoints API, see Create an endpoint attachment.
Deleting an endpoint attachment
To delete an endpoint using the Apigee UI:
In the Google Cloud console, go to the Management > Endpoint attachments page.
- Select the Endpoint Attachment to delete.
- Click Delete Endpoint Attachment.
You can also use the Apigee Endpoints API to list, create, and delete endpoint attachments.
Connecting with private DNS peering zones
A peering zone is a Cloud DNS private zone that lets you send DNS requests between Cloud DNS zones in different VPC networks.
To provide DNS peering, you must create a Cloud DNS private peering zone and configure it to perform DNS lookups in a VPC network where the records for that zone's namespace are available. The VPC network where the DNS peering zone performs lookups is called the DNS producer network. For more information, see Peering zones.
You can configure Apigee to resolve private DNS zones in a DNS producer network. This configuration allows Apigee to resolve target endpoints in a project that uses private domain names.
We explore two primary use cases in this section, where Apigee is configured with or without VPC peering enabled:
- Configuring private DNS peering with VPC peering enabled
- Configuring private DNS peering when VPC peering is not enabled
Overview
To do its job, Apigee needs to connect to backend targets that you manage. These targets may be resolvable through a public or private DNS. If the target is publicly resolvable, then there's no problem, the Apigee backend target points to the public address of the service. Private endpoints can be static IP addresses or resolvable DNS names that you host and manage. To resolve private target endpoints, it is common to maintain a private DNS zone hosted in your Google Cloud project. By default, these private DNS names cannot be resolved by Apigee.
Configuring private DNS peering with VPC peering enabled
If you have a Cloud DNS private zone hosted in the Cloud project that is peered with Apigee, you can configure DNS peering to allow Apigee to resolve names in your private zone. By default, private zones are private to the VPC network in which they are hosted. For steps to configure DNS peering between a private DNS zone and Apigee (the service producer), see Share private DNS zones with service producers.
Configuring private DNS peering when VPC peering is not enabled
This section explains how to configure Apigee to resolve private DNS names in your project where VPC peering is not enabled. Figure 2 shows the configuration, where a DNS peering zone in Apigee resolves private domain names in a private DNS zone hosted in your Google Cloud project.
- As a prerequisite, Apigee must be provisioned without VPC peering. To check if VPC
peering is enabled or not, execute this Apigee API call. You must have the
apigee.adminpermission to execute this call:curl -X GET -H "Authorization: Bearer $(gcloud auth print-access-token)" \ "https://apigee.googleapis.com/v1/organizations/ORGANIZATION"Where:
ORGANIZATIONis the name of your Apigee organization.
If the response contains
"disableVpcPeering": "true", then VPC peering is not enabled. - Get the Apigee project number:
gcloud projects describe APIGEE_PROJECT_ID --format="value(projectNumber)"
Where:
APIGEE_PROJECT_IDis the project ID of your Apigee project. Typically, this is the name of your Apigee organization.
- Grant the Apigee per-project service account (P4SA) the
dns.networks.targetWithPeeringZonepermission on the project that contains the producer VPC network. To get this permission you can add thedns.peerrole to the Apigee P4SA, as follows:gcloud projects add-iam-policy-binding PRODUCER_PROJECT_ID \ --member=serviceAccount:SERVICE_ACCOUNT \ --role=roles/dns.peerWhere:
PRODUCER_PROJECT_IDis the project ID of the project that contains the producer VPC network.SERVICE_ACCOUNTis the Apigee P4SA. For example:service-APIGEE_CONSUMER_PROJECT_NUMBER@gcp-sa-apigee.iam.gserviceaccount.com.Where
APIGEE_CONSUMER_PROJECT_NUMBERis the Apigee project number you retrieved in the previous step.
- Create a DNS peering zone with the private DNS zone in your project:
curl -X POST -H "Authorization: Bearer $(gcloud auth print-access-token)" -H "Content-Type:application/json" \
      "https://apigee.googleapis.com/v1/organizations/ORGANIZATION/dnsZones?dnsZoneId=DNS_ZONE_ID" \
      -d '{
        "domain": "DOMAIN",
        "description": "DESCRIPTION",
        "peeringConfig": {
           "targetProjectId": "PRODUCER_PROJECT_ID",
           "targetNetworkId": "PRODUCER_VPC_NETWORK"
        }
    }'
Where:
ORGANIZATIONis the name of your Apigee organization.DNS_ZONE_IDis the name of the DNS zone you want to create.DOMAINis the DNS name of this managed zone, for instanceexample.com.DESCRIPTIONis a brief description of the DNS zone. Maximum characters: 1024PRODUCER_PROJECT_IDis the project that contains the producer VPC network.PRODUCER_VPC_NETWORKis the VPC network in the customer project.
- Validate that the peering was successfully created:
curl -X GET -H "Authorization: Bearer $(gcloud auth print-access-token)" \
      "https://apigee.googleapis.com/v1/organizations/ORGANIZATION/dnsZones/DNS_ZONE_ID"
Where:
- ORGANIZATION is the name of your Apigee organization.
- DNS_ZONE_ID is the name of the DNS zone you created.
On success, the response includes this status code:
"state": "ACTIVE" - With peering complete, you can create a DNS record in the private zone and refer to it in an endpoint attachment configuration. See Create an endpoint attachment.
Limitations
See DNS peering limitations and key points.Troubleshooting
PSC connection state issues
This section describes possible solutions when an endpoint attachment has been provisioned and the status is Active, but the connection state is not Accepted. Some possible connection states are shown in Figure 3.

Figure 3: Endpoint attachment state details
The state given can help point to the likely cause, as described in the following table:
| Connection state | Possible cause | Recommended solution |
|---|---|---|
| ACCEPTED | The service attachment has accepted the connection from the connection endpoint. | N/A |
| PENDING | The Apigee project ID may not be in the consumer accepted projects list nor in the rejected list. | Add the Apigee project ID to the consumer accept list on the service attachment. See Change the connection preference for a published service. |
| REJECTED | The Apigee project ID is in the consumer reject list. | Remove the Apigee project ID from the consumer reject list and add it to the consumer accept list on the service attachment. See Manage requests for access to a published service. |
| FROZEN | The service attachment for this endpoint attachment has been suspended or disabled. | Describe the service attachment for details. See View details for a published service. |
| CLOSED | The service attachment for this endpoint attachment has been deleted. | Recreate the service attachment and endpoint attachment. |
| NEEDS_ATTENTION | The endpoint attachment has been accepted by the service attachment, however there is an issue with the service attachment. | Describe the service attachment for more details. See View details for a published service. |
| UNAVAILABLE | The connectivity state is unavailable, which can occur during provisioning. | Wait a few minutes to see if the status changes. |
PSC configuration with Apigee
See the Apigee connectivity issues with southbound PSC targets playbook.