This page applies to Apigee and Apigee hybrid.
View
Apigee Edge documentation.

![]()
What you'll learn
Through this tutorial, you'll learn to:
- Add a policy that affects the request and response.
- See the effects of the policy.
What you'll need
- An Apigee installation. See Overview and prerequisites.
- A working API proxy with at least one policy attached. See Build your first API proxy overview.
- An HTTP API client installed on your machine to make API calls. The tutorial examples
use
curl.
Add the SpikeArrest policy
In this tutorial, you'll add and configure the SpikeArrest policy to guard the target
service against sudden traffic spikes that can be caused by an increase in usage, buggy clients,
or malicious attacks. When the number of requests exceeds the rate limit, the API returns an
HTTP 429 error.
Apigee in Cloud console
To add the SpikeArrest policy to an API proxy:
In the Google Cloud console, go to the Proxy development > API Proxies page.
If you followed the Get Started tutorial, you can add it to the API proxy you created in Create an API proxy.
- Click the Develop tab.
- In the left-hand pane, click the + button in the Policies row.
In the Create policy dialog, click in the Select policy type field and scroll down to Traffic Management and select SpikeArrest.
Optionally, you can change the Name and Display name of the policy. By default, Apigee provides a short prefix for the policy name, in this case, SA-. You can add a sequence of descriptive words, separated by dashes, after the prefix. See Naming conventions.
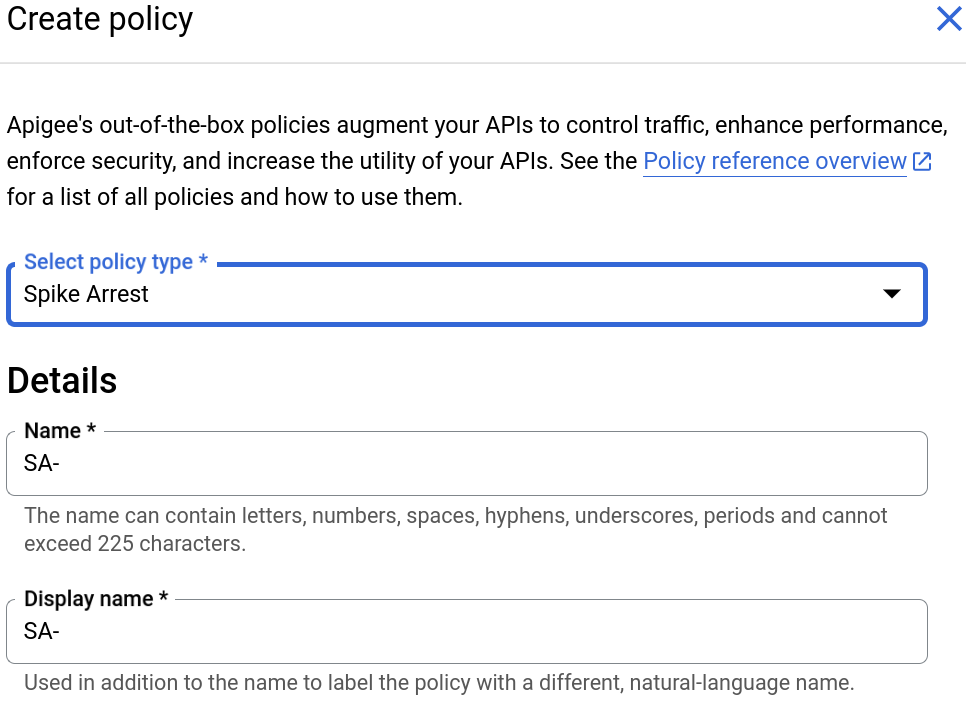
When you are done, click Create to create the policy.
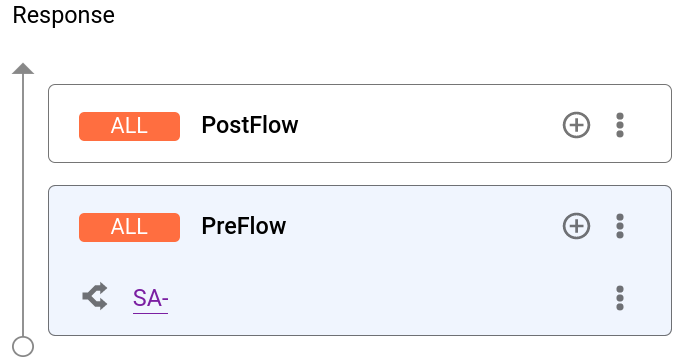
Now that you have created the Spike Arrest policy, you can add it to a step in the PreFlow.
- Select Proxy Endpoints > default > PreFlow in the
left-hand pane:

Note: You may need to expand the visual editor in the right-hand pane to see all the elements. To do so, click and drag the divider between the visual editor and the text editor down a little.
- Click the + button next to PreFlow in the Response pane
at the bottom-right of the visual editor:

- In the Add policy step dialog, select the Spike Arrest policy.
Click Add to attach the policy.
The Spike Arrest policy is now displayed in the Response pane:
Now that you have attached the Spike Arrest policy to the PreFlow, you can try changing the code for the policy:
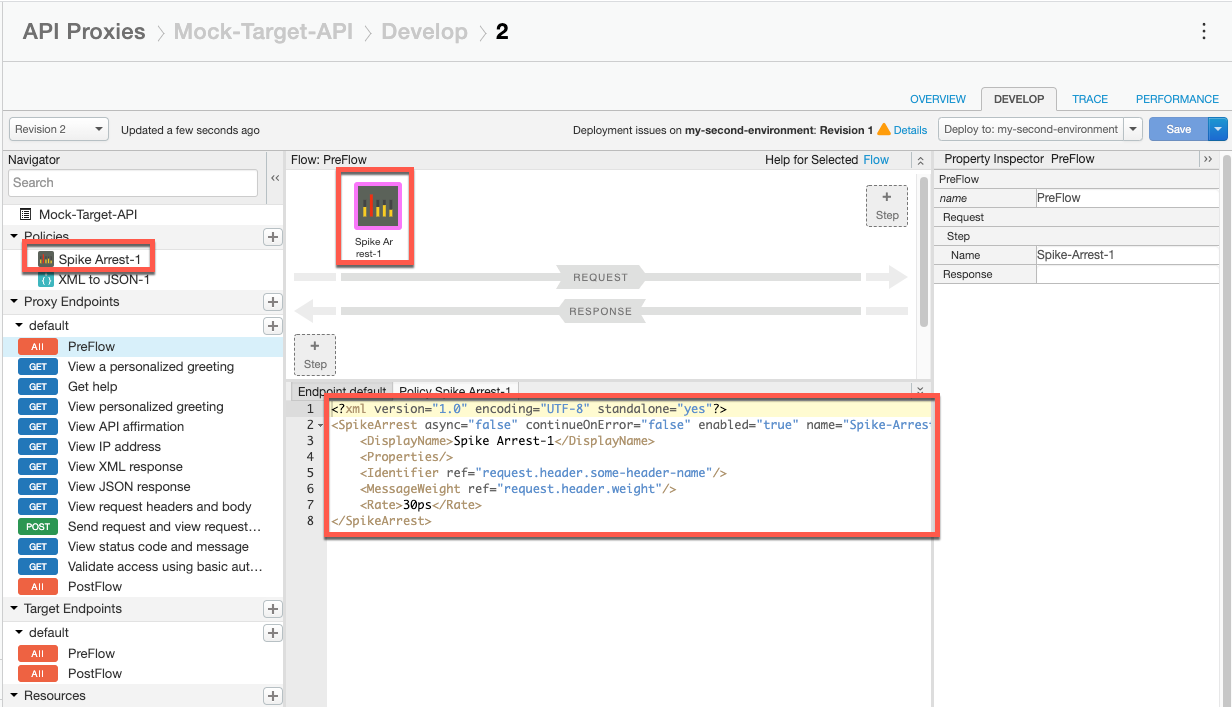
In the Response pane, select SA-.

- The text editor displays the XML code for the proxy, including the
Spike Arrest policy step in the Response element of the PreFlow.
<?xml version="1.0" encoding="UTF-8" standalone="yes"?> <SpikeArrest continueOnError="false" enabled="true" name="SA-"> <DisplayName>SA-</DisplayName> <Properties/> <Identifier ref="request.header.some-header-name"/> <MessageWeight ref="request.header.weight"/> <Rate>30ps</Rate> </SpikeArrest> -
In the XML for the policy, change the value of the
<Rate>element to1pm(which translates into roughly two requests allowed every 60 seconds in the cloud).You can specify the rate as an integer value per minute (
pm) or per second (ps). This is a very low limit and is used only for this tutorial to demonstrate the policy. Typically, you set it to a much higher limit.Notice that the
Ratevalue in the Property Inspector also changes to1pm. Alternatively, you can change the Rate value in the Property Inspector and it will be reflected in the XML view. - Click Save to save the current revision with your changes.
Classic UI
To add the SpikeArrest policy to an API proxy:
- Sign in to Apigee UI.
- Select Develop > API Proxies in the left navigation bar.
- Select the API proxy to which you want to add the SpikeArrest policy.
If you followed the Get Started tutorial, you can add it to the API proxy you created in Create an API proxy.
- In the editor for the new API proxy, click the Develop tab:

The API Proxy Editor lets you see the structure of your API proxy and configure its flow. The editor presents a visual representation of your proxy's request and response message flow as well as an editable display of the underlying XML that defines the proxy.
- In the left Navigator pane, click PreFlow under Proxy Endpoints > default. (Other tutorials will cover the concept of flows.)
- Click the top +Step button, corresponding to the Request PreFlow. This
displays a categorized list of all the policies you can create.

- Select SpikeArrest in the Traffic Management category. The New
Policy dialog appears:
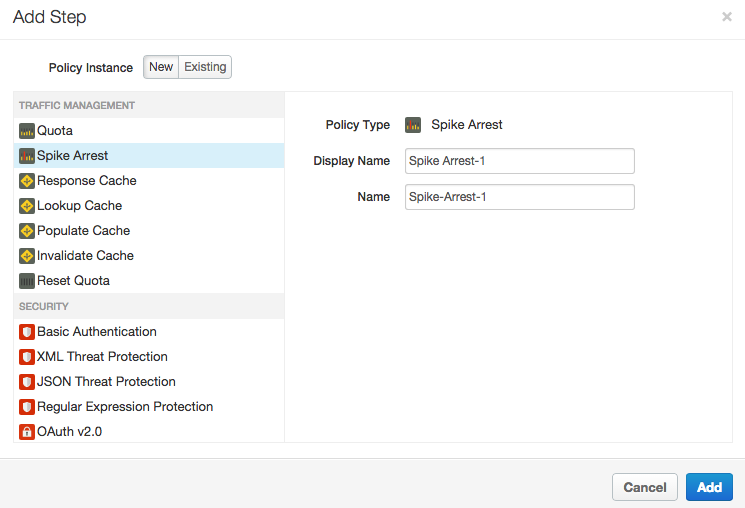
- Leave the default names, and click Add. The new policy is attached to the PreFlow flow of a request.
- In the Navigator, ensure that PreFlow under Proxy Endpoints
> default is still selected and note the following in the API Proxy Editor:
- The new SpikeArrest-1 policy is added under Policies in the Navigator in the left side of the API Proxy Editor.
- The SpikeArrest-1 icon is added to the Designer view in the top center of the API Proxy Editor, which is a visual representation of your proxy's message flows.
- The XML for the policy is displayed in the Code view in the bottom center of the API Proxy Editor.
- In the Navigator, select SpikeArrest-1 under Policies and note the
following in the API Proxy Editor:
- The policy details are displayed in the Designer view in the top center of the API Proxy Editor.
- The XML for the policy is displayed in the Code view in the bottom center of the API Proxy Editor.
- The XML element and attribute values for the policy are displayed in the Property Inspector in the right side of the API Proxy Editor.

-
In the XML for the policy, change the value of the
<Rate>element to1pm(which translates into roughly two requests allowed every 60 seconds in the cloud).You can specify the rate as an integer value per minute (
pm) or per second (ps). This is a very low limit and is used only for this tutorial to demonstrate the policy. Typically, you set it to a much higher limit.Notice that the
Ratevalue in the Property Inspector also changes to1pm. Alternatively, you can change the Rate value in the Property Inspector and it will be reflected in the XML view. - Click Save to save the current revision with your changes.
- Deploy your changes using the Deploy to: button.
-
Call the API using
curl, using the URL for your domain:curl "http://YOUR_DOMAIN/myproxy"
where:
ENV_GROUP_HOSTNAMEis the environment group hostname that you set during provisioning.DOMAIN_HOSTNAMEis your domain hostname.
See Test the API proxy for more information.
Make sure the request succeeds and you see the same XML response as you did previously. (You can also enter just the URL in a web browser.)
Next, try testing the
Ratesetting in different ways:- Execute the
curlcommand (or refresh the browser window) two or three more times within one minute, and notice that you get the following message because you exceeded the rate limit of the policy:{ "fault": { "faultstring":"Spike arrest violation. Allowed rate : 1pm", "detail": { "errorcode":"policies.ratelimit.SpikeArrestViolation"} } }If you try making more calls within a minute, you will continue to get the fault message.
- Edit your policy to set the <
Rate>limit to15pm(which translates into roughly two calls allowed every four seconds in the cloud), and then save and deploy the API proxy. - Execute the
curlcommand or refresh the browser repeatedly (curlis faster). Notice that if you make one or two calls within four-second intervals, your calls succeed. If you make the calls quickly, more than two within four seconds, you should get the fault error. But after each 4-second interval you can continue making calls, as opposed to being blocked for an entire minute (with the1pmsetting).
Except as otherwise noted, the content of this page is licensed under the Creative Commons Attribution 4.0 License, and code samples are licensed under the Apache 2.0 License. For details, see the Google Developers Site Policies. Java is a registered trademark of Oracle and/or its affiliates.
Last updated 2025-10-24 UTC.