Diese Seite gilt für Apigee und Apigee Hybrid.
Apigee Edge-Dokumentation aufrufen

Wenn Sie einen API-Proxy in Apigee mit OAuth-Sicherheit aufrufen, ist Apigee für die Prüfung der Zugriffstoken zuständig. Dabei können Sie sich Apigee als eine Art "Gatekeeper" vorstellen: Ein API-Aufruf kann damit ohne ein Zugriffstoken, das bestätigt werden muss, nicht ausgeführt werden.
VerifyAccessToken-Richtlinie hinzufügen
Zur Konfiguration der Tokenverifizierung platzieren Sie eine OAuthV2-Richtlinie mit dem Vorgang VerifyAccessToken an den Anfang des API-Proxy-Ablaufs, also zu Beginn des ProxyEndpoint-PreFlows. Damit werden Zugriffstokens geprüft, bevor eine andere Verarbeitung stattfindet. Wenn ein Token abgelehnt wird, beendet Apigee die Verarbeitung und gibt einen Fehler an den Client zurück.
So greifen Sie über die Apigee-Benutzeroberfläche auf die Seite "API-Proxys" zu:
Apigee in der Cloud Console
Rufen Sie in der Google Cloud Console die Seite Proxy-Entwicklung > API-Proxys auf.
- Wählen Sie in der Liste den Proxy aus, den Sie schützen möchten.
- Klicken Sie auf der Seite mit den Proxy-Details auf den Tab Entwickeln.
- Klicken Sie im Navigationsmenü unter Proxy-Endpunkte, Standard auf PreFlow. In der Regel wird der gewünschte Endpunkt default genannt. Es können aber auch mehrere Proxy-Endpunkte erstellt werden. Wenn Sie mehrere Endpunkte haben, sollten Sie mit den folgenden Schritten die Tokenprüfung für jeden einzelnen Endpunkt ausführen.

Klicken Sie im Proxy-Ablaufeditor auf Richtlinienschritt hinzufügen.

- Wählen Sie im Dialogfeld Richtlinienschritt hinzufügen die Option Neue Richtlinie erstellen aus.
- Wählen Sie in der Richtlinienliste unter Sicherheit die Option OAuth v2.0 aus.
- Optional haben Sie die Möglichkeit, den Richtliniennamen und den Anzeigenamen zu ändern. Zur besseren Lesbarkeit können Sie beispielsweise den Anzeigenamen und den Namen in VerifyAccessToken ändern.
- Klicken Sie auf Hinzufügen.
Klassische UI
- Öffnen Sie die Apigee-Benutzeroberfläche.
- Wählen Sie in der linken Navigationsleiste Develop > API Proxies aus.
- Wählen Sie in der Liste den Proxy aus, den Sie schützen möchten.
- Klicken Sie auf der Übersichtsseite auf den Tab Entwickeln.
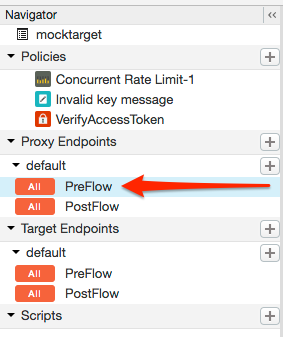
- Wählen Sie im Navigator PreFlow für einen Endpunkt aus, der unter "Proxy-Endpunkte" aufgeführt ist. In der Regel wird der gewünschte Endpunkt "Standard" genannt. Es können aber auch mehrere Proxy-Endpunkte erstellt werden. Wenn Sie mehrere Endpunkte haben, sollten Sie mit den folgenden Schritten die Tokenprüfung für jeden einzelnen Endpunkt ausführen.
- Klicken Sie im Proxy-Ablaufeditor auf + Schritt.

- Wählen Sie Richtlinieninstanz neu aus.
- Wählen Sie in der Richtlinienliste OAuth v2.0 aus.
- Optional haben Sie die Möglichkeit, den Richtliniennamen und den Anzeigenamen zu ändern. Zur besseren Lesbarkeit können Sie beispielsweise den Anzeigenamen und den Namen in "VerifyAccessToken" ändern.
- Klicken Sie auf Hinzufügen.
Die Standardrichtlinie ist bereits mit dem Vorgang "VerifyAccessToken" konfiguriert, sodass Sie keine weiteren Schritte ausführen müssen.
<?xml version="1.0" encoding="UTF-8" standalone="yes"?>
<OAuthV2 async="false" continueOnError="false" enabled="true" name="OAuth-v20-1">
    <DisplayName>OAuth v2.0 1</DisplayName>
    <FaultRules/>
    <Properties/>
    <Attributes/>
    <ExternalAuthorization>false</ExternalAuthorization>
    <Operation>VerifyAccessToken</Operation>
    <SupportedGrantTypes/>
    <GenerateResponse enabled="true"/>
    <Tokens/>
</OAuthV2>