Die GraphQL-Richtlinie kann die Nutzlasten von GraphQL-Anfragen in Variablen für den Nachrichtenablauf parsen, die Anfrage mit einem GraphQL-Schema vergleichen oder beides.
Die GraphQL-Richtlinie kann GraphQL-Nutzlasten in Nachrichtenablaufvariablen parsen, GraphQL-Anfragen anhand eines Schemas prüfen oder beides.
Sie können die GraphQL-Richtlinie für Folgendes verwenden:
Ihre APIs dürfen nur Anfragen verarbeiten, die dem von Ihnen angegebenen Schema entsprechen.
Sie können Einschränkungen für die Nutzlast festlegen, indem Sie eine maximal zulässige Anzahl für Fragmente festlegen.
Verknüpfen Sie GraphQL mit API-Produkten.
Nutzen Sie die Features der Oauth2-, VerifyAPIKey- und Kontingentrichtlinien wie bei REST.
GraphQL unterstützt die folgenden Nutzlasttypen:
POST von graphQL-Nutzlasten mit Content-Type : application/graphql
POST von graphQL-Nutzlasten mit Content-Type: applcation/json
GET von graphQL-Nutzlasten, bei denen die Nutzlast ein Abfrageparameter ist
Eine kurze Zusammenfassung der Optionen für die GraphQL-Richtlinie finden Sie unten im Abschnitt GraphQL-Optionen.
Weitere Informationen zu GraphQL finden Sie auf GraphQL.org.
Beispiel
Das folgende Beispiel zeigt, wie Sie ein GraphQL-Schema in Apigee hochladen und es zur Überprüfung von Anfragen mit GraphQL-Inhalten verwenden.
Schemadatei erstellen
Erstellen Sie zum Ausführen des Beispiels zuerst eine GraphQL-Schemadatei mit folgendem Inhalt:
type Query {
allPersons(last: Int): [Person!]!
}
type Mutation {
createPerson(name: String!, age: Int!): Person!
}
type Subscription {
newPerson: Person!
}
type Person {
name: String!
sex: String!
age: Int!
posts: [Post!]!
}
type Post {
title: String!
author: Person!
}
Speichern Sie die Datei mit dem gewünschten Namen, gefolgt von der Erweiterung .graphql.
GraphQL-Richtlinie in der Apigee-Benutzeroberfläche hinzufügen
Wählen Sie in der Navigationsleiste Entwickeln > API Proxies aus.
Wählen Sie in der Liste der Proxys den API-Proxy aus, für den Sie die GraphQL-Richtlinie verwenden möchten.
Klicken Sie auf den Tab DEVELOP.
Klicken Sie im linken Bereich neben dem Ordner Richtlinien auf die Schaltfläche +.
Klicken Sie im Dialogfeld Richtlinie erstellen in das Feld Richtlinientyp wählen, scrollen Sie nach unten zu Mediation und wählen Sie GraphQL.
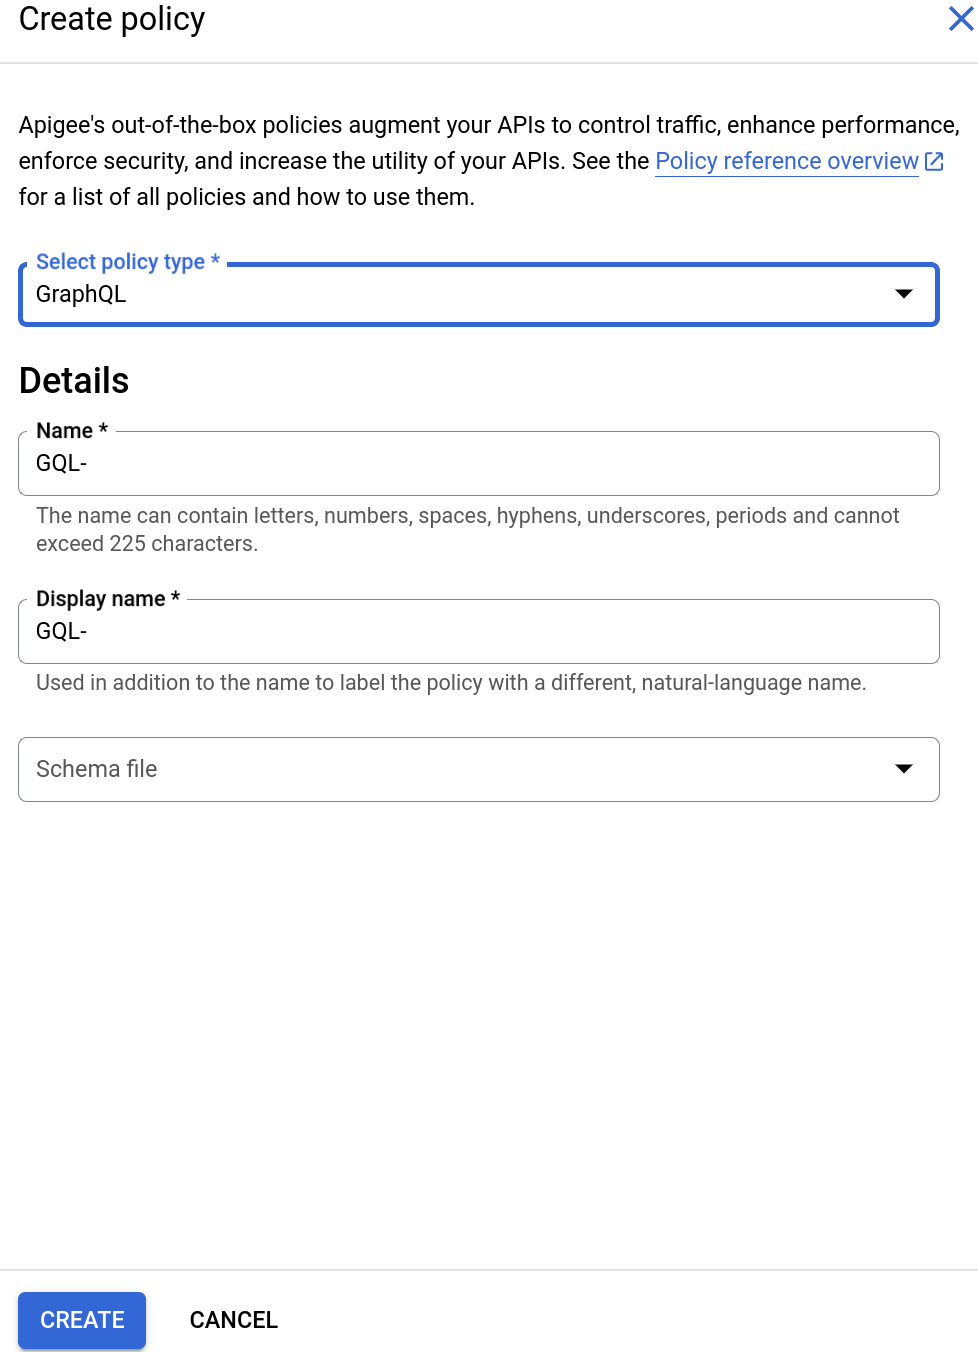
Geben Sie einen Anzeigenamen und einen Namen ein.
Wählen Sie als Nächstes eine GraphQL-Schemadatei:
Klicken Sie auf das Feld Schemadatei. Folgende Optionen sind verfügbar:
Kein Schema. Wenn Sie diese Option auswählen, verwendet Apigee kein Schema, um Anfragen zu validieren.
GraphQL-Schema importieren (.graphql)
Wählen Sie GraphQL-Schema importieren (.graphql) aus. Dadurch wird Folgendes angezeigt:
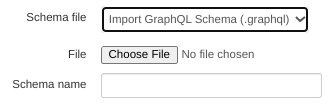
Klicken Sie auf Datei auswählen und wählen Sie die zuvor erstellte Schemadatei aus (die die Erweiterung .graphql haben muss). Die Datei wird im Feld Schemaname angezeigt.
Klicken Sie auf Erstellen, um die Richtlinie zu erstellen.
Nachdem Sie die Richtlinie GraphQL erstellt haben, können Sie sie an einen Schritt im PreFlow anhängen:
Wählen Sie im linken Bereich Proxy-Endpunkte > Standard > PreFlow:
Klicken Sie auf die Schaltfläche + neben PreFlow im Antwortbereich unten rechts im visuellen Editor:
Wählen Sie im Dialogfeld Richtlinienschritt hinzufügen die Richtlinie GQL-.
Klicken Sie auf Hinzufügen, um die Richtlinie anzuhängen.
Klicken Sie auf Speichern, um die aktuelle Überarbeitung mit Ihren Änderungen zu speichern.
Klicken Sie zum Bereitstellen der Änderungen auf den Tab Übersicht und wählen Sie Bereitstellen.
Unter GraphQL-Optionen unten finden Sie die Optionen, die Sie für die GraphQL-Richtlinie festlegen können.
Wählen Sie in der Navigationsleiste Entwickeln > API Proxies aus.
Wählen Sie in der Liste der Proxys den API-Proxy aus, für den Sie die GraphQL-Richtlinie verwenden möchten.
Klicken Sie auf den Tab DEVELOP.
Klicken Sie im Bereich Ablauf: PreFlow auf + Schritt.
Scrollen Sie im Bereich Schritt hinzufügen nach unten zum Abschnitt Vermittlung und wählen Sie GraphQL aus.
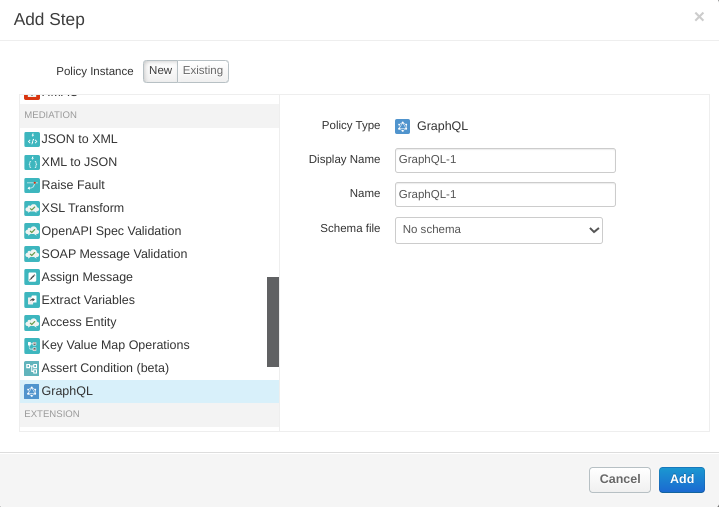
Im Bereich Schritt hinzufügen werden die folgenden Optionen angezeigt:
Anzeigename: Anzeigename der Richtlinie.
Name: Interner Name der Richtlinie.
Schemadatei: Option zum Hochladen einer Datei mit einem GraphQL-Schema, das Apigee zur Validierung von Anfragen mit GraphQL-Inhalten verwendet.
So verwenden Sie ein Schema:
Klicken Sie auf das Feld Schemadatei. Folgende Optionen sind verfügbar:
Kein Schema. Wenn Sie diese Option auswählen, verwendet Apigee kein Schema, um Anfragen zu validieren.
GraphQL-Schema importieren (.graphql)
Wählen Sie GraphQL-Schema importieren (.graphql) aus. Dadurch wird Folgendes angezeigt:
Klicken Sie auf Datei wählen und wählen Sie die
zuvor erstellte Schemadatei aus (die die Erweiterung .graphql haben muss). Die Datei wird im Feld Schemaname angezeigt.
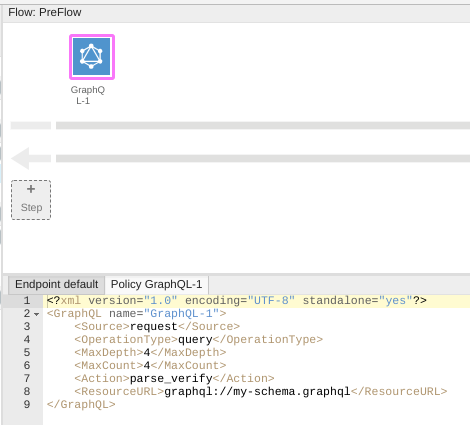
Klicken Sie auf Hinzufügen. Der Bereich Ablauf: PreFlow wird jetzt so angezeigt:
Unter GraphQL-Optionen unten finden Sie die Optionen, die Sie für die GraphQL-Richtlinie festlegen können. Lassen Sie sie in diesem Beispiel unverändert.
Klicken Sie zum Bereitstellen des Proxys auf den Tab Übersicht und wählen Sie Bereitstellen.
Jetzt können Sie die GraphQL-Richtlinie mit dem folgenden curl-Befehl testen:
Dabei ist PROXY_BASEPATH der Proxy-Basispfad und HOST_NAME der Name Ihres Proxys, einschließlich der aktuellen Überarbeitungsnummer. Wenn Sie den Befehl ausführen, validiert Apigee die Anfrage anhand des Schemas und gibt die folgende Ausgabe zurück.
OperationType: Der Vorgangstyp. Folgende Optionen sind verfügbar:
query: Das GraphQL-Äquivalent des REST-GET-Vorgangs.
mutation: Das GraphQL-Äquivalent des REST-PUT-Vorgangs.
query_mutation: Sowohl query als auch mutation.
MaxDepth: Die maximale Tiefe der Abfrage, wenn sie als Baum dargestellt wird.
Mit MaxDepth können Sie tiefe Abfragen in der Nutzlast blockieren, sodass Apigee keine sehr großen Ablaufvariablen zum Speichern der Werte erstellen muss.
Die Nutzlast wird jedoch unverändert gesendet, unabhängig vom Wert von MaxDepth.
MaxCount: Maximale Anzahl der Fragmente, die in der Nutzlast enthalten sein können.
Damit lässt sich verhindern, dass der GraphQL-Back-End-Server des Kunden hochkomplexe Abfragen ausführt. Dadurch werden Clients gezwungen, ihre Logik in kleinere Nutzlasten aufzuteilen.
Action: Eine der folgenden GraphQL-Aktionen:
parseApigee parst die GraphQL-Nutzlast in die Ablaufvariablen. Sie können dann den Inhalt der Ablaufvariablen in Richtlinien wie JavaCallout verwenden. Beachten Sie, dass parse auch die Nutzlast überprüft.
verify: Apigee prüft, ob die GraphQL-Nutzlast dem Schema entspricht, das in den Proxy hochgeladen wurde. Sie können verify verwenden, um sicherzustellen, dass Sie keine Anfragen erhalten, die nicht Ihrem Schema entsprechen. Dies kann wertvolle CPU-Zeit im Back-End sparen.
parse_verify: Parst und überprüft die Nutzlast.
ResourceURL: Der Pfad zur GraphQL-Schemadatei, mit der Apigee die GraphQL-Anfrage prüft.
[[["Leicht verständlich","easyToUnderstand","thumb-up"],["Mein Problem wurde gelöst","solvedMyProblem","thumb-up"],["Sonstiges","otherUp","thumb-up"]],[["Schwer verständlich","hardToUnderstand","thumb-down"],["Informationen oder Beispielcode falsch","incorrectInformationOrSampleCode","thumb-down"],["Benötigte Informationen/Beispiele nicht gefunden","missingTheInformationSamplesINeed","thumb-down"],["Problem mit der Übersetzung","translationIssue","thumb-down"],["Sonstiges","otherDown","thumb-down"]],["Zuletzt aktualisiert: 2025-09-03 (UTC)."],[[["\u003cp\u003eThe GraphQL policy in Apigee and Apigee hybrid allows parsing GraphQL request payloads into message flow variables, verifying requests against a GraphQL schema, or both.\u003c/p\u003e\n"],["\u003cp\u003eThis policy enables ensuring that APIs process only schema-conforming requests, setting limits on the number of fragments, and associating GraphQL with API products.\u003c/p\u003e\n"],["\u003cp\u003eApigee supports various GraphQL payload types, including POST with \u003ccode\u003eapplication/graphql\u003c/code\u003e or \u003ccode\u003eapplication/json\u003c/code\u003e, and GET with the payload as a query parameter.\u003c/p\u003e\n"],["\u003cp\u003eSchema validation is a resource-intensive operation, and only one schema per policy can be included, requiring multiple policies for multiple schemas, and the schema file needs to be uploaded during policy creation.\u003c/p\u003e\n"],["\u003cp\u003eThe GraphQL policy options include actions such as \u003ccode\u003eparse\u003c/code\u003e, \u003ccode\u003everify\u003c/code\u003e, and \u003ccode\u003eparse_verify\u003c/code\u003e, along with parameters like \u003ccode\u003eOperationType\u003c/code\u003e, \u003ccode\u003eMaxDepth\u003c/code\u003e, and \u003ccode\u003eMaxCount\u003c/code\u003e to manage GraphQL operations and payload complexity.\u003c/p\u003e\n"]]],[],null,["# Using GraphQL\n\n*This page\napplies to **Apigee** and **Apigee hybrid**.*\n\n\n*View [Apigee Edge](https://docs.apigee.com/api-platform/get-started/what-apigee-edge) documentation.*\n\nThe [GraphQL policy](/apigee/docs/api-platform/reference/policies/graphql-policy) can\nparse GraphQL request payloads into message flow\nvariables, verify the request against a GraphQL schema, or both.\n\nThe GraphQL policy can parse GraphQL payloads into message flow\nvariables, verify GraphQL requests against a schema, or both.\n\nYou can use the GraphQL policy to:\n\n- Ensure that your APIs only process requests that conform to the schema you provide.\n- Impose restrictions on the payload by setting a maximum on the number of fragments allowed.\n- Associate GraphQL with API products.\n- Leverage the Oauth2, VerifyAPIKey, and Quota policy features, just as in REST.\n\nGraphQL supports the following types of payloads:\n\n- POST of graphQL payloads with `Content-Type : application/graphql`\n- POST of graphQL payloads with `Content-Type: applcation/json`\n- GET of graphQL payloads where the payload is a query parameter\n\n| **Note:** For `application/json` payloads of the form \n|\n| ```\n| {\n| \"query\": \"...\",\n| \"operationName\": \"...\",\n| \"variables\": { \"myVariable\": \"someValue\", ... }\n| }\n| ```\n| Apigee currently ignores the optional `operationName` and `variables` fields.\n\nFor a quick summary of the options for the GraphQL policy, see [GraphQL\noptions](#graphql-options) below.\n\nTo learn more about GraphQL,\nsee [GraphQL.org](https://graphql.org/).\n\nExample\n-------\n\nThe following example shows how to upload a GraphQL schema to Apigee, and use it to\nvalidate requests with GraphQL content.\n| **Caution:** Verifying the payload against the schema is generally an expensive operation, and we recommend choosing to perform schema validation with care. Schema validation operations can be CPU intensive, especially when the payload and the schema are complex, and can result in significant latencies.\n| **Note:** You can only provide one schema per policy. If you need to include multiple schemas, add multiple GraphQL policies to your proxy.\n| **Notes:** For the classic Proxy Editor only:\n|\n| - You can only upload a GraphQL schema file when you add a GraphQL policy. You *cannot* upload it in the **Resources** pane in the Proxy Editor.\n| - After uploading a GraphQL schema file, you cannot view or edit it in the Proxy Editor.\n|\n| These limitations do not apply to the new Proxy Editor.\n\n### Create a schema file\n\nTo run the example, first create a GraphQL schema file with the following contents: \n\n```\ntype Query {\n allPersons(last: Int): [Person!]!\n}\n\ntype Mutation {\n createPerson(name: String!, age: Int!): Person!\n}\n\ntype Subscription {\n newPerson: Person!\n}\n\ntype Person {\n name: String!\n sex: String!\n age: Int!\n posts: [Post!]!\n}\n\ntype Post {\n title: String!\n author: Person!\n}\n```\n\nSave the file with whatever name you'd like to use, followed by the extension `.graphql`.\n\n### Add the GraphQL policy in the Apigee UI\n\n| **Note:** Apigee is introducing a new version of the Proxy\n| Editor, which will make it easier to manage proxies.\n|\n| The instructions in the first two tabs below explain how to\nuse either the new Proxy Editor or the classic Proxy Editor. \n\n### New Proxy Editor\n\nFirst, create the GraphQL policy as follows:\n\n1. Sign in to the [Apigee UI](https://apigee.google.com).\n2. In the navigation bar, select **Develop \\\u003e API Proxies**.\n3. In the list of proxies, select the API proxy for which you want to use the GraphQL policy.\n4. Click the **DEVELOP** tab.\n5. In the left-hand pane, click the **+** button next to the **Policies** folder.\n6. In the **Create policy** dialog, click in the **Select policy type** field and\n scroll down to **Mediation** and select\n [**GraphQL**](/apigee/docs/api-platform/reference/policies/graphql-policy).\n\n Enter a **Display name** and **Name**.\n\n Next, select a GraphQL schema file as follows:\n 1. Click the **Schema File** field. This displays the following choices:\n - **No Schema**. If you select this option, Apigee will not use a schema to validate requests.\n - **Import GraphQL schema (.graphql)**\n 2. Select **Import GraphQL schema (.graphql)**. This displays the\n following:\n\n 3. Click **Choose File** and select the schema file you created previously\n (which must have the extension `.graphql`).\n The file appears in the **Schema name** field.\n\n7. Click **Create** to create the policy.\n\nNow that you have created the **GraphQL** policy, you can attach it to a step in\nthe PreFlow:\n\n1. Select **Proxy Endpoints \\\u003e default \\\u003e PreFlow** in the left-hand pane:\n\n2. Click the **+** button next to **PreFlow** in the **Response** pane at the bottom-right of the Visual Editor:\n\n3. In the **Add policy step** dialog, select the **GQL-** policy. **Note:** This example uses the default name, **GQL** , for the GraphQL policy. You can change the name in the **DisplayName** element in the XML for the policy, by adding a descriptive phrase after **GQL-** . See [Change the policy name](/apigee/docs/api-platform/get-started/add-policy#change-the-policy-name).\n4. Click **Add** to attach the policy.\n5. Click **Save** to save the current revision with your changes.\n6. To deploy your changes, click the **Overview** tab and select **Deploy**.\n\nSee [GraphQL options](#graphql-options) below for the options you can set for\nthe GraphQL policy.\n\n### Classic Proxy Editor\n\n1. Sign in to the [Apigee UI](https://apigee.google.com).\n2. In the navigation bar, select **Develop \\\u003e API Proxies**.\n3. In the list of proxies, select the API proxy for which you want to use the GraphQL policy.\n4. Click the **DEVELOP** tab.\n5. In the **Flow: PreFlow** pane, click the **+ Step** button.\n\n6. In the **Add Step** pane, scroll down to\n the bottom of the **Mediation** section, and select **GraphQL**.\n\n The **Add Step** pane displays the following options:\n - **Display Name**: Display name of the policy.\n - **Name**: Internal name of the policy.\n - **Schema file**: Option to upload a file containing a GraphQL schema that Apigee will use to validate requests with GraphQL content.\n\n To use a schema, do the following:\n 1. Click the **Schema File** field. This displays the following choices:\n - **No Schema**. If you select this option, Apigee will not use a schema to validate requests.\n - **Import GraphQL schema (.graphql)**\n 2. Select **Import GraphQL schema (.graphql)**. This displays the\n following:\n\n 3. Click **Choose File** and select the schema file you\n [created previously](#create-a-schema-file)\n (which must have the extension `.graphql`).\n The file appears in the **Schema name** field.\n\n7. Click **Add** . The **Flow: PreFlow** pane now appears as shown below:\n\n\n See [GraphQL options](#graphql-options) below for the options you can set for\n the GraphQL policy. For this example, leave them as they are.\n8. To deploy your proxy, click the **Overview** tab and select **Deploy**.\n\n\nNow you can test the GraphQL policy with the following `curl` command: \n\n```\ncurl --location --request POST 'https://PROXY_BASEPATH/HOST_NAME' --data-raw 'query query_name {allPersons {name}}' -k\n```\n\nWhere \u003cvar translate=\"no\"\u003ePROXY_BASEPATH\u003c/var\u003e is the proxy basepath and \u003cvar translate=\"no\"\u003eHOST_NAME\u003c/var\u003e is the name of\nyour proxy, including the latest revision number. When you\nrun the command, Apigee validates the request against the schema and returns the following\noutput. \n\n```\n{\n \"query query_name {allPersons {name}}\": \"\",\n \"id\": 101\n}\n```\n\nHere's another example of a request: \n\n```\ncurl --location --request POST 'https://PROXY_BASEPATH/HOST_NAME' --data-raw 'query ilovegql {DEADBEEF}' -k\n```\n\nThis time the request validation fails with the following error message. \n\n```\n{\"fault\":{\"faultstring\":\"steps.graphQL.SchemaValidationFailed\",\"detail\":{\"errorcode\":\"steps.graphQL.SchemaValidationFailed\"}}}\n```\n\nGraphQL options\n---------------\n\nThe GraphPolicy has the following options:\n\n- `OperationType`: The operation type. The options are:\n - `query`: The GraphQL equivalent of the REST `GET` operation.\n - `mutation`: The GraphQL equivalent of the REST `PUT` operation.\n - `query_mutation`: Both `query` and `mutation`.\n- `MaxDepth`: The maximum depth of the query, when represented as a tree. `MaxDepth` allows you to block deep queries in the payload, so that Apigee does not need to create very large flow variables to hold the values. However, the payload is sent as is, regardless of the value of `MaxDepth`.\n- `MaxCount`: The maximum number of fragments that can be in the payload. You can use this to prevent the GraphQL back-end server of the customer from executing highly complex queries, forcing clients to break their logic into smaller payloads.\n- `Action`: One the following GraphQL actions:\n - `parse`Apigee parses the GraphQL payload into the flow variables. You can then use the contents of the flow variables in policies such as JavaCallout. Note that `parse` also verifies the payload.\n - `verify`: Apigee verifies that the GraphQL payload conforms to the schema uploaded to the proxy. You can use `verify` to ensure that you do not get requests that don't conform to your schema. This can save valuable CPU time in the backend.\n - `parse_verify`: Parse and verify the payload.\n- `ResourceURL`: The path to the GraphQL schema file that Apigee uses to verify the GraphQL request.\\`\n\nTo learn more about these options, see the\n[GraphQL policy reference\npage](/apigee/docs/api-platform/reference/policies/graphql-policy)."]]