This page applies to Apigee, but not to Apigee hybrid.
View
Apigee Edge documentation.

You can expand an Apigee organization across multiple regions. Multi-region expansion allows improvements in these areas:
- High availability: In case of a region failure, traffic can still be served by the remaining regions, increasing the overall availability of your APIs.
- High capacity: Additional regions provide extra capacity for serving your API traffic and room for any unexpected spike in traffic without adding much pressure on a single environment, increasing the overall capacity of your APIs.
- Low latency: Additional regions can lower the overall transaction latency for clients by serving their requests in a geographically closer region.
This document explains how to add Apigee to a new region and how to remove Apigee from a region.
Adding Apigee to a new region
You can have one runtime instance per region, so to add a new region you must create an entirely new instance in that region.
The general process for adding a new region is as follows:
- Ensure that you have an appropriate IP address range in your peering network available, as described in Prerequisites. In addition, be sure that your account can support a new region, as described in Limits.
- Define environment variables
- Create a new key ring and key
- Reserve a new address range
- Create a new instance
- Attach environments to the new instance
- Configure routing
Each of these steps is described in the sections that follow.
Prerequisites
Ensure that your network has /22 and /28 as non-overlapping IP address ranges available. This is in addition to the ranges used by other regions.
Limits
By default, your initial org is typically created with a single region. When deciding whether to create a second (or subsequent) region, note that you can only add a region if your license entitlements allow it. Optionally you can purchase an org pack.
- If you have a subscription-based pricing model, you may need to purchase additional Org units to allow expansion to multiple regions. See Subscription entitlements.
- If you have a Pay-as-you-go pricing model, expanding to multiple regions will incur additional costs, as explained in Adding regions for Pay-as-you-go.
- Eval accounts are limited to one region and cannot be expanded to a second region.
For more information, see Pay-as-you-go overview.
No organization can have more than 10 (11 for hybrid) regions.
Define environment variables
We recommend that you define the following environment variables to ensure consistency across the commands used throughout this documentation.
export NEW_REGION_LOCATION="NEW_REGION_LOCATION"export NEW_INSTANCE_NAME="NEW_INSTANCE_NAME"export NETWORK_NAME"=NETWORK_NAME"export DISK_KEY_RING_NAME="YOUR_DISK_KEY_RING_NAME"export DISK_KEY_NAME="YOUR_DISK_KEY_NAME"export PROJECT_ID=YOUR_PROJECT_IDexport AUTH="Authorization: Bearer $(gcloud auth print-access-token)"export PROJECT_NUMBER=$(gcloud projects describe $PROJECT_ID --format="value(projectNumber)")
Where:
NEW_REGION_LOCATIONis the physical location of your new instance. Valid values are any Compute Engine region. For more information, see Regions and zones. For example,us-west1.NEW_INSTANCE_NAMEis the name of the new region. It must be unique for your organization. For example,my-instance-2.NETWORK_NAMEis the name of your organization's peering network. For example,my-network. See Configure service networking.DISK_KEY_RING_NAMEis a name for the disk key ring.DISK_KEY_NAMEis a name for the disk ring.AUTHdefines theAuthenticationheader with a bearer token. You will use this header when calling Apigee APIs. Note that the token expires after a period of time and when it does, you can simply regenerate it using the same command. For more information, see the reference page for the print-access-token command.PROJECT_IDis your Cloud project ID.PROJECT_NUMBERis the Cloud project number for your Cloud project.
Create a new key ring and key
Each region requires its own disk encryption key for the network. Google recommends that you also create a separate key ring for the new region. You do not need to create a new database encryption key because all instances in an organization share the same database encryption key.
For additional details, see About the Apigee encryption keys.
To create a new disk encryption key ring and key:
- Create a new disk key ring using the
gcloudcommand:gcloud kms keyrings create $DISK_KEY_RING_NAME \ --location $NEW_REGION_LOCATION \ --project $PROJECT_ID
Verify that disk key ring is set to the same location as the instance. Each instance and key ring should have its own location.
gcloud kms keyrings list \
  --location $NEW_REGION_LOCATION \
  --project $PROJECT_ID
gcloud kms keyrings describe $DISK_KEY_RING_NAME \
  --location $NEW_REGION_LOCATION \
  --project $PROJECT_ID
- Create a new disk key using the
kms keys createcommand; for example:gcloud kms keys create $DISK_KEY_NAME --keyring $DISK_KEY_RING_NAME \ --location $NEW_REGION_LOCATION --purpose "encryption" --project $PROJECT_ID
The key can be referenced by its key path. You can get the key path with the following command:
gcloud kms keys list \
  --location=$NEW_REGION_LOCATION \
  --keyring=$DISK_KEY_RING_NAME \
  --project=$PROJECT_ID
The key path looks like the following:
projects/PROJECT_ID/locations/NEW_REGION_LOCATION/keyRings/my-disk-key-ring/cryptoKeys/my-disk-key
- Grant access for the Apigee Service Agent to use the new key by executing the
gcloud kms keys add-iam-policy-bindingcommand; for example:gcloud kms keys add-iam-policy-binding $DISK_KEY_NAME \ --location $NEW_REGION_LOCATION \ --keyring $DISK_KEY_RING_NAME \ --member serviceAccount:service-$PROJECT_NUMBER@gcp-sa-apigee.iam.gserviceaccount.com \ --role roles/cloudkms.cryptoKeyEncrypterDecrypter \ --project $PROJECT_ID
Verify that the key is bound to the Apigee Service Agent.
gcloud kms keys get-iam-policy $DISK_KEY_NAME \
  --keyring $DISK_KEY_RING_NAME \
  --location $NEW_REGION_LOCATION \
  --project $PROJECT_ID
gcloud kms keys describe $DISK_KEY_NAME \
  --keyring $DISK_KEY_RING_NAME \
  --location $NEW_REGION_LOCATION \
  --project $PROJECT_ID
Reserve a new address range
Reserve IP addresses for your peering network's address range. For more information and important considerations, see also Understanding peering ranges.
- Create these environment variables:
export NEW_RANGE_NAME_22=YOUR_CIDR_22_RANGE_NAME
export NEW_RANGE_NAME_28=YOUR_CIDR_28_RANGE_NAMEexport NETWORK_NAME=YOUR_NETWORK_NAMEWhere:
NEW_RANGE_NAME_22is the name of the IP address range of CIDR length /22 you will create. You can name the range anything you want. For example:google-svcs-new_22NEW_RANGE_NAME_28is the name of the IP address range of CIDR length /28 you will create. You can name the range anything you want. For example:google-svcs-new_28NETWORK_NAMEis the name of the network resource in which the addresses should be reserved.Google creates a default network (named
default) for each new project, so you can use that. However, Google does not recommend using the default network for anything other than testing.
- Create a network IP range with a CIDR length of /22:
gcloud compute addresses create $NEW_RANGE_NAME_22 \
  --global \
  --prefix-length=22 \
  --description="Peering range for Apigee services" \
  --network=$NETWORK_NAME \
  --purpose=VPC_PEERING \
  --project=$PROJECT_ID
On success,
gcloudresponds with the following:Created [https://www.googleapis.com/compute/v1/projects/PROJECT_NAME/global/addresses/google-svcs-new].
Validate the created compute address:
gcloud compute addresses list \
  --global \
  --project=$PROJECT_ID
gcloud compute addresses describe $NEW_RANGE_NAME_22 \
  --global \
  --project=$PROJECT_ID
After you create a range of IP addresses, the addresses are associated with the project until you release them.
- Create a network IP range with a CIDR length of /28. This range is required and is used by Apigee for troubleshooting purposes and cannot be customized or changed.
gcloud compute addresses create $NEW_RANGE_NAME_28 \
  --global \
  --prefix-length=28 \
  --description="Peering range for supporting Apigee services" \
  --network=$NETWORK_NAME \
  --purpose=VPC_PEERING \
  --project=$PROJECT_ID
- Get the names of the peering ranges:
gcloud services vpc-peerings list \ --network=$NETWORK_NAME \ --project=$PROJECT_ID
- Add the newly reserved ranges to your peered network with the following command where
$NEW_RANGE_NAME_22and$NEW_RANGE_NAME_28are the new range names and ORIGINAL_RANGE_NAME_1 and ORIGINAL_RANGE_NAME_n are the reserved peering range names returned in the previous command:gcloud services vpc-peerings update --service=servicenetworking.googleapis.com \ --network=$NETWORK_NAME \ --ranges=$NEW_RANGE_NAME_22,$NEW_RANGE_NAME_28,ORIGINAL_RANGE_NAME_1,ORIGINAL_RANGE_NAME_n \ --project=$PROJECT_ID
Validate the created compute address:
gcloud compute addresses list \
  --global \
  --project=$PROJECT_ID
 gcloud compute addresses describe $NEW_RANGE_NAME_28 \
  --global \
  --project=$PROJECT_ID
Validate the vpc-peering changes that have been updated:
gcloud services vpc-peerings list \
  --network=$NETWORK_NAME \
  --project=$PROJECT_ID
Create a new instance
Create a new instance for the region using the Instances API.
With VPC-peering
If Apigee was set up to use VPC peering, use this API call to create the instance:
curl -X POST -H "$AUTH" \
  -H "Content-Type: application/json" \
  "https://apigee.googleapis.com/v1/organizations/$PROJECT_ID/instances" \
  -d '{
    "name":"'"$NEW_INSTANCE_NAME"'",
    "location":"'"$NEW_REGION_LOCATION"'",
    "diskEncryptionKeyName":"KEY_PATH",
    "ipRange":"IP_ADDRESS_1/28, IP_ADDRESS_2/22"  # OPTIONAL
  }'
Where:
- KEY_PATH is the disk encryption key's key path that you created in Create a new key ring and key.
- IP_ADDRESS_* are CIDR IP addresses for the /22 and /28 CIDR ranges used to
create the Apigee instance. Note that
ipRangeis optional. If you do not provide this field, Apigee automatically requests an available /22 and /28 CIDR block from Service Networking. See also Apigee instances API.
This request can take up to 20 minutes to complete because Apigee must create and launch a new Kubernetes cluster, install the Apigee resources on that cluster, and set up load balancing.
Without VPC-peering
If Apigee was not set up to use VPC peering, use this API call to create the instance:
curl -X POST -H "$AUTH" \
  -H "Content-Type:application/json" \
  "https://apigee.googleapis.com/v1/organizations/$PROJECT_ID/instances" \
  -d '{
    "name":"'"$INSTANCE_NAME"'",
    "location":"'"$RUNTIME_LOCATION"'",
    "diskEncryptionKeyName":"'"KEY_PATH"'",
    "consumerAcceptList":[ARRAY_OF_PROJECT_IDS]
  }'
Where:
- KEY_PATH is the disk encryption key's key path that you created in Create a new key ring and key. See also Apigee instances API.
-
consumerAcceptList(Optional) Specifies a list of Google Cloud project IDs that can privately connect to the Apigee VPC's service attachment. Service attachment is an entity used with Google Cloud Private Service Connect to allow service producers (in this case, Apigee) to expose services to consumers (in this case, one or more Cloud projects that you own). By default, we use the Cloud project that is already associated with your Apigee organization. For example: "consumerAcceptList": ["project1", "project2", "project3"]
This request can take up to 20 minutes to complete because Apigee must create and launch a new Kubernetes cluster, install the Apigee resources on that cluster, and set up load balancing.
timer The create instance operation takes approximately 30 minutes to complete.
To check the status of your runtime instance creation request, execute the following command. When the state is ACTIVE, you can go on to the next step.
curl -i -X GET -H "$AUTH" \
  "https://apigee.googleapis.com/v1/organizations/$PROJECT_ID/instances/$NEW_INSTANCE_NAME"
For more details about creating a runtime instance, including additional context and troubleshooting information, see Step 5: Create an Apigee runtime instance.
Attach environments to the new instance
After creating the instance, you must attach environments to it, otherwise it cannot respond to API requests.
Environments are shared across instances; therefore, you should attach
existing environments to the new region. You do not define new
environments for the new region. If you define a new environment for the
new region which is serving the same basepaths for the same hosts as your
original environment, your runtime calls may return HTTP 503
errors.
When you populate a new region with environments, you do not need to attach the environments to environment groups: they are already attached to their groups. You need only attach the environments to the new instance.
To attach your environments to the new region, use the Instances attachment API as the following example shows:
curl -X POST -H "$AUTH" \
  -H "Content-Type: application/json" \
  https://apigee.googleapis.com/v1/organizations/$PROJECT_ID/instances/$NEW_INSTANCE_NAME/attachments \
  -d '{
    "environment":"ENVIRONMENT_NAME"
  }'
To get a list of your environments:
curl -i -X GET -H "$AUTH" \
  "https://apigee.googleapis.com/v1/organizations/$PROJECT_ID/environments"
You must attach each environment with a separate call to the Instances Attachment API. You cannot attach more than one environment in a single call.
Configure routing
You can configure network routing in the new region using either a managed instance group (MIG) or a Private Service Connect (PSC) based configuration.
Configure PSC routing
The following steps explain how to configure routing in the new region using PSC.
Overview
The following figure shows the high-level, northbound architecture for multi-region PSC:
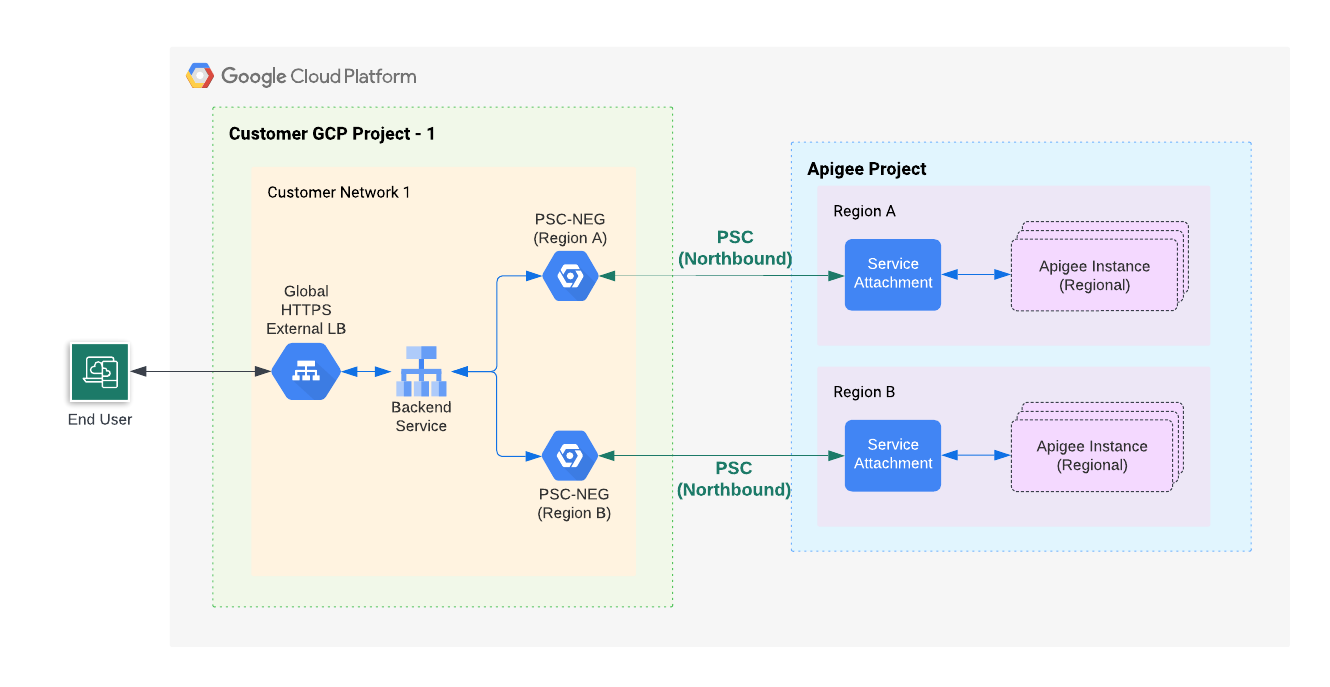
As Figure 1 illustrates, you will create a network endpoint group (NEG) in your project that communicates with a service attachment in the region where the new Apigee instance resides. The Apigee NEGs for all regions are connected to your Apigee production global external load balancer's backend service.
Create a network endpoint group for the new region
Follow these steps to create and configure a load balancer with a network endpoint group (NEG) for the new region:
- Create a new NEG:
- Get the service attachment from the instance you created previously:
curl -i -X GET -H "$AUTH" \
  "https://apigee.googleapis.com/v1/organizations/$PROJECT_ID/instances"
In the following sample output, the
serviceAttachmentvalue is shown in bold type:{ "instances": [ { "name": "us-west1", "location": "us-west1", "host": "10.82.192.2", "port": "443", "createdAt": "1645731488019", "lastModifiedAt": "1646504754219", "diskEncryptionKeyName": "projects/my-project/locations/us-west1/keyRings/us-west1/cryptoKeys/dek", "state": "ACTIVE", "peeringCidrRange": "SLASH_22", "runtimeVersion": "1-7-0-20220228-190814", "ipRange": "10.82.192.0/22,10.82.196.0/28", "consumerAcceptList": [ "875609189304" ], "serviceAttachment": "projects/bfac7497a40c32a12p-tp/regions/us-west1/serviceAttachments/apigee-us-west1-crw7" } ] }
Create a NEG that points to the service attachment that you obtained from the instance response body in the previous step.
gcloud compute network-endpoint-groups create NEG_NAME \
  --network-endpoint-type=private-service-connect \
  --psc-target-service=TARGET_SERVICE \
  --region=$NEW_REGION_LOCATION \
  --network=NETWORK_NAME \
  --subnet=SUBNET_NAME \
  --project=PROJECT_ID
Replace the following:
- NEG_NAME: a name for the network endpoint group.
- TARGET_SERVICE: the service attachment that you want to
connect to. For example:
projects/bfac7497a40c32a12p-tp/regions/us-west1/serviceAttachments/apigee-us-west1-crw7 - NETWORK_NAME: (Optional) Name of the network in which the NEG is created. If you omit
this parameter, the
defaultproject network is used. - SUBNET_NAME: Name of the subnet used for private connectivity to the producer. The subnet size can be small: the PSC NEG only needs one IP from the subnet. For Apigee, only one PSC NEG is needed per region. The subnet can be shared and used by VMs or other entities. If a subnet is not specified, network endpoints may belong to any subnetwork in the region where the network endpoint group is created.
- PROJECT_ID The Cloud project that is already associated with your Apigee organization, or a Cloud project included
in the
consumerAcceptlistwhen the Apigee runtime instance was created.
- Get the service attachment from the instance you created previously:
- Get the name of the backend service for your production Apigee load balancer:
gcloud compute backend-services list --project=$PROJECT_ID
- Add the NEG as the backend to the backend service:
gcloud compute backend-services add-backend BACKEND_SERVICE_NAME \
  --network-endpoint-group=NEG_NAME \
  --network-endpoint-group-region=$NEW_REGION_LOCATION \
  --global --project=$PROJECT_ID
Replace the following:
- BACKEND_SERVICE_NAME: The name of the backend service.
- NEG_NAME: The name of the network endpoint group.
- (Optional) You can set an outlier detection traffic policy on the backend service for handling failover scenarios automatically. See the following for more information:
Test the final setup
Call an API proxy. See Deploy a sample proxy.
Configure MIG routing
The following steps explain how to configure routing in the new region using a managed instance group (MIG).
Overview
The following figure shows the high-level, northbound architecture for multi-region using managed instance groups (MIGs):
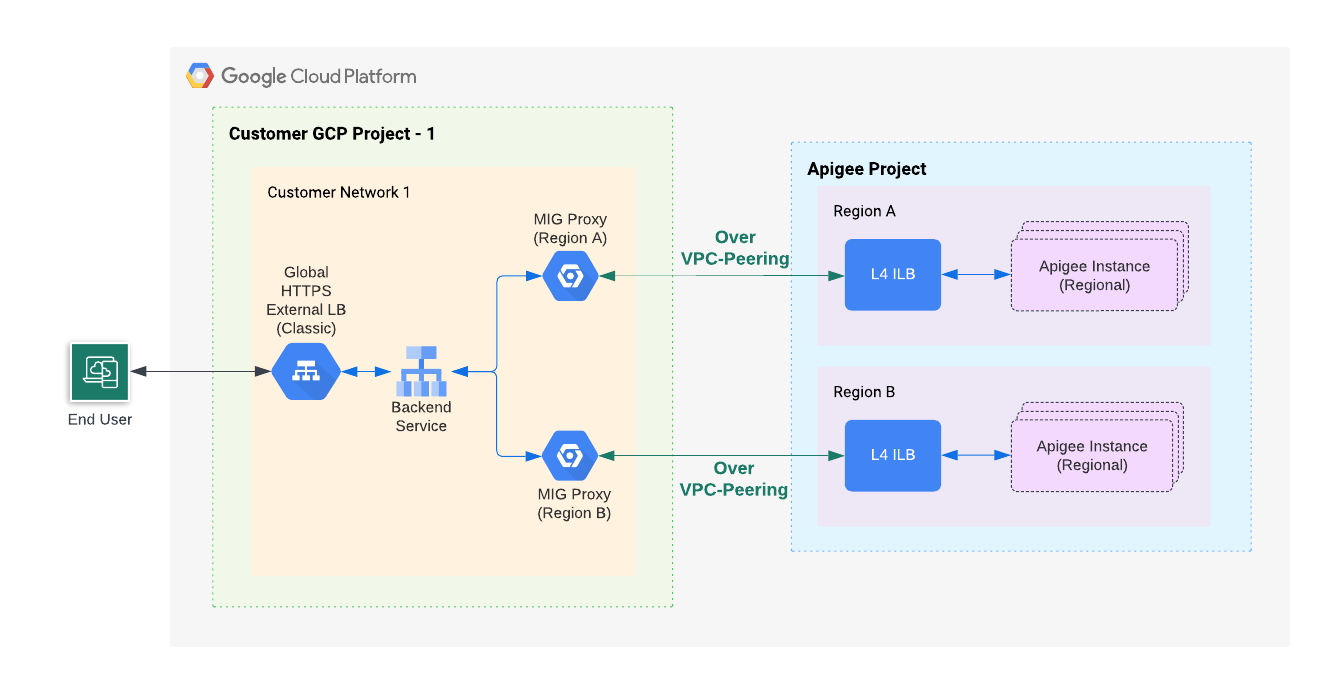
As Figure 2 illustrates, you will create a MIG in your project to communicate with a load balancer deployed in the region where the new Apigee instance resides. The MIG proxies for all regions are connected to your Apigee production global external load balancer's backend.
Create a managed instance group (MIG) for the new region
Follow these steps to create and configure a MIG for the new region:
Enable Private Google Access for a subnet of your VPC network.
To enable Private Google Access for a subnet of your VPC network, follow the steps listed in Enabling Private Google Access.
Set up environment variables:
The instructions in this section use environment variables to refer to repeatedly used strings. We recommend that you set these before continuing:
MIG_NAME=YOUR_MIG_NAME
VPC_NAME=YOUR_VPC_NAME # If you are using a shared VPC, use the shared VPC nameVPC_SUBNET=YOUR_SUBNET_NAME # Private Google Access must be enabled for this subnetNEW_REGION_LOCATION=YOUR_NEW_REGION # The same region as your new Apigee runtime instanceAPIGEE_ENDPOINT=APIGEE_INSTANCE_IP# See the tip below for details on getting this IP address value- Create a managed instance group. In this step, you create and configure a managed instance group (MIG).
- Create an instance template by executing the following command.
gcloud compute instance-templates create $MIG_NAME \
  --project $PROJECT_ID \
  --region $NEW_REGION_LOCATION \
  --network $VPC_NAME \
  --subnet $VPC_SUBNET \
  --tags=https-server,apigee-mig-proxy,gke-apigee-proxy \
  --machine-type e2-medium --image-family debian-12 \
  --image-project debian-cloud --boot-disk-size 20GB \
  --no-address \
  --metadata ENDPOINT=$APIGEE_ENDPOINT,startup-script-url=gs://apigee-5g-saas/apigee-envoy-proxy-release/latest/conf/startup-script.sh
As you can see from this command, machines are of type
e2-medium. They run Debian 12 and have 20GB of disk. Thestartup-script.shscript configures the MIG to route inbound traffic from the load balancer to the Apigee instance. - Create a managed instance group by executing the following command:
gcloud compute instance-groups managed create $MIG_NAME \
  --project $PROJECT_ID --base-instance-name apigee-mig \
  --size 2 --template $MIG_NAME --region $NEW_REGION_LOCATION
- Configure autoscaling for the group by executing the following command:
gcloud compute instance-groups managed set-autoscaling $MIG_NAME \
  --project $PROJECT_ID --region $NEW_REGION_LOCATION --max-num-replicas 3 \
  --target-cpu-utilization 0.75 --cool-down-period 90
- Define a named port by executing the following command:
gcloud compute instance-groups managed set-named-ports $MIG_NAME \
  --project $PROJECT_ID --region $NEW_REGION_LOCATION --named-ports https:443
- Create an instance template by executing the following command.
- Get the name of the backend service for your production Apigee load balancer:
gcloud compute backend-services list --project=$PROJECT_ID
- Add the MIG to your backend service with the following command:
gcloud compute backend-services add-backend BACKEND_SERVICE_NAME \
  --project $PROJECT_ID --instance-group $MIG_NAME \
  --instance-group-region $NEW_REGION_LOCATION \
  --balancing-mode UTILIZATION --max-utilization 0.8 --global
Replace BACKEND_SERVICE_NAME with the name of the backend service.
Test the final setup
Call an API proxy. See Deploy a sample proxy.
Adding regions
Adding multiple regions to an Apigee environment can provide high availability, higher capacity, and lower latency for your APIs. A multi-region deployment supports high availability because manual failover is not needed as the XLB will health check each region. Higher capacity is provided when multiple regions are serving the same APIs at the same time. In addition, if your API clients are in multiple regions, having your API served from a region closer to your clients will help lower latency and improve performance.
Example: A multi-region deployment improves availability, capacity, and latency
In an active-active multi-region deployment, traffic is served out of two regions at the same time. You add a backend service for each region's MIG to the same External HTTPS Load Balancer (XLB), as explained in Step 8e(3) under the External routing (MIG) tab in the Step 8: Configure routing section. For more information, see also Create a managed instance group (MIG) for the new region.
For each request, the XLB will choose the region closest to the client, unless the number of requests exceeds the limit set for a particular backend. See Application Capacity Optimizations with Global Load Balancing for more information about how external load balancers route traffic.
Adding regions for Pay-as-you-go
With the Pay-as-you-go pricing model, you can set the minimum number of Apigee gateway nodes for an environment. This makes it possible to ensure that regions always run with extra capacity to immediately support failover traffic, in the event of a region failure.
Setting the minimum number of Apigee gateway nodes
If you are able to serve all of your normal API traffic out of 2 active regions, each with 4 Apigee gateway nodes, then each region should have a minimum of 8 nodes each. This is to immediately support the loss of one region. See About Apigee nodes for more information on determining the number of nodes you need to handle your API traffic. Note that the minimum number of nodes is set per environment, but enforced per region. For example, if you set the minimum to 8, then each region will have a minimum of 8 nodes.
Cost
In the above example, you would incur the cost of running at least 16 Apigee gateway nodes (8 nodes x 2 regions). The cost may increase as node numbers automatically increase to handle additional traffic, up to the maximum.
Removing Apigee from a region
To decommission an Apigee instance from serving API traffic, follow these steps to ensure uninterrupted service (zero downtime for your APIs):
- Enable connection draining on the backend service. Connection draining is a process that ensures that existing, in-progress requests are given time to complete when a backend is removed from the backend-service.
- If Cloud DNS has been configured to route the traffic to this Apigee region through the weighted round-robin routing policy, remove that DNS configuration, as described in Manage DNS routing policies and health checks.
- Detach the MIG backend from the backend-service. This, along with connection draining, will ensure that the Apigee instance does not receive any new traffic, but allows any in-flight requests to be completed.
- Delete the Apigee Instance and its corresponding MIG. See Delete an instance.