This document introduces concepts, principles, terminology, and architecture of near-zero downtime database migration for cloud architects who are migrating databases to Google Cloud from on-premises or other cloud environments.
This document is part 1 of two parts. Part 2 discusses setting up and executing the migration process, including failure scenarios.
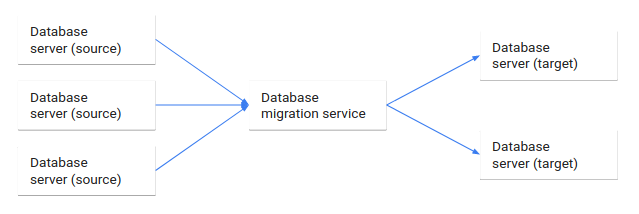
Database migration is the process of migrating data from one or more source databases to one or more target databases by using a database migration service. When a migration is finished, the dataset in the source databases resides fully, though possibly restructured, in the target databases. Clients that accessed the source databases are then switched over to the target databases, and the source databases are turned down.
The following diagram illustrates this database migration process.
This document describes database migration from an architectural standpoint:
- The services and technologies involved in database migration.
- The differences between homogeneous and heterogeneous database migration.
- The tradeoffs and selection of a migration downtime tolerance.
- A setup architecture that supports a fallback if unforeseen errors occur during a migration.
This document does not describe how you set up a particular database migration technology. Rather, it introduces database migration in fundamental, conceptual, and principle terms.
Architecture
The following diagram shows a generic database migration architecture.
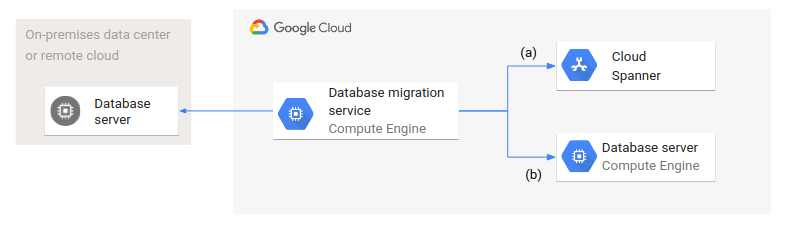
A database migration service runs within Google Cloud and accesses both source and target databases. Two variants are represented: (a) shows the migration from a source database in an on-premises data center or a remote cloud to a managed database like Spanner; (b) shows a migration to a database on Compute Engine.
Even though the target databases are different in type (managed and unmanaged) and setup, the database migration architecture and configuration is the same for both cases.
Terminology
The most important data migration terms for these documents are defined as follows:
source database: A database that contains data to be migrated to one or more target databases.
target database: A database that receives data migrated from one or more source databases.
database migration: A migration of data from source databases to target databases with the goal of turning down the source database systems after the migration completes. The entire dataset, or a subset, is migrated.
homogeneous migration: A migration from source databases to target databases where the source and target databases are of the same database management system from the same provider.
heterogeneous migration: A migration from source databases to target databases where the source and target databases are of different database management systems from different providers.
database migration system: A software system or service that connects to source databases and target databases and performs data migrations from source to target databases.
data migration process: A configured or implemented process executed by the data migration system to transfer data from source to target databases, possibly transforming the data during the transfer.
database replication: A continuous transfer of data from source databases to target databases without the goal of turning down the source databases. Database replication (sometimes called database streaming) is an ongoing process.
Classification of database migrations
There are different types of database migrations that belong to different classes. This section describes the criteria that defines those classes.
Replication versus migration
In a database migration, you move data from source databases to target databases. After the data is completely migrated, you delete source databases and redirect client access to the target databases. Sometimes you keep the source databases as a fallback measure if you encounter unforeseen issues with the target databases. However, after the target databases are reliably operating, you eventually delete the source databases.
With database replication, in contrast, you continuously transfer data from the source databases to the target databases without deleting the source databases. Sometimes database replication is referred to as database streaming. While there is a defined starting time, there is typically no defined completion time. The replication might be stopped or become a migration.
This document discusses only database migration.
Partial versus complete migration
Database migration is understood to be a complete and consistent transfer of data. You define the initial dataset to be transferred as either a complete database or a partial database (a subset of the data in a database) plus every change committed on the source database system thereafter.
Heterogeneous migration versus homogeneous migration
A homogeneous database migration is a migration between the source and target databases of the same database technology, for example, migrating from a MySQL database to a MySQL database, or from an Oracle® database to an Oracle database. Homogeneous migrations also include migrations between a self-hosted database system such as PostgreSQL to a managed version of it such as Cloud SQL for PostgreSQL or AlloyDB for PostgreSQL.
In a homogenous database migration, the schemas for the source and target databases are likely identical. If the schemas are different, the data from the source databases must be transformed during migration.
Heterogeneous database migration is a migration between source and target databases of different database technologies, for example, from an Oracle database to Spanner. Heterogeneous database migration can be between the same data models (for example, from relational to relational), or between different data models (for example, from relational to key-value).
Migrating between different database technologies doesn't necessarily involve different data models. For example, Oracle, MySQL, PostgreSQL, and Spanner all support the relational data model. However, multi-model databases like Oracle, MySQL, or PostgreSQL support different data models. Data stored as JSON documents in a multi-model database can be migrated to MongoDB with little or no transformation necessary, as the data model is the same in the source and the target database.
Although the distinction between homogeneous and heterogeneous migration is based on database technologies, an alternative categorization is based on database models involved. For example, a migration from an Oracle database to Spanner is homogeneous when both use the relational data model; a migration is heterogeneous if, for example, data stored as JSON objects in Oracle is migrated to a relational model in Spanner.
Categorizing migrations by data model more accurately expresses the complexity and effort required to migrate the data than basing the categorization on the database system involved. However, because the commonly used categorization in the industry is based on the database systems involved, the remaining sections are based on that distinction.
Migration downtime: zero versus minimal versus significant
After you successfully migrate a dataset from the source to the target database, you then switch client access over to the target database and delete the source database.
Switching clients from the source databases to the target databases involves several processes:
- To continue processing, clients must close existing connections to the source databases and create new connections to the target databases. Ideally, closing connections is graceful, meaning that you don't unnecessarily roll back ongoing transactions.
- After closing connections on the source databases, you must migrate remaining changes from the source databases to the target databases (called draining) to ensure that all changes are captured.
- You might need to test target databases to ensure that these databases are functional and that clients are functional and operate within their defined service level objectives (SLOs).
In a migration, achieving truly zero downtime for clients is impossible; there are times when clients cannot process requests. However, you can minimize the duration that clients are unable to process requests in several ways (near-zero downtime):
- You can start your test clients in read-only mode against the target databases long before you switch the clients over. With this approach, testing is concurrent with the migration.
- You can configure the amount of data being migrated (that is, in flight between the source and target databases) to be as small as possible when the switch over period approaches. This step reduces the time for draining because there are fewer differences between the source databases and the target databases.
- If new clients operating on the target databases can be started concurrently with existing clients operating on the source databases, you can shorten the switch over time because the new clients are ready to execute as soon as all data is drained.
While it's unrealistic to achieve zero downtime during a switch over, you can minimize the downtime by starting activities concurrently with the ongoing data migration when possible.
In some database migration scenarios, significant downtime is acceptable. Typically, this allowance is a result of business requirements. In such cases, you can simplify your approach. For example, with a homogeneous database migration, you might not require data modification; export and import or backup and restore are perfect approaches. With heterogeneous migrations, the database migration system does not have to deal with updates of source database systems during the migration.
However, you need to establish that the acceptable downtime is long enough for the database migration and follow-up testing to occur. If this downtime cannot be clearly established or is unacceptably long, you need to plan a migration that involves minimal downtime.
Database migration cardinality
In many situations database migration takes place between a single source database and a single target database. In such situations, the cardinality is 1:1 (direct mapping). That is, a source database is migrated without changes to a target database.
A direct mapping, however, is not the only possibility. Other cardinalities include the following:
- Consolidation (n:1). In a consolidation, you migrate data from several source databases to a smaller number of target databases (or even one target). You might use this approach to simplify database management or employ a target database that can scale.
- Distribution (1:n). In a distribution, you migrate data from one source database to several target databases. For example, you might use this approach when you need to migrate a large centralized database containing regional data to several regional target databases.
- Re-distribution (n:m). In a re-distribution, you migrate data from several source databases to several target databases. You might use this approach when you have sharded source databases with shards of very different sizes. The re-distribution evenly distributes the sharded data over several target databases that represent the shards.
Database migration provides an opportunity to redesign and implement your database architecture in addition to merely migrating data.
Migration consistency
The expectation is that a database migration is consistent. In the context of migration, consistent means the following:
- Complete. All data that is specified to be migrated is actually migrated. The specified data could be all data in a source database or a subset of the data.
- Duplicate free. Each piece of data is migrated once, and only once. No duplicate data is introduced into the target database.
- Ordered. The data changes in the source database are applied to the target database in the same order as the changes occurred in the source database. This aspect is essential to ensure data consistency.
An alternative way to describe migration consistency is that after a migration completes, the data state between the source and the target databases is equivalent. For example, in a homogenous migration that involves the direct mapping of a relational database, the same tables and rows must exist in the source and the target databases.
This alternative way of describing migration consistency is important because not all data migrations are based on sequentially applying transactions in the source database to the target database. For example, you might back up the source database and use the backup to restore the source database content into the target database (when significant downtime is possible).
Active-passive versus active-active migration
An important distinction is whether the source and target databases are both open to modifying query processing. In an active-passive database migration, the source databases can be modified during the migration, while the target databases allow only read-only access.
An active-active migration supports clients writing into both the source as well as the target databases during the migration. In this type of migration, conflicts can occur. For example, if the same data item in the source and target database is modified so as to conflict with each other semantically, you might need to run conflict resolution rules to resolve the conflict.
In an active-active migration, you must be able to resolve all data conflicts by using conflict resolution rules. If you cannot, you might experience data inconsistency.
Database migration architecture
A database migration architecture describes the various components required for executing a database migration. This section introduces a generic deployment architecture and treats the database migration system as a separate component. It also discusses the features of a database management system that support data migration as well as non-functional properties that are important for many use cases.
Deployment architecture
A database migration can occur between source and target databases located in any environment, like on-premises or different clouds. Each source and target database can be in a different environment; it is not necessary that all are collocated in the same environment.
The following diagram shows an example of a deployment architecture involving several environments.
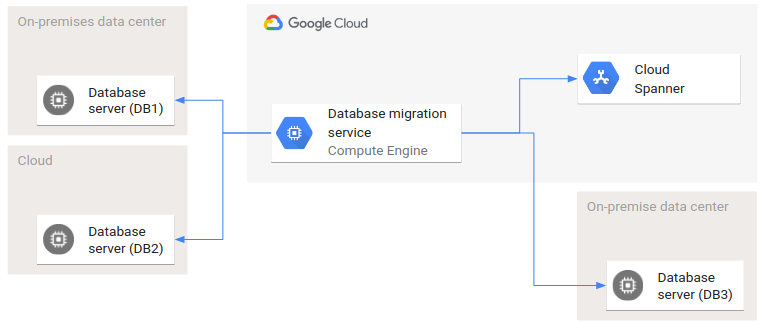
DB1 and DB2 are two source databases, and DB3 and Spanner are the target databases. Two clouds and two on-premises data centers are involved in this database migration. The arrows represent the invocation relationships: the database migration service invokes interfaces of all source and target databases.
A special case not discussed here is the migration of data from a database into the same database. This special case uses the database migration system for data transformation only, not for migrating data between different systems across different environments.
Fundamentally, there are three approaches to database migration, which this section discusses:
- Using a database migration system
- Using database management system replication functionality
- Using custom database migration functionality
Database migration system
The database migration system is at the core of database migration. The system executes the actual data extraction from the source databases, transports the data to the target databases, and optionally modifies the data during transit. This section discusses the basic database migration system functionality in general. Examples of database migration systems include Database Migration Service, Striim, Debezium, tcVision and Cloud Data Fusion.
Data migration process
The core technical building block of a database migration system is the data migration process. The data migration process is specified by a developer and defines the source databases from which data is extracted, the target databases into which data is migrated, and any data modification logic applied to the data during the migration.
You can specify one or more data migration processes and execute them sequentially or concurrently depending on the needs of the migration. For example, if you migrate independent databases, the corresponding data migration processes can run in parallel.
Data extraction and insertion
You can detect changes (insertions, updates, deletions) in a database system in two ways: database-supported change data capture (CDC) based on a transaction log, and differential querying of data itself using the query interface of a database management system.
CDC based on a transaction log
Database-supported CDC is based on database management features that are separate from the query interface. One approach is based on transaction logs (for example the binary log in MySQL). A transaction log contains the changes made to data in the correct order. The transaction log is continuously read, and so every change can be observed. For database migration, this logging is extremely useful, as CDC ensures that each change is visible and is subsequently migrated to the target database without loss and in the correct order.
CDC is the preferred approach for capturing changes in a database management system. CDC is built into the database itself and has the least load impact on the system.
Differential querying
If no database management system feature exists that supports observing all changes in the correct order, you can use differential querying as an alternative. In this approach, each data item in a database gets an additional attribute that contains a timestamp or a sequence number. Every time the data item is changed, the change timestamp is added or the sequence number is increased. A polling algorithm reads all data items since the last time it executed or since the last sequence number it used. Once the polling algorithm determines the changes, it records the current time or sequence number into its internal state and then passes on the changes to the target database.
While this approach works without problems for inserts and updates, you need to carefully design deletes because a delete removes a data item from the database. After the data is deleted, it is impossible for the poller to detect that a deletion occurred. You implement a deletion by using an additional status field (a logical delete flag) that indicates the data is deleted. Alternatively, deleted data items can be collected into one or more tables, and the poller accesses those tables to determine if deletion occurred.
For variants on differential querying, see Change data capture.
Differential querying is the least preferred approach because it involves schema and functionality changes. Querying the database also adds a query load that does not relate to executing client logic.
Adapter and agent
The database migration system requires access to the source and to the database systems. Adapters are the abstraction that encapsulates the access functionality. In the simplest form, an adapter can be a JDBC driver for inserting data into a target database that supports JDBC. In a more complex case, an adapter is running in the environment of the target (sometimes called agent), accessing a built-in database interface like log files. In an even more complex case an adapter or agent interfaces with yet another software system, which in turn accesses the database. For example, an agent accesses Oracle GoldenGate, and that in turn accesses an Oracle database.
The adapter or agent that accesses a source database implements the CDC interface or the differential querying interface, depending on the design of the database system. In both cases, the adapter or agent provides changes to the database migration system, and the database migration system is unaware if the changes were captured by CDC or differential querying.
Data modification
In some use cases, data is migrated from source databases to target databases unmodified. These straight-through migrations are typically homogeneous.
Many use cases, however, require data to be modified during the migration process. Typically, modification is required when there are differences in schema, differences in data values, or opportunities to clean up data while it is in transition.
The following sections discuss several types of modifications that can be required in a data migration—data transformation, data enrichment or correlation, and data reduction or filtering.
Data transformation
Data transformation transforms some or all data values from the source database. Some examples include the following:
- Data type transformation. Sometimes data types between the source and target databases are not equivalent. In these cases, data type transformation casts the source value into the target value based on type transformation rules. For example, a timestamp type from the source might be transformed into a string in the target.
- Data structure transformation. Data structure transformation modifies the structure in the same database model or between different database models. For example, in a relational system, one source table might be split into two target tables, or several source tables might be denormalized into one target table by using a join. A 1:n relationship in the source database might be transformed into a parent and child relationship in Spanner. Documents from a source document database system might be decomposed into a set of relational rows in a target system.
- Data value transformation. Data value transformation is separate from data type transformation. Data value transformation changes the value without changing the data type. For example, a local time zone is converted to Coordinated Universal Time (UTC). Or a short zip code (five digits) represented as a string is converted to a long zip code (five digits followed by a dash followed by 4 digits, also known as ZIP+4).
Data enrichment and correlation
Data transformation is applied on the existing data without reference to additional, related reference data. With data enrichment, additional data is queried to enrich source data before it's stored in the target database.
- Data correlation. It is possible to correlate source data. For example, you can combine data from two tables in two source databases. In one target database, for instance, you might relate a customer to all open, fulfilled, and canceled orders whereby the customer data and the order data originate from two different source databases.
- Data enrichment. Data enrichment adds reference data. For example, you might enrich records that only contain a zip code by adding the city name corresponding to the zip code. A reference table containing zip codes and the corresponding city names is a static dataset accessed for this use case. Reference data can be dynamic as well. For example, you might use a list of all known customers as reference data.
Data reduction and filtering
Another type of data transformation is reducing or filtering the source data before migrating it to a target database.
- Data reduction. Data reduction removes attributes from a data item. For example, if a zip code is present in a data item, the corresponding city name might not be required and is dropped, because it can be recalculated or because it is not needed anymore. Sometimes this information is kept for historical reasons to record the name of the city as entered by the user, even if the city name changes in time.
- Data filtering. Data filtering removes a data item altogether. For example, all canceled orders might be removed and not transferred to the target database.
Data combination or recombination
If data is migrated from different source databases to different target databases, it can be necessary to combine data differently between source and target databases.
Suppose that customers and orders are stored in two different source databases. One source database contains all orders, and a second source database contains all customers. After migration, customers and their orders are stored in a 1:n relationship within a single target database schema—not in a single target database, however, but several target databases where each contains a partition of the data. Each target database represents a region and contains all customers and their orders located in that region.
Target database addressing
Unless there is only one target database, each data item that is migrated needs to be sent to the correct target database. A couple of approaches to addressing the target database include the following:
- Schema-based addressing. Schema-based addressing determines the target database based on the schema. For example, all data items of a customer collection or all rows of a customer table are migrated to the same target database storing customer information, even though this information was distributed in several source databases.
- Content-based routing. Content-based routing (using a content-based router, for example) determines the target database based on data values. For example, all customers located in the Latin America region are migrated to a specific target database that represents that region.
You can use both types of addressing at the same time in a database migration. Regardless of the addressing type used, the target database must have the correct schema in place so that data items are stored.
Persistence of in-transit data
Database migration systems, or the environments on which they run, can fail during a migration, and in-transit data can be lost. When failures occur, you need to restart the database migration system and ensure that the data stored in the source database is consistently and completely migrated to the target databases.
As part of the recovery, the database migration system needs to identify the last successfully migrated data item to determine where to begin extracting from the source databases. To resume at the point of failure, the system needs to keep an internal state on the migration progress.
You can maintain state in several ways:
- You can store all extracted data items within the database migration system before any database modification, and then remove the data item once its modified version is successfully stored in the target database. This approach ensures that the database migration system can exactly determine what is extracted and stored.
- You can maintain a list of references to the data items in transit. One possibility is to store the primary keys or other unique identifiers of each data item together with a status attribute. After a failure, this state is the basis for recovering the system consistently.
- You can query the source and target databases after a failure to determine the difference between the source and target database systems. The next data item to be extracted is determined based on the difference.
Other approaches to maintaining state can depend on the specific source databases. For example, a database migration system can keep track of which transaction log entries are fetched from the source database and which are inserted into the target database. If a failure occurs, the migration can be restarted from the last successful inserted entry.
Persistence of in-transit data is also important for other reasons than errors or failures. For example, it might not be possible to query data from the source database to determine its state. If, for instance, the source database contained a queue, the messages in that queue might have been removed at some point.
Yet another use case for persistence of in-transit data is large window processing of the data. During data modification, data items can be transformed independently of each other. However, sometimes the data modification depends on several data items (for example, numbering the data items processed per day, starting at zero every day).
A final use case for persistence of in-transit data is to provide repeatability of the data during data modification when the database system cannot access the source databases again. For example, you might need to re-execute the data modifications with different modification rules and then verify and compare the results with the initial data modifications. This approach might be necessary if you need to track any inconsistencies in the target database because of an incorrect data modification.
Completeness and consistency verification
You need to verify that your database migration is complete and consistent. This check ensures that each data item is migrated only once, and that the datasets in the source and target databases are identical and that the migration is complete.
Depending on the data modification rules, it is possible that a data item is extracted but not inserted into a target database. For this reason, directly comparing the source and target databases is not a solid approach for verifying completeness and consistency. However, if the database migration system tracks the items that are filtered out, you can then compare the source and target databases along with the filtered items.
Replication feature of the database management system
A special use case in a homogeneous migration is where the target database is a copy of the source database. Specifically, the schemas in the source and target databases are the same, the data values are the same, and each source database is a direct mapping (1:1) to a target database.
In this case, you can use the built-in replication feature that comes with most database management systems to replicate one database to another.
There are two types of data replication: logical and physical.
Logical replication: In the case of logical replication, changes in database objects are transferred based on their replication identifiers (usually primary keys). The advantages of logical replication are that it is flexible, granular, and you can customize it. In some cases, logical replication lets you replicate changes between different database engine versions. Many database engines support logical replication filters, where you can define the set of data to be replicated. The main disadvantages are that logical replication might introduce some performance overhead and the latency of this replication method is usually higher than that of physical replication.
Physical replication: In contrast, physical replication works on the disk block level and offers better performance with lower replication latency. For large datasets, physical replication can be more straightforward and efficient, especially in the case of non-relational data structures. However, it is not customizable and depends highly on the database engine version.
Examples are MySQL replication, PostgreSQL replication (see also pglogical), or Microsoft SQL Server replication.
However, if data modification is required, or you have any cardinality other than a direct mapping, a database migration system's capabilities are needed to address such a use case.
Custom database migration functionality
Some reasons for building database migration functionality instead of using a database migration system or database management system include the following:
- You need full control over every detail.
- You want to reuse the database migration capabilities.
- You want to reduce costs or simplify your technological footprint.
Building blocks for building migration functionality include the following:
- Export and import: If downtime is not a factor, you can use database export and database import to migrate data in homogenous database migrations. Export and import, however, requires that you quiesce the source database to prevent updates before you export the data. Otherwise, changes might not be captured in the export, and the target database won't be an exact copy of the source database.
- Backup and restore: Like in the case of export and import, backup and restore incurs downtime because you need to quiesce the source database so that the backup contains all data and the latest changes. The downtime continues until the restore is completed successfully on the target database.
- Differential querying: If changing the database schema is an option, you can extend the schema so that database changes can be queried at the query interface. An additional timestamp attribute is added, indicating the time of the last change. An additional delete flag can be added, indicating if the data item is deleted or not (logical delete). With these two changes, a poller executing in a regular interval can query all changes since its last execution. The changes are applied to the target database. Additional approaches are discussed in Change data capture.
These are only a few of the possible options to build a custom database migration. Although a custom solution provides the most flexibility and control over implementation, it also requires constant maintenance to address bugs, scalability limitations, and other issues that might arise during a database migration.
Additional considerations of database migration
The following sections briefly discuss non-functional aspects that are important in the context of database migration. These aspects include error handling, scalability, high availability, and disaster recovery.
Error handling
Failures during database migration must not cause data loss or the processing of database changes out of order. Data integrity must be preserved regardless of what caused the failure (such as a bug in the system, a network interruption, a VM crash, or a zone failure).
A data loss occurs when a migration system retrieves the data from the source databases and does not store it in the target databases because of some error. When data is lost, the target databases don't match the source databases and are thus inconsistent and incomplete. The completeness and consistency verification functionality flags this state (Completeness and consistency verification).
Scalability
In a database migration, time-to-migrate is an important metric. In a zero downtime migration (in the sense of minimal downtime), the migration of the data occurs while the source databases continue to change. To migrate in a reasonable timeframe, the rate of data transfer must be significantly faster than the rate of updates of the source database systems, especially when the source database system is large. The higher the transfer rate, the faster the database migration can be completed.
When the source database systems are quiesced and are not being modified, the migration might be faster because there are no changes to incorporate. In a homogeneous database, the time-to-migrate might be quite fast because you can use backup and restore or export and import features, and the transfer of files scales.
High availability and disaster recovery
In general, source and target databases are configured for high availability. A primary database has a corresponding read replica that is promoted to be the primary database when a failure occurs.
When a zone fails, the source or target databases fail over to a different zone to be continuously available. If a zone failure occurs during a database migration, the migration system itself is impacted because several of the source or target databases it accesses become inaccessible. The migration system must reconnect to the newly promoted primary databases that are running after a failure. Once the database migration system is reconnected, it must recover the migration itself to ensure the completeness and consistency of the data in the target databases. The migration system must determine the last consistent transfer to establish where to resume.
If the database migration system itself fails (for example, the zone it runs in becomes inaccessible), then it must be recovered. One recovery approach is a cold restart. In this approach, the database migration system is installed in an operational zone and restarted. The biggest issue to address is that the migration system must be able to determine the last consistent data transfer before the failure and continue from that point to ensure data completeness and consistency in the target databases.
If the database migration system is enabled for high availability, it can fail over and continue processing afterwards. If limited downtime of the database migration system is important, you need to select a database and implement high availability.
In terms of recovering the database migration, disaster recovery is very similar to high availability. Instead of reconnecting to newly promoted primary databases in a different zone, the database migration system must reconnect to databases in a different region (a failover region). The same holds true for the database migration system itself. If the region where the database migration system runs becomes inaccessible, the database migration system must fail over to a different region and continue from the last consistent data transfer.
Pitfalls
Several pitfalls can cause inconsistent data in the target databases. Some common ones to avoid are the following:
- Order violation. If scalability of the migration system is achieved by scaling out, then several data transfer processes are running concurrently (in parallel). Changes in a source database system are ordered according to committed transactions. If changes are picked up from the transaction log, the order must be maintained throughout the migration. Parallel data transfer can change the order because of varying speed between the underlying processes. It is necessary to ensure that the data is inserted into the target databases in the same order as it is received from the source databases.
- Consistency violation. With differential queries, the source databases have additional data attributes that contain, for example, commit timestamps. The target databases won't have commit timestamps because the commit timestamps are only put in place to establish change management in the source databases. It is important to ensure that inserts into the target databases must be timestamp consistent, which means all changes with the same timestamp must be in the same insert or update or upsert transaction. Otherwise, the target database might have an inconsistent state (temporarily) if some changes are inserted and others with the same timestamp are not. This temporary inconsistent state does not matter if the target databases are not accessed for processing. However, if they are used for testing, consistency is paramount. Another aspect is the creation of the timestamp values in the source database and how they relate to the commit time of the transaction in which they are set. Because of transaction commit dependencies, a transaction with an earlier timestamp might become visible after a transaction with a later timestamp. If the differential query is executed between the two transactions, it won't see the transaction with the earlier timestamp, resulting in an inconsistency on the target database.
- Missing or duplicate data. When a failover occurs, a careful recovery is required if some data is not replicated between the primary and the failover replica. For example, a source database fails over and not all data is replicated to the failover replica. At the same time, the data is already migrated to the target database before the failure. After failover, the newly promoted primary database is behind in terms of data changes to the target database (called flashback). A migration system needs to recognize this situation and recover from it in such a way that the target database and the source database get back into a consistent state.
- Local transactions. To have the source and target database receive the same changes, a common approach is to have clients write to both the source and target databases instead of using a data migration system. This approach has several pitfalls. One pitfall is that two database writes are two separate transactions; you might encounter a failure after the first finishes and before the second finishes. This scenario causes inconsistent data from which you must recover. Also, there are several clients in general, and they are not coordinated. The clients do not know the source database transaction commit order and therefore cannot write to the target databases implementing that transaction order. The clients might change the order, which can lead to data inconsistency. Unless all access goes through coordinated clients, and all clients ensure the target transaction order, this approach can lead to an inconsistent state with the target database.
In general, there are other pitfalls to watch out for. The best way to find problems that might lead to data inconsistency is to do a complete failure analysis that iterates through all possible failure scenarios. If concurrency is implemented in the database migration system, all possible data migration process execution orders must be examined to ensure that data consistency is preserved. If high availability or disaster recovery (or both) is implemented, all possible failure combinations must be examined.
What's next
- Read Database migrations: Concepts and principles (Part 2).
- Read about database migration in the following documents:
- See Database migration for more database migration guides.
- Explore reference architectures, diagrams, and best practices about Google Cloud. Take a look at our Cloud Architecture Center.