This document shows you how to set up user provisioning and single sign-on between a Microsoft Entra ID (formerly Azure AD) tenant and your Cloud Identity or Google Workspace account.
The document assumes that you already use Microsoft Office 365 or Microsoft Entra ID in your organization and want to use Microsoft Entra ID for allowing users to authenticate with Google Cloud. Microsoft Entra ID itself might be connected to an on-premises Active Directory and might use Entra ID federation, pass-through authentication, or password hash synchronization.
Objectives
- Set up Microsoft Entra ID to automatically provision users and, optionally, groups to Cloud Identity or Google Workspace.
- Configure single sign-on to allow users to sign in to Google Cloud by using a Microsoft Entra ID user account or a user that has been provisioned from Active Directory to Microsoft Entra ID.
Costs
If you are using the free edition of Cloud Identity, setting up federation with Microsoft Entra ID won't use any billable components of Google Cloud.
Check the Microsoft Entra ID pricing page for any fees that might apply to using Microsoft Entra ID.
Before you begin
- Make sure you understand the differences between connecting Google Cloud to Microsoft Entra ID versus directly connecting Google Cloud to Active Directory.
- Decide how you want to map
identities,
groups,
and domains
between Microsoft Entra ID and Cloud Identity or Google Workspace.
Specifically, answer the following questions:
- Do you plan to use email addresses or User Principal Names (UPNs) as common identifiers for users?
- Do you plan to provision groups? If so, do you plan to map groups by email address or by name?
- Do you plan to provision all users to Google Cloud or only a select subset of users?
- Before connecting your production Microsoft Entra ID tenant to Google Cloud, consider using a Microsoft Entra ID test tenant for setting up and testing user provisioning.
- Sign up for Cloud Identity if you don't have an account already.
- If you're using the free edition of Cloud Identity and intend to provision more than 50 users, request an increase of the total number of free Cloud Identity users through your support contact.
- If you suspect that any of the domains you plan to use for Cloud Identity could have been used by employees to register consumer accounts, consider migrating these user accounts first. For more details, see Assessing existing user accounts.
Prepare your Cloud Identity or Google Workspace account
Create a dedicated user for Microsoft Entra ID, grant that user the necessary privileges, and register the necessary domains.
Create a user for Microsoft Entra ID
To let Microsoft Entra ID access your Cloud Identity or Google Workspace account, you must create a user for Microsoft Entra ID in your Cloud Identity or Google Workspace account.
The Microsoft Entra ID user is only intended for automated provisioning. Therefore, it's best to keep it separate from other user accounts by placing it in a separate organizational unit (OU). Using a separate OU also ensures that you can later disable single sign-on for the Microsoft Entra ID user.
Create a new OU:
- Open the Admin Console and log in using the super-admin user created when you signed up for Cloud Identity or Google Workspace.
- In the menu, go to Directory > Organizational units.
- Click Create organizational unit and provide a name and description for the OU:
- Name:
Automation - Description:
Automation users
- Name:
- Click Create.
Create a user account for Microsoft Entra ID and place it in the
AutomationOU. For detailed instructions, see Add an account for a new user or Add an account for multiple users (Beta).When you create the account, provide an appropriate name and email address such as the following:
- First Name:
Microsoft Entra ID - Last Name:
Provisioning - Primary email:
azuread-provisioning
Keep the primary domain for the email address.
- First Name:
For the user account, set the Organizational unit to the
AutomationOU that you created previously. For details, see Move users to an organizational unit.Configure a password:
- If the password option is available on the page, ensure that Automatically generate a new password isn't selected, and then enter a password. Make sure that Ask for a password change at the next sign-in isn't selected.
- If the password option isn't available on the page, save the new user account, and then reset the user's password.
Assign privileges to Microsoft Entra ID
To let Microsoft Entra ID create, list, and suspend users and groups in your
Cloud Identity or Google Workspace account, you must grant
the azuread-provisioning user additional privileges as follows:
To allow Microsoft Entra ID to manage all users, including delegated administrators and super-admin users, you must make the
azuread-provisioninguser a super-admin.To allow Microsoft Entra ID to manage non-admin users only, it's sufficient to make the
azuread-provisioninguser a delegated administrator. As a delegated administrator, Microsoft Entra ID can't manage other delegated administrators or super-admin users.
Super-admin
To make the azuread-provisioning user a super-admin, do the following:
- Locate the newly created user in the list and click the user's name to open their account page.
- Under Admin roles and privileges, click Assign roles.
- Enable the super-admin role.
- Click Save.
Delegated administrator
To make the azuread-provisioning user a delegated administrator, create
a new admin role and assign it to the user:
- In the menu, go to Account > Admin roles.
- Click Create new role.
- Provide a name and description for the role such as the following:
- Name:
Microsoft Entra ID - Description:
Role for automated user and group provisioning
- Name:
- Click Continue.
- On the next screen, scroll down to the section named Admin API privileges
and set the following privileges to enabled:
- Organization Units > Read
- Users
- Groups
- Click Continue.
- Click Create role.
- Click Assign users.
- Select the
azuread-provisioninguser and click Assign role.
Register domains
In Cloud Identity and Google Workspace, users and groups are identified by email address. The domains used by these email addresses must be registered and verified first.
Prepare a list of DNS domains that you need to register:
- If you plan to map users by UPN, include all domains used by UPNs. If in doubt, include all custom domains of your Microsoft Entra ID tenant.
- If you plan to map users by email address, include all domains used in email addresses. The list of domains might be different from the list of custom domains of your Microsoft Entra ID tenant.
If you plan to provision groups, amend the list of DNS domains:
- If you plan to map groups by email address, include all domains used in group email addresses. If in doubt, include all custom domains of your Microsoft Entra ID tenant.
- If you plan to map groups by name, include a dedicated subdomain like
groups.PRIMARY_DOMAIN, wherePRIMARY_DOMAINis the primary domain name of your Cloud Identity or Google Workspace account.
Now that you've identified the list of DNS domains, you can register any missing domains. For each domain on the list not yet registered, perform the following steps:
- In the Admin Console, go to Account > Domains > Manage domains.
- Click Add a domain.
- Enter the domain name and select Secondary domain.
- Click Add domain and start verification and follow the instructions to verify ownership of the domain.
Configure Microsoft Entra ID provisioning
Create an enterprise application
You are ready to connect Microsoft Entra ID to your Cloud Identity or Google Workspace account by setting up the Google Cloud/G Suite Connector by Microsoft gallery app from the Microsoft Azure Marketplace.
The gallery app can be configured to handle both user provisioning and single sign-on. In this document, you use two instances of the gallery app—one for user provisioning and one for single sign-on.
First, create an instance of the gallery app to handle user provisioning:
- Open the Azure portal and sign in as a user with global administrator privileges.
- Select Microsoft Entra ID > Enterprise applications.
- Click New application.
- Search for Google Cloud, and then click the Google Cloud/G Suite Connector by Microsoft item in the result list.
- Set the name of the application to
Google Cloud (Provisioning). - Click Create.
- Adding the application may take a few seconds, you should then be redirected to a page titled Google Cloud (Provisioning) - Overview.
- In the Azure Portal menu, click Manage > Properties:
- Set Enabled for users to sign-in to No.
- Set Assignment required to No.
- Set Visible to users to No.
- Click Save.
In the Azure Portal menu, click Manage > Provisioning:
- Click Get started.
- Change Provisioning Mode to Automatic.
- Click Admin Credentials > Authorize.
Sign in using the
azuread-provisioning@DOMAINuser you created earlier, whereDOMAINis the primary domain of your Cloud Identity or Google Workspace account.Because this is the first time you've signed on using this user, you are asked to accept the Google Terms of Service and privacy policy.
If you agree to the terms, click I understand.
Confirm access to the Cloud Identity API by clicking Allow.
Click Test Connection to verify that Microsoft Entra ID can successfully authenticate with Cloud Identity or Google Workspace.
Click Save.
Configure user provisioning
The right way to configure user provisioning depends on whether you intend to map users by email address or by UPN.
UPN
- Under Mappings, click Provision Entra ID Users.
- For the attributes surname and givenName, do the following:
- Click Edit.
- Set Default value if null to
_. - Click OK.
- Click Save.
- Confirm that saving changes will result in users and groups being resynchronized by clicking Yes.
- Click X to close the Attribute Mapping dialog.
UPN: domain substitution
- Under Mappings, click Provision Entra ID Users.
For the attribute userPrincipalName, do the following:
- Click Edit.
Configure the following mapping:
- Mapping type: Expression
Expression:
Replace([userPrincipalName], "@DOMAIN", , , "@SUBSTITUTE_DOMAIN", , )
Replace the following:
DOMAIN: domain name you want to replaceSUBSTITUTE_DOMAINdomain name to use instead
Click OK.
For the attributes surname and givenName, do the following:
- Click Edit.
- Set Default value if null to
_. - Click OK.
Click Save.
Confirm that saving changes will result in users and groups being resynchronized by clicking Yes.
Click X to close the Attribute Mapping dialog.
Email address
- Under Mappings, click Provision Entra ID Users.
- For the attribute userPrincipalName, do the following:
- Click Edit.
- Set Source attribute to mail.
- Click OK.
- For the attributes surname and givenName, do the following:
- Click Edit.
- Set Default value if null to
_. - Click OK.
- Click Save.
- Confirm that saving changes will result in users and groups being resynchronized by clicking Yes.
- Click X to close the Attribute Mapping dialog.
You must configure mappings for primaryEmail, name.familyName, name.givenName,
and suspended. All other attribute mappings are optional.
When you configure additional attribute mappings, note the following:
- The Google Cloud/G Suite Connector by Microsoft gallery currently doesn't let you assign email aliases.
- The Google Cloud/G Suite Connector by Microsoft gallery currently doesn't let you assign licenses to users. As a workaround, consider setting up automatic licensing for organizational units.
- To assign a user to an organization unit, add a mapping for
OrgUnitPath. The path must begin with a/character, must omit the root, and must refer to an organizational unit that already exists. For example, if the full path is example.com > employees > engineering, specify/employees/engineering.
Configure group provisioning
The right way to configure group provisioning depends on whether your groups are mail-enabled. If groups aren't mail-enabled, or if groups use an email address ending with "onmicrosoft.com", you can derive an email address from the group's name.
No group mapping
- Under Mappings, click Provision Entra ID Groups.
- Set Enabled to No.
- Click Save.
- Confirm that saving changes will result in users and groups being resynchronized by clicking Yes.
- Click X to close the Attribute Mapping dialog.
Name
- Under Mappings section, click Provision Entra ID Groups.
- For the attribute mail, do the following:
- Click Edit.
- Configure the following settings:
- Mapping type: Expression.
- Expression:
Join("@", NormalizeDiacritics(StripSpaces([displayName])), "GROUPS_DOMAIN"). ReplaceGROUPS_DOMAINwith the domain that all group email addresses are supposed to use—for example,groups.example.com. - Target attribute: email.
- Click OK.
- Click Save.
- Confirm that saving changes will result in users and groups being resynchronized by clicking Yes.
- Click X to close the Attribute Mapping dialog.
Email address
- If you map groups by email address, keep the default settings.
Configure user assignment
If you know that only a certain subset of users need access to Google Cloud, you can optionally restrict the set of users to be provisioned by assigning the enterprise app to specific users or groups of users.
If you want all users to be provisioned, you can skip the following steps.
- In the Azure Portal menu, click Manage > Users and groups.
- Add the users or groups you want to provision. If you select a group, all members of this group are automatically provisioned.
- Click Assign.
Enable automatic provisioning
The next step is to configure Microsoft Entra ID to automatically provision users to Cloud Identity or Google Workspace:
- In the Azure Portal menu, click Manage > Provisioning.
- Select Edit provisioning.
- Set Provisioning Status to On.
Under Settings, set Scope to one of the following:
- Sync only assigned users and groups if you have configured user assignment.
- Sync all users and groups otherwise.
If this box to set the scope isn't displayed, click Save and refresh the page.
Click Save.
Microsoft Entra ID starts an initial synchronization. Depending on the number of users and groups in the directory, this process can take several minutes or hours. You can refresh the browser page to see the status of the synchronization at the bottom of the page or select Audit Logs in the menu to see more details.
After the initial synchronization has completed, Microsoft Entra ID will periodically propagate updates from Microsoft Entra ID to your Cloud Identity or Google Workspace account. For further details on how Microsoft Entra ID handles user and group modifications, see Mapping the user lifecycle and Mapping the group lifecycle.
Troubleshooting
If the synchronization doesn't start within five minutes, you can force it to start by doing the following:
- Click Edit provisioning.
- Set Provisioning Status to Off.
- Click Save.
- Set Provisioning Status to On.
- Click Save.
- Close the provisioning dialog.
- Click Restart provisioning.
If synchronization still doesn't start, click Test Connection to verify that your credentials have been saved successfully.
Configure Microsoft Entra ID for single sign-on
Although all relevant Microsoft Entra ID users are now automatically being provisioned to Cloud Identity or Google Workspace, you cannot use these users to sign in yet. To allow users to sign in, you still need to configure single sign-on.
Create a SAML profile
To configure single sign-on with Microsoft Entra ID, you first create a SAML profile in your Cloud Identity or Google Workspace account. The SAML profile contains the settings related to your Microsoft Entra ID tenant, including its URL and signing certificate.
You later assign the SAML profile to certain groups or organizational units.
To create a new SAML profile in your Cloud Identity or Google Workspace account, do the following:
In the Admin Console, go to SSO with third-party IdP.
Click Third-party SSO profiles > Add SAML profile.
On the SAML SSO profile page, enter the following settings:
- Name:
Entra ID - IDP entity ID: Leave blank
- Sign-in page URL: Leave blank
- Sign-out page URL:: Leave blank
- Change password URL:: Leave blank
Don't upload a verification certificate yet.
- Name:
Click Save.
The SAML SSO profile page that appears contains two URLs:
- Entity ID
- ACS URL
You need these URLs in the next section when you configure Microsoft Entra ID.
Create a Microsoft Entra ID application
Create a second enterprise application to handle single sign-on:
- In the Azure portal, go to Microsoft Entra ID > Enterprise applications.
- Click New application.
- Search for Google Cloud, and then click Google Cloud/G Suite Connector by Microsoft in the result list.
- Set the name of the application to
Google Cloud. Click Create.
Adding the application may take a few seconds. You are then redirected to a page titled Google Cloud - Overview.
In the Azure Portal menu, click Manage > Properties.
Set Enabled for users to sign-in to Yes.
Set Assignment required to Yes unless you want to allow all users to use single sign-on.
Click Save.
Configure user assignment
If you already know that only a certain subset of users need access to Google Cloud, you can optionally restrict the set of users to be allowed to sign in by assigning the enterprise app to specific users or groups of users.
If you set User assignment required to No before, then you can skip the following steps.
- In the Azure Portal menu, click Manage > Users and groups.
- Add the users or groups you want to allow single sign-on for.
- Click Assign.
Enable single sign-on
To enable Cloud Identity to use Microsoft Entra ID for authentication, you must adjust some settings:
- In the Azure Portal menu, click Manage > Single sign-on.
- On the ballot screen, click the SAML card.
- On the Basic SAML Configuration card, click edit Edit.
In the Basic SAML Configuration dialog, enter the following settings:
- Identifier (Entity ID):
- Add the Entity URL from your SSO profile and set Default to enabled.
- Remove all other entries.
- Reply URL: Add the ACS URL from your SSO profile.
Sign on URL:
https://www.google.com/a/PRIMARY_DOMAIN/ServiceLogin?continue=https://console.cloud.google.com/
Replace
PRIMARY_DOMAINwith the primary domain name used by your Cloud Identity or Google Workspace account.
- Identifier (Entity ID):
Click Save, and then dismiss the dialog by clicking X.
On the SAML Certificates card, find the entry labeled Certificate (Base 64) and click Download to download the certificate to your local computer.
On the Set up Google Cloud card, you find two URLs:
- Login URL
- Microsoft Entra ID Identifier
You need these URLs in the next section when you complete the SAML profile.
The remaining steps differ depending on whether you map users by email address or by UPN.
UPN
- On the Attributes & Claims card, click edit Edit.
Delete all claims listed under Additional claims. You can delete records by clicking the … button and selecting Delete.
The list of attributes and claims looks like the following:
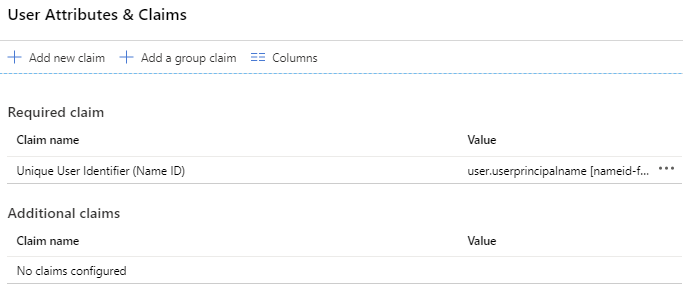
Dismiss the dialog by clicking X.
UPN: domain substitution
- On the User Attributes & Claims card, click edit Edit.
Delete all claims listed under Additional claims. You can delete records by clicking the … button and selecting Delete.
The list of attributes and claims looks like the following:
Click Unique User Identifier (Name ID) to change the claims mapping.
Set Source to Transformation and configure the following transformation:
- Transformation: ExtractMailPrefix()
- Parameter 1: user.userPrincipalName
Select Add transformation and configure the following transformation:
- Transformation: Join()
- Separator:
@ - Parameter 2: Enter the substitute domain name.
You must use the same substitute domain name for user provisioning and single sign-on. If the domain name isn't listed, you might need to verify it first .
Click Add.
Click Save.
Dismiss the dialog by clicking X.
Email address
- On the User Attributes & Claims card, click edit Edit.
- Select the row labeled Unique User Identifier (Name ID).
- Change Source attribute to user.mail.
- Click Save.
Delete all claims listed under Additional claims. To delete all records, click more_horiz, and then click Delete.
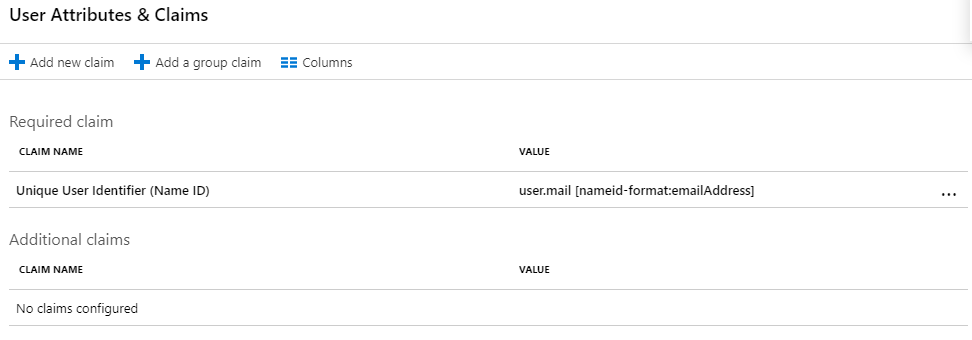
Dismiss the dialog by clicking close.
Complete the SAML profile
Complete the configuration of your SAML profile:
Return to the Admin Console and go to Security > Authentication > SSO with third-party IdP.
Open the
Entra IDSAML profile that you created earlier.Click the IDP details section to edit the settings.
Enter the following settings:
- IDP entity ID: Enter the Microsoft Entra Identifier from the Set up Google Cloud card in the Azure Portal.
- Sign-in page URL: Enter the Login URL from the Set up Google Cloud card in the Azure Portal.
- Sign-out page URL:
https://login.microsoftonline.com/common/wsfederation?wa=wsignout1.0 - Change password URL:
https://account.activedirectory.windowsazure.com/changepassword.aspx
Under Verification certificate, click Upload certificate, and then pick the token signing certificate that you downloaded previously.
Click Save.
The Microsoft Entra ID token signing certificate is valid for a limited amount of time and you must rotate the certificate before it expires. For more information, see Rotate a single sign-on certificate later in this document.
Your SAML profile is complete, but you still need to assign it.
Assign the SAML profile
Select the users for which the new SAML profile should apply:
In the Admin Console, on the SSO with third-party IDPs page, click Manage SSO profile assignments > Manage.
On the left pane, select the group or organizational unit for which you want to apply the SSO profile. To apply the profile to all users, select the root organizational unit.
On the right pane, select Another SSO profile.
In the menu, select the
Entra ID - SAMLSSO profile that you created earlier.Click Save.
To assign the SAML profile to another group or organizational unit, repeat the steps above.
Update the SSO settings for the Automation OU to
disable single sign-on:
- On the left pane, select the
AutomationOU. - On the right pane, select None.
- Click Override.
Optional: Configure redirects for domain-specific service URLs
When you link to the Google Cloud console from internal portals or documents, you can improve the user experience by using domain-specific service URLs.
Unlike regular service URLs such as https://console.cloud.google.com/,
domain specific-service URLs include the name of your primary domain. Unauthenticated
users that click a link to a domain specific-service URL are immediately redirected
to Entra ID instead of being shown a Google sign-in page first.
Examples for domain-specific service URLs include the following:
| Google service | URL | Logo |
|---|---|---|
| Gemini Enterprise | https://www.google.com/a/DOMAIN/ServiceLogin?continue=https://vertexaisearch.cloud.google.com/home/cid/ID |
|
| Google Cloud console | https://www.google.com/a/DOMAIN/ServiceLogin?continue=https://console.cloud.google.com/ |
|
| Google Docs | https://docs.google.com/a/DOMAIN |
|
| Google Sheets | https://www.google.com/a/DOMAIN/ServiceLogin?continue=https://sheets.google.com/
|
|
| Google Sites | https://www.google.com/a/DOMAIN/ServiceLogin?continue=https://slides.google.com/ |
|
| Google Drive | https://drive.google.com/a/DOMAIN |
|
| Gmail | https://mail.google.com/a/DOMAIN |
|
| Google Groups | https://www.google.com/a/DOMAIN/ServiceLogin?continue=https://groups.google.com/ |
|
| Google Keep | https://www.google.com/a/DOMAIN/ServiceLogin?continue=https://keep.google.com/
|
|
| Looker Studio | https://www.google.com/a/DOMAIN/ServiceLogin?continue=https://lookerstudio.google.com/ |
|
| YouTube | https://www.google.com/a/DOMAIN/ServiceLogin?continue=https://www.youtube.com/
|
To configure domain-specific service URLs so that they redirect to Entra ID, do the following:
In the Admin Console, on the SSO with third-party IDPs page, click Domain-specific service URLs > Edit.
Set Automatically redirect users to the third-party IdP in the following SSO profile to enabled.
Set SSO profile to
Entra ID.Click Save.
Optional: Configure login challenges
Google sign-in might ask users for additional verification when they sign in from unknown devices or when their sign-in attempt looks suspicious for other reasons. These login challenges help to improve security, and we recommend that you leave login challenges enabled.
If you find that login challenges cause too much inconvenience, you can disable login challenges by doing the following:
- In the Admin Console, go to Security > Authentication > Login challenges.
- In the left pane, select an organizational unit for which you want to disable login challenges. To disable login challenges for all users, select the root organizational unit.
- Under Settings for users signing in using other SSO profiles, select Don't ask users for additional verifications from Google.
- Click Save.
Test single sign-on
Now that you've completed the single sign-on configuration in both Microsoft Entra ID and Cloud Identity or Google Workspace, you can access Google Cloud in two ways:
- Through the list of apps in your Microsoft Office portal.
- Directly by opening https://console.cloud.google.com/.
To check that the second option works as intended, run the following test:
- Pick a Microsoft Entra ID user that has been provisioned to Cloud Identity or Google Workspace and that doesn't have super-admin privileges assigned. Users with super-admin privileges always have to sign in using Google credentials and are therefore not suitable for testing single sign-on.
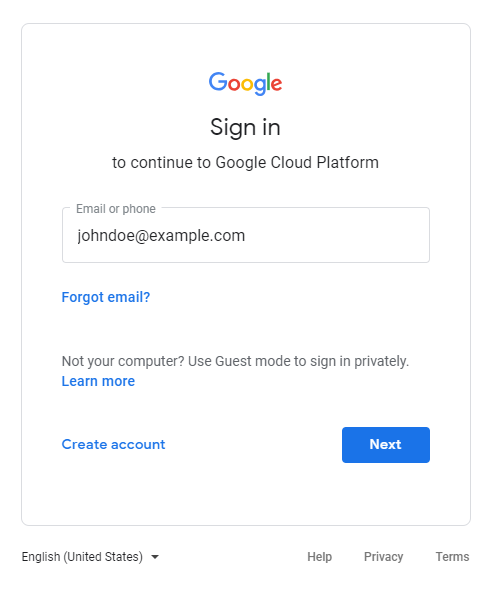
- Open a new browser window and go to https://console.cloud.google.com/.
In the Google Sign-In page that appears, enter the email address of the user and click Next. If you use domain substitution, this address must be the email address with the substitution applied.
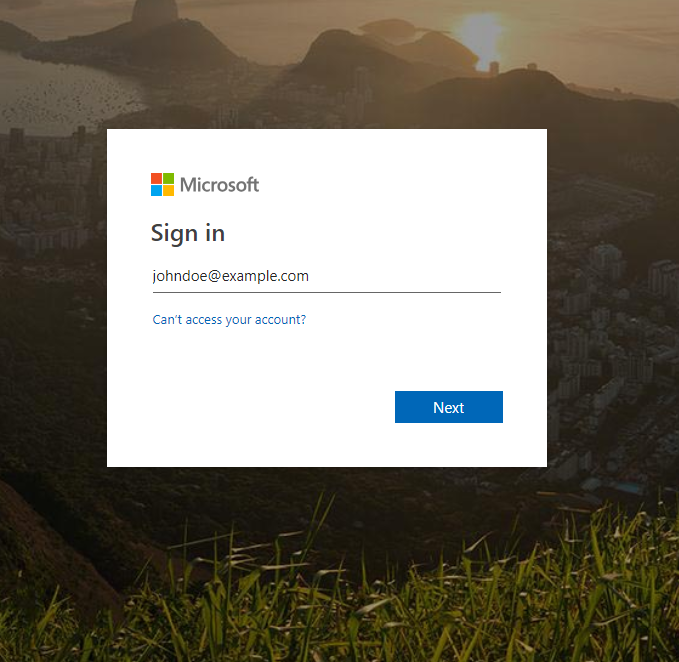
You are redirected to Microsoft Entra ID and will see another sign-in prompt. Enter the email address of the user (without domain substitution) and click Next.
After entering your password, you are prompted whether to stay signed in or not. For now, choose No.
After successful authentication, Microsoft Entra ID should redirect you back to Google Sign-In. Because this is the first time you've signed in using this user, you are asked to accept the Google Terms of Service and privacy policy.
If you agree to the terms, click I understand.
You are redirected to the Google Cloud console, which asks you to confirm preferences and accept the Google Cloud Terms of Service.
If you agree to the terms, choose Yes and click Agree and continue.
Click the avatar icon on the top left of the page, and then click Sign out.
You are redirected to a Microsoft Entra ID page confirming that you have been successfully signed out.
Keep in mind that users with super-admin privileges are exempted from single sign-on, so you can still use the Admin Console to verify or change settings.
Rotate a single sign-on certificate
The Microsoft Entra ID token signing certificate is valid for only several months, and you must replace the certificate before it expires.
To rotate a signing certificate, add an additional certificate to the Microsoft Entra ID application:
- In the Azure portal, go to Microsoft Entra ID > Enterprise applications and open the application that you created for single sign-on.
- In the Azure Portal menu, click Manage > Single sign-on.
On the SAML Certificates card, click edit Edit.
You see a list of one or more certificates. One certificate is marked as Active.
Click New certificate.
Keep the default signing settings and click Save.
The certificate is added to the list of certificates and is marked as Inactive.
Select the new certificate and click more_horiz > Base64 certificate download.
Keep the browser window open and don't close the dialog.
To use the new certificate, do the following:
Open a new browser tab or window.
Open the Admin Console and go to SSO with third-party IdP.
Open the
Entra IDSAML profile.Click IDP details.
Click Upload another certificate and select the new certificate that you downloaded previously.
Click Save.
Return to the Microsoft Entra ID portal and the SAML Certificates dialog.
Select the new certificate and click more_horiz > Make certificate active.
Click Yes to activate the certificate.
Microsoft Entra ID now uses the new signing certificate.
Test that SSO still works as expected. For more information, see Test single sign-on.
To remove the old certificate, do the following:
- Return to the Admin Console and the
Entra IDSAML profile. - Click IDP details.
- Under Verification certificate, compare the expiry dates of your certificates to find the old certificate and click delete.
- Click Save.
Migrate from a legacy SSO profile to a SAML profile
If you set up single sign-on between Microsoft Entra ID and your Cloud Identity or Google Workspace account in 2023 or earlier, you might be using a legacy SSO profile. This section explains the differences between SAML profiles and legacy SSO profiles and shows you how to migrate from a legacy SSO profile to a SAML profile.
SAML profiles and legacy SSO profiles compared
Legacy SSO profiles are deprecated. We recommend that you replace them with SAML profiles. SAML profiles differ from legacy profiles in several ways, including the following:
- You can create multiple SAML profiles and assign them to one or more organizational units or groups. In contrast, you can only create a single legacy SSO profile for each Cloud Identity or Google Workspace account.
- SAML profiles use a different format from legacy SSO profiles for entity IDs and assertion consumer service (ACS) URLs.
- When you use SAML profiles, login challenges are enabled by default. In contrast, when you use a legacy SSO profile, login challenges are disabled by default.
Migrate from a legacy SSO profile to a SAML profile
To migrate from a legacy SSO profile to a SAML profile in a way that minimizes disruption, do the following:
In the Azure portal, open the enterprise application that you use for single sign-on and do the following:
- In the Azure Portal menu, click Manage > Single sign-on.
- On the SAML Certificates card, find the entry that's labeled Certificate (Base 64), and then click Download to download the certificate to your local computer.
On the Set up Google Cloud card, take note of the following:
- Login URL
- Microsoft Entra ID Identifier
You need this information when you create a SAML profile.
In the Admin Console, go to Security > Authentication > Login challenges.
For each organization unit, do the following:
- Select an organization unit.
Click Post-SSO verification and modify the Settings for users signing in using other SSO profiles so that they match the Settings for users signing in using the SSO profile for your organization.
In this dialog, other SSO profiles refers to the SAML profiles and SSO profile for your organization refers to your legacy SSO profile.
Click Save or Override.
In the Admin Console, go to SSO with third-party IdP and do the following:
Go to SSO with third-party IdP
Click Third-party SSO profiles > Add SAML profile.
On the SAML SSO profile page, enter the following information:
- Name:
Entra ID - IDP entity ID: Enter the Microsoft Entra Identifier from the Set up Google Cloud card in the Azure Portal.
- Sign-in page URL: Enter the Login URL from the Set up Google Cloud card in the Azure Portal.
- Sign-out page URL:
https://login.microsoftonline.com/common/wsfederation?wa=wsignout1.0 - Change password URL:
https://account.activedirectory.windowsazure.com/changepassword.aspx
- Name:
For Verification certificate, click Upload certificate, and then select the token signing certificate that you downloaded previously.
Click Save.
On the SAML SSO profile page, take note of the following:
- Entity ID
- ACS URL
You need this information when you configure Microsoft Entra ID.
Return to the Azure portal, open the enterprise application that you use for single sign-on and do the following:
- In the Azure Portal menu, click Manage > Single sign-on.
- On the Basic SAML Configuration card, click edit Edit.
For Identifier (Entity ID), add the Entity URL from the SAML profile that you created.
For Reply URL (Assertion Consumer Service URL), add the ACS URL from the SAML profile that you created.
Click Save, and then dismiss the dialog by clicking X.
Return to the Admin Console and go to Security > Authentication > SSO with third party IdP, and then click Manage SSO profile assignments > Manage.
For each existing SSO profile assignment that uses the Legacy SSO profile, do the following:
- Change the SSO profile from Legacy SSO profile to Entra ID - SAML.
- Select Have Google prompt for their username, then redirect them to this profile's IDP sign-in page.
- Click Save.
Go back to the SSO with third-party IDPs page, and then click Domain-specific service URLs > Edit.
Go to domain-specific service URLs
If Automatically redirect users to the third-party IdP in the following SSO profile is currently set to enabled, change the SSO profile to Entra ID - SAML.
If Automatically redirect users to the third-party IdP in the following SSO profile is set to disabled, you can skip this step.
Click Save.
Return to the Azure portal, open the enterprise application that you use for single sign-on and do the following:
- In the Azure Portal menu, click Manage > Single sign-on.
- On the Basic SAML Configuration card, click edit Edit.
- For Identifier (Entity ID), remove
google.comandhttp://google.com. - For Reply URL (Assertion Consumer Service URL), remove
https://www.google.com/. - Click Save, and then dismiss the dialog by clicking X.
Clean up
To avoid incurring charges to your Google Cloud account for the resources used in this tutorial, either delete the project that contains the resources, or keep the project and delete the individual resources.
To disable single sign-on in your Cloud Identity or Google Workspace account, follow these steps:
In the Admin Console and go to Manage SSO profile assignments.
For each profile assignment, do the following:
- Open the profile.
- If you see an Inherit button, click Inherit. If you don't see an Inherit button, select None and click Save.
Return to the SSO with third-party IDPs page and open the Microsoft Entra ID SAML profile.
Click Delete.
You can remove single sign-on and provisioning settings in Microsoft Entra ID as follows:
- In the Azure portal, go to Microsoft Entra ID > Enterprise applications.
- From the list of applications, choose Google Cloud.
- In the Azure Portal menu, click Manage > Single sign-on.
- Click Delete.
- Confirm the deletion by clicking Yes.
What's next
- Learn more about federating Google Cloud with Microsoft Entra ID
- Read about best practices for planning accounts and organizations and best practices for federating Google Cloud with an external identity provider.
- Acquaint yourself with our best practices for managing super-admin accounts.
Contributors
Author: Johannes Passing | Cloud Solutions Architect