Jump Start Solution: Ecommerce web app deployed on Kubernetes

Last reviewed 2023-08-29 UTC

This guide helps you understand, deploy, and use the Ecommerce web app deployed on Kubernetes Jump Start Solution. This solution demonstrates how to build and run a simple ecommerce application for a retail organization, with a publicly visible shop website. It shows you how to create an application that can scale to handle spikes in usage (for example, during peak scale events like a sale), and can manage requests based on the visitor's location, helping the online shop provide a consistent service to a geographically distributed customer base.

The application is deployed as multiple small services, or microservices, running on Google-managed Kubernetes clusters in Google Cloud. Each service performs a specific task such as providing the web frontend or managing the shopping cart.

This solution is a good starting point if you need the configurability and flexibility offered by Kubernetes features when managing your website. A microservices architecture like this one is also particularly useful if you have a larger engineering team, as it lets different teams or developers create and manage different parts of the application separately. If this doesn't sound like your organization, or if you're not sure, consider also trying our Ecommerce web app deployed on Cloud Run solution. It uses Cloud Run to deploy a similar online shop application without the need for Kubernetes, and doesn't use microservices.

This document assumes that you're familiar with basic cloud concepts, though not necessarily Google Cloud. Experience with Terraform is helpful.

About Cymbal Shops

The application used in this solution is a demo online shop for an imaginary retail chain called Cymbal Shops, with a website that visitors can use to browse through the company's products, add products to their cart, go to the checkout, and purchase products — you can try it yourself after deploying the solution (though sadly you can't really buy any of the products). Cymbal Shops have customers in both the US and Europe, so they need a website solution that isn't slower for some visitors than others. Cymbal Shops also often have sales, and get lots of shoppers around holidays, so they need their website to be able to cope with surges in traffic without slowing down or having other issues, and without having to spend money on Cloud resources that they don't actually need.

Products used

The solution uses the following Google Cloud products:

  • Google Kubernetes Engine (GKE): A managed environment for deploying, managing, and scaling containerized applications using Google infrastructure.
  • Multi Cluster Ingress: A Google-hosted service that supports deploying shared load balancing resources across clusters and across regions.

For information about how these products are configured and how they interact, see the next section.

Architecture

The solution deploys an ecommerce application with a publicly accessible web interface. The following diagram shows the architecture of the Google Cloud resources that the solution deploys:

Ecommerce web app deployed on Kubernetes jump start solution diagram

Request flow

The following is the request processing flow for the deployed application. The steps in the flow are numbered as shown in the preceding architecture diagram.

  1. A user interacts with the Cymbal Shops website in their browser, which sends an HTTP request to a Google Cloud Load Balancer. This is a load balancer that sits at the edge of Google's network and directs traffic to the appropriate destination within Google Cloud.
  2. The user request is directed to one of the two GKE clusters where the application frontend is running. By default this is the cluster nearest the user: in our diagram above, the nearest cluster to the user is in Europe, so that's where the request goes. You'll learn more about how this is configured using the Multi Cluster Ingress service in the next section.
  3. The request is handled by one or more of the backend microservices that make up the rest of the Cymbal Shops application.
  4. The application's cartservice stores the state of the user's shopping cart while they're visiting the site, using a Redis database. One Redis database is deployed to the US cluster only.

Components and configuration

The Cymbal Shops app runs on Google Kubernetes Engine (GKE) clusters. Kubernetes is an open-source system for automating deployment, scaling, and management of containerized applications, where the application is packaged (or containerized) with its dependencies in a way that's independent of its environment. A Kubernetes cluster is a set of machines, called nodes, that you use to run your containers. GKE with Autopilot is Google's scalable and fully automated Kubernetes service, where your clusters are made up of Compute Engine virtual machines on Google Cloud.

The Cymbal Shops solution includes the following components:

  • Three GKE clusters, as follows:
    • One cluster, known as a config cluster, that's used to manage the Multi Cluster Ingress service for the application. Multi Cluster Ingress is a service that lets you load balance traffic across a specified set of clusters, with a single virtual IP address for your application.
    • Two clusters in different regions to run the Cymbal Shops microservices. Each cluster has identical Cymbal Shops services, running in the same Kubernetes namespaces. This lets Multi Cluster Ingress treat both frontend services as if they were the same service, choosing the cluster to send traffic to depending on proximity to the website visitor. Multi Cluster Ingress can also be used to make sure traffic is sent only to healthy clusters, perform gradual rollouts when upgrading, and more.
  • All three GKE clusters have Autopilot enabled. Autopilot is a GKE feature that lets you create clusters where Google manages your cluster configuration, including your nodes, scaling, security, and other preconfigured settings. For Cymbal Shops, this means that when there are more visitors to the site than usual, the clusters can automatically scale up the amount of CPU, memory, and storage they use based on the application's needs. With Autopilot enabled, the Cymbal Shops platform admin doesn't have to worry about requesting (and paying for) more Cloud resources than they actually need most of the time, or risk having clusters that are too under-resourced to cope with increased traffic on busy days.

Cost

See the Ecommerce web app deployed on Kubernetes page for an estimated monthly cost based on the default resource locations and estimated usage time. You can find out more about pricing for GKE, Autopilot, and Multi Cluster Ingress in the GKE pricing page.

Deploy the solution

This section guides you through the process of deploying the solution.

Create or choose a Google Cloud project

When you deploy the solution, you choose the Google Cloud project where the resources are deployed. When you're deciding whether to use an existing project or to create a new project, consider the following factors:

  • If you create a project for the solution, then when you no longer need the deployment, you can delete the project and avoid continued billing. If you use an existing project, you must delete the deployment when you no longer need it.
  • Using a new project can help avoid conflicts with previously provisioned resources, such as resources that are used for production workloads.

If you want to deploy the solution in a new project, create the project before you begin the deployment.

To create a project, complete the following steps:

  1. In the Google Cloud console, go to the project selector page.

    Go to project selector

  2. To begin creating a Google Cloud project, click Create project.

  3. Name your project. Make a note of your generated project ID.

  4. Edit the other fields as needed.

  5. To create the project, click Create.

Get the required IAM permissions

To start the deployment process, you need the Identity and Access Management (IAM) permissions that are listed in the following table. If you have the roles/owner basic role for the project in which you plan to deploy the solution, then you already have all the necessary permissions. If you don't have the roles/owner role, then ask your administrator to grant these permissions (or the roles that include these permissions) to you.

IAM permission required Predefined role that includes the required permissions

serviceusage.services.enable

Service Usage Admin
(roles/serviceusage.serviceUsageAdmin)

iam.serviceAccounts.create

Service Account Admin
(roles/iam.serviceAccountAdmin)

resourcemanager.projects.setIamPolicy

Project IAM Admin
(roles/resourcemanager.projectIamAdmin)
config.deployments.create
config.deployments.list
Cloud Infrastructure Manager Admin
(roles/config.admin)

Service account created for the solution

If you start the deployment process through the console, Google creates a service account to deploy the solution on your behalf (and to delete the deployment later if you choose). This service account is assigned certain IAM permissions temporarily; that is, the permissions are revoked automatically after the solution deployment and deletion operations are completed. Google recommends that after you delete the deployment, you delete the service account, as described later in this guide.

View the roles that are assigned to the service account

These roles are listed here in case an administrator of your Google Cloud project or organization needs this information.

  • roles/container.admin
  • roles/gkehub.editor
  • roles/compute.networkAdmin
  • roles/iam.serviceAccountAdmin
  • roles/iam.serviceAccountUser
  • roles/resourcemanager.projectIamAdmin
  • roles/serviceusage.serviceUsageAdmin

Choose a deployment method

To help you deploy this solution with minimal effort, a Terraform configuration is provided in GitHub. The Terraform configuration defines all the Google Cloud resources that are required for the solution.

You can deploy the solution by using one of the following methods:

  • Through the console: Use this method if you want to try the solution with the default configuration and see how it works. Cloud Build deploys all the resources that are required for the solution. When you no longer need the deployed solution, you can delete it through the console. Any resources that you create after you deploy the solution might need to be deleted separately.

    To use this deployment method, follow the instructions in Deploy through the console.

  • Using the Terraform CLI: Use this method if you want to customize the solution or if you want to automate the provisioning and management of the resources by using the infrastructure as code (IaC) approach. Download the Terraform configuration from GitHub, optionally customize the code as necessary, and then deploy the solution by using the Terraform CLI. After you deploy the solution, you can continue to use Terraform to manage the solution.

    To use this deployment method, follow the instructions in Deploy using the Terraform CLI.

Deploy through the console

Complete the following steps to deploy the preconfigured solution.

  1. In the Google Cloud Jump Start Solutions catalog, go to the Ecommerce web app deployed on Kubernetes solution.

    Go to the Ecommerce web app deployed on Kubernetes solution

  2. Review the information that's provided on the page, such as the estimated cost of the solution and the estimated deployment time.

  3. When you're ready to start deploying the solution, click Deploy.

    A step-by-step interactive guide is displayed.

  4. Complete the steps in the interactive guide.

    Note the name that you enter for the deployment. This name is required later when you delete the deployment.

    When you click Deploy, the Solution deployments page is displayed. The Status field on this page shows Deploying.

  5. Wait for the solution to be deployed.

    If the deployment fails, the Status field shows Failed. You can use the Cloud Build log to diagnose the errors. For more information, see Errors when deploying through the console.

    After the deployment is completed, the Status field changes to Deployed.

When you no longer need the solution, you can delete the deployment to avoid continued billing for the Google Cloud resources. For more information, see Delete the deployment.

Continue to Explore Cymbal Shops to find out how to test and explore your solution.

Deploy using the Terraform CLI

This section describes how you can customize the solution or automate the provisioning and management of the solution by using the Terraform CLI. Solutions that you deploy by using the Terraform CLI are not displayed in the Solution deployments page in the Google Cloud console.

When you no longer need the deployment, you can delete it by using the Terraform CLI, as described in Delete using the Terraform CLI.

Set up the Terraform client

You can run Terraform either in Cloud Shell or on your local host. This guide describes how to run Terraform in Cloud Shell, which has Terraform preinstalled and configured to authenticate with Google Cloud.

The Terraform code for this solution is available in a GitHub repository.

  1. Clone the GitHub repository to Cloud Shell.

    Open in Cloud Shell

    A prompt is displayed to confirm downloading the GitHub repository to Cloud Shell.

  2. Click Confirm.

    Cloud Shell is launched in a separate browser tab, and the Terraform code is downloaded to the $HOME/cloudshell_open directory of your Cloud Shell environment.

  3. In Cloud Shell, check whether the current working directory is $HOME/cloudshell_open/terraform-ecommerce-microservices-on-gke/infra. This is the directory that contains the Terraform configuration files for the solution. If you need to change to that directory, run the following command:

    cd $HOME/cloudshell_open/terraform-ecommerce-microservices-on-gke/infra
    
  4. Initialize Terraform by running the following command:

    terraform init
    

    Wait until you see the following message:

    Terraform has been successfully initialized!
    

Configure the Terraform variables

The Terraform code that you downloaded includes variables that you can use to customize the deployment based on your requirements. For example, you can specify the Google Cloud project and the region where you want the solution to be deployed.

  1. Make sure that the current working directory is $HOME/cloudshell_open/terraform-ecommerce-microservices-on-gke/infra. If it isn't, go to that directory.

  2. In the same directory, create a text file named terraform.tfvars.

  3. In the terraform.tfvars file, copy the following code snippet, and set values for the required variables.

    • Follow the instructions that are provided as comments in the code snippet.
    • This code snippet includes only the variables for which you must set values. The Terraform configuration includes other variables that have default values. To review all the variables and the default values, see the variables.tf file that's available in the $HOME/cloudshell_open/terraform-ecommerce-microservices-on-gke/infra directory.
    • Make sure that each value that you set in the terraform.tfvars file matches the variable type as declared in the variables.tf file. For example, if the type that’s defined for a variable in the variables.tf file is bool, then you must specify true or false as the value of that variable in the terraform.tfvars file.
# This is an example of the terraform.tfvars file.
# The values in this file must match the variable types declared in variables.tf.
# The values in this file override any defaults in variables.tf.

# ID of the project in which you want to deploy the solution
project_id = "PROJECT_ID"

For information about the values that you can assign to the project_id variable, see Identifying projects.

Validate and review the Terraform configuration

  1. Make sure that the current working directory is $HOME/cloudshell_open/terraform-ecommerce-microservices-on-gke/infra. If it isn't, go to that directory.

  2. Verify that the Terraform configuration has no errors:

    terraform validate
    

    If the command returns any errors, make the required corrections in the configuration and then run the terraform validate command again. Repeat this step until the command returns the following message:

    Success! The configuration is valid.
    
  3. Review the resources that are defined in the configuration:

    terraform plan
    
  4. If you didn't create the terraform.tfvars file as described earlier, Terraform prompts you to enter values for the variables that don't have default values. Enter the required values.

    The output of the terraform plan command is a list of the resources that Terraform provisions when you apply the configuration.

    If you want to make any changes, edit the configuration and then run the terraform validate and terraform plan commands again.

Provision the resources

When no further changes are necessary in the Terraform configuration, deploy the resources.

  1. Make sure that the current working directory is $HOME/cloudshell_open/terraform-ecommerce-microservices-on-gke/infra. If it isn't, go to that directory.

  2. Apply the Terraform configuration:

    terraform apply
    
  3. If you didn't create the terraform.tfvars file as described earlier, Terraform prompts you to enter values for the variables that don't have default values. Enter the required values.

    Terraform displays a list of the resources that will be created.

  4. When you're prompted to perform the actions, enter yes.

    Terraform displays messages showing the progress of the deployment.

    If the deployment can't be completed, Terraform displays the errors that caused the failure. Review the error messages and update the configuration to fix the errors. Then run the terraform apply command again. For help with troubleshooting Terraform errors, see Errors when deploying the solution using the Terraform CLI.

    After all the resources are created, Terraform displays the following message:

    Apply complete!
    

When you no longer need the solution, you can delete the deployment to avoid continued billing for the Google Cloud resources. For more information, see Delete the deployment.

Continue to Explore Cymbal Shops to find out how to test and explore your solution.

Explore Cymbal Shops

Congratulations, you have now deployed the Cymbal Shops website! You can visit the Cymbal Shops website and look around, then explore how the solution works in the Google Cloud console. Be aware that it can take about five minutes after successfully deploying the application for the site to appear at the provided address.

Visit the Cymbal Shops site

How you find the Cymbal Shops site depends on how you deployed the solution.

Console deployments

If you deployed the solution through the console, you can visit the site directly from the Solution deployments page.

  • If you have just finished deploying the solution, click View web app to visit the site. Otherwise, click the Actions menu for the deployment, and then select View web app.

Terraform deployments

If you deployed the solution by using the Terraform CLI, first find the IP address for the frontend provided by Multi Cluster Ingress. You can do this from the command line by using the Google Cloud CLI (the simplest approach), or from the Google Cloud console.

gcloud

  1. Make sure you have the latest version of the Google Cloud CLI installed. We recommend running the command from Cloud Shell, where the tool is already installed for you.
  2. Run the following command to get the IP address, replacing PROJECT_ID with the ID of your Google Cloud project:

    gcloud compute addresses list \
       --filter="name=('multi-cluster-ingress-ip-address-1')" \
       --project=PROJECT_ID
    
  3. Copy and paste the address returned by the command into your browser to visit the website.

Console

  1. Go to the Google Kubernetes Engine page in the Google Cloud console.

    Go to Google Kubernetes Engine

  2. Select Object Browser in the navigation menu.

  3. In the Object Browser list, expand the networking.gke.io section, then select MultiClusterIngress. You may need to scroll down to find this section.

  4. In the MultiClusterIngress page, select frontend-multi-cluster-ingress.

  5. In the frontend-multi-cluster-ingress details page, find the IP address. Click this address to visit the website.

Explore the website

You can now interact with the Cymbal Shops website just as its customers would see it, including browsing through products, adding products to the cart, and checking out as a guest.

Explore your solution

To view the Google Cloud resources that are deployed and their configuration, take an interactive tour.

Start the tour

Delete the deployment

When you no longer need the solution deployment, to avoid continued billing for the resources that you created, delete the deployment.

Delete through the console

Use this procedure if you deployed the solution through the console.

  1. In the Google Cloud console, go to the Solution deployments page.

    Go to Solution deployments

  2. Select the project that contains the deployment that you want to delete.

  3. Locate the deployment that you want to delete.

  4. Click Actions and then select Delete.

  5. Enter the name of the deployment and then click Confirm.

    The Status field shows Deleting.

    If the deletion fails, see the troubleshooting guidance in Error when deleting a deployment.

When you no longer need the Google Cloud project that you used for the solution, you can delete the project. For more information, see Optional: Delete the project.

Delete using the Terraform CLI

Use this procedure if you deployed the solution by using the Terraform CLI.

  1. In Cloud Shell, make sure that the current working directory is $HOME/cloudshell_open/terraform-ecommerce-microservices-on-gke/infra. If it isn't, go to that directory.

  2. Remove the resources that were provisioned by Terraform:

    terraform destroy
    

    Terraform displays a list of the resources that will be destroyed.

  3. When you're prompted to perform the actions, enter yes.

    Terraform displays messages showing the progress. After all the resources are deleted, Terraform displays the following message:

    Destroy complete!
    

    If the deletion fails, see the troubleshooting guidance in Error when deleting a deployment.

When you no longer need the Google Cloud project that you used for the solution, you can delete the project. For more information, see Optional: Delete the project.

Optional: Delete the project

If you deployed the solution in a new Google Cloud project, and if you no longer need the project, then delete it by completing the following steps:

  1. In the Google Cloud console, go to the Manage resources page.

    Go to Manage resources

  2. In the project list, select the project that you want to delete, and then click Delete.
  3. At the prompt, type the project ID, and then click Shut down.

If you decide to retain the project, then delete the service account that was created for this solution, as described in the next section.

Optional: Delete the service account

If you deleted the project that you used for the solution, then skip this section.

As mentioned earlier in this guide, when you deployed the solution, a service account was created on your behalf. The service account was assigned certain IAM permissions temporarily; that is, the permissions were revoked automatically after the solution deployment and deletion operations were completed, but the service account isn't deleted. Google recommends that you delete this service account.

  • If you deployed the solution through the Google Cloud console, go to the Solution deployments page. (If you're already on that page, refresh the browser.) A process is triggered in the background to delete the service account. No further action is necessary.

  • If you deployed the solution by using the Terraform CLI, complete the following steps:

    1. In the Google Cloud console, go to the Service accounts page.

      Go to Service accounts

    2. Select the project that you used for the solution.

    3. Select the service account that you want to delete.

      The email ID of the service account that was created for the solution is in the following format:

      goog-sc-DEPLOYMENT_NAME-NNN@PROJECT_ID.iam.gserviceaccount.com
      

      The email ID contains the following values:

      • DEPLOYMENT_NAME: the name of the deployment.
      • NNN: a random 3-digit number.
      • PROJECT_ID: the ID of the project in which you deployed the solution.
    4. Click Delete.

Troubleshoot errors

The actions that you can take to diagnose and resolve errors depend on the deployment method and the complexity of the error

Errors when deploying through the console

If the deployment fails when you use the console, do the following:

  1. Go to the Solution deployments page.

    If the deployment failed, the Status field shows Failed.

  2. View the details of the errors that caused the failure:

    1. Click Actions.

    2. Select View Cloud Build logs.

  3. Review the Cloud Build log and take appropriate action to resolve the issue that caused the failure.

Errors when deploying using the Terraform CLI

If the deployment fails when you use Terraform, the output of the terraform apply command includes error messages that you can review to diagnose the problem.

The examples in the following sections show deployment errors that you might encounter when you use Terraform.

Error creating Feature: Resource already exists

If you deploy this solution into a project where Multi Cluster Ingress is already configured, you will see an error similar to the following:

Error: Error creating Feature: Resource already exists - apply blocked by lifecycle params: &beta.Feature{Name:(*string)(0xc0017d1d00), Labels:map[string]string{}, ResourceState:(*beta.FeatureResourceState)(0xc001b9d890), Spec:(*beta.FeatureSpec)(0xc001792f00), State:(*beta.FeatureState)(0xc001792f50), CreateTime:(*string)(0xc001792fd0), UpdateTime:(*string)(0xc001792ff0), DeleteTime:(*string)(nil), Project:(*string)(0xc0017d1d40), Location:(*string)(0xc0017d1ca0)}.
running tf apply: terraform apply failed: running terraform failed: exit status 1

This is because this solution deploys a new config GKE cluster into the selected project. A project (specifically, a project's fleet) can contain only a single config cluster for configuring Multi Cluster Ingress. To fix this issue, either remove the existing Multi Cluster Ingress config cluster, or start again in a new project.

Error: job: default/kubernetes-manifests-deployer-job is in failed state

This solution's Terraform deploys a Kubernetes Job called kubernetes-manifests-deployer-job. This Kubernetes Job deploys the Kubernetes resources (Cymbal Shops microservices, the Redis database, and so on) needed for this solution into all three clusters.

Because this Kubernetes Job is complex and relies on the readiness of all three clusters, it may occasionally fail with an error message similar to:

kubernetes_job.kubernetes_manifests_deployer_job: Creation errored after 5m8s
...
Error: job: default/kubernetes-manifests-deployer-job is in failed state

If you receive this error, it's likely that some, if not all, of the solution's Google Cloud infrastructure is already provisioned, even though the rest of the deployment did not complete successfully. We recommend deleting the project to avoid getting billed for these resources, and retrying the deployment in a new, separate project.

API not enabled error

If you create a project and then immediately attempt to deploy the solution in the new project, the deployment might fail with an error like the following:

Error: Error creating Network: googleapi: Error 403: Compute Engine API has not
been used in project PROJECT_ID before or it is disabled. Enable it by visiting
https://console.developers.google.com/apis/api/compute.googleapis.com/overview?project=PROJECT_ID
then retry. If you enabled this API recently, wait a few minutes for the action
to propagate to our systems and retry.

If this error occurs, wait a few minutes and then run the terraform apply command again.

Error when deleting a deployment

In certain cases, attempts to delete a deployment might fail:

  • After deploying a solution through the console, if you change any resource that was provisioned by the solution, and if you then try to delete the deployment, the deletion might fail. The Status field on the Solution deployments page shows Failed, and the Cloud Build log shows the cause of the error.
  • After deploying a solution by using the Terraform CLI, if you change any resource by using a non-Terraform interface (for example, the console), and if you then try to delete the deployment, the deletion might fail. The messages in the output of the terraform destroy command show the cause of the error.

Review the error logs and messages, identify and delete the resources that caused the error, and then try deleting the deployment again.

If a console-based deployment doesn't get deleted and if you can't diagnose the error by using the Cloud Build log, then you can delete the deployment by using the Terraform CLI, as described in the next section.

Delete a console-based deployment by using the Terraform CLI

This section describes how to delete a console-based deployment if errors occur when you try to delete it through the console. In this approach, you download the Terraform configuration for the deployment that you want to delete and then use the Terraform CLI to delete the deployment.

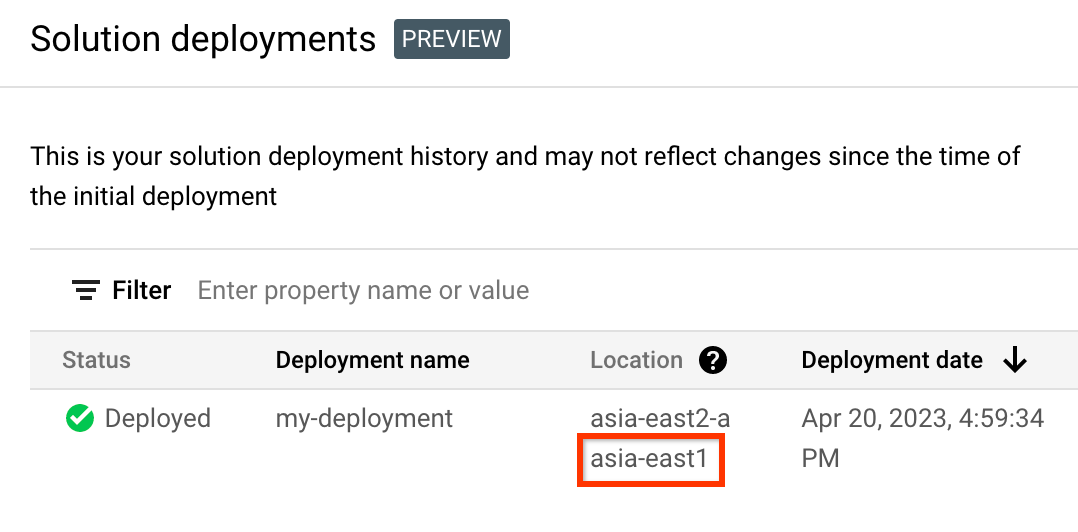
  1. Identify the region where the deployment's Terraform code, logs, and other data are stored. This region might be different from the region that you selected while deploying the solution.

    1. In the Google Cloud console, go to the Solution deployments page.

      Go to Solution deployments

    2. Select the project that contains the deployment that you want to delete.

    3. In the list of deployments, identify the row for the deployment that you want to delete.

    4. Click View all row content.

    5. In the Location column, note the second location, as highlighted in the following example:

      Location of the deployment code, logs and other artifacts.

  2. In the Google Cloud console, activate Cloud Shell.

    Activate Cloud Shell

    At the bottom of the Google Cloud console, a Cloud Shell session starts and displays a command-line prompt. Cloud Shell is a shell environment with the Google Cloud CLI already installed and with values already set for your current project. It can take a few seconds for the session to initialize.

  3. Create environment variables for the project ID, region, and name of the deployment that you want to delete:

    export REGION="REGION"
    export PROJECT_ID="PROJECT_ID"
    export DEPLOYMENT_NAME="DEPLOYMENT_NAME"
    

    In these commands, replace the following:

    • REGION: the location that you noted earlier in this procedure.
    • PROJECT_ID: the ID of the project where you deployed the solution.
    • DEPLOYMENT_NAME: the name of the deployment that you want to delete.
  4. Get the ID of the latest revision of the deployment that you want to delete:

    export REVISION_ID=$(curl \
        -H "Authorization: Bearer $(gcloud auth print-access-token)" \
        -H "Content-Type: application/json" \
        "https://config.googleapis.com/v1alpha2/projects/${PROJECT_ID}/locations/${REGION}/deployments/${DEPLOYMENT_NAME}" \
        | jq .latestRevision -r)
        echo $REVISION_ID
    

    The output is similar to the following:

    projects/PROJECT_ID/locations/REGION/deployments/DEPLOYMENT_NAME/revisions/r-0
    
  5. Get the Cloud Storage location of the Terraform configuration for the deployment:

    export CONTENT_PATH=$(curl \
        -H "Authorization: Bearer $(gcloud auth print-access-token)" \
        -H "Content-Type: application/json" \
        "https://config.googleapis.com/v1alpha2/${REVISION_ID}" \
        | jq .applyResults.content -r)
        echo $CONTENT_PATH
    

    The following is an example of the output of this command:

    gs://PROJECT_ID-REGION-blueprint-config/DEPLOYMENT_NAME/r-0/apply_results/content
    
  6. Download the Terraform configuration from Cloud Storage to Cloud Shell:

    gsutil cp -r $CONTENT_PATH $HOME
    cd $HOME/content/infra
    

    Wait until the Operation completed message is displayed, as shown in the following example:

    Operation completed over 45 objects/268.5 KiB
    
  7. Initialize Terraform:

    terraform init
    

    Wait until you see the following message:

    Terraform has been successfully initialized!
    
  8. Remove the deployed resources:

    terraform destroy
    

    Terraform displays a list of the resources that will be destroyed.

    If any warnings about undeclared variables are displayed, ignore the warnings.

  9. When you're prompted to perform the actions, enter yes.

    Terraform displays messages showing the progress. After all the resources are deleted, Terraform displays the following message:

    Destroy complete!
    
  10. Delete the deployment artifact:

    curl -X DELETE \
        -H "Authorization: Bearer $(gcloud auth print-access-token)" \
        -H "Content-Type: application/json" \
        "https://config.googleapis.com/v1alpha2/projects/${PROJECT_ID}/locations/${REGION}/deployments/${DEPLOYMENT_NAME}?force=true&delete_policy=abandon"
    
  11. Wait a few seconds and then verify that the deployment artifact was deleted:

    curl -H "Authorization: Bearer $(gcloud auth print-access-token)" \
        -H "Content-Type: application/json" \
        "https://config.googleapis.com/v1alpha2/projects/${PROJECT_ID}/locations/${REGION}/deployments/${DEPLOYMENT_NAME}" \
        | jq .error.message
    

    If the output shows null, wait a few seconds and then run the command again.

    After the deployment artifact is deleted, a message as shown in the following example is displayed:

    Resource 'projects/PROJECT_ID/locations/REGION/deployments/DEPLOYMENT_NAME' was not found
    

Submit feedback

Jump Start Solutions are for informational purposes only and are not officially supported products. Google may change or remove solutions without notice.

To troubleshoot errors, review the Cloud Build logs and the Terraform output.

To submit feedback, do the following:

  • For documentation, in-console tutorials, or the solution, use the Send Feedback button on the page.
  • For unmodified Terraform code, create issues in the GitHub repository. GitHub issues are reviewed on a best-effort basis and are not intended for general usage questions.
  • For issues with the products that are used in the solution, contact Cloud Customer Care.

    We also recommend reviewing the list of (both open and closed) issues in the solution's GitHub repository.

What's next