Quando chama um proxy de API no Apigee que tem segurança OAuth, o Apigee é responsável por
validar os tokens de acesso. Pense no Apigee como o porteiro: nenhuma chamada API pode passar se não tiver um token de acesso que possa ser validado.
Adicionar uma política VerifyAccessToken
Para configurar a validação de tokens, coloque uma política OAuthV2 com a operação VerifyAccessToken no início do fluxo do proxy de API (o início do Preflow do ProxyEndpoint). Se forem colocados aí, os tokens de acesso são validados antes de qualquer outro processamento e, se um token for rejeitado, o Apigee para o processamento e devolve um erro ao cliente.
Para aceder à página Proxies de API através da IU do Apigee:
Selecione Desenvolver > Proxies de API na barra de navegação do lado esquerdo.
Na lista, selecione o proxy que quer proteger.
Na página de vista geral, clique no separador Desenvolver.
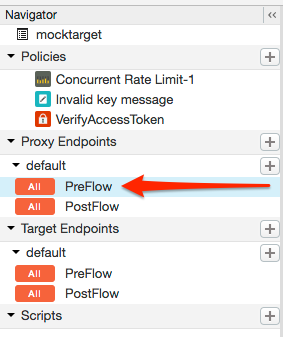
No navegador, selecione PreFlow para um ponto final listado em Proxy
Endpoints. Normalmente, o ponto final pretendido chama-se "default", embora seja possível
criar vários pontos finais de proxy. Se tiver vários pontos finais, é provável que queira seguir estes passos para fazer a validação de tokens em cada um deles.
No editor de fluxo de proxy, clique em + Passo.
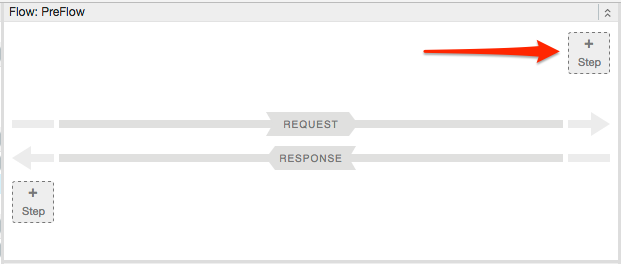
Selecione Policy Instance New.
Na lista de políticas, selecione OAuth v2.0.
Opcionalmente, altere o nome da política e o nome a apresentar. Por exemplo, para uma melhor legibilidade,
pode alterar o nome a apresentar e o nome para "VerifyAccessToken".
Clique em Adicionar.
A política predefinida já está configurada com a operação VerifyAccessToken, pelo que não
tem de fazer mais nada:
[[["Fácil de entender","easyToUnderstand","thumb-up"],["Meu problema foi resolvido","solvedMyProblem","thumb-up"],["Outro","otherUp","thumb-up"]],[["Difícil de entender","hardToUnderstand","thumb-down"],["Informações incorretas ou exemplo de código","incorrectInformationOrSampleCode","thumb-down"],["Não contém as informações/amostras de que eu preciso","missingTheInformationSamplesINeed","thumb-down"],["Problema na tradução","translationIssue","thumb-down"],["Outro","otherDown","thumb-down"]],["Última atualização 2025-09-04 UTC."],[[["\u003cp\u003eThis content focuses on configuring OAuth 2.0 access token verification within Apigee and Apigee hybrid API proxies.\u003c/p\u003e\n"],["\u003cp\u003eApigee acts as a gatekeeper, requiring and verifying access tokens for all API calls to ensure security.\u003c/p\u003e\n"],["\u003cp\u003eTo verify access tokens, an OAuthV2 policy with the VerifyAccessToken operation must be placed at the beginning of the API proxy's flow, specifically the ProxyEndpoint Preflow.\u003c/p\u003e\n"],["\u003cp\u003eThe default setting for the VerifyAccessToken policy expects the access token to be included in the Authorization header as a Bearer token, but it can be configured to support different types of tokens.\u003c/p\u003e\n"],["\u003cp\u003eIf encountering an "Invalid API call as no apiproduct match found" error, an external community article is provided for troubleshooting steps.\u003c/p\u003e\n"]]],[],null,["# Verifying access tokens\n\n*This page\napplies to **Apigee** and **Apigee hybrid**.*\n\n\n*View [Apigee Edge](https://docs.apigee.com/api-platform/get-started/what-apigee-edge) documentation.*\n\nWhen you call an API proxy on Apigee that has OAuth security, Apigee is responsible for\nverifying access tokens. Think of Apigee as the gatekeeper -- no API call can pass through that\ndoes not have an access token that can be verified.\n| **Tip:** When verifying an access token, if you happen to see this error: \"Invalid API call as no apiproduct match found\", go to this [Apigee Community article](https://community.apigee.com/content/kbentry/6831/oauth20-access-token-verification-throws-invalid-a.html) for details on the cause of this error and steps to correct it.\n\nAdding a VerifyAccessToken policy\n---------------------------------\n\nTo configure token verification, place an [OAuthV2 policy](/apigee/docs/api-platform/reference/policies/oauthv2-policy) with the\n**VerifyAccessToken** operation at the very beginning of the API proxy flow (the\nbeginning of the ProxyEndpoint Preflow). If placed there, access tokens will be verified before\nany other processing takes place, and if a token is rejected, Apigee stops processing and returns\nan error back to the client.\n\nTo access the API proxies page using the Apigee UI:\n\n1. Open the [Apigee UI](https://apigee.google.com).\n2. Select **Develop \\\u003e API Proxies** in the left navigation bar.\n3. From the list, select the proxy you wish to protect.\n4. In the overview page, click the **Develop** tab.\n5. In the Navigator, select **PreFlow** for an endpoint listed under Proxy Endpoints. Typically, the endpoint you want is called \"default\", although it is possible to create multiple proxy endpoints. If you do have multiple endpoints, you will probably want to follow these steps to perform token verification on each one. \n\n \u003cbr /\u003e\n\n6. In the proxy flow editor, click **+ Step** . \n\n \u003cbr /\u003e\n\n7. Select **Policy Instance New**.\n8. From the policy list, select **OAuth v2.0**.\n9. Optionally, change the policy name and display name. For example, for better readability, you might change the display name and name both to \"VerifyAccessToken\".\n10. Click **Add**.\n\nThe default policy is already configured with the VerifyAccessToken operation, so you do not\nhave to do anything further: \n\n```text\n\u003c?xml version=\"1.0\" encoding=\"UTF-8\" standalone=\"yes\"?\u003e\n\u003cOAuthV2 async=\"false\" continueOnError=\"false\" enabled=\"true\" name=\"OAuth-v20-1\"\u003e\n \u003cDisplayName\u003eOAuth v2.0 1\u003c/DisplayName\u003e\n \u003cFaultRules/\u003e\n \u003cProperties/\u003e\n \u003cAttributes/\u003e\n \u003cExternalAuthorization\u003efalse\u003c/ExternalAuthorization\u003e\n \u003cOperation\u003eVerifyAccessToken\u003c/Operation\u003e\n \u003cSupportedGrantTypes/\u003e\n \u003cGenerateResponse enabled=\"true\"/\u003e\n \u003cTokens/\u003e\n\u003c/OAuthV2\u003e\n```\n| **Note:** By default, VerifyAccessToken expects the access token to be sent in an Authorization header as a Bearer token. For example: \n|\n| ```text\n| -H \"Authorization: Bearer Rft3dqrs56Blirls56a\"\n| ```\n|\n| You can change this default in the `\u003cAccessToken\u003e ` element in the\n| OAuthV2 policy, as explained in the [OAuthV2 policy\n| documentation](/apigee/docs/api-platform/reference/policies/oauthv2-policy#accesstokenelement)."]]