Nachdem Sie die Entwicklung und das Testen mit Apigee in VS Code abgeschlossen haben, können Sie die API als Archiv in einer Apigee-Umgebung bereitstellen. In diesem Schritt erstellen Sie eine Apigee-Umgebung, die die Archivbereitstellung unterstützt, und erstellen ein Archiv Ihrer API-Proxy-Konfiguration in der Apigee-Umgebung.
Führen Sie die Schritte unter Umgebung erstellen aus, um Folgendes durchzuführen:
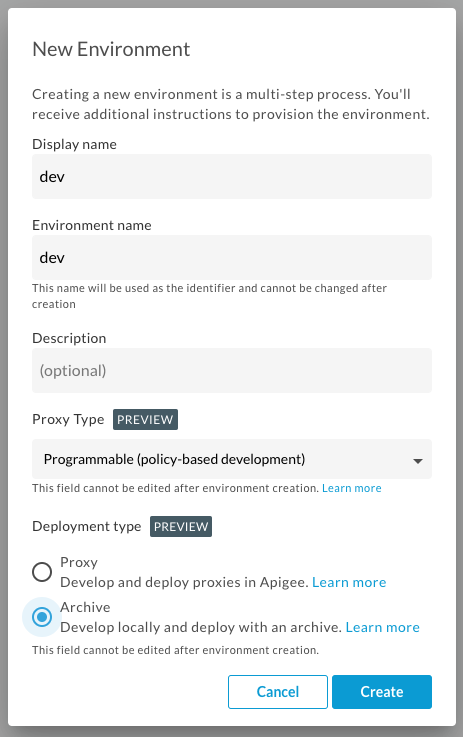
Erstellen Sie eine neue dev-Umgebung in Ihrer Apigee-Organisation und aktivieren Sie Archiv als Bereitstellungstyp Verwenden Sie die UI oder die API
Prüfen Sie, ob die Umgebungsgruppe erstellt wurde, bevor Sie fortfahren. Sie können dann den Status der neuen Gruppe mithilfe einer Anfrage wie der folgenden prüfen:
Durch Anhängen einer Umgebung an die Gruppe sind die Proxys in dieser Umgebung nur über die Hostnamen in der Gruppe routingfähig. Dadurch wird ein lang andauernder Vorgang ausgelöst, der einige Minuten dauern kann. Wir empfehlen, ein bis zwei Minuten zu warten, bevor Sie mit dem nächsten Schritt fortfahren. In der Zwischenzeit können Sie den Status des Vorgangs wie zuvor prüfen.
Ein Archiv Ihrer API-Proxy-Konfiguration in der Apigee-Umgebung bereitstellen
Gehen Sie auf dem Tab Terminal in Apigee VS Code zum Verzeichnis myapigeeworkspace.
cd myapigeeworkspace
Wenn Sie ls ausführen, sollte das Verzeichnis den Ordner src enthalten.
Weitere Informationen zu den Variablen in diesem Beispiel und zum Einrichten des API-Zugriffs finden Sie unter Beispielproxy bereitstellen.
Die folgende Fehlermeldung wird angezeigt:
{"fault":{"faultstring":"Failed to resolve API Key variable request.queryparam.apikey",
  "detail":{"errorcode":"steps.oauth.v2.FailedToResolveAPIKey"}}}
Sie müssen ein API-Produkt erstellen, das die helloworld API enthält, und einen Entwickler dann beim API-Produkt erstellen und registrieren, um einen API-Schlüssel zu erhalten.
Erstellen Sie einen API-Schlüssel.
Erstellen Sie einen API-Proxy mithilfe der Apigee-Benutzeroberfläche.
Wählen Sie Publish > API Products aus.
Klicken Sie auf + Erstellen.
Geben Sie die Produktdetails für Ihr API-Produkt ein.
Geben Sie folgende Informationen in die entsprechenden Felder ein:
Feld
Einstellung
Name:
myproduct
Display name:
myproduct
Environment:
dev
Access:
Öffentlich
Quota:
Leer lassen
Allowed OAuth scope:
Leer lassen
Klicken Sie unter Vorgänge auf + Vorgang hinzufügen.
Wählen Sie unter Quelle aus dem Drop-down-Menü „API Proxy“ die Option helloworld aus.
Geben Sie unter Vorgang im Feld "Pfad" / ein.
Übernehmen Sie die Standardwerte der restlichen Felder.
Klicken Sie auf Speichern, um den Vorgang zu speichern.
Klicken Sie auf Speichern, um das API-Produkt zu speichern.
Erstellen Sie einen Entwickler in Ihrer Organisation:
Klicken Sie im seitlichen Navigationsmenü auf Veröffentlichen > Entwickler.
Klicken Sie auf + Entwickler.
Geben Sie folgende Informationen in die entsprechenden Felder ein:
Feld
Einstellung
First Name:
Alex
Last Name:
Hamilton
Username:
ahamilton
Email:
ahamilton@example.com
Klicken Sie auf Erstellen.
App registrieren:
Wählen Sie Veröffentlichen > Apps aus.
Klicken Sie auf + App.
Geben Sie folgende Informationen in die entsprechenden Felder ein:
Feld
Einstellung
Name:
myapp
Display name:
myapp
Developer:
ahamilton@example.com
Callback URL:
Leer lassen
Notes:
Leer lassen
Expiry:
Nie
Product:
Klicken Sie auf Produkt hinzufügen.
Wählen Sie myproduct aus.
Klicken Sie auf Hinzufügen.
Custom attributes:
Leer lassen
Kopieren Sie den API-Schlüssel.
Klicken Sie auf der Seite "Apps" (Veröffentlichen > Apps) auf myapp.
Klicken Sie auf der Seite myapp im Abschnitt Anmeldedaten neben Schlüssel auf Anzeigen. Beachten Sie, dass der API-Schlüssel mit dem von Ihnen erstellten API-Produkt verknüpft ist.
Wählen Sie den API-Schlüssel aus und kopieren Sie ihn.
Führen Sie den curl-Aufruf noch einmal aus und übergeben Sie damit den API-Schlüssel mit dem Abfrageparameter apikey:
[[["Leicht verständlich","easyToUnderstand","thumb-up"],["Mein Problem wurde gelöst","solvedMyProblem","thumb-up"],["Sonstiges","otherUp","thumb-up"]],[["Schwer verständlich","hardToUnderstand","thumb-down"],["Informationen oder Beispielcode falsch","incorrectInformationOrSampleCode","thumb-down"],["Benötigte Informationen/Beispiele nicht gefunden","missingTheInformationSamplesINeed","thumb-down"],["Problem mit der Übersetzung","translationIssue","thumb-down"],["Sonstiges","otherDown","thumb-down"]],["Zuletzt aktualisiert: 2025-09-04 (UTC)."],[[["\u003cp\u003eThis guide outlines how to deploy an API archive to an Apigee environment after local development and testing in VS Code, applicable to both Apigee and Apigee hybrid.\u003c/p\u003e\n"],["\u003cp\u003eThe process involves creating a new 'dev' environment in your Apigee organization, enabling 'Archive' as the deployment type, and attaching this environment to a runtime instance and environment group.\u003c/p\u003e\n"],["\u003cp\u003eAfter creating the environment, you deploy the API proxy configuration archive to the newly created environment using the \u003ccode\u003egcloud beta apigee archives deploy\u003c/code\u003e command.\u003c/p\u003e\n"],["\u003cp\u003eYou will need to create an API product, a developer, and register an app in order to obtain an API key to successfully test the deployed API.\u003c/p\u003e\n"],["\u003cp\u003eAfter testing the deployment with an API key, you can use this new flow for promoting the API archive to an Apigee production environment.\u003c/p\u003e\n"]]],[],null,["# Step 7: Deploy to an Apigee environment\n\n*This page\napplies to **Apigee** and **Apigee hybrid**.*\n\n\n*View [Apigee Edge](https://docs.apigee.com/api-platform/get-started/what-apigee-edge) documentation.*\n\n\u003cbr /\u003e\n\nAfter you complete local development and testing with Apigee in VS Code, you are ready to deploy your API as an archive to an Apigee\nenvironment. In this step, you'll create an Apigee environment that supports archive deployment and deploy an archive of your API proxy configuration to the Apigee environment.\n| **Before you begin** : Install Google Cloud SDK and the `gcloud beta apigee` component, as described in [Getting started using gcloud with Apigee](/apigee/docs/api-platform/get-started/gcloud-get-started).\n\n1. Follow the steps in [Create an environment](https://cloud.google.com/apigee/docs/api-platform/get-started/install-cli#create-environment) to perform the following:\n 1. Create a new **dev** environment in your Apigee organization, enabling **Archive** as the deployment type. Use the [UI](https://cloud.google.com/apigee/docs/api-platform/fundamentals/environments-working-with#creating-a-new-environment-in-the-ui) or [API](/apigee/docs/reference/apis/apigee/rest/v1/organizations.environments/create).\n 2. Attach the environment to a runtime instance using the [Instances attachment API](/apigee/docs/reference/apis/apigee/rest/v1/organizations.instances.attachments).\n\n\n This command triggers a long-running operation. Ensure that the environment has been attached to the runtime before continuing.\n 3. Create an environment group if you do not already have one using the [Create environment groups API](/apigee/docs/reference/apis/apigee/rest/v1/organizations.envgroups/create).\n\n\n Ensure that the environment group has been created before continuing. You can check the status of your new group using a\n request like the following: \n\n ```\n curl -i -H \"$AUTH\" -H \"Content-Type:application/json\" \\\n \"https://apigee.googleapis.com/v1/organizations/$PROJECT_ID/environments/ENVIRONMENT_NAME\"\n ```\n 4. Attach the new environment to the environment group using the [Environment group attachment API](/apigee/docs/reference/apis/apigee/rest/v1/organizations.envgroups.attachments).\n\n Attaching an environment to the group makes the proxies in that environment\n routable via the hostnames in the group. This triggers a long-running operation that can take several minutes to complete. We recommend that you wait a minute or two before continuing to the next step. In the meantime you can check the status of the operation as before.\n2. Deploy an archive of your API proxy configuration to the Apigee environment.\n 1. In the **Terminal** tab in Apigee VS Code, navigate to the **myapigeeworkspace** directory. \n\n ```\n cd myapigeeworkspace\n ```\n\n\n When you run `ls` the directory should contain the `src` folder.\n 2. Run the following command: \n\n ```\n gcloud beta apigee archives deploy --environment=dev --labels=release=052021\n ```\n\n\n The following provides an example of the response: \n\n ```\n Using Apigee organization dev\n Waiting for operation [b64c2665-b5ac-43cc-9e2d-232e8895c2ed] to complete...done\n ```\n3. Run the following command in the **Terminal** tab to test your API: \n\n ```\n curl https://INTERNAL_LOAD_BALANCER_IP/helloworld /\n -H \"Host: ENV_GROUP_HOSTNAME\" \n ```\n\n\n For more information about the variables in this example and how to set up API access, see [Deploy a sample proxy](/apigee/docs/api-platform/get-started/deploy-sample).\n\n\n The following error message is displayed: \n\n ```\n {\"fault\":{\"faultstring\":\"Failed to resolve API Key variable request.queryparam.apikey\",\n \"detail\":{\"errorcode\":\"steps.oauth.v2.FailedToResolveAPIKey\"}}}\n ```\n\n\n You need to create an API product that includes the `helloworld` API, then create and register a developer with the API product in order to obtain an API key.\n4. Obtain an API key.\n 1. Create an API product using the Apigee UI:\n 1. Go to the API products page: \n\n ### Apigee in Cloud console\n\n In the Google Cloud console, go to the **Distribution \\\u003e API products** page.\n\n [Go to API products](https://console.cloud.google.com/apigee/apiproducts)\n\n ### Classic Apigee UI\n\n Select **Publish \\\u003e API Products**.\n 2. Click **+ Create**.\n 3. Enter the Product Details for your API product. \n 4. Enter the following information in the fields:\n\n 5. In the **Operations** section, click **+ Add an Operation**.\n 6. Under **Source** select **helloworld** from the API Proxy dropdown menu.\n 7. Under **Operation** , in the Path field, enter `/`.\n\n\n Leave other fields set to their defaults.\n 8. Click **Save** to save the Operation.\n 9. Click **Save** to save the API product.\n\n \u003cbr /\u003e\n\n 2. Create a developer in your organization: \n\n ### Apigee in Cloud console\n\n 1. In the Google Cloud console, go to the **Distribution \\\u003e Developers** page.\n\n [Go to Developers](https://console.cloud.google.com/apigee/developers)\n 2. Click **+ Create**.\n 3. Enter the following information in the fields:\n\n 4. Click **Add**.\n\n ### Classic Apigee UI\n\n 1. Select **Publish \\\u003e Developers** in the navigation menu.\n 2. Click **+ Developer**.\n 3. Enter the following information in the fields:\n\n 4. Click **Create**.\n 3. Register an app:\n 1. Open the app editor. \n\n ### Apigee in Cloud console\n\n 1. In the Google Cloud console, go to the **Distribution \\\u003e Apps** page.\n\n [Go to Apps](https://console.cloud.google.com/apigee/apps)\n 2. Click **+ Create**.\n\n ### Classic Apigee UI\n\n 1. Select **Publish \\\u003e Apps**.\n 2. Click **+ App**.\n 2. Enter the following information in the fields:\n\n 3. Click **Create**.\n 4. \n 4. Copy the API key.\n\n ### Apigee in Cloud console\n\n - In the Google Cloud console, go to the **Distribution \\\u003e Apps** page.\n\n [Go to Apps](https://console.cloud.google.com/apigee/apps)\n - Click **myapp**.\n - In the **Credentials** section, next to **Key** , click visibility_off **Show**.\n - Click content_copy **Copy**.\n\n ### Classic Apigee UI\n\n - On the Apps page (**Publish \\\u003e Apps** ), click **myapp**.\n\n - On the **myapp** page, click **Show** next to **Key** in the **Credentials** section. Notice that the API key is associated with the API product you created. \n - Select and copy the API key.\n\n5. Run the curl call again passing the API key using the `apikey` query parameter, as follows: \n\n ```\n curl -v https://$PUBLIC_FACING_IP/helloworld?apikey=ZQA5euYtNeJ7ZCGCJMpvd6F2BZOmxOzY\n ```\n\n The following response is returned: \n\n ```\n {\n \"root\": {\n \"city\": \"San Jose\",\n \"firstName\": \"John\",\n \"lastName\": \"Doe\",\n \"state\": \"CA\"\n }\n }\n ```\n\n\u003cbr /\u003e\n\n**Congratulations!** You've successfully deployed your API archive to an Apigee environment!\n\nIn the next step, you'll promote your API archive to an Apigee production environment.\n\n\n[1](/apigee/docs/api-platform/local-development/vscode/tutorial-create-workspace)\n\n\n[2](/apigee/docs/api-platform/local-development/vscode/tutorial-create-proxy)\n\n\n[3](/apigee/docs/api-platform/local-development/vscode/tutorial-deploy)\n\n\n[4](/apigee/docs/api-platform/local-development/vscode/tutorial-test)\n\n\n[5](/apigee/docs/api-platform/local-development/vscode/tutorial-change-target-endpoint)\n\n\n[6](/apigee/docs/api-platform/local-development/vscode/tutorial-attach-policy)\n\n\n[7](/apigee/docs/api-platform/local-development/vscode/tutorial-deploy-apigee)\n\n\n[(NEXT) Step 8: Promote an archive to production](/apigee/docs/api-platform/local-development/vscode/tutorial-promote)\n\n\u003cbr /\u003e"]]