Ahora que configuraste Google Cloud y la IU de Apigee, instalaste y configuraste el entorno de ejecución, estás listo para ver cómo funciona todo en conjunto.
1. Crea un proxy de API nuevo con la IU de Apigee
En esta sección, se describe cómo crear un proxy de API nuevo en la IU mediante el uso del asistente de proxy de API.
Para crear un proxy de API simple con el asistente de proxy de API, haz lo siguiente:
Selecciona tu organización en el menú desplegable de la esquina superior izquierda.
Selecciona Desarrollar > Proxies de API en la vista principal.
Haz clic en Crear nuevo. Se iniciará el asistente de proxy de API.
Selecciona Proxy inverso (más común).
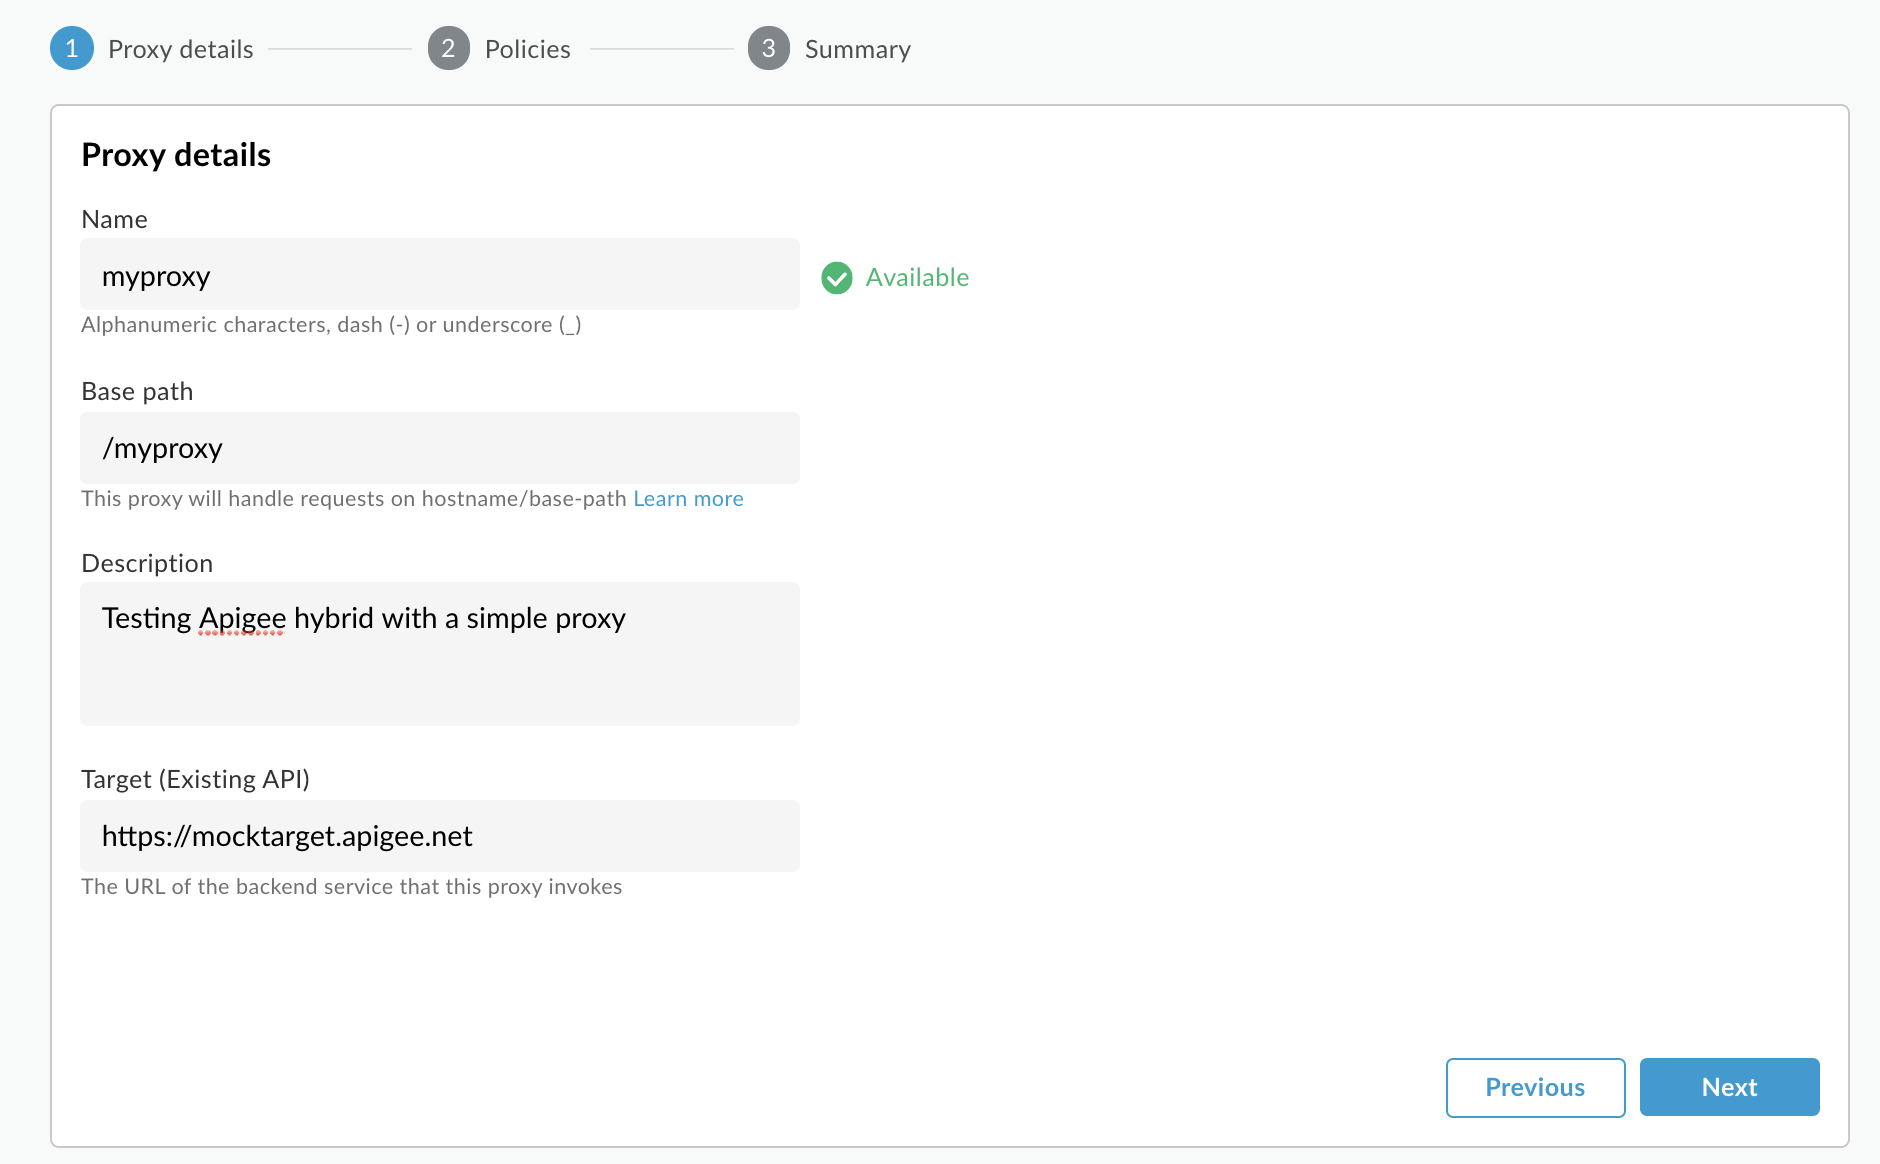
Se muestra la vista Detalles del proxy.
Configura tu proxy con los siguientes ajustes:
Nombre del proxy: Ingresa “myproxy”. En los pasos restantes de esta sección, se supone que este es el ID de tu proxy.
Ruta base del proxy: Se configurará de forma automática como "/myproxy". La ruta base del proxy es parte de la URL que se usa para realizar solicitudes a la API. Edge usa la URL para hacer coincidir solicitudes entrantes y enrutarlas al proxy de API adecuado.
(Opcional) Descripción: Ingresa una descripción para tu nuevo proxy de API, como "Prueba de Apigee Hybrid con un proxy simple".
Destino (API existente): Ingresa "https://mocktarget.apigee.net". Esto define la URL de destino que Apigee invoca en una solicitud al proxy de API. El servicio de destino ficticio se aloja en Apigee y muestra datos simples. No requiere una clave de API ni un token de acceso.
Los detalles de tu proxy de API deben tener el siguiente aspecto:
Haz clic en Siguiente.
En la pantalla Policies, selecciona Pass through (no authorization) como la opción de seguridad.
Haz clic en Siguiente.
En la pantalla Resumen, selecciona un entorno para implementar tu proxy y haz clic en Crear e implementar.
Hybrid genera el proxy (a veces denominado el paquete del proxy):
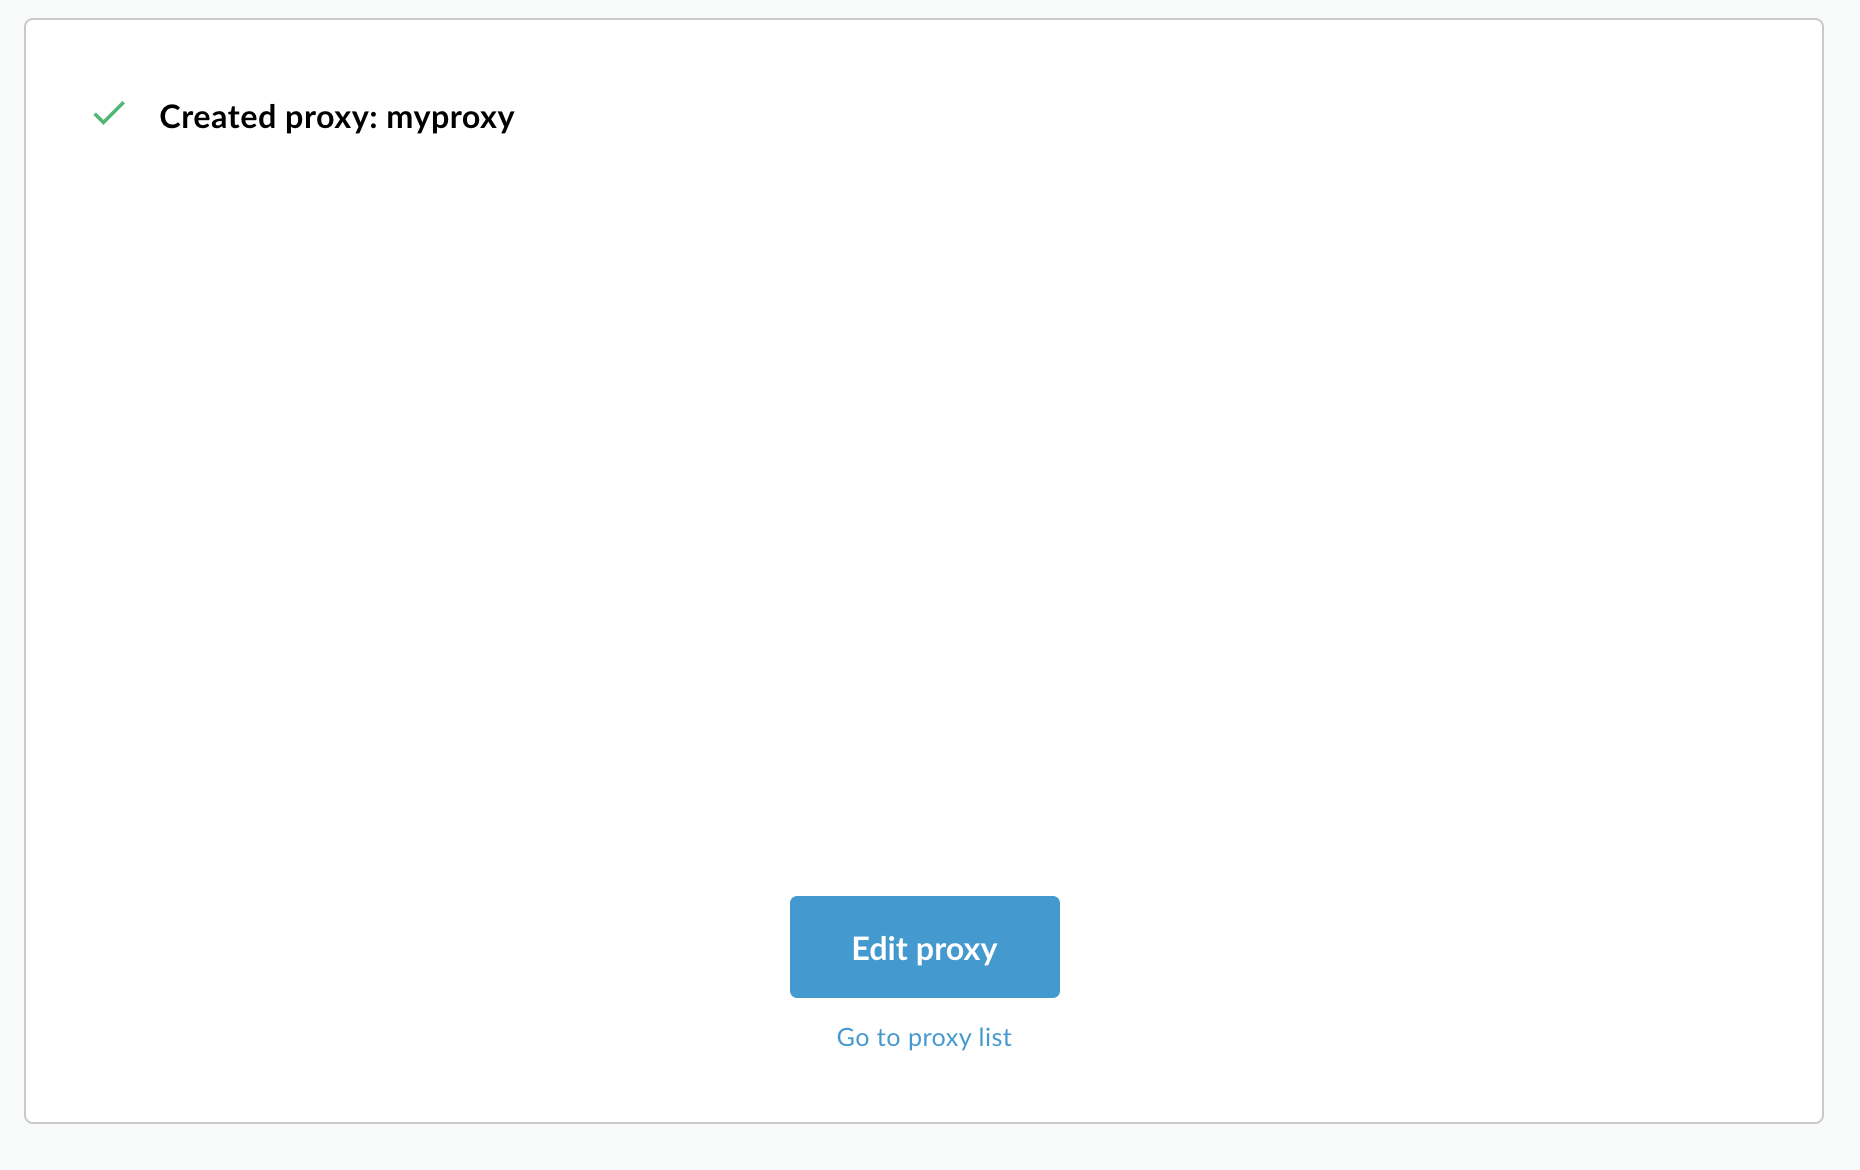
Haz clic en Ir a la lista de proxy.
Apigee muestra la vista Proxies, en la que se muestra una lista de los proxies de API. El proxy nuevo debe aparecer con un indicador de estado verde, lo que significa que se implementó.
2. Llama al proxy de API
Cuando la IU indica que el proxy está implementado, puedes intentar llamarlo con cURL o el cliente REST que elijas.
Por ejemplo:
Busca la dirección IP externa y el puerto de la puerta de enlace de entrada de Apigee con el siguiente comando:
kubectl get svc -n apigee -l app=apigee-ingressgateway
Deberías obtener un resultado similar al siguiente:
NAME TYPE CLUSTER-IP EXTERNAL-IP PORT(S) AGE
apigee-ingressgateway-prod-hybrid-37a39bd LoadBalancer 192.0.2.123 233.252.0.123 15021:32049/TCP,80:31624/TCP,443:30723/TCP 16h
Exporta tu IP externa y el puerto a las variables:
[[["Fácil de comprender","easyToUnderstand","thumb-up"],["Resolvió mi problema","solvedMyProblem","thumb-up"],["Otro","otherUp","thumb-up"]],[["Difícil de entender","hardToUnderstand","thumb-down"],["Información o código de muestra incorrectos","incorrectInformationOrSampleCode","thumb-down"],["Faltan la información o los ejemplos que necesito","missingTheInformationSamplesINeed","thumb-down"],["Problema de traducción","translationIssue","thumb-down"],["Otro","otherDown","thumb-down"]],["Última actualización: 2025-09-03 (UTC)"],[[["\u003cp\u003eThis documentation version (1.8) is end-of-life and users should upgrade to a newer version for continued support.\u003c/p\u003e\n"],["\u003cp\u003eYou can create a new API proxy using the Apigee UI's API Proxy Wizard by configuring settings like the proxy name, base path, and target API.\u003c/p\u003e\n"],["\u003cp\u003eThe newly created API proxy can be tested by calling it with cURL or another REST client once it has been deployed.\u003c/p\u003e\n"],["\u003cp\u003eAfter setting up an environment group, you can use the command line to find the external IP and port of the Apigee ingress gateway to target requests.\u003c/p\u003e\n"]]],[],null,["# Step 10: Deploy an API proxy\n\n| You are currently viewing version 1.8 of the Apigee hybrid documentation. **This version is end of life.** You should upgrade to a newer version. For more information, see [Supported versions](/apigee/docs/hybrid/supported-platforms#supported-versions).\n\nNow that you've configured and the Apigee UI, and installed and configured the\nruntime, you're ready to see how it all works together.\n\n1. Create a new API proxy using the Apigee UI\n---------------------------------------------\n\nThis section describes how to create a new API proxy in the UI by using the API Proxy Wizard.\n\n**To create a simple API proxy using the API Proxy Wizard:**\n\n1. Open [Apigee UI](https://apigee.google.com) in a browser.\n2. Select your organization from the dropdown menu in the upper left corner.\n3. Select **Develop \\\u003e API Proxies** in the main view.\n4. Click **Create New**.The API Proxy Wizard starts.\n5. Select **Reverse proxy** (most common).\n\n The **Proxy details** view is displayed.\n6. Configure your proxy with the following settings:\n - **Proxy Name:** Enter \"myproxy\". The remaining steps in this section assume that this is your proxy's ID.\n - **Proxy Base Path:** Automatically set to \"/myproxy\". The **Proxy Base\n Path** is part of the URL used to make requests to your API. Edge uses the URL to match and route incoming requests to the proper API proxy.\n - (Optional)**Description:** Enter a description for your new API proxy, such as \"Testing Apigee hybrid with a simple proxy\".\n - **Target (Existing API):** Enter \"https://mocktarget.apigee.net\". This defines the target URL that Apigee invokes on a request to the API proxy. The mocktarget service is hosted at Apigee and returns simple data. It requires no API key or access token.\n\n Your API proxy's details should look like the following:\n\n7. Click **Next**.\n8. On the **Policies** screen, select **Pass through (no authorization)** as the security option.\n9. Click **Next**.\n10. On the **Summary** screen, select an environment to deploy your proxy to and click **Create and Deploy** .\n\n Hybrid generates the proxy (sometimes referred to as *the proxy bundle*):\n\n11. Click **Go to proxy list** .\n\n Apigee displays the **Proxies** view, which displays a list of API proxies. Your\n new proxy should display with a green status indicator, meaning that it has been deployed.\n\n2. Call the API proxy\n---------------------\n\nWhen the UI indicates your proxy is deployed, you can try calling it using cURL or the REST\nclient of your choice.\nFor example:\n\n1. Make sure your `DOMAIN` environment variable is set to the domain name you used for the hostname for your environment group in [Project and org\n setup - Step 3: Create an environment group](/apigee/docs/hybrid/v1.8/precog-add-environment). \n\n ```\n echo $DOMAIN\n ```\n2. Find the external IP address and port of the Apigee ingress gateway with the following command:\n\n ```\n kubectl get svc -n apigee -l app=apigee-ingressgateway\n ```\n\n\n Your output should look something like: \n\n ```\n NAME TYPE CLUSTER-IP EXTERNAL-IP PORT(S) AGE\n apigee-ingressgateway-prod-hybrid-37a39bd LoadBalancer 192.0.2.123 233.252.0.123 15021:32049/TCP,80:31624/TCP,443:30723/TCP 16h\n ```\n3. Export your external IP and port to variables: \n\n export INGRESS_IP_ADDRESS=EXTERNAL_IP_ADDRESS\n export INGRESS_PORT=\u003cvar translate=\"no\"\u003ePORT_NUMBER\u003c/var\u003e\n\n4. Call the API proxy: \n\n ```\n curl -H Host:$DOMAIN --resolve \\\n $DOMAIN:$INGRESS_PORT:$INGRESS_IP_ADDRESS \\\n https://$DOMAIN:$INGRESS_PORT/myproxy -k\n ```\n\n\n For example: \n\n ```\n curl -H Host:example.com --resolve example.com:443:233.252.0.123 https://example.com:443/myproxy -k\n ```\n\n\nTo learn more about building and deploying API proxies, see [Build your first proxy overview](/apigee/docs/api-platform/get-started/get-started).\n| **Congratulations!**\n|\n| You've successfully installed Apigee hybrid. To learn more about building and deploying\n| API proxies, see [Introduction to API proxy building](/apigee/docs/api-platform/fundamentals/build-simple-api-proxy).\n\n*[Google Cloud]: Google Cloud"]]