Ora che hai configurato Google Cloud e l'interfaccia utente di Apigee e hai installato e configurato il runtime, puoi scoprire come funzionano insieme.
1. Creare un nuovo proxy API utilizzando l'interfaccia utente di Apigee
Questa sezione descrive come creare un nuovo proxy API nell'interfaccia utente utilizzando la procedura guidata per i proxy API.
Per creare un proxy API semplice utilizzando la procedura guidata Proxy API:
Seleziona la tua organizzazione dal menu a discesa nell'angolo in alto a sinistra.
Seleziona Sviluppa > Proxy API nella visualizzazione principale.
Fai clic su Crea nuovo.Viene avviata la procedura guidata Proxy API.
Seleziona Proxy inverso (il più comune).
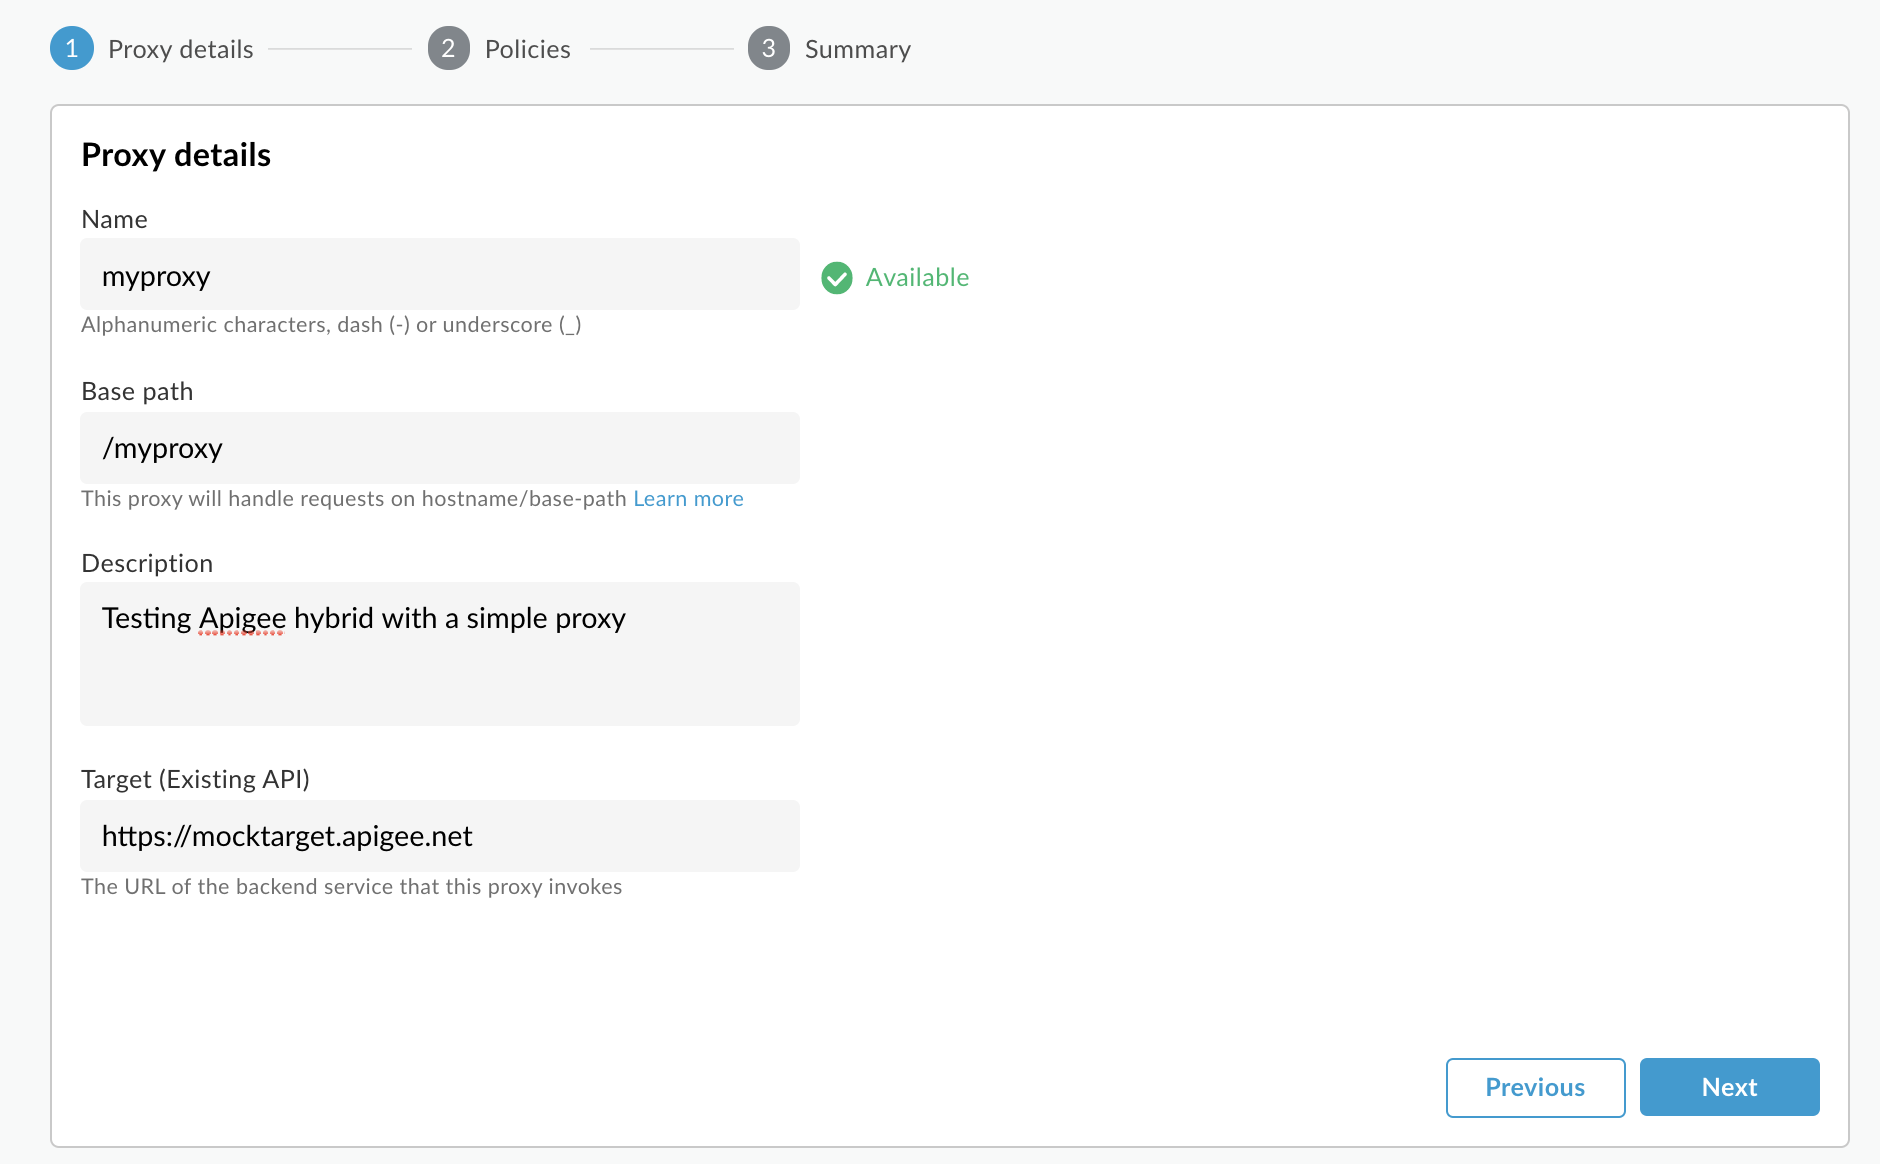
Viene visualizzata la visualizzazione Dettagli proxy.
Configura il proxy con le seguenti impostazioni:
Nome del proxy: inserisci "myproxy". I passaggi rimanenti di questa sezione presuppongono
che questo sia l'ID del tuo proxy.
Percorso base del proxy: impostato automaticamente su "/myproxy". Il percorso base del proxy fa parte dell'URL utilizzato per inviare richieste all'API. Edge utilizza l'URL per
associare e instradare le richieste in entrata al proxy API appropriato.
(Facoltativo) Descrizione:inserisci una descrizione per il nuovo proxy API, ad esempio "Test di Apigee Hybrid con un proxy semplice".
Destinazione (API esistente): inserisci "https://mocktarget.apigee.net". Questo definisce l'URL di destinazione invocato da Apigee su una richiesta al proxy API. Il servizio mocktarget è ospitato su Apigee e restituisce dati semplici. Non richiede una chiave API o un token di accesso.
I dettagli del proxy API dovrebbero avere il seguente aspetto:
Fai clic su Avanti.
Nella schermata Norme, seleziona Passthrough (nessuna autorizzazione) come opzione di sicurezza.
Fai clic su Avanti.
Nella schermata Riepilogo, seleziona un ambiente in cui eseguire il deployment del proxy e
fai clic su Crea ed esegui il deployment.
Hybrid genera il proxy (a volte chiamato bundle del proxy):
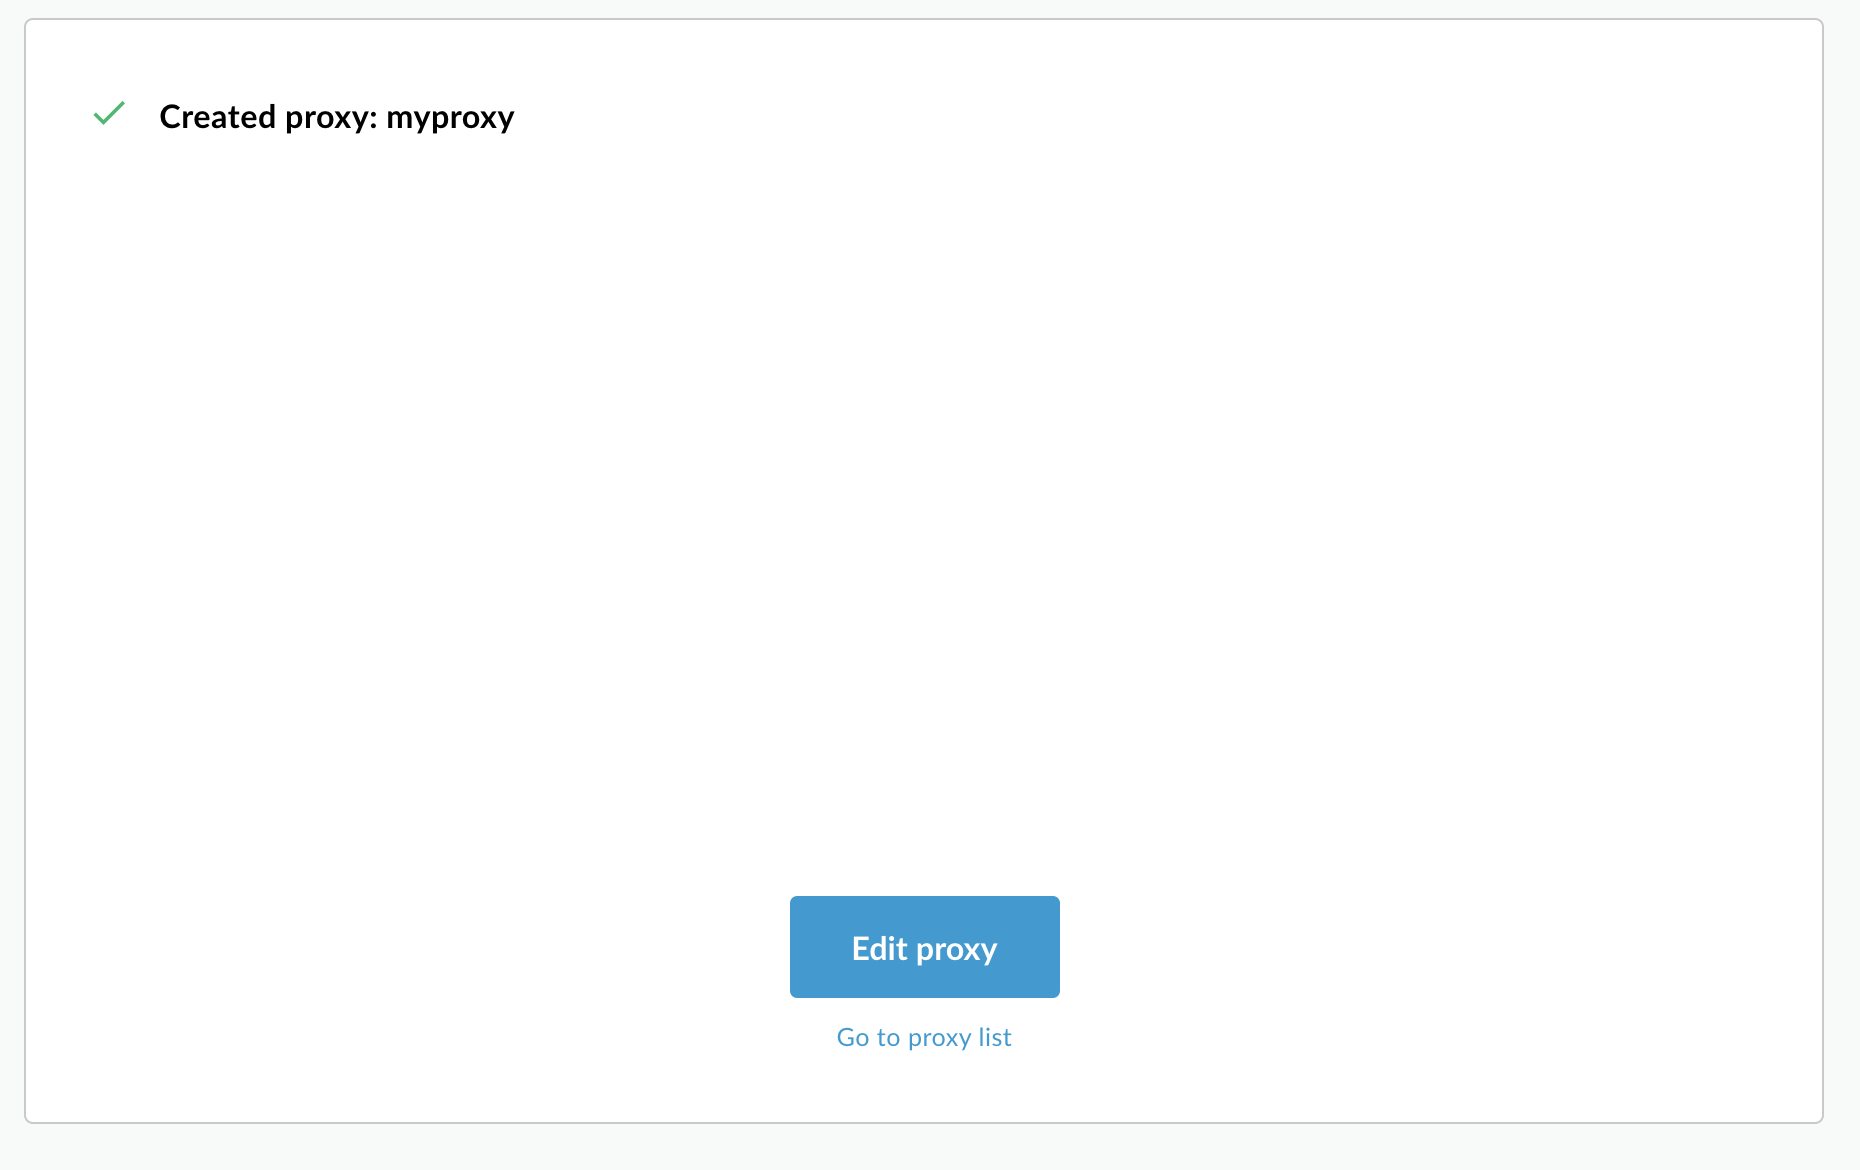
Fai clic su Vai all'elenco di proxy.
Apigee mostra la visualizzazione Proxy, che mostra un elenco di proxy API. Il nuovo proxy dovrebbe essere visualizzato con un indicatore di stato verde, a indicare che è stato implementato.
2. Chiama il proxy API
Quando l'interfaccia utente indica che il proxy è stato disegnato, puoi provare a chiamarlo utilizzando cURL o il client REST di tua scelta.
Ad esempio:
Trova l'indirizzo IP esterno e la porta del gateway di ingresso Apigee con il seguente comando:
kubectl get svc -n apigee -l app=apigee-ingressgateway
L'output dovrebbe avere il seguente aspetto:
NAME TYPE CLUSTER-IP EXTERNAL-IP PORT(S) AGE
apigee-ingressgateway-prod-hybrid-37a39bd LoadBalancer 192.0.2.123 233.252.0.123 15021:32049/TCP,80:31624/TCP,443:30723/TCP 16h
[[["Facile da capire","easyToUnderstand","thumb-up"],["Il problema è stato risolto","solvedMyProblem","thumb-up"],["Altra","otherUp","thumb-up"]],[["Difficile da capire","hardToUnderstand","thumb-down"],["Informazioni o codice di esempio errati","incorrectInformationOrSampleCode","thumb-down"],["Mancano le informazioni o gli esempi di cui ho bisogno","missingTheInformationSamplesINeed","thumb-down"],["Problema di traduzione","translationIssue","thumb-down"],["Altra","otherDown","thumb-down"]],["Ultimo aggiornamento 2025-09-05 UTC."],[[["\u003cp\u003eThis documentation version (1.8) is end-of-life and users should upgrade to a newer version for continued support.\u003c/p\u003e\n"],["\u003cp\u003eYou can create a new API proxy using the Apigee UI's API Proxy Wizard by configuring settings like the proxy name, base path, and target API.\u003c/p\u003e\n"],["\u003cp\u003eThe newly created API proxy can be tested by calling it with cURL or another REST client once it has been deployed.\u003c/p\u003e\n"],["\u003cp\u003eAfter setting up an environment group, you can use the command line to find the external IP and port of the Apigee ingress gateway to target requests.\u003c/p\u003e\n"]]],[],null,["# Step 10: Deploy an API proxy\n\n| You are currently viewing version 1.8 of the Apigee hybrid documentation. **This version is end of life.** You should upgrade to a newer version. For more information, see [Supported versions](/apigee/docs/hybrid/supported-platforms#supported-versions).\n\nNow that you've configured and the Apigee UI, and installed and configured the\nruntime, you're ready to see how it all works together.\n\n1. Create a new API proxy using the Apigee UI\n---------------------------------------------\n\nThis section describes how to create a new API proxy in the UI by using the API Proxy Wizard.\n\n**To create a simple API proxy using the API Proxy Wizard:**\n\n1. Open [Apigee UI](https://apigee.google.com) in a browser.\n2. Select your organization from the dropdown menu in the upper left corner.\n3. Select **Develop \\\u003e API Proxies** in the main view.\n4. Click **Create New**.The API Proxy Wizard starts.\n5. Select **Reverse proxy** (most common).\n\n The **Proxy details** view is displayed.\n6. Configure your proxy with the following settings:\n - **Proxy Name:** Enter \"myproxy\". The remaining steps in this section assume that this is your proxy's ID.\n - **Proxy Base Path:** Automatically set to \"/myproxy\". The **Proxy Base\n Path** is part of the URL used to make requests to your API. Edge uses the URL to match and route incoming requests to the proper API proxy.\n - (Optional)**Description:** Enter a description for your new API proxy, such as \"Testing Apigee hybrid with a simple proxy\".\n - **Target (Existing API):** Enter \"https://mocktarget.apigee.net\". This defines the target URL that Apigee invokes on a request to the API proxy. The mocktarget service is hosted at Apigee and returns simple data. It requires no API key or access token.\n\n Your API proxy's details should look like the following:\n\n7. Click **Next**.\n8. On the **Policies** screen, select **Pass through (no authorization)** as the security option.\n9. Click **Next**.\n10. On the **Summary** screen, select an environment to deploy your proxy to and click **Create and Deploy** .\n\n Hybrid generates the proxy (sometimes referred to as *the proxy bundle*):\n\n11. Click **Go to proxy list** .\n\n Apigee displays the **Proxies** view, which displays a list of API proxies. Your\n new proxy should display with a green status indicator, meaning that it has been deployed.\n\n2. Call the API proxy\n---------------------\n\nWhen the UI indicates your proxy is deployed, you can try calling it using cURL or the REST\nclient of your choice.\nFor example:\n\n1. Make sure your `DOMAIN` environment variable is set to the domain name you used for the hostname for your environment group in [Project and org\n setup - Step 3: Create an environment group](/apigee/docs/hybrid/v1.8/precog-add-environment). \n\n ```\n echo $DOMAIN\n ```\n2. Find the external IP address and port of the Apigee ingress gateway with the following command:\n\n ```\n kubectl get svc -n apigee -l app=apigee-ingressgateway\n ```\n\n\n Your output should look something like: \n\n ```\n NAME TYPE CLUSTER-IP EXTERNAL-IP PORT(S) AGE\n apigee-ingressgateway-prod-hybrid-37a39bd LoadBalancer 192.0.2.123 233.252.0.123 15021:32049/TCP,80:31624/TCP,443:30723/TCP 16h\n ```\n3. Export your external IP and port to variables: \n\n export INGRESS_IP_ADDRESS=EXTERNAL_IP_ADDRESS\n export INGRESS_PORT=\u003cvar translate=\"no\"\u003ePORT_NUMBER\u003c/var\u003e\n\n4. Call the API proxy: \n\n ```\n curl -H Host:$DOMAIN --resolve \\\n $DOMAIN:$INGRESS_PORT:$INGRESS_IP_ADDRESS \\\n https://$DOMAIN:$INGRESS_PORT/myproxy -k\n ```\n\n\n For example: \n\n ```\n curl -H Host:example.com --resolve example.com:443:233.252.0.123 https://example.com:443/myproxy -k\n ```\n\n\nTo learn more about building and deploying API proxies, see [Build your first proxy overview](/apigee/docs/api-platform/get-started/get-started).\n| **Congratulations!**\n|\n| You've successfully installed Apigee hybrid. To learn more about building and deploying\n| API proxies, see [Introduction to API proxy building](/apigee/docs/api-platform/fundamentals/build-simple-api-proxy).\n\n*[Google Cloud]: Google Cloud"]]