Lorsque vous appelez un proxy d'API sur Apigee avec une sécurité OAuth, Apigee est responsable de la vérification des jetons d'accès. Considérez Apigee comme le gardien. Aucun appel d'API ne peut aboutir sans avoir un jeton d'accès pouvant être validé.
Ajouter une règle VerifyAccessToken
Pour configurer la validation des jetons, placez une règle OAuthV2 avec l'opération VerifyAccessToken au tout début du flux de proxy d'API (le début du flux préliminaire de point de terminaison proxy). Si elle est placée, les jetons d'accès sont vérifiés avant tout autre traitement. Si un jeton est refusé, Apigee arrête le traitement et renvoie une erreur au client.
Pour accéder à la page "Proxys d'API" à l'aide de l'interface utilisateur d'Apigee, procédez comme suit :
Sélectionnez Développer > Proxys API dans la barre de navigation de gauche.
Dans la liste, sélectionnez le proxy que vous souhaitez protéger.
Dans la page de présentation, cliquez sur l'onglet Développer.
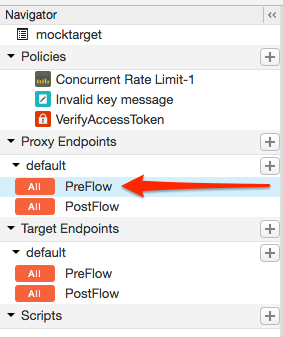
Dans le navigateur, sélectionnez PreFlow (Flux préliminaire) pour un point de terminaison répertorié sous Points de terminaison proxy. En règle générale, le point de terminaison souhaité est appelé "par défaut", bien qu'il soit possible de créer plusieurs points de terminaison proxy. Si vous disposez de plusieurs points de terminaison, vous souhaiterez probablement procéder comme suit pour effectuer la validation de jetons sur chacun d'eux.
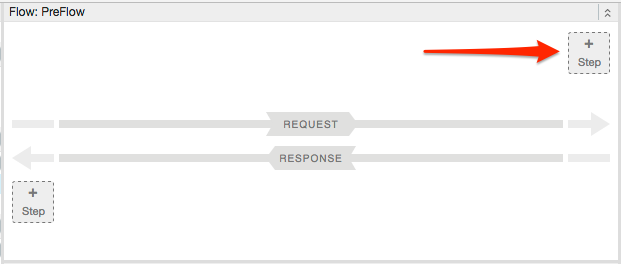
Dans l'éditeur de flux proxy, cliquez sur + Step (+ étape).
Sélectionnez Policy Instance New (Nouvelle règle d'instance).
Dans la liste des règles, sélectionnez OAuth v2.0.
Si vous le souhaitez, modifiez le nom de la règle et le nom à afficher. Par exemple, pour améliorer la lisibilité, vous pouvez à la fois remplacer le nom à afficher et le nom par "VerifyAccessToken".
Cliquez sur Ajouter.
La règle par défaut est déjà configurée avec l'opération VerifyAccessToken. Ainsi, vous n'avez rien d'autre à faire :
Sauf indication contraire, le contenu de cette page est régi par une licence Creative Commons Attribution 4.0, et les échantillons de code sont régis par une licence Apache 2.0. Pour en savoir plus, consultez les Règles du site Google Developers. Java est une marque déposée d'Oracle et/ou de ses sociétés affiliées.
Dernière mise à jour le 2025/09/04 (UTC).
[[["Facile à comprendre","easyToUnderstand","thumb-up"],["J'ai pu résoudre mon problème","solvedMyProblem","thumb-up"],["Autre","otherUp","thumb-up"]],[["Difficile à comprendre","hardToUnderstand","thumb-down"],["Informations ou exemple de code incorrects","incorrectInformationOrSampleCode","thumb-down"],["Il n'y a pas l'information/les exemples dont j'ai besoin","missingTheInformationSamplesINeed","thumb-down"],["Problème de traduction","translationIssue","thumb-down"],["Autre","otherDown","thumb-down"]],["Dernière mise à jour le 2025/09/04 (UTC)."],[[["\u003cp\u003eThis content focuses on configuring OAuth 2.0 access token verification within Apigee and Apigee hybrid API proxies.\u003c/p\u003e\n"],["\u003cp\u003eApigee acts as a gatekeeper, requiring and verifying access tokens for all API calls to ensure security.\u003c/p\u003e\n"],["\u003cp\u003eTo verify access tokens, an OAuthV2 policy with the VerifyAccessToken operation must be placed at the beginning of the API proxy's flow, specifically the ProxyEndpoint Preflow.\u003c/p\u003e\n"],["\u003cp\u003eThe default setting for the VerifyAccessToken policy expects the access token to be included in the Authorization header as a Bearer token, but it can be configured to support different types of tokens.\u003c/p\u003e\n"],["\u003cp\u003eIf encountering an "Invalid API call as no apiproduct match found" error, an external community article is provided for troubleshooting steps.\u003c/p\u003e\n"]]],[],null,["# Verifying access tokens\n\n*This page\napplies to **Apigee** and **Apigee hybrid**.*\n\n\n*View [Apigee Edge](https://docs.apigee.com/api-platform/get-started/what-apigee-edge) documentation.*\n\nWhen you call an API proxy on Apigee that has OAuth security, Apigee is responsible for\nverifying access tokens. Think of Apigee as the gatekeeper -- no API call can pass through that\ndoes not have an access token that can be verified.\n| **Tip:** When verifying an access token, if you happen to see this error: \"Invalid API call as no apiproduct match found\", go to this [Apigee Community article](https://community.apigee.com/content/kbentry/6831/oauth20-access-token-verification-throws-invalid-a.html) for details on the cause of this error and steps to correct it.\n\nAdding a VerifyAccessToken policy\n---------------------------------\n\nTo configure token verification, place an [OAuthV2 policy](/apigee/docs/api-platform/reference/policies/oauthv2-policy) with the\n**VerifyAccessToken** operation at the very beginning of the API proxy flow (the\nbeginning of the ProxyEndpoint Preflow). If placed there, access tokens will be verified before\nany other processing takes place, and if a token is rejected, Apigee stops processing and returns\nan error back to the client.\n\nTo access the API proxies page using the Apigee UI:\n\n1. Open the [Apigee UI](https://apigee.google.com).\n2. Select **Develop \\\u003e API Proxies** in the left navigation bar.\n3. From the list, select the proxy you wish to protect.\n4. In the overview page, click the **Develop** tab.\n5. In the Navigator, select **PreFlow** for an endpoint listed under Proxy Endpoints. Typically, the endpoint you want is called \"default\", although it is possible to create multiple proxy endpoints. If you do have multiple endpoints, you will probably want to follow these steps to perform token verification on each one. \n\n \u003cbr /\u003e\n\n6. In the proxy flow editor, click **+ Step** . \n\n \u003cbr /\u003e\n\n7. Select **Policy Instance New**.\n8. From the policy list, select **OAuth v2.0**.\n9. Optionally, change the policy name and display name. For example, for better readability, you might change the display name and name both to \"VerifyAccessToken\".\n10. Click **Add**.\n\nThe default policy is already configured with the VerifyAccessToken operation, so you do not\nhave to do anything further: \n\n```text\n\u003c?xml version=\"1.0\" encoding=\"UTF-8\" standalone=\"yes\"?\u003e\n\u003cOAuthV2 async=\"false\" continueOnError=\"false\" enabled=\"true\" name=\"OAuth-v20-1\"\u003e\n \u003cDisplayName\u003eOAuth v2.0 1\u003c/DisplayName\u003e\n \u003cFaultRules/\u003e\n \u003cProperties/\u003e\n \u003cAttributes/\u003e\n \u003cExternalAuthorization\u003efalse\u003c/ExternalAuthorization\u003e\n \u003cOperation\u003eVerifyAccessToken\u003c/Operation\u003e\n \u003cSupportedGrantTypes/\u003e\n \u003cGenerateResponse enabled=\"true\"/\u003e\n \u003cTokens/\u003e\n\u003c/OAuthV2\u003e\n```\n| **Note:** By default, VerifyAccessToken expects the access token to be sent in an Authorization header as a Bearer token. For example: \n|\n| ```text\n| -H \"Authorization: Bearer Rft3dqrs56Blirls56a\"\n| ```\n|\n| You can change this default in the `\u003cAccessToken\u003e ` element in the\n| OAuthV2 policy, as explained in the [OAuthV2 policy\n| documentation](/apigee/docs/api-platform/reference/policies/oauthv2-policy#accesstokenelement)."]]