本页面适用于 Apigee 和 Apigee Hybrid。
查看 Apigee Edge 文档。

您必须先在 Cloud Code 中新建或打开现有 Apigee 工作区,然后才能使用 Cloud Code 在本地开发 Apigee API。Apigee 工作区包含本地开发所需的目录结构。
以下部分介绍如何创建、打开和管理 Apigee 工作区。
创建 Apigee 工作区
要创建 Apigee 工作区,请执行以下操作:
执行以下操作之一:
如果没有打开的 Apigee 工作区,请点击 Apigee 部分中的 Create Apigee workspace。
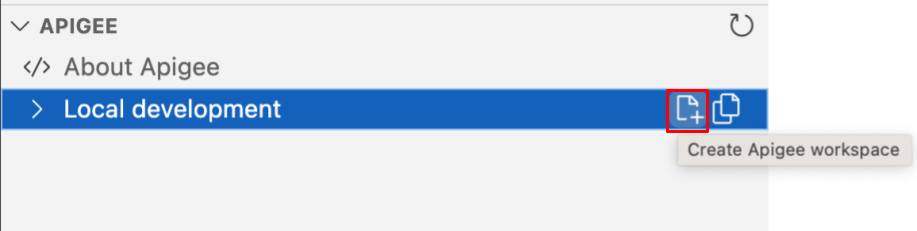
选择 View > Command Palette 以打开 Command Palette,然后选择 Cloud Code: Create Apigee workspace。
输入 Apigee 工作区的名称。
导航到要保存 Apigee 工作区的目录。 如果您使用的是源代码控制管理,请在源代码控制代码库中选择一个位置。
点击 Select workspace folder。 Apigee 工作区将创建并存储在指定的本地目录中,并在 VS Code Explorer 中打开。
点击活动栏中的
 Cloud Code 图标。
Apigee 工作区将显示在 Apigee 部分中:
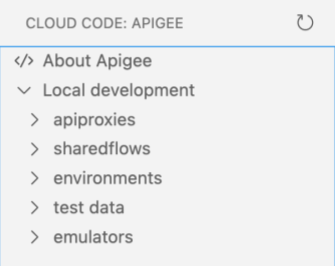
根据所选的工作区类型,系统会创建以下内容:
- 对于单代码库工作区,系统会在
your-workspace-location下创建一组文件夹。如需了解详情,请参阅了解 Apigee 单代码库工作区的结构。 -
对于多代码库工作区,系统会创建一个名为
your-workspace-location.code-workspace的文件,其中包含所需的 JSON 内容。如需了解详情,请参阅了解 Apigee 多代码库工作区的结构。
打开 Apigee 工作区
要打开现有 Apigee 工作区,请执行以下操作:
执行以下操作之一:
如果没有打开的 Apigee 工作区,请点击 Apigee Explorer 本地开发节点上的打开 Apigee 工作区。
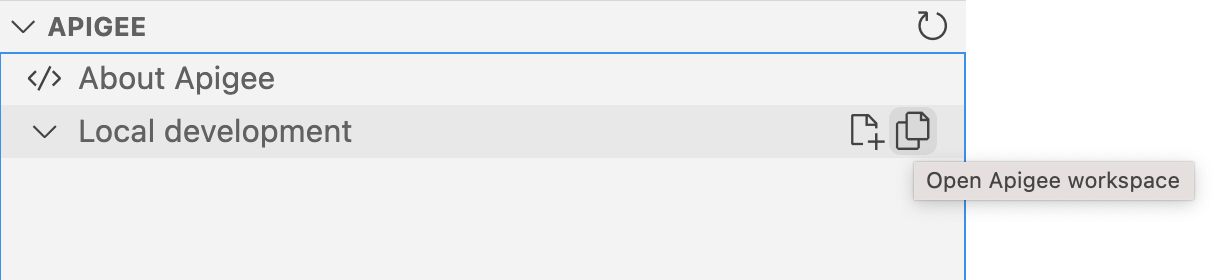
选择 View > Command Palette 以打开 Command Palette,然后选择 Cloud Code: Open Apigee Workspace。
导航到本地环境中的 Apigee 工作区。
- 如果要打开单代码库工作区,请选择包含
src/main/apigee文件夹的 Apigee 工作区的顶级文件夹。 - 如果要打开多代码库工作区,请选择扩展名为
.code-workspace的工作区文件。
- 如果要打开单代码库工作区,请选择包含
点击选择工作区文件夹或多代码库工作区文件。 Apigee 工作区在 Cloud Code 中打开,您可以在其中浏览工作区内容。
点击活动栏中的
Cloud Code 图标。
Apigee 工作区将显示在 Apigee Explorer 中:
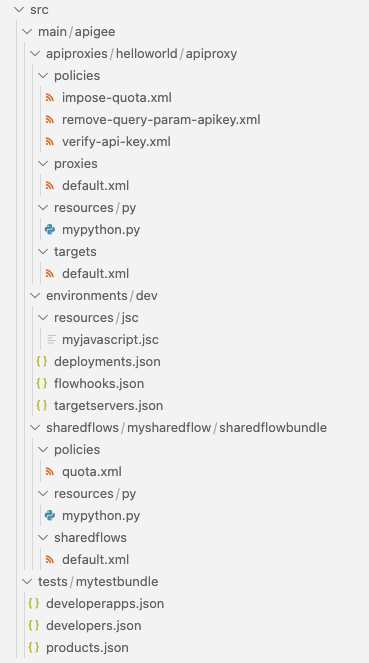
了解 Apigee 单代码库工作区的结构
当您在 Apigee in Google Cloud中创建单仓库 Apigee 工作区时,系统会创建一组文件夹,供您开发 API 代理和共享流、配置和部署环境以及构建和导出测试资源。Apigee 工作区存储在本地环境的 your-workspace-folder/src/main/apigee 中。
下表简要概述了 Apigee 工作区的结构。
| 文件夹 | 说明 |
|---|---|
apiproxies
|
在该文件夹下,为每个 API 代理配置设置一个 apiproxy-name/apiproxy 文件夹,结构如 API 代理配置目录结构所述。例如: 如需了解详情,请参阅开发 API 代理。 |
environments
|
定义要部署的 API 代理和共享流的运行时执行上下文,包括:
如需了解详情,请参阅配置和部署环境。 |
sharedflows
|
在该文件夹下,为每个共享流配置设置一个 sharedflow-name/sharedflowbundle 文件夹,结构如共享流软件包配置参考所述。
例如: 如需了解详情,请参阅开发共享流。 |
tests
|
提供一组在本地测试 API 所需的测试资源,例如 API 产品或开发者。
如需了解详情,请参阅构建和导出测试资源。 |
请参阅以下本地环境中 Apigee 工作区结构的示例,其中 src/main/apigee 是根文件夹:
了解 Apigee 多代码库工作区的结构
多代码库工作区的工作方式与 Cloud Code 中的多根工作区类似。用户可以灵活地为工件选择单独的存储位置,还可以使用单工作区同时开发这些工件。例如,一个适用场景是用户喜欢为每个代理配一个源代码管理代码库。
多代码库工作区是扩展名为 .code-workspace 的 JSON 文本文件。
这是多代码库工作区的示例内容,其中包含两个 API 代理(authentication-proxy、products-proxy)、一个共享流 (SF-threat-protection)、两个环境(dev、test)和一个测试软件包 (test-products):
{
  "folders": [
    {
      "name": "authentication-proxy",
      "type": "proxy",
      "path": "/work/quickdemo/multi/authentication-proxy"
    },
    {
      "name": "products-proxy",
      "type": "proxy",
      "path": "/work/quickdemo/multi/products-proxy"
    },
    {
      "name": "SF-threat-protection",
      "type": "sharedflow",
      "path": "/work/quickdemo/multi/SF-threat-protection"
    },
    {
      "name": "dev",
      "type": "environment",
      "path": "/work/quickdemo/multi/dev"
    },
    {
      "name": "test",
      "type": "environment",
      "path": "/work/quickdemo/multi/test"
    },
    {
      "name": "test-products",
      "type": "test",
      "path": "/work/quickdemo/multi/test-products"
    }
  ]
}
以下是可添加到多代码库工作区的每种文件夹类型的要求:
| 文件夹类型 | 所需的文件夹结构 |
|---|---|
environment |
按照配置环境中的说明定义环境配置。文件夹名称用作环境的名称。 |
proxy |
按照 API 代理配置目录结构中的说明定义 API 代理结构。该文件夹的名称用作 API 代理的名称。 |
sharedflow |
按照共享流软件包配置参考中的说明定义共享流和结构。文件夹的名称用作共享流的名称。 |
test |
按照构建测试资源中的说明定义一组测试资源。文件夹的名称用作测试资源的名称。 |
修改 Apigee 多代码库工作区
通过在 Cloud Code 或您的首选编辑器中打开 your-workspace.code-workspace 文件,修改多代码库工作区。
如需从 Cloud Code 中的 Apigee 扩展程序打开该文件,请执行以下操作:
点击 Apigee Explorer 本地开发节点上的修改工作区。
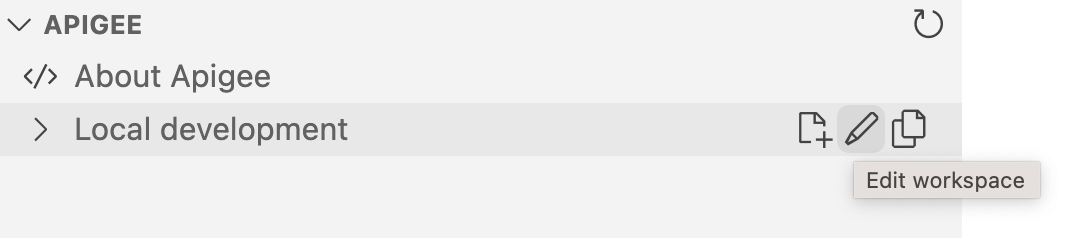
选择 View > Command Palette 以打开 Command Palette,然后选择 Cloud Code: Edit Workspace。
管理 Apigee 工作区中的文件夹和文件
以下部分介绍如何管理 Apigee 工作区中的文件夹和文件。
修改 Apigee 工作区中的文件
如需修改 Apigee 工作区中的文件,请执行以下操作:
在 Apigee Explorer 中,点击要修改的文件的名称。内容会显示在编辑器中。
根据需要修改文件。
选择 File > Save 或 ⌘S 保存修改。
复制 Apigee 工作区中的文件夹和文件
如需复制 Apigee 工作区中的文件夹或文件,请执行以下操作:
在 Apigee Explorer 中,右键点击要复制的文件夹或文件,然后选择 Copy。
输入文件夹或文件的唯一名称,然后按 Enter 键。
复制的文件夹或文件会显示在 Apigee 工作区中。
重命名 Apigee 工作区中的文件夹和文件
如需重命名 Apigee 工作区中的文件夹或文件,请执行以下操作:
在 Apigee Explorer 中,右键点击要复制的文件夹或文件,然后选择 Rename。
输入文件夹或文件的唯一名称,然后按 Enter 键。
该文件夹或文件在 Apigee Explorer 中完成重命名。
从 Apigee 工作区删除文件夹和文件
如需从 Apigee 工作区中删除某个文件夹或文件,在 Apigee Explorer 中右键点击要删除的文件夹或文件,然后选择 Delete。文件夹或文件会从 Apigee 工作区中移除。
刷新 Apigee 工作区视图
如需刷新 Apigee 工作区视图并同步最近的任何更改(更改可能在 Cloud Code 之外进行),请执行以下操作之一:
将光标放在 Apigee Explorer 标题栏上,然后点击
 。
。选择 View > Command Palette 以打开 Command Palette,然后选择 Cloud Code: Refresh Apigee Explorer view。