Maintenant que vous avez testé votre nouveau proxy, vous êtes presque prêt à lui ajouter une règle. Toutefois, avant cela, modifiez le point de terminaison cible de votre proxy pour en choisir un qui puisse renvoyer des données.
Rappelez-vous qu'à l'étape Créer un proxy d'API, vous avez défini le point de terminaison cible (dans le champ API existante) sur https://mocktarget.apigee.net.
Supposons que le point de terminaison n'ait renvoyé aucune donnée intéressante. Vous pouvez ensuite remplacer le point de terminaison par un élément renvoyant un fichier XML utile. Cette section explique la procédure à suivre.
Nouvel éditeur de proxys
Vous pouvez modifier le point de terminaison cible d'un proxy dans la vue Développer de l'éditeur de proxys.
Pour ouvrir la vue Développer, procédez comme suit :
Sélectionnez Développer > Proxys d'API, puis dans le volet Proxys, sélectionnez l'environnement du proxy.
Cliquez sur l'onglet Develop (Développer) pour afficher la vue Develop (Développer) :
Vue "Develop" (Développer)
Dans le volet de gauche de la vue Develop (Développer), vous pouvez :
Rechercher du texte dans le proxy avec le champ Search proxy (Rechercher un proxy).
Ajouter de nouvelles règles.
Ajouter des points de terminaison de proxy et de cibles.
Ajouter d'autres ressources.
Si vous ne souhaitez pas afficher le volet de gauche, vous pouvez le réduire en cliquant sur le bouton de fermeture .
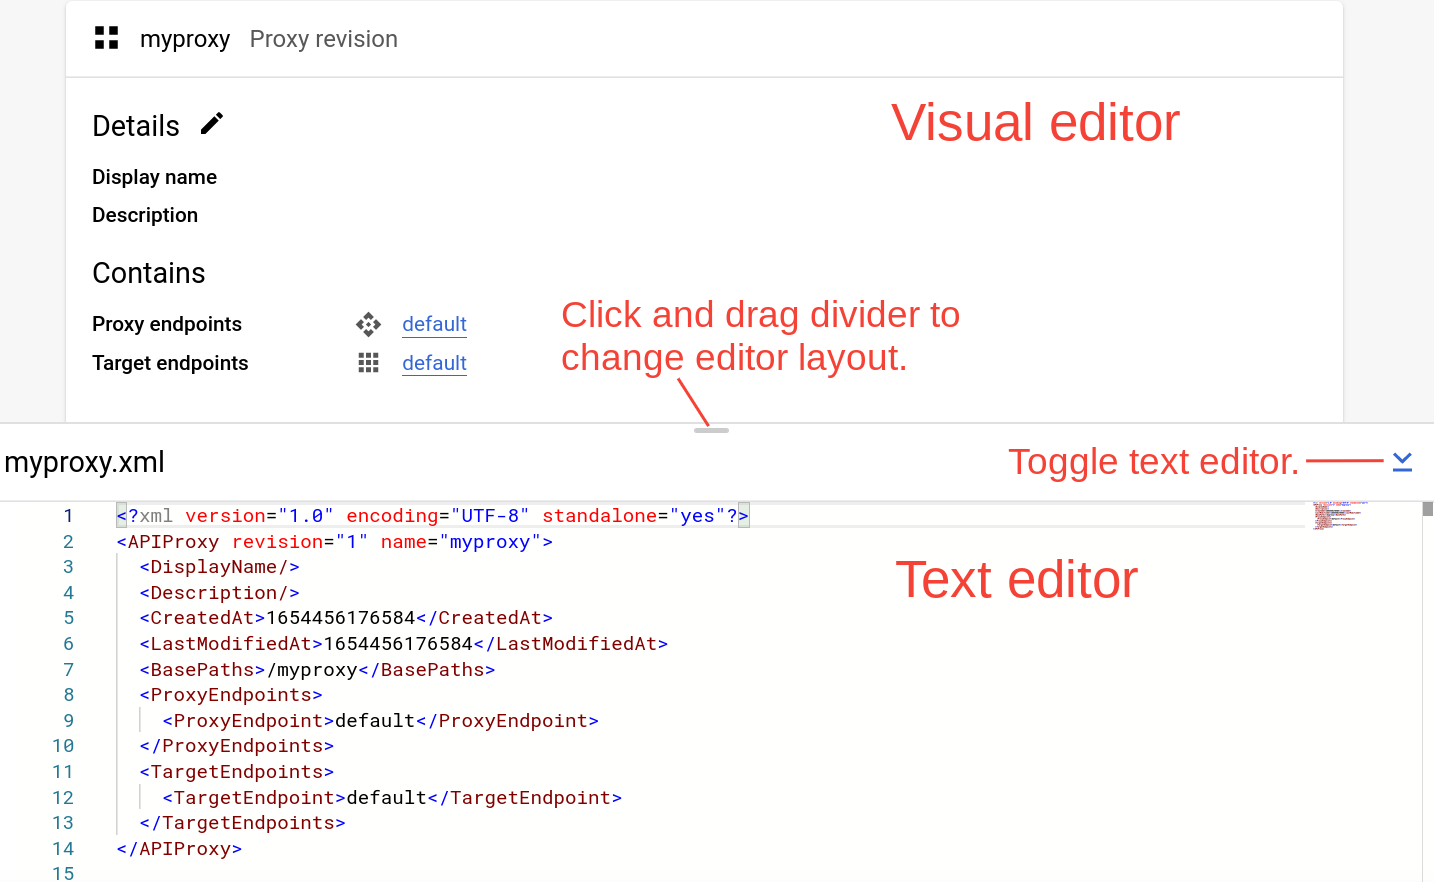
Le volet de droite de la vue Develop (Développer) affiche les éditeurs visuels et textuels du proxy :
L'éditeur visuel fournit une vue graphique du flux de requêtes et de réponses.
L'éditeur de texte vous permet de modifier le fichier XML pour le proxy ou la cible.
Remarques :
Vous pouvez cliquer sur le séparateur et le faire glisser entre les deux éditeurs pour développer la zone d'affichage de l'un ou l'autre des deux éditeurs.
Vous pouvez développer la zone d'affichage de l'éditeur visuel en cliquant sur le bouton d'activation situé à droite de l'éditeur de texte, ce qui a pour effet de fermer le volet de l'éditeur de texte. Cliquez à nouveau sur le bouton d'activation pour rouvrir le volet de l'éditeur de texte.
Modifier le point de terminaison cible
Pour modifier le point de terminaison cible du proxy, procédez comme suit :
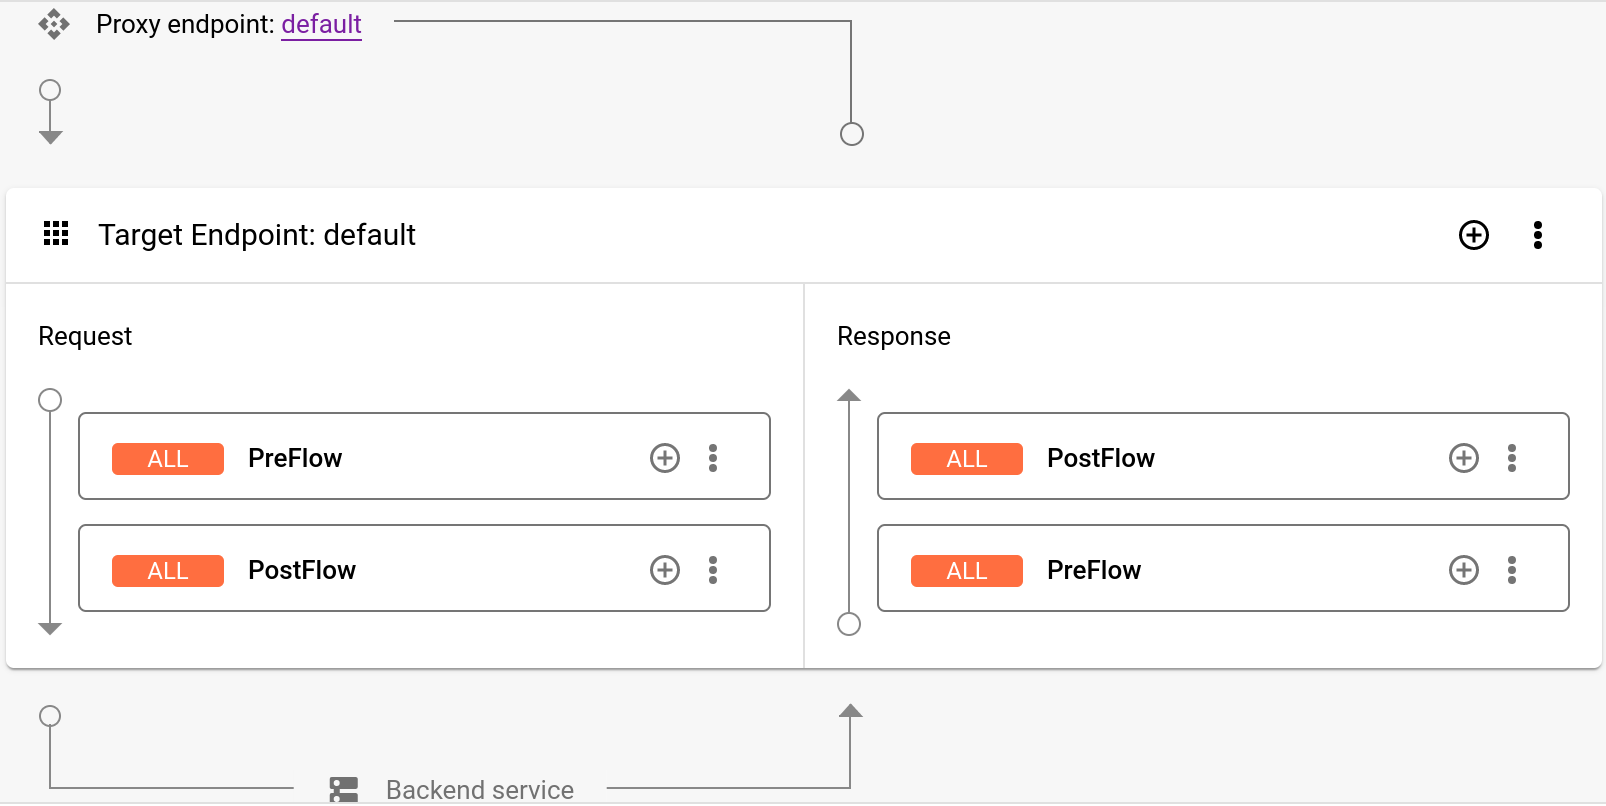
Dans le volet Révision du proxy, sélectionnez Points de terminaison cibles > Par défaut.
Un diagramme du point de terminaison cible s'affiche dans l'éditeur visuel :
Sous l'éditeur visuel, le code XML du point de terminaison cible s'affiche dans l'éditeur de texte :
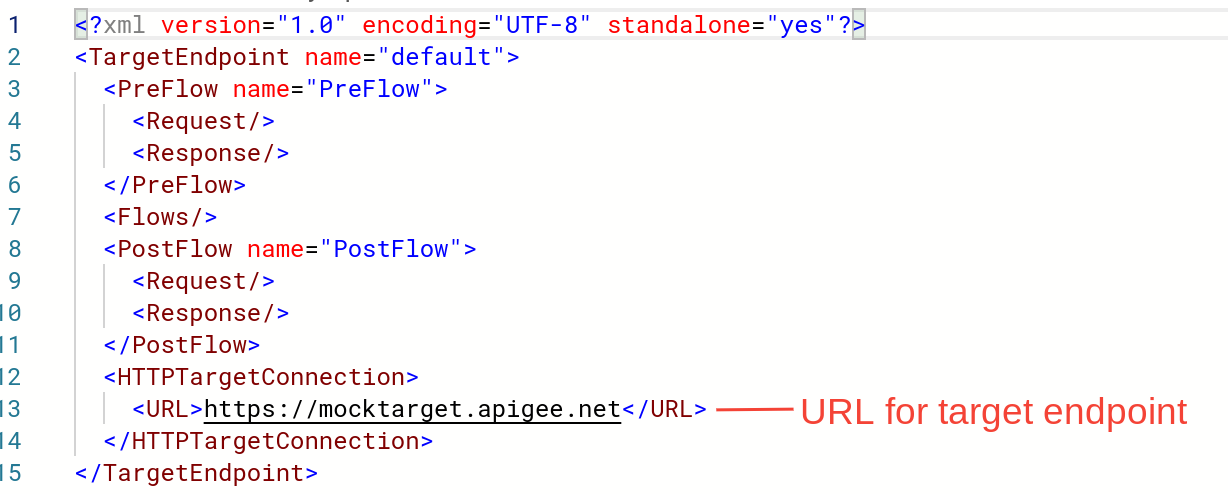
Dans l'éditeur de texte, remplacez <URL> par https://mocktarget.apigee.net/xml. (Ajoutez "/xml" à l'URL existante.)
Cliquez sur la flèche à côté de Save (Enregistrer) en haut à droite de l'éditeur de proxy, puis sélectionnez Save as new revision (Enregistrer en tant que nouvelle révision).
Pour déployer vos modifications, cliquez sur Déployer.
Dans la boîte de dialogue Déployer, sélectionnez la révision et l'environnement dans lesquels effectuer le déploiement, puis cliquez sur Déployer.
Éditeur de proxy classique
Pour modifier le point de terminaison cible de votre proxy, procédez comme suit :
Sélectionnez votre proxy dans la liste pour afficher ses détails. Si votre proxy ne figure pas dans la liste, vérifiez que vous avez sélectionné l'organisation appropriée, comme décrit dans la section Passer d'une organisation à une autre.
Cliquez sur l'onglet Develop (Développer) :
Vous êtes alors dirigé vers l'éditeur de proxys d'API. L'éditeur de proxys vous permet de voir la structure de votre proxy d'API et de configurer son flux. (Un flux représente le chemin d'accès par étapes emprunté par une requête de proxy d'API via la plate-forme Apigee. Les autres tutoriels couvrent le concept de flux.)
Dans le volet Navigator (Navigateur), sélectionnez Target Endpoints > default > PreFlow (Points de terminaison cibles > Par défaut > PreFlow) :
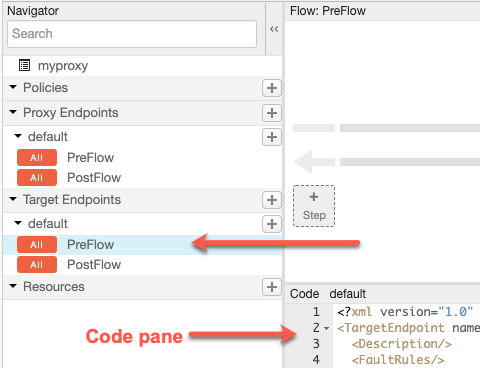
Apigee affiche les paramètres du point de terminaison dans le volet Code :
Pour enregistrer vos modifications dans la configuration du proxy, cliquez sur le bouton Enregistrer.
Apigee enregistre vos modifications dans une nouvelle révision du proxy.
Pour déployer la nouvelle révision, sélectionnez Deploy to: test (Déployer vers : test), puis cliquez sur Deploy 2 (Déployer 2).
Dans la boîte de dialogue de confirmation, cliquez sur Deploy (Déployer).
Si une erreur se produit, Apigee enregistre vos modifications, mais ne déploie pas le proxy. En cas d'erreur :
Corrigez la configuration du proxy. Apigee peut fournir des conseils de syntaxe dans une fenêtre pop-up.
Déployez manuellement vos modifications dans l'environnement test en cliquant sur Deployment > test (Déploiement > test) si Apigee ne les déploie pas automatiquement.
Vous pouvez vérifier si votre révision de proxy a bien été déployée en affichant l'état de la révision de déploiement à côté de la liste déroulante Deploy (Déployer). Exemple :
Tester le proxy
Vous pouvez tester vos modifications en envoyant une requête à votre proxy, comme vous l'avez fait dans la section Appeler votre proxy d'API. L'exemple suivant suppose que le proxy est nommé myproxy :
Sauf indication contraire, le contenu de cette page est régi par une licence Creative Commons Attribution 4.0, et les échantillons de code sont régis par une licence Apache 2.0. Pour en savoir plus, consultez les Règles du site Google Developers. Java est une marque déposée d'Oracle et/ou de ses sociétés affiliées.
Dernière mise à jour le 2025/09/03 (UTC).
[[["Facile à comprendre","easyToUnderstand","thumb-up"],["J'ai pu résoudre mon problème","solvedMyProblem","thumb-up"],["Autre","otherUp","thumb-up"]],[["Difficile à comprendre","hardToUnderstand","thumb-down"],["Informations ou exemple de code incorrects","incorrectInformationOrSampleCode","thumb-down"],["Il n'y a pas l'information/les exemples dont j'ai besoin","missingTheInformationSamplesINeed","thumb-down"],["Problème de traduction","translationIssue","thumb-down"],["Autre","otherDown","thumb-down"]],["Dernière mise à jour le 2025/09/03 (UTC)."],[[["\u003cp\u003eThis page details how to modify an Apigee API proxy's target endpoint to interact with a resource returning XML data, applicable to both Apigee and Apigee hybrid.\u003c/p\u003e\n"],["\u003cp\u003eThe process involves accessing the Apigee UI, either through the Google Cloud console or the classic interface, and navigating to the API proxy editor to adjust the target endpoint settings.\u003c/p\u003e\n"],["\u003cp\u003eThe target endpoint URL is updated to \u003ccode\u003ehttps://mocktarget.apigee.net/xml\u003c/code\u003e, which directs the proxy to a resource providing test XML data.\u003c/p\u003e\n"],["\u003cp\u003eAfter updating the URL in the visual or text editor, the changes must be saved as a new revision and then deployed to the appropriate environment for testing.\u003c/p\u003e\n"],["\u003cp\u003eOnce the API proxy's target endpoint has been updated, you can then test it to confirm it now returns an XML response.\u003c/p\u003e\n"]]],[],null,["# Step 4: Change the target endpoint\n\n*This page\napplies to **Apigee** and **Apigee hybrid**.*\n\n\n*View [Apigee Edge](https://docs.apigee.com/api-platform/get-started/what-apigee-edge) documentation.*\n\nAn Apigee API proxy has two endpoints: a proxy endpoint and a target endpoint. The proxy endpoint is the client interface.\nIt receives requests from clients and\nsends responses back to clients.\nThe target endpoint is the API producer interface. It communicates from Apigee to an API producer, such as a backend\nservice or API. To learn more about endpoints, see [What is an API proxy?](/apigee/docs/api-platform/fundamentals/understanding-apis-and-api-proxies#whatisanapiproxy)\n\nIn this step, you will change the API proxy's target endpoint to `https://mocktarget.apigee.net/xml`, a resource that\nreturns test XML data. After making the change, you will redeploy and test the revised API proxy. \n\n### Apigee in Cloud console\n\n1. In the Google Cloud console, go to the **Proxy development \\\u003e API proxies** page.\n\n [Go to API proxies](https://console.cloud.google.com/apigee/proxies)\n2. Make sure the same Google Cloud project where you created the API proxy is selected from the dropdown at the top of the page.\n3. In the proxies table, select the proxy **myproxy** , which you created in [Step 1: Create an API proxy](/apigee/docs/api-platform/get-started/create-proxy).\n4. Click the **Develop** tab.\n\n### Explore the Develop view\n\nIn the left-hand pane of the **Develop** view, you can:\n\n- Search for text in the proxy in the **Search proxy** field.\n- Add new policies.\n- Add proxy and target endpoints.\n- Add other resources.\n\nIf you don't want to view the left-hand pane, you can collapse it by clicking the\nclose button .\n\nThe right-hand pane of the **Develop** view displays the visual and text editors\nfor the proxy:\n\n- The visual editor provides a graphical view of the request and response flow.\n- The text editor lets you edit the XML for the proxy or target.\n\n**Notes:**\n\n- You can click and drag the divider between the two editors up or down to expand the display area of either editor.\n- You can expand the display area of the visual editor by clicking the toggle button on the right side of the text editor, which closes the text editor pane. Click the toggle button again to re-open the text editor pane.\n\n### Change the target endpoint\n\nTo change the target endpoint of the proxy:\n\n1. In the **Proxy revision** pane, select **Target Endpoints \\\u003e default** .\n\n This displays a diagram of the target endpoint in the visual editor:\n\n Below the visual editor, the XML code for the target endpoint is displayed in the text editor:\n\n2. In the text editor, change the `\u003cURL\u003e` to\n `https://mocktarget.apigee.net`**/xml**. (Append \"/xml\" to the existing URL.)\n\n The new URL is shown below: \n\n ```text\n ...\n \u003cHTTPTargetConnection\u003e\n \u003cProperties/\u003e\n \u003cURL\u003ehttps://mocktarget.apigee.net/xml\u003c/URL\u003e\n \u003c/HTTPTargetConnection\u003e\n ...\n ```\n3. Click the arrow next to **Save** at the top right of the Proxy Editor, and select **Save as new revision**.\n4. To deploy your changes, click **Deploy**.\n5. In the **Deploy** dialog, select the revision and environment in which to deploy, and click **Deploy**.\n\n### Classic Apigee UI\n\nTo change your proxy's target endpoint:\n\n1. Sign in to the [Apigee UI](https://apigee.google.com).\n2. Select **Develop \\\u003e API Proxies**.\n3. Select your proxy from the list to display the API proxy details. If you don't see your proxy in the list, be sure that you selected the right organization, as described in [Switching between your organizations](/apigee/docs/api-platform/get-started/switch-org).\n4. Click the **Develop** tab:\n\n This takes you to the API Proxy Editor. The Proxy Editor lets you see the structure of your\n API proxy and configure its flow. (A flow is just the stepwise path an API proxy request takes\n through the Apigee platform. Other tutorials will cover the concept of\n *flows*.)\n5. In the **Navigator** pane, select **Target Endpoints \\\u003e\n default \\\u003e PreFlow** :\n\n Apigee displays the endpoint settings in the **Code** pane: \n\n ```text\n \u003cTargetEndpoint name=\"default\"\u003e\n \u003cDescription/\u003e\n \u003cFaultRules/\u003e\n \u003cPreFlow name=\"PreFlow\"\u003e\n \u003cRequest/\u003e\n \u003cResponse/\u003e\n \u003c/PreFlow\u003e\n \u003cPostFlow name=\"PostFlow\"\u003e\n \u003cRequest/\u003e\n \u003cResponse/\u003e\n \u003c/PostFlow\u003e\n \u003cFlows/\u003e\n \u003cHTTPTargetConnection\u003e\n \u003cProperties/\u003e\n \u003cURL\u003ehttps://mocktarget.apigee.net\u003c/URL\u003e\n \u003c/HTTPTargetConnection\u003e\n \u003c/TargetEndpoint\u003e\n ```\n\n The target endpoint is defined by the `\u003cHTTPTargetConnection\u003e`\n element.\n6. Change the URL to `\"https://mocktarget.apigee.net`**/xml**`\"`. (Append \"/xml\"\n to the existing URL.)\n\n The new URL returns a small block of XML in the body of the response.\n\n Your endpoint configuration should now look like the following: \n\n ```text\n ...\n \u003cHTTPTargetConnection\u003e\n \u003cProperties/\u003e\n \u003cURL\u003ehttps://mocktarget.apigee.net/xml\u003c/URL\u003e\n \u003c/HTTPTargetConnection\u003e\n ...\n ```\n7. To save your changes to the proxy configuration, click the **Save**\n button.\n\n Apigee saves your changes in a new proxy revision.\n8. To deploy the new revision, select **Deploy to: test** and click **Deploy 2**.\n9. In the confirmation dialog, click **Deploy** .\n\n If there is an error, Apigee will save your changes but not deploy the proxy. In the\n case of an error:\n 1. Fix your proxy configuration. Apigee may provide syntax guidance as a pop-up.\n 2. Manually deploy your changes to the `test` environment by clicking **Deployment \\\u003e test** if Apigee does not automatically deploy it.\n\n You can check if your proxy revision was deployed successfully by viewing the\n deployment revision status adjacent to the Deploy drop-down. For example:\n\nTest the proxy\n--------------\n\nTo test the API proxy revision, call the proxy just as you did in\n[Call an API proxy](/apigee/docs/api-platform/get-started/test-proxy).\n\nThis time, the mocktarget endpoint returns XML in the body of the response: \n\n```text\n\u003c?xml version=\"1.0\" encoding=\"UTF-8\"?\u003e\n\u003croot\u003e\n \u003ccity\u003eSan Jose\u003c/city\u003e\n \u003cfirstName\u003eJohn\u003c/firstName\u003e\n \u003clastName\u003eDoe\u003c/lastName\u003e\n \u003cstate\u003eCA\u003c/state\u003e\n\u003c/root\u003e\n```\n\nNow that the API proxy returns XML data, in the next step you will add a policy\nthat converts XML to JSON.\n[1](/apigee/docs/api-platform/get-started/create-proxy) [2](/apigee/docs/api-platform/get-started/deploy-proxy) [3](/apigee/docs/api-platform/get-started/test-proxy) [4](/apigee/docs/api-platform/get-started/change-endpoint) [(NEXT) Step 5: Add a policy](/apigee/docs/api-platform/get-started/add-policy)\n\n\u003cbr /\u003e"]]