Selecione Desenvolver > Proxies de API na vista principal.
Na lista pendente Ambiente, selecione o ambiente no qual quer criar um novo proxy de API. Esta secção pressupõe que o nome do ambiente é "test". Criou, pelo menos, um ambiente no passo 5: adicione um ambiente.
A IU híbrida apresenta uma lista de proxies de API para esse ambiente. Se ainda não tiver criado nenhum proxy, a lista está vazia.
Clique em +Proxy na parte superior direita.
O assistente de proxy de API é iniciado.
Selecione Proxy inverso (mais comum) e clique em Seguinte.
É apresentada a vista Detalhes do proxy.
Configure o proxy com as seguintes definições:
Nome do proxy: introduza "myproxy". Os passos restantes nesta secção partem do princípio de que este é o ID do seu proxy.
Caminho base do proxy: definido automaticamente como "/myproxy". O caminho base do proxy faz parte do URL usado para fazer pedidos à sua API. O Edge usa o URL para
fazer corresponder e encaminhar os pedidos recebidos para o proxy de API adequado.
(Opcional) Descrição: introduza uma descrição para o novo proxy de API, como "Testar o Apigee hybrid com um proxy simples".
Destino (API existente): introduza "https://mocktarget.apigee.net". Isto define o URL de destino que o Apigee invoca num pedido ao proxy de API. O serviço mocktarget está alojado no Apigee e devolve dados simples. Não requer uma chave da API nem um token de acesso.
Os detalhes do proxy de API devem ter o seguinte aspeto:
Clicar em Seguinte.
No ecrã Políticas, selecione Pass through (none) como a opção de segurança.
Clicar em Seguinte.
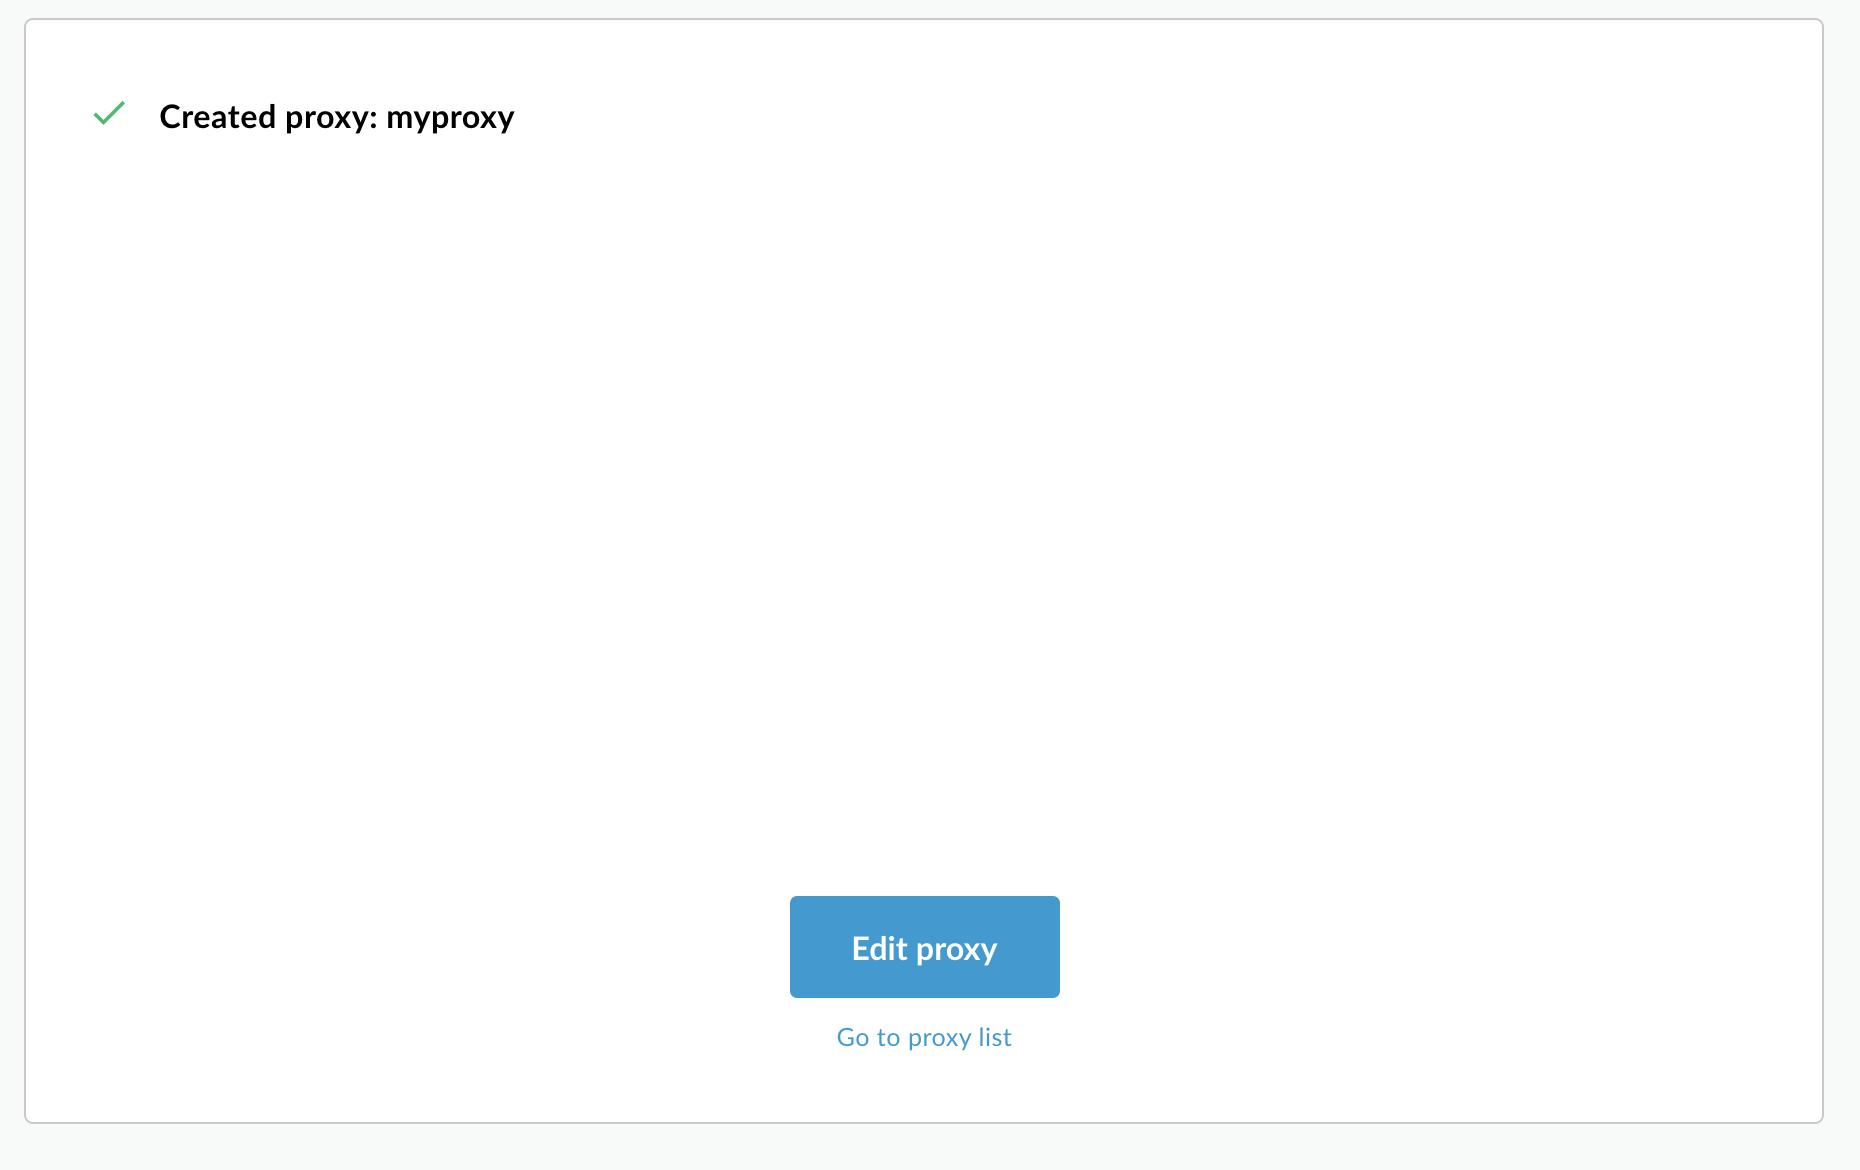
No ecrã Resumo, clique em Criar.
O Hybrid gera o proxy (por vezes, denominado pacote de proxy):
Clique em Sair.
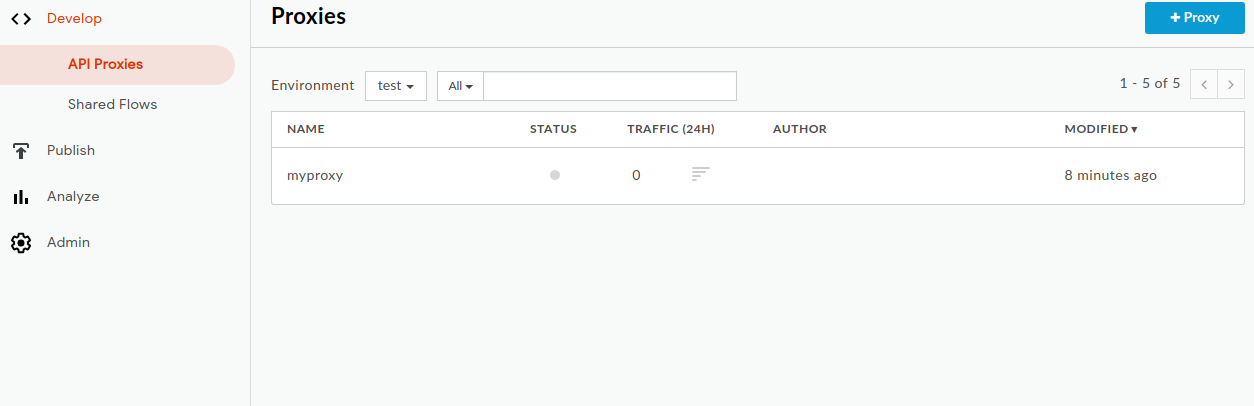
Híbrido apresenta a vista Proxies, que apresenta uma lista de proxies de API. O novo proxy deve estar na parte superior da lista, com um indicador de estado cinzento, o que significa que ainda não foi implementado.
2. Implemente o proxy no cluster através da IU híbrida
Depois de criar um novo proxy, tem de o implementar para o poder experimentar. Esta secção descreve como implementar o novo proxy através da IU híbrida.
Para implementar um proxy de API na IU híbrida:
Na IU híbrida, selecione Desenvolver > Proxies de API.
Certifique-se de que o ambiente "test" está selecionado.
A IU apresenta o novo proxy na lista de proxies:
Clique no proxy "myproxy".
A IU apresenta o separador Vista geral dos proxies de API para esse proxy.
Tenha em atenção que, em Implementações, a coluna Revisão mostra "Não implementado".
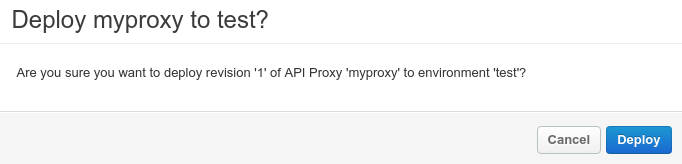
Na coluna Revisão, expanda o seletor pendente para escolher a revisão a implementar.
A lista pendente apresenta apenas "1" e "Undeploy".
Selecione "1", a revisão que quer implementar, na lista pendente.
A IU pede-lhe que confirme a implementação:
Clique em Implementar.
A IU inicia o processo de implementação da revisão 1 do novo proxy no cluster.
Tenha em atenção que a implementação não é um processo instantâneo. O modelo de implementação "eventualmente consistente" do Hybrid significa que uma nova implementação é implementada no cluster durante um curto período e não imediatamente.
Embora existam várias formas de verificar o estado de implementação de um proxy na IU, os dois passos seguintes explicam como chamar o proxy de API que acabou de implementar e como verificar o estado de implementação com uma chamada às APIs Apigee.
Em que your_host_alias é um domínio público usado para aceder às suas APIs,
conforme configurado na propriedade virtualhosts.hostAliases
no ficheiro de substituições. Consulte o artigo Configure o cluster.
Por exemplo:
curl -v -k https://apitest.acme.com/myproxy
Se a chamada for bem-sucedida, verá o seguinte resultado:
[[["Fácil de entender","easyToUnderstand","thumb-up"],["Meu problema foi resolvido","solvedMyProblem","thumb-up"],["Outro","otherUp","thumb-up"]],[["Difícil de entender","hardToUnderstand","thumb-down"],["Informações incorretas ou exemplo de código","incorrectInformationOrSampleCode","thumb-down"],["Não contém as informações/amostras de que eu preciso","missingTheInformationSamplesINeed","thumb-down"],["Problema na tradução","translationIssue","thumb-down"],["Outro","otherDown","thumb-down"]],["Última atualização 2025-09-04 UTC."],[[["\u003cp\u003eThis documentation version (1.2) is end-of-life and users should upgrade to a newer, supported version.\u003c/p\u003e\n"],["\u003cp\u003eYou can create a new API proxy in the Apigee UI using the API Proxy Wizard by selecting "Reverse proxy" and configuring the proxy details.\u003c/p\u003e\n"],["\u003cp\u003eAfter creating the API proxy, it needs to be deployed to the cluster via the UI, and the process involves selecting the revision to deploy and confirming the deployment.\u003c/p\u003e\n"],["\u003cp\u003eOnce deployed, the API proxy can be called using a tool like cURL, targeting the specified host alias and base path.\u003c/p\u003e\n"],["\u003cp\u003eThis specific case does not automatically deploy to the cluster and requires a manual step to be carried out in order for it to work.\u003c/p\u003e\n"]]],[],null,["# Create and deploy a new API proxy\n\n| You are currently viewing version 1.2 of the Apigee hybrid documentation. **This version is end of life.** You should upgrade to a newer version. For more information, see [Supported versions](/apigee/docs/hybrid/supported-platforms#supported-versions).\n\nNow that you've configured and the hybrid UI, and installed and configured the\nruntime, you're ready to see how it all works together.\n\nThis section walks you through the following:\n\n1. **[Create a new API proxy](#create-proxy)** in the Apigee UI using the API Proxy Wizard\n2. **[Deploy your new proxy](#deploy)** to your cluster with the UI\n\n1. Create a new API proxy using the hybrid UI\n---------------------------------------------\n\nThis section describes how to create a new API proxy in the UI by using the API Proxy Wizard.\n\n**To create a simple API proxy using the API Proxy Wizard:**\n\n1. Open [Apigee UI](https://apigee.google.com) in a browser.\n2. Select **Develop \\\u003e API Proxies** in the main view.\n3. From the **Environment** drop-down list, select the environment in which you want to create a new API proxy. This section assumes the name of the environment is \"test\". You created at least one environment in [Step 5: Add an environment](/apigee/docs/hybrid/v1.2/precog-add-environment).\n\n The hybrid UI displays a list of API proxies for that environment. If you haven't created any\n proxies yet, the list is empty.\n4. Click **+Proxy** in the upper right.\n\n The API Proxy Wizard starts.\n5. Select **Reverse proxy** (most common), and click **Next** .\n\n The **Proxy details** view is displayed.\n6. Configure your proxy with the following settings:\n - **Proxy Name:** Enter \"myproxy\". The remaining steps in this section assume that this is your proxy's ID.\n - **Proxy Base Path:** Automatically set to \"/myproxy\". The **Proxy Base\n Path** is part of the URL used to make requests to your API. Edge uses the URL to match and route incoming requests to the proper API proxy.\n - (Optional)**Description:** Enter a description for your new API proxy, such as \"Testing Apigee hybrid with a simple proxy\".\n - **Target (Existing API):** Enter \"https://mocktarget.apigee.net\". This defines the target URL that Apigee invokes on a request to the API proxy. The mocktarget service is hosted at Apigee and returns simple data. It requires no API key or access token.\n\n Your API proxy's details should look like the following:\n\n7. Click **Next**.\n8. On the **Policies** screen, select **Pass through (none)** as the security option.\n9. Click **Next**.\n10. On the **Summary** screen, click **Create** .\n\n Hybrid generates the proxy (sometimes referred to as *the proxy bundle*):\n\n | **NOTE:** In this case, the hybrid UI does *not* deploy the proxy to your cluster. You will do this in [the next step](#deploy).\n11. Click **Exit** .\n\n Hybrid displays the **Proxies** view, which displays a list of API proxies. The\n new proxy should be at the top of the list, with a gray status indicator, meaning that it has\n not yet been deployed.\n\n2. Deploy your proxy to the cluster using the hybrid UI\n-------------------------------------------------------\n\nAfter creating a new proxy, you must deploy it so that you can try it out. This section\ndescribes how to deploy your new proxy using the hybrid UI.\n\n**To deploy an API proxy in the hybrid UI:**\n\n1. In the hybrid UI, select **Develop \\\u003e API Proxies** .\n\n Be sure the \"test\" environment is selected.\n\n The UI displays your new proxy in the proxies list:\n\n2. Click on the \"myproxy\" proxy.\n\n The UI displays the **API Proxies Overview** tab for that proxy.\n\n Notice that under **Deployments** , the **Revision** column shows\n \"Not deployed\".\n3. In the **Revision** column, expand the drop-down selector to choose the revision to deploy.\n\n The drop down list displays only \"1\" and \"Undeploy\".\n4. Select \"1\"---the revision that you want to deploy---from the drop down list.\n\n The UI prompts you to confirm the deployment:\n\n5. Click **Deploy** .\n\n The UI begins the process of deploying revision 1 of your new proxy to the cluster.\n\n Note that deployment is not an instantaneous process. Hybrid's \"eventually consistent\"\n deployment model means that a new deployment will be rolled out to the cluster over a short\n period of time and not immediately.\n\nWhile there are [several ways](/apigee/docs/api-platform/deploy/ui-deploy-overview#viewing-deployment-status) to check the\ndeployment status of a proxy in the UI, the next two steps explain how to call the API proxy\nyou just deployed and how\nto check the deployment status with a call to the [Apigee APIs](/apigee/docs/reference/apis/apigee/rest).\n\n3. Call the API proxy\n---------------------\n\nWhen the [UI indicates\nyour proxy is deployed](/apigee/docs/hybrid/v1.2/ui-deploy-overview#view-deployment-status), you can try calling it using cURL or the REST client of your choice: \n\n```\ncurl -v -k https://your_host_alias/myproxy\n```\n\n\nWhere \u003cvar translate=\"no\"\u003eyour_host_alias\u003c/var\u003e is a publicly facing domain used to access your APIs,\nas configured in the `virtualhosts.hostAliases`\nproperty in your overrides file. See [Configure the cluster](/apigee/docs/hybrid/v1.2/install-copy-overrides).\n\n\nFor example: \n\n```\ncurl -v -k https://apitest.acme.com/myproxy\n```\n\nIf the call succeeds, you will see the following output: \n\n```\nHello, Guest!\n```\n\n*[Google Cloud]: Google Cloud"]]