Au cours de cette étape, vous allez promouvoir une archive de la configuration de proxy d'API vers un environnement de production dans votre organisation Apigee.
Suivez les étapes décrites dans la section Créer un environnement pour effectuer les opérations suivantes :
Créez un environnement prod dans votre organisation Apigee en activant le type de déploiement Archive. Utilisez l'UI ou l'API.
Assurez-vous que le groupe d'environnement a été créé avant de continuer. Vous pouvez vérifier l'état de votre nouveau groupe à l'aide d'une requête semblable à celle-ci :
Associer un environnement au groupe permet de rendre les proxys de cet environnement routables via les noms d'hôte du groupe. Cela déclenche une opération de longue durée qui peut prendre plusieurs minutes. Nous vous recommandons d'attendre une ou deux minutes avant de passer à l'étape suivante. En attendant, vous pouvez vérifier l'état de l'opération comme avant.
Créez un environnement production dans votre environnement de développement local :
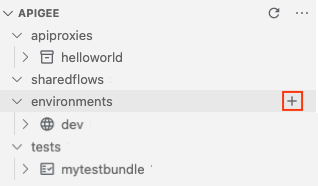
Dans Apigee dans VS Code, placez votre curseur sur le dossier environments dans l'explorateur Apigee, puis cliquez sur .
L'assistant de création d'environnement s'ouvre.
Saisissez prod comme nom d'environnement, puis appuyez sur Entrée.
L'environnement est créé.
Développez le dossier prod dans la section Apigee pour en afficher le contenu.
Placez le curseur sur le fichier deployments.json dans l'explorateur Apigee, puis cliquez sur .
L'assistant Déploiement s'ouvre.
Sélectionnez le proxy de l'API helloworld pour l'ajouter au déploiement, puis cliquez sur OK.
Le fichier deployments.json est ouvert dans l'éditeur. Le fichier a été mis à jour pour inclure le proxy d'API helloworld dans le tableau de déploiement proxies, comme illustré ci-dessous :
Répétez l'étape précédente jusqu'à ce que state soit défini sur FINISHED, indiquant que le déploiement d'archive est terminé.
Exécutez la commande suivante pour afficher tous les déploiements d'archive dans l'environnement prod :
gcloud beta apigee archives list --environment=prod
Voici un exemple de réponse :
Using Apigee organization 'prod'
ARCHIVE ID                        ENVIRONMENT   DEPLOYED AT           LABELS            OPERATION STATUS
vrytwbhso558oil53m                prod          2021-04-20 21:20:53   release=052021.1  Deployed
Félicitations ! Vous venez de promouvoir votre archive d'API dans un environnement de production Apigee !
Sauf indication contraire, le contenu de cette page est régi par une licence Creative Commons Attribution 4.0, et les échantillons de code sont régis par une licence Apache 2.0. Pour en savoir plus, consultez les Règles du site Google Developers. Java est une marque déposée d'Oracle et/ou de ses sociétés affiliées.
Dernière mise à jour le 2025/09/04 (UTC).
[[["Facile à comprendre","easyToUnderstand","thumb-up"],["J'ai pu résoudre mon problème","solvedMyProblem","thumb-up"],["Autre","otherUp","thumb-up"]],[["Difficile à comprendre","hardToUnderstand","thumb-down"],["Informations ou exemple de code incorrects","incorrectInformationOrSampleCode","thumb-down"],["Il n'y a pas l'information/les exemples dont j'ai besoin","missingTheInformationSamplesINeed","thumb-down"],["Problème de traduction","translationIssue","thumb-down"],["Autre","otherDown","thumb-down"]],["Dernière mise à jour le 2025/09/04 (UTC)."],[[["\u003cp\u003eThis page details the process of promoting an API proxy configuration archive to a production environment in Apigee or Apigee hybrid.\u003c/p\u003e\n"],["\u003cp\u003eThe process includes creating a new "prod" environment in your Apigee organization and attaching it to a runtime instance and environment group.\u003c/p\u003e\n"],["\u003cp\u003eA new "prod" environment is then set up in the local development environment using Apigee in VS Code.\u003c/p\u003e\n"],["\u003cp\u003eAn archive of the API proxy configuration is deployed to the newly created "prod" environment within the Apigee organization using the \u003ccode\u003egcloud\u003c/code\u003e command.\u003c/p\u003e\n"],["\u003cp\u003eThe procedure uses the \u003ccode\u003egcloud\u003c/code\u003e command to monitor the status of the long-running archive deployment operation, which involves checking the state until it reaches \u003ccode\u003eFINISHED\u003c/code\u003e, as well as listing out the existing archives.\u003c/p\u003e\n"]]],[],null,["# Step 8: Promote an archive to production\n\n*This page\napplies to **Apigee** and **Apigee hybrid**.*\n\n\n*View [Apigee Edge](https://docs.apigee.com/api-platform/get-started/what-apigee-edge) documentation.*\n\n\u003cbr /\u003e\n\n|\n| **Preview\n| --- Archive deployment**\n|\n|\n| This feature is subject to the \"Pre-GA Offerings Terms\" in the General Service Terms section\n| of the [Service Specific Terms](/terms/service-terms#1).\n|\n| Pre-GA features are available \"as is\" and might have limited support.\n|\n| For more information, see the\n| [launch stage descriptions](/products#product-launch-stages).\n\nIn this step, you'll promote an archive of your API proxy configuration to a production environment in your Apigee organization.\n\n1. Follow the steps in [Create an environment](https://cloud.google.com/apigee/docs/api-platform/get-started/install-cli#create-environment) to perform the following:\n 1. Create a new **prod** environment in your Apigee organization, enabling **Archive** as the deployment type. Use the [UI](https://cloud.google.com/apigee/docs/api-platform/fundamentals/environments-working-with#creating-a-new-environment-in-the-ui) or [API](/apigee/docs/reference/apis/apigee/rest/v1/organizations.environments/create).\n 2. Attach the environment to a runtime instance using the [Instances attachment API](/apigee/docs/reference/apis/apigee/rest/v1/organizations.instances.attachments).\n\n\n This command triggers a long-running operation. Ensure that the environment has been attached to the runtime before continuing.\n 3. Create an environment group if you do not already have one using the [Create environment groups API](/apigee/docs/reference/apis/apigee/rest/v1/organizations.envgroups/create).\n\n\n Ensure that the environment group has been created before continuing. You can check the status of your new group using a\n request like the following: \n\n ```\n curl -i -H \"$AUTH\" -H \"Content-Type:application/json\" \\\n \"https://apigee.googleapis.com/v1/organizations/$PROJECT_ID/environments/ENVIRONMENT_NAME\"\n ```\n 4. Attach the new environment to the environment group using the [Environment group attachment API](/apigee/docs/reference/apis/apigee/rest/v1/organizations.envgroups.attachments).\n\n Attaching an environment to the group makes the proxies in that environment\n routable via the hostnames in the group. This triggers a long-running operation that can take several minutes to complete. We recommend that you wait a minute or two before continuing to the next step. In the meantime you can check the status of the operation as before.\n2. Create a new **prod** environment in your local development environment:\n 1. In Apigee in VS Code, position your cursor over the **environments** folder in the Apigee section and click .\n\n \u003cbr /\u003e\n\n The Create environment wizard opens.\n 2. Enter **prod** for the environment name and press **\u003ckbd\u003eEnter\u003c/kbd\u003e** .\n\n The environment is created.\n 3. Expand the **prod** environment folder in the Apigee section to view its contents.\n 4. Position your cursor over the **deployments.json** file in the Apigee section and click .\n\n The Deployments wizard opens.\n\n \u003cbr /\u003e\n\n 5. Select the **helloworld** API proxy to add it to the deployment and click **OK** .\n\n The `deployments.json` file is opened in the editor. The file has been updated to include the `helloworld` API proxy in the `proxies` deployment array, as shown below: \n\n ```\n {\n \"proxies\": [\n \"helloworld\"\n ],\n \"sharedflows\": []\n }\n ```\n3. Deploy an archive of your API proxy configuration to the `prod` environment in your Apigee organization.\n 1. In the **Terminal** tab in Apigee VS Code, navigate to the **myapigeeworkspace** directory. \n\n ```\n cd myapigeeworkspace\n ```\n 2. Run the following command: \n\n ```\n gcloud beta apigee archives deploy --environment=prod --labels=release=052021.1\n ```\n\n\n The following provides an example of the response: \n\n ```\n Using Apigee organization dev\n Waiting for operation [$OPERATION_ID] to complete...⠹\n ```\n 3. Run the following command to check the status of the operation, replacing \u003cvar translate=\"no\"\u003e$OPERATION_ID\u003c/var\u003e with the operation ID returned in the previous call: \n\n ```\n gcloud beta apigee operations describe $OPERATION_ID\n ```\n\n\n The following provides an example of the response. Note that `state` is set to `IN_PROGRESS`. \n\n ```\n Using Apigee organization 'prod'\n done: true\n metadata:\n '@type': type.googleapis.com/google.cloud.apigee.v1.OperationMetadata\n operationType: INSERT\n state: IN_PROGRESS\n targetResourceName: uri\n name: organizations/prod/operations/$OPERATION_ID\n organization: prod\n response:\n '@type': type.googleapis.com/google.cloud.apigee.v1.CanaryEvaluation\n control: 1-5-0-20210319-071117-ghq74\n endTime: '2021-03-20T06:15:44.329363950Z'\n metricLabels:\n env: test\n location: us-central1\n name: uri\n startTime: '2021-03-20T06:14:44.306534584Z'\n treatment: 1-5-0-20210319-190954-if0wk\n verdict: NONE\n uuid: $OPERATION_ID\n ```\n 4. Repeat the previous step until `state` is set to `FINISHED` indicating that the archive depoloyment is complete.\n 5. Run the following command to view all archive deployments in the `prod` environment: \n\n ```\n gcloud beta apigee archives list --environment=prod\n ```\n\n\n The following provides an example of the response: \n\n ```\n Using Apigee organization 'prod'\n ARCHIVE ID ENVIRONMENT DEPLOYED AT LABELS OPERATION STATUS\n vrytwbhso558oil53m prod 2021-04-20 21:20:53 release=052021.1 Deployed\n ```\n\n\u003cbr /\u003e\n\n**Congratulations!** You've successfully promoted your API archive to an Apigee production environment!"]]


 .
.
 .
.