Crea un lugar de trabajo de Apigee para desarrollar tus API.
Para acceder a Apigee en Cloud Code, inicia VS Code, haz clic en el ícono de Cloud Code en la barra de actividad y, luego, selecciona la sección Apigee.
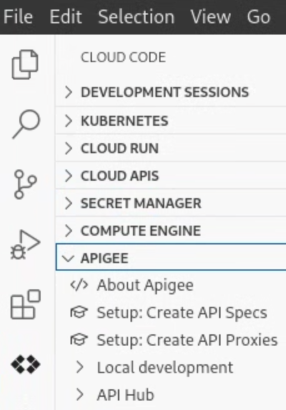
Haz clic en Desarrollo local y, luego, en el ícono Crear espacio de trabajo de Apigee en esa carpeta (). Como alternativa, puedes seleccionar Ver > Paleta de comandos para abrir la paleta de comandos y seleccionar Cloud Code: Abrir espacio de trabajo de Apigee.
Ingresa myapigeeworkspace en el indicador y presiona Intro.
Navega hasta el directorio en el que deseas guardar el lugar de trabajo de Apigee.
Si usas la administración del control de la fuente, selecciona una ubicación en tu repositorio de control de origen.
Haz clic en Seleccionar carpeta de lugar de trabajo.
El lugar de trabajo de Apigee se crea, se almacena en el directorio local especificado y se muestra en la sección Apigee:
Como se muestra, se crea un conjunto de carpetas para que desarrolles proxies de API y flujos compartidos, configures entornos de implementación y compiles recursos de prueba.
[[["Fácil de comprender","easyToUnderstand","thumb-up"],["Resolvió mi problema","solvedMyProblem","thumb-up"],["Otro","otherUp","thumb-up"]],[["Difícil de entender","hardToUnderstand","thumb-down"],["Información o código de muestra incorrectos","incorrectInformationOrSampleCode","thumb-down"],["Faltan la información o los ejemplos que necesito","missingTheInformationSamplesINeed","thumb-down"],["Problema de traducción","translationIssue","thumb-down"],["Otro","otherDown","thumb-down"]],["Última actualización: 2025-09-04 (UTC)"],[[["\u003cp\u003eThis guide demonstrates how to create an Apigee workspace within VS Code for developing APIs, applicable to both Apigee and Apigee hybrid.\u003c/p\u003e\n"],["\u003cp\u003eYou can initiate the workspace creation process by accessing the Cloud Code extension in VS Code and selecting the "Create Apigee workspace" option.\u003c/p\u003e\n"],["\u003cp\u003eUsers can select either a single-repository or multi-repository workspace based on their development preferences.\u003c/p\u003e\n"],["\u003cp\u003eThe workspace is saved locally in a specified directory and provides a structured environment with folders for developing API proxies, shared flows, deployment environments, and test resources.\u003c/p\u003e\n"],["\u003cp\u003eThe created workspace will be called "myapigeeworkspace" and it will be displayed in the "Apigee" section of your Cloud Code workspace.\u003c/p\u003e\n"]]],[],null,["# Step 1: Create an Apigee workspace\n\n*This page\napplies to **Apigee** and **Apigee hybrid**.*\n\n\n*View [Apigee Edge](https://docs.apigee.com/api-platform/get-started/what-apigee-edge) documentation.*\n\nCreate an Apigee workspace for developing your APIs.\n\n1. To access Apigee in Cloud Code, launch VS Code and click the\n Cloud Code icon in the Activity bar, then select the **Apigee** section.\n\n2. Click **Local Development** and then the **Create Apigee workspace** icon in that folder (). Alternatively, you can select **View \\\u003e Command Palette** to open the Command palette and select **Cloud Code: Open Apigee workspace**.\n\n3. Select the workspace type that matches your preferred development style. You can choose between a [single-repository workspace](/apigee/docs/api-platform/local-development/vscode/manage-apigee-workspace#understanding_the_structure_of_an_apigee_single-repository_workspace) or a [multi-repository workspace](/apigee/docs/api-platform/local-development/vscode/manage-apigee-workspace#understanding_the_structure_of_an_apigee_multi-repository_workspace).\n\n4. Enter **myapigeeworkspace** at the prompt and press **Enter**.\n\n5. Navigate to the directory where you want to save the Apigee workspace.\n If you are using source control management, select a location in your source control repository.\n\n6. Click **Select workspace folder**.\n\nThe Apigee workspace is created, stored in the specified local directory, and shown in the **Apigee** section:\n\nAs shown, a set of folders is created for you to develop API proxies and shared flows, configure deployment environments, and build test resources.\n\n\n[1](/apigee/docs/api-platform/local-development/vscode/tutorial-create-workspace)\n\n\n[(NEXT) Step 2: Create an API proxy](/apigee/docs/api-platform/local-development/vscode/tutorial-create-proxy)\n\n\n[3](/apigee/docs/api-platform/local-development/vscode/tutorial-deploy)\n\n\n[4](/apigee/docs/api-platform/local-development/vscode/tutorial-test)\n\n\n[5](/apigee/docs/api-platform/local-development/vscode/tutorial-change-target-endpoint)\n\n\n[6](/apigee/docs/api-platform/local-development/vscode/tutorial-attach-policy)\n\n\n[7](/apigee/docs/api-platform/local-development/vscode/tutorial-deploy-apigee)\n\n\n[8](/apigee/docs/api-platform/local-development/vscode/tutorial-promote)\n\n\u003cbr /\u003e"]]