Crea un workspace Apigee per sviluppare le tue API.
Per accedere ad Apigee in Cloud Code, avvia VS Code e fai clic sull'icona
Cloud Code nella barra delle attività, poi seleziona la sezione Apigee.
Fai clic su Sviluppo locale e poi sull'icona Crea spazio di lavoro Apigee in quella cartella (). In alternativa, puoi selezionare Visualizza > Tavolozza comandi per aprire la tavolozza dei comandi e selezionare Cloud Code: Open Apigee workspace (Cloud Code: Apri spazio di lavoro Apigee).
Inserisci myapigeeworkspace al prompt e premi Invio.
Vai alla directory in cui vuoi salvare lo spazio di lavoro Apigee.
Se utilizzi la gestione del controllo del codice sorgente, seleziona una posizione nel repository del controllo del codice sorgente.
Fai clic su Seleziona cartella dell'area di lavoro.
L'area di lavoro Apigee viene creata, archiviata nella directory locale specificata e mostrata nella sezione Apigee:
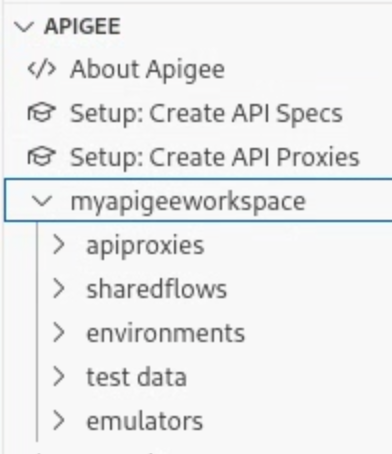
Come mostrato, viene creato un insieme di cartelle per sviluppare proxy API e flussi condivisi, configurare gli ambienti di deployment e creare risorse di test.
[[["Facile da capire","easyToUnderstand","thumb-up"],["Il problema è stato risolto","solvedMyProblem","thumb-up"],["Altra","otherUp","thumb-up"]],[["Difficile da capire","hardToUnderstand","thumb-down"],["Informazioni o codice di esempio errati","incorrectInformationOrSampleCode","thumb-down"],["Mancano le informazioni o gli esempi di cui ho bisogno","missingTheInformationSamplesINeed","thumb-down"],["Problema di traduzione","translationIssue","thumb-down"],["Altra","otherDown","thumb-down"]],["Ultimo aggiornamento 2025-09-04 UTC."],[[["\u003cp\u003eThis guide demonstrates how to create an Apigee workspace within VS Code for developing APIs, applicable to both Apigee and Apigee hybrid.\u003c/p\u003e\n"],["\u003cp\u003eYou can initiate the workspace creation process by accessing the Cloud Code extension in VS Code and selecting the "Create Apigee workspace" option.\u003c/p\u003e\n"],["\u003cp\u003eUsers can select either a single-repository or multi-repository workspace based on their development preferences.\u003c/p\u003e\n"],["\u003cp\u003eThe workspace is saved locally in a specified directory and provides a structured environment with folders for developing API proxies, shared flows, deployment environments, and test resources.\u003c/p\u003e\n"],["\u003cp\u003eThe created workspace will be called "myapigeeworkspace" and it will be displayed in the "Apigee" section of your Cloud Code workspace.\u003c/p\u003e\n"]]],[],null,["# Step 1: Create an Apigee workspace\n\n*This page\napplies to **Apigee** and **Apigee hybrid**.*\n\n\n*View [Apigee Edge](https://docs.apigee.com/api-platform/get-started/what-apigee-edge) documentation.*\n\nCreate an Apigee workspace for developing your APIs.\n\n1. To access Apigee in Cloud Code, launch VS Code and click the\n Cloud Code icon in the Activity bar, then select the **Apigee** section.\n\n2. Click **Local Development** and then the **Create Apigee workspace** icon in that folder (). Alternatively, you can select **View \\\u003e Command Palette** to open the Command palette and select **Cloud Code: Open Apigee workspace**.\n\n3. Select the workspace type that matches your preferred development style. You can choose between a [single-repository workspace](/apigee/docs/api-platform/local-development/vscode/manage-apigee-workspace#understanding_the_structure_of_an_apigee_single-repository_workspace) or a [multi-repository workspace](/apigee/docs/api-platform/local-development/vscode/manage-apigee-workspace#understanding_the_structure_of_an_apigee_multi-repository_workspace).\n\n4. Enter **myapigeeworkspace** at the prompt and press **Enter**.\n\n5. Navigate to the directory where you want to save the Apigee workspace.\n If you are using source control management, select a location in your source control repository.\n\n6. Click **Select workspace folder**.\n\nThe Apigee workspace is created, stored in the specified local directory, and shown in the **Apigee** section:\n\nAs shown, a set of folders is created for you to develop API proxies and shared flows, configure deployment environments, and build test resources.\n\n\n[1](/apigee/docs/api-platform/local-development/vscode/tutorial-create-workspace)\n\n\n[(NEXT) Step 2: Create an API proxy](/apigee/docs/api-platform/local-development/vscode/tutorial-create-proxy)\n\n\n[3](/apigee/docs/api-platform/local-development/vscode/tutorial-deploy)\n\n\n[4](/apigee/docs/api-platform/local-development/vscode/tutorial-test)\n\n\n[5](/apigee/docs/api-platform/local-development/vscode/tutorial-change-target-endpoint)\n\n\n[6](/apigee/docs/api-platform/local-development/vscode/tutorial-attach-policy)\n\n\n[7](/apigee/docs/api-platform/local-development/vscode/tutorial-deploy-apigee)\n\n\n[8](/apigee/docs/api-platform/local-development/vscode/tutorial-promote)\n\n\u003cbr /\u003e"]]