Questa pagina si applica ad Apigee e Apigee hybrid.
Visualizza la documentazione di
Apigee Edge.

Un proxy API Apigee ha due endpoint: un endpoint proxy e un endpoint di destinazione. L'endpoint proxy è l'interfaccia client. Riceve richieste dai client e invia risposte ai client. L'endpoint di destinazione è l'interfaccia del producer API. Comunica da Apigee a un producer di API, ad esempio un servizio o un'API di backend. Per saperne di più sugli endpoint, consulta Che cos'è un proxy API?
In questo passaggio, modificherai l'endpoint di destinazione del proxy API in https://mocktarget.apigee.net/xml, una risorsa che
restituisce dati XML di test. Dopo aver apportato la modifica, esegui nuovamente il deployment e testa il proxy API rivisto.
Apigee nella console Cloud
Nella console Google Cloud , vai alla pagina Sviluppo proxy > Proxy API.
- Assicurati che sia selezionato lo stesso progetto Google Cloud in cui hai creato il proxy API dal menu a discesa nella parte superiore della pagina.
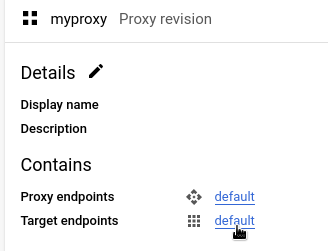
- Nella tabella dei proxy, seleziona il proxy myproxy, che hai creato nel passaggio 1: crea un proxy API.
- Fai clic sulla scheda Sviluppa.
Esplorare la visualizzazione Sviluppa
Nel riquadro a sinistra della visualizzazione Sviluppa, puoi:
- Cerca il testo nel proxy nel campo Cerca proxy.
- Aggiungi nuove norme.
- Aggiungi endpoint proxy e di destinazione.
- Aggiungi altre risorse.
Se non vuoi visualizzare il riquadro a sinistra, puoi comprimerlo facendo clic sul pulsante
Chiudi  .
.
Il riquadro a destra della visualizzazione Sviluppa mostra gli editor visivi e di testo per il proxy:
- L'editor visivo fornisce una visualizzazione grafica del flusso di richiesta e risposta.
- L'editor di testo ti consente di modificare l'XML per il proxy o la destinazione.

Note:
- Puoi fare clic e trascinare il divisore tra i due editor verso l'alto o verso il basso per espandere l'area di visualizzazione di uno dei due editor.
- Puoi espandere l'area di visualizzazione dell'editor visuale facendo clic sul pulsante di attivazione/disattivazione sul lato destro dell'editor di testo, che chiude il riquadro dell'editor di testo. Fai di nuovo clic sul pulsante per riaprire il riquadro dell'editor di testo.
Modificare l'endpoint di destinazione
Per modificare l'endpoint di destinazione del proxy:
- Nel riquadro Revisione proxy, seleziona Endpoint di destinazione > predefinito.
Viene visualizzato un diagramma dell'endpoint di destinazione nell'editor visivo:
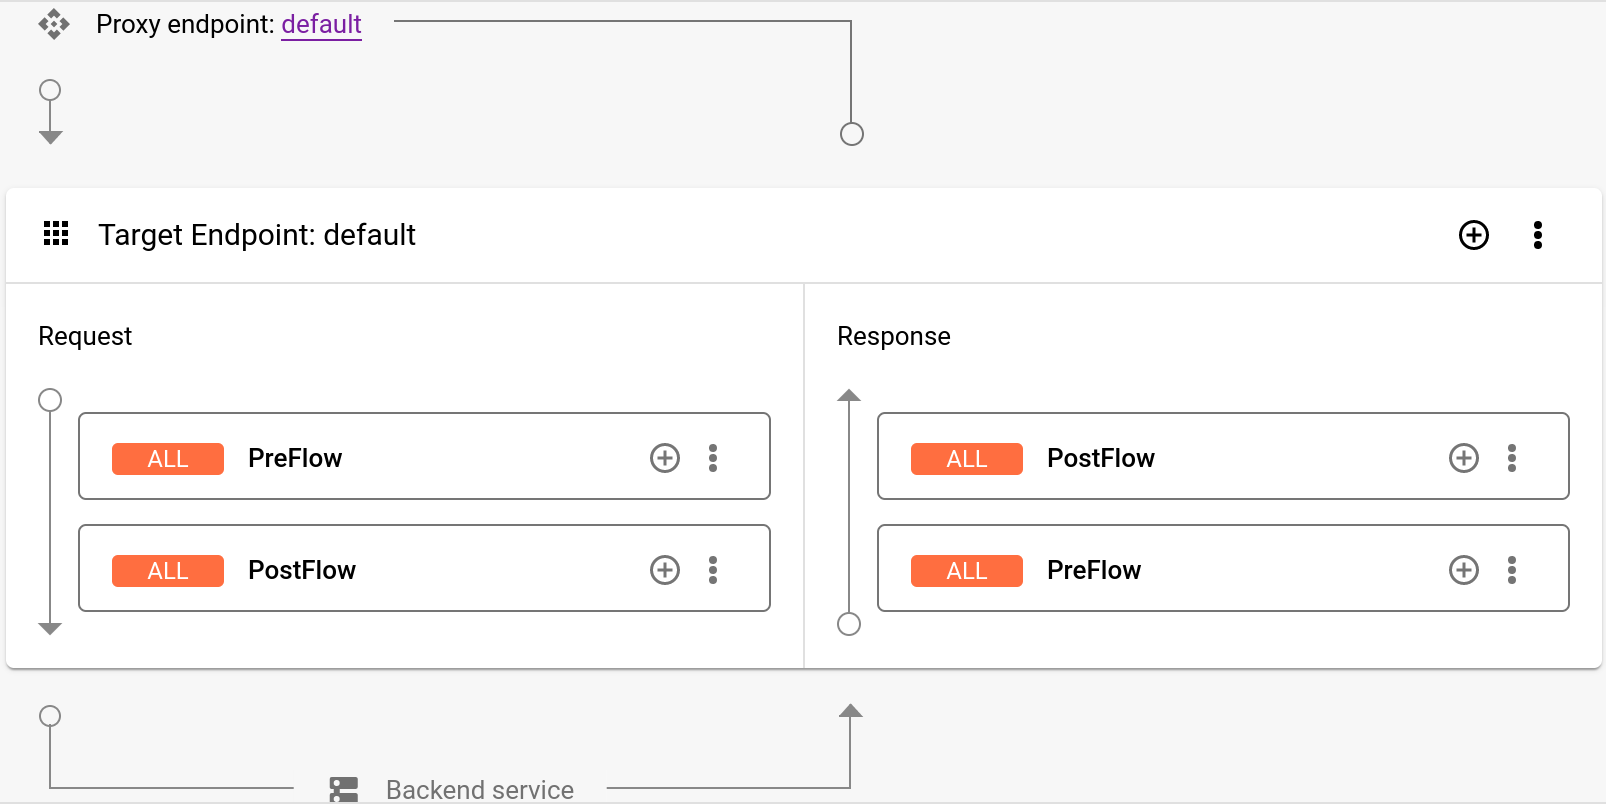
Sotto l'editor visuale, il codice XML per l'endpoint di destinazione viene visualizzato nell'editor di testo:
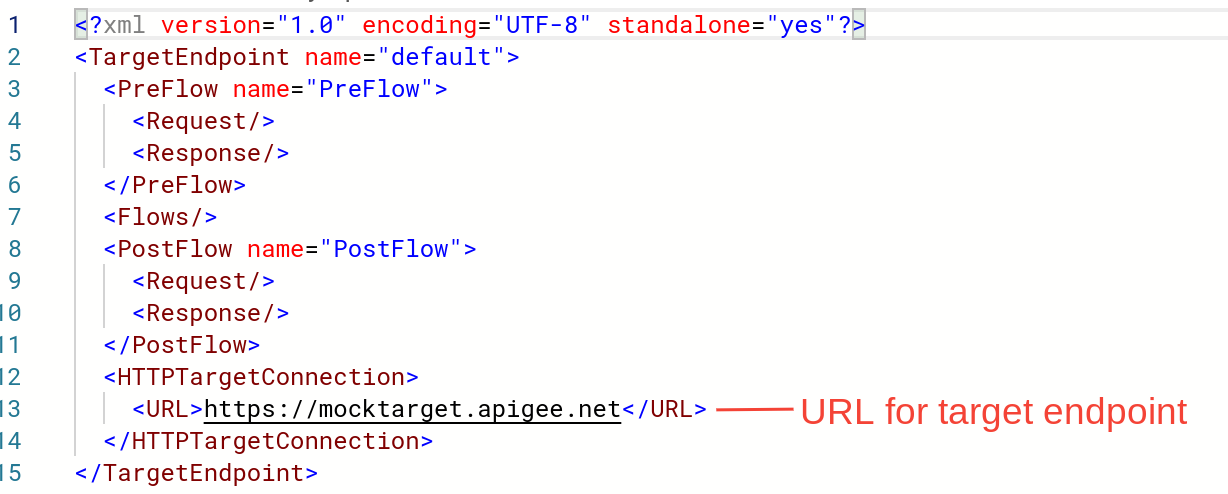
Nell'editor di testo, modifica
<URL>inhttps://mocktarget.apigee.net/xml. Aggiungi "/xml" all'URL esistente.Il nuovo URL è mostrato di seguito:
...
<HTTPTargetConnection>
  <Properties/>
  <URL>https://mocktarget.apigee.net/xml</URL>
</HTTPTargetConnection>
...
- Fai clic sulla freccia accanto a Salva in alto a destra nell'editor proxy e seleziona Salva come nuova revisione.
- Per eseguire il deployment delle modifiche, fai clic su Esegui il deployment.
- Nella finestra di dialogo Esegui il deployment, seleziona la revisione e l'ambiente in cui eseguire il deployment e fai clic su Esegui il deployment.
UI Apigee classica
Per modificare l'endpoint di destinazione del proxy:
- Accedi alla UI Apigee.
- Seleziona Sviluppa > Proxy API.
- Seleziona il proxy dall'elenco per visualizzare i dettagli del proxy API. Se non vedi il tuo proxy nell'elenco, assicurati di aver selezionato l'organizzazione corretta, come descritto in Passare da un'organizzazione all'altra.
Fai clic sulla scheda Sviluppa:

Viene visualizzato l'editor proxy API. L'editor proxy ti consente di visualizzare la struttura del tuo proxy API e configurarne il flusso. Un flusso è semplicemente il percorso passo passo che una richiesta proxy API intraprende attraverso la piattaforma Apigee. Altri tutorial tratteranno il concetto di flussi.)
- Nel riquadro Navigator, seleziona Target Endpoints >
default > PreFlow:

Apigee mostra le impostazioni dell'endpoint nel riquadro Codice:
<TargetEndpoint name="default">
  <Description/>
  <FaultRules/>
  <PreFlow name="PreFlow">
    <Request/>
    <Response/>
  </PreFlow>
  <PostFlow name="PostFlow">
    <Request/>
    <Response/>
  </PostFlow>
  <Flows/>
  <HTTPTargetConnection>
    <Properties/>
    <URL>https://mocktarget.apigee.net</URL>
  </HTTPTargetConnection>
</TargetEndpoint>
L'endpoint di destinazione è definito dall'elemento
<HTTPTargetConnection>. Modifica l'URL in
"https://mocktarget.apigee.net/xml". (Aggiungi "/xml" all'URL esistente.)Il nuovo URL restituisce un piccolo blocco di XML nel corpo della risposta.
La configurazione dell'endpoint ora dovrebbe avere il seguente aspetto:
...
<HTTPTargetConnection>
  <Properties/>
  <URL>https://mocktarget.apigee.net/xml</URL>
</HTTPTargetConnection>
...
Per salvare le modifiche alla configurazione del proxy, fai clic sul pulsante Salva.
Apigee salva le modifiche in una nuova revisione del proxy.
- Per eseguire il deployment della nuova revisione, seleziona Esegui il deployment in: test e fai clic su Esegui il deployment 2.
- Nella finestra di dialogo di conferma, fai clic su Implementa.
Se si verifica un errore, Apigee salva le modifiche, ma non esegue il deployment del proxy. In caso di errore:
- Correggi la configurazione del proxy. Apigee potrebbe fornire indicazioni sulla sintassi come popup.
- Esegui manualmente il deployment delle modifiche nell'ambiente
testfacendo clic su Deployment > test se Apigee non lo esegue automaticamente.
Puoi verificare se la revisione del proxy è stata implementata correttamente visualizzando lo stato della revisione dell'implementazione accanto al menu a discesa Implementa. Ad esempio:

Testa il proxy
Per testare la revisione del proxy API, chiamalo come hai fatto in Chiamare un proxy API.
Questa volta, l'endpoint mocktarget restituisce XML nel corpo della risposta:
<?xml version="1.0" encoding="UTF-8"?>
<root>
  <city>San Jose</city>
  <firstName>John</firstName>
  <lastName>Doe</lastName>
  <state>CA</state>
</root>
Ora che il proxy API restituisce dati XML, nel passaggio successivo aggiungerai un criterio che converte XML in JSON.
1 2 3 4 (NEXT) Step 5: Add a policy