Ahora que ya probaste tu proxy nuevo, ya estás listo para agregarle una política. Sin embargo, antes de hacerlo debes cambiar el extremo de destino del proxy por uno que muestre algunos datos.
Recuerda que en el Paso 1: Crea un proxy de API, debes configurar el extremo de destino (en el campo API existente) como https://mocktarget.apigee.net.
Supongamos que el extremo no mostró ningún dato interesante. Luego, puedes cambiar el extremo a uno que muestre algunos XML útiles. Esta sección explica cómo hacerlo.
Editor de proxies nuevo
Puedes cambiar el extremo de destino del proxy en la vista Desarrollo del editor de proxy.
Para abrir la vista Desarrollo, haz lo siguiente:
Selecciona Desarrollar > Proxies de API y, en el panel Proxies, selecciona el entorno para el proxy.
Haz clic en la pestaña Desarrollar para mostrar la vista Desarrollar:
Vista Desarrollar
En el panel izquierdo de la vista Desarrollar, puedes hacer lo siguiente:
Busca texto en el proxy en el campo Proxy de búsqueda.
Agrega políticas nuevas.
Agrega extremos de proxy y de destino.
Agrega otros recursos.
Si no deseas ver el panel izquierdo, puedes contraerlo haciendo clic en el botón para cerrar .
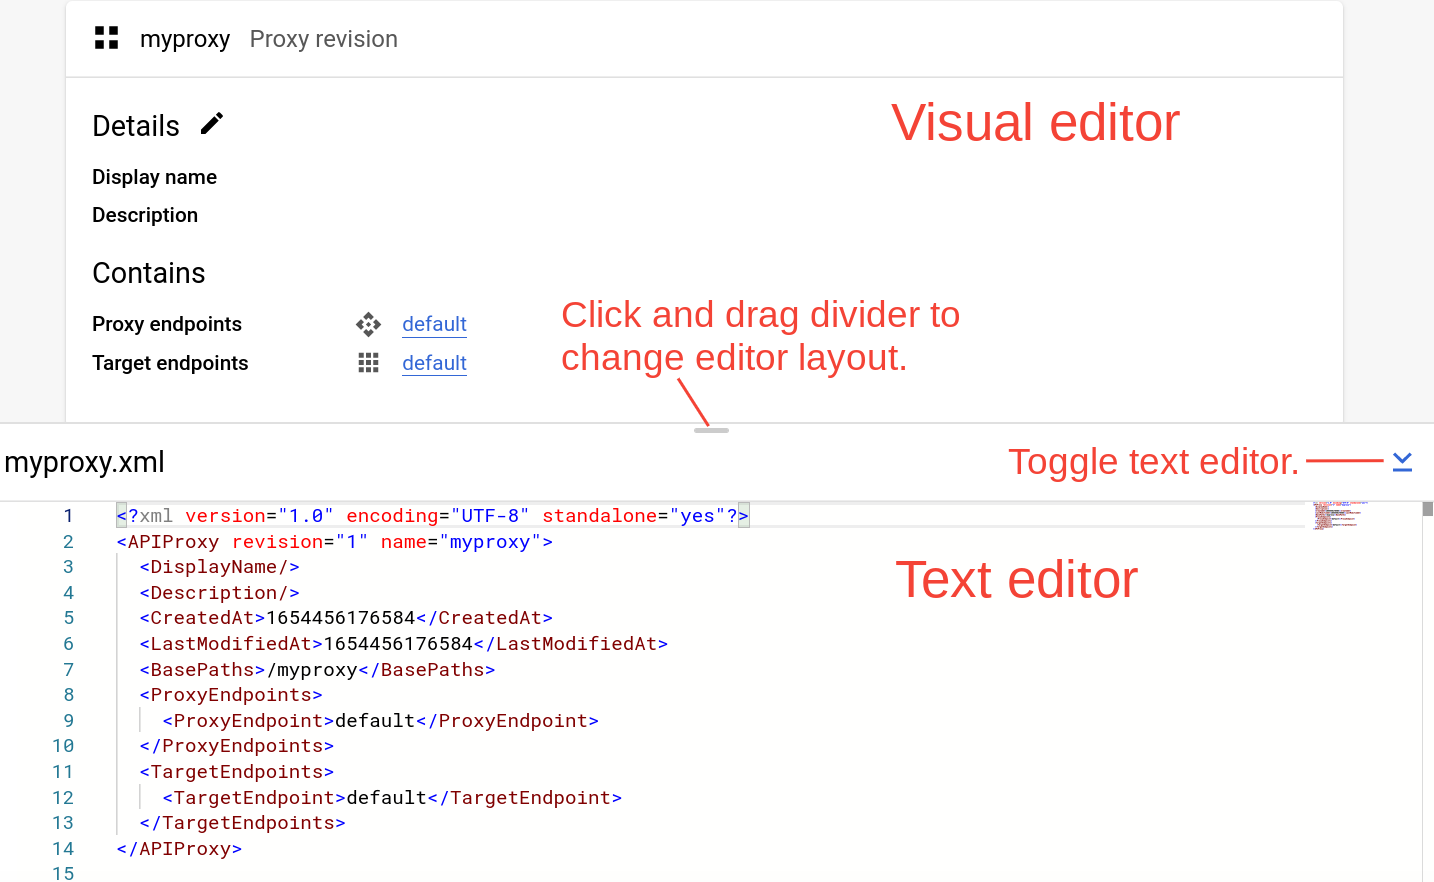
En el panel derecho de la vista Desarrollar, se muestran los editores visuales y de texto para el proxy:
El editor visual proporciona una vista gráfica del flujo de solicitud y respuesta.
El editor de texto te permite editar el XML del proxy o de destino.
Notas:
Puedes hacer clic y arrastrar el divisor entre los dos editores hacia arriba o hacia abajo a fin de expandir el área de visualización de cualquiera de los editores.
Para expandir el área de visualización del editor visual, haz clic en el botón de activación, ubicado al lado derecho del editor de texto, que cierra el panel del editor de texto. Haz clic en el botón de activación de nuevo a fin de volver a abrir el panel del editor de texto.
Cambia el extremo de destino
Para cambiar el extremo de destino del proxy, sigue estos pasos:
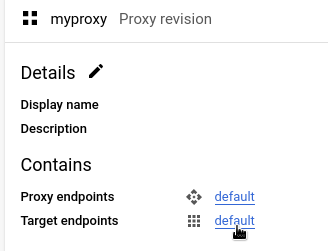
En el panel Revisión del proxy, selecciona Extremos de destino > predeterminado.
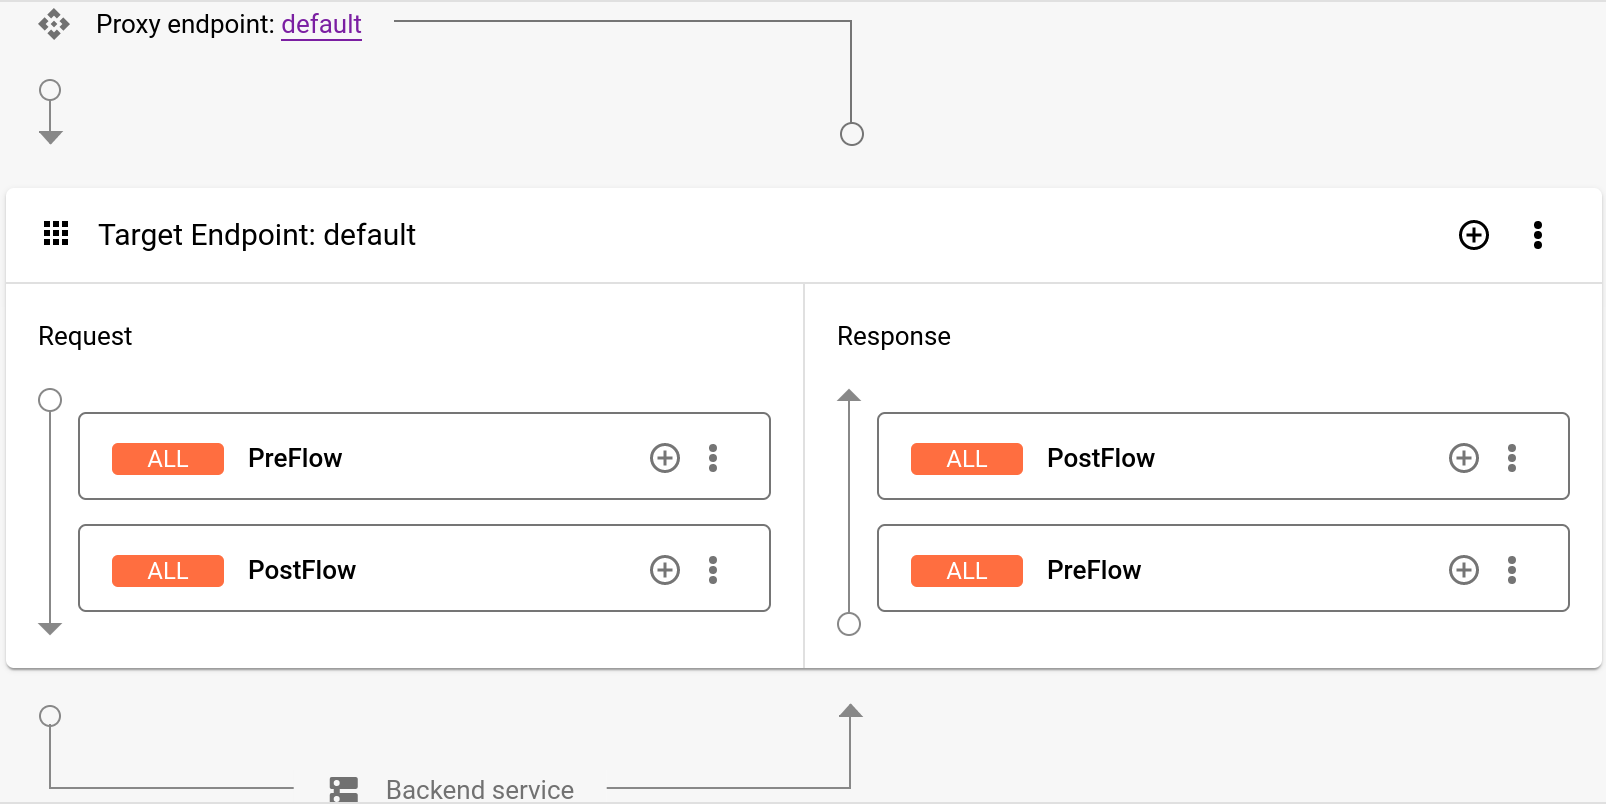
Aquí se muestra un diagrama del extremo de destino en el editor visual:
Debajo del editor visual, se muestra el código XML del extremo de destino en el editor de texto:
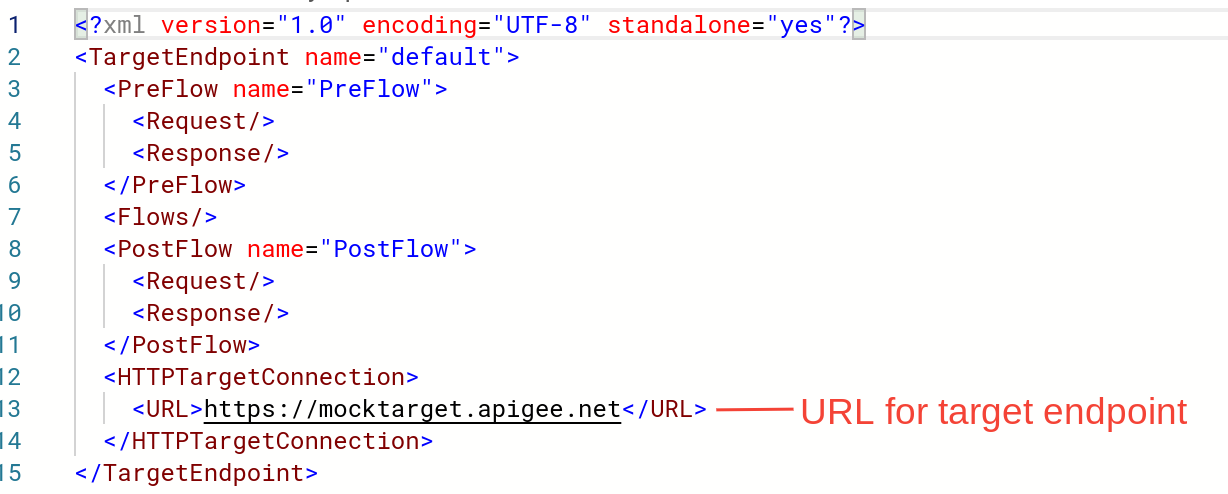
En el editor de texto, cambia el <URL> a https://mocktarget.apigee.net/xml. (Agrega “/xml” a la URL existente).
Selecciona el proxy de la lista para mostrar los detalles del proxy de API. Si no ves tu proxy en la lista, asegúrate de haber seleccionado la organización correcta, como se describe en Cambia entre organizaciones.
Haz clic en la pestaña Develop:
Esta acción te llevará al Editor del proxy de API. El Editor de proxy te permite ver la estructura de tu proxy de API y configurar su flujo. (Un flujo es solo la ruta gradual que toma una solicitud de proxy de API a través de la plataforma de Apigee. Otros instructivos abordarán el concepto de flujos).
En el panel Navegador, selecciona Extremos de destino > predeterminado > PreFlow:
Apigee muestra la configuración del extremo en el panel Code:
Para guardar los cambios en la configuración del proxy, haz clic en el botón Guardar.
Apigee guarda los cambios en una revisión de proxy nueva.
Para implementar la revisión nueva, selecciona Deploy to: test y selecciona Deploy 2.
En el diálogo de confirmación, haz clic en Implementar.
Si hay un error, Apigee guardará tus cambios, pero no implementará el proxy. Si ocurre un error, haz lo siguiente:
Corrige la configuración del proxy. Apigee puede proporcionar orientación de sintaxis como una ventana emergente.
Implementa de forma manual los cambios en el entorno test. Para ello haz clic en Deployment > test si Apigee no lo implementa de forma automática.
Para verificar si la revisión del proxy se implementó de forma correcta, visualiza el estado de la revisión de implementación junto al menú desplegable Implementar. Por ejemplo:
Prueba el proxy
Para probar los cambios, envía una solicitud al proxy, como lo hiciste en Llama al proxy de API. En el siguiente ejemplo, se supone que el proxy se llama myproxy:
[[["Fácil de comprender","easyToUnderstand","thumb-up"],["Resolvió mi problema","solvedMyProblem","thumb-up"],["Otro","otherUp","thumb-up"]],[["Difícil de entender","hardToUnderstand","thumb-down"],["Información o código de muestra incorrectos","incorrectInformationOrSampleCode","thumb-down"],["Faltan la información o los ejemplos que necesito","missingTheInformationSamplesINeed","thumb-down"],["Problema de traducción","translationIssue","thumb-down"],["Otro","otherDown","thumb-down"]],["Última actualización: 2025-09-04 (UTC)"],[[["\u003cp\u003eThis page details how to modify an Apigee API proxy's target endpoint to interact with a resource returning XML data, applicable to both Apigee and Apigee hybrid.\u003c/p\u003e\n"],["\u003cp\u003eThe process involves accessing the Apigee UI, either through the Google Cloud console or the classic interface, and navigating to the API proxy editor to adjust the target endpoint settings.\u003c/p\u003e\n"],["\u003cp\u003eThe target endpoint URL is updated to \u003ccode\u003ehttps://mocktarget.apigee.net/xml\u003c/code\u003e, which directs the proxy to a resource providing test XML data.\u003c/p\u003e\n"],["\u003cp\u003eAfter updating the URL in the visual or text editor, the changes must be saved as a new revision and then deployed to the appropriate environment for testing.\u003c/p\u003e\n"],["\u003cp\u003eOnce the API proxy's target endpoint has been updated, you can then test it to confirm it now returns an XML response.\u003c/p\u003e\n"]]],[],null,["# Step 4: Change the target endpoint\n\n*This page\napplies to **Apigee** and **Apigee hybrid**.*\n\n\n*View [Apigee Edge](https://docs.apigee.com/api-platform/get-started/what-apigee-edge) documentation.*\n\nAn Apigee API proxy has two endpoints: a proxy endpoint and a target endpoint. The proxy endpoint is the client interface.\nIt receives requests from clients and\nsends responses back to clients.\nThe target endpoint is the API producer interface. It communicates from Apigee to an API producer, such as a backend\nservice or API. To learn more about endpoints, see [What is an API proxy?](/apigee/docs/api-platform/fundamentals/understanding-apis-and-api-proxies#whatisanapiproxy)\n\nIn this step, you will change the API proxy's target endpoint to `https://mocktarget.apigee.net/xml`, a resource that\nreturns test XML data. After making the change, you will redeploy and test the revised API proxy. \n\n### Apigee in Cloud console\n\n1. In the Google Cloud console, go to the **Proxy development \\\u003e API proxies** page.\n\n [Go to API proxies](https://console.cloud.google.com/apigee/proxies)\n2. Make sure the same Google Cloud project where you created the API proxy is selected from the dropdown at the top of the page.\n3. In the proxies table, select the proxy **myproxy** , which you created in [Step 1: Create an API proxy](/apigee/docs/api-platform/get-started/create-proxy).\n4. Click the **Develop** tab.\n\n### Explore the Develop view\n\nIn the left-hand pane of the **Develop** view, you can:\n\n- Search for text in the proxy in the **Search proxy** field.\n- Add new policies.\n- Add proxy and target endpoints.\n- Add other resources.\n\nIf you don't want to view the left-hand pane, you can collapse it by clicking the\nclose button .\n\nThe right-hand pane of the **Develop** view displays the visual and text editors\nfor the proxy:\n\n- The visual editor provides a graphical view of the request and response flow.\n- The text editor lets you edit the XML for the proxy or target.\n\n**Notes:**\n\n- You can click and drag the divider between the two editors up or down to expand the display area of either editor.\n- You can expand the display area of the visual editor by clicking the toggle button on the right side of the text editor, which closes the text editor pane. Click the toggle button again to re-open the text editor pane.\n\n### Change the target endpoint\n\nTo change the target endpoint of the proxy:\n\n1. In the **Proxy revision** pane, select **Target Endpoints \\\u003e default** .\n\n This displays a diagram of the target endpoint in the visual editor:\n\n Below the visual editor, the XML code for the target endpoint is displayed in the text editor:\n\n2. In the text editor, change the `\u003cURL\u003e` to\n `https://mocktarget.apigee.net`**/xml**. (Append \"/xml\" to the existing URL.)\n\n The new URL is shown below: \n\n ```text\n ...\n \u003cHTTPTargetConnection\u003e\n \u003cProperties/\u003e\n \u003cURL\u003ehttps://mocktarget.apigee.net/xml\u003c/URL\u003e\n \u003c/HTTPTargetConnection\u003e\n ...\n ```\n3. Click the arrow next to **Save** at the top right of the Proxy Editor, and select **Save as new revision**.\n4. To deploy your changes, click **Deploy**.\n5. In the **Deploy** dialog, select the revision and environment in which to deploy, and click **Deploy**.\n\n### Classic Apigee UI\n\nTo change your proxy's target endpoint:\n\n1. Sign in to the [Apigee UI](https://apigee.google.com).\n2. Select **Develop \\\u003e API Proxies**.\n3. Select your proxy from the list to display the API proxy details. If you don't see your proxy in the list, be sure that you selected the right organization, as described in [Switching between your organizations](/apigee/docs/api-platform/get-started/switch-org).\n4. Click the **Develop** tab:\n\n This takes you to the API Proxy Editor. The Proxy Editor lets you see the structure of your\n API proxy and configure its flow. (A flow is just the stepwise path an API proxy request takes\n through the Apigee platform. Other tutorials will cover the concept of\n *flows*.)\n5. In the **Navigator** pane, select **Target Endpoints \\\u003e\n default \\\u003e PreFlow** :\n\n Apigee displays the endpoint settings in the **Code** pane: \n\n ```text\n \u003cTargetEndpoint name=\"default\"\u003e\n \u003cDescription/\u003e\n \u003cFaultRules/\u003e\n \u003cPreFlow name=\"PreFlow\"\u003e\n \u003cRequest/\u003e\n \u003cResponse/\u003e\n \u003c/PreFlow\u003e\n \u003cPostFlow name=\"PostFlow\"\u003e\n \u003cRequest/\u003e\n \u003cResponse/\u003e\n \u003c/PostFlow\u003e\n \u003cFlows/\u003e\n \u003cHTTPTargetConnection\u003e\n \u003cProperties/\u003e\n \u003cURL\u003ehttps://mocktarget.apigee.net\u003c/URL\u003e\n \u003c/HTTPTargetConnection\u003e\n \u003c/TargetEndpoint\u003e\n ```\n\n The target endpoint is defined by the `\u003cHTTPTargetConnection\u003e`\n element.\n6. Change the URL to `\"https://mocktarget.apigee.net`**/xml**`\"`. (Append \"/xml\"\n to the existing URL.)\n\n The new URL returns a small block of XML in the body of the response.\n\n Your endpoint configuration should now look like the following: \n\n ```text\n ...\n \u003cHTTPTargetConnection\u003e\n \u003cProperties/\u003e\n \u003cURL\u003ehttps://mocktarget.apigee.net/xml\u003c/URL\u003e\n \u003c/HTTPTargetConnection\u003e\n ...\n ```\n7. To save your changes to the proxy configuration, click the **Save**\n button.\n\n Apigee saves your changes in a new proxy revision.\n8. To deploy the new revision, select **Deploy to: test** and click **Deploy 2**.\n9. In the confirmation dialog, click **Deploy** .\n\n If there is an error, Apigee will save your changes but not deploy the proxy. In the\n case of an error:\n 1. Fix your proxy configuration. Apigee may provide syntax guidance as a pop-up.\n 2. Manually deploy your changes to the `test` environment by clicking **Deployment \\\u003e test** if Apigee does not automatically deploy it.\n\n You can check if your proxy revision was deployed successfully by viewing the\n deployment revision status adjacent to the Deploy drop-down. For example:\n\nTest the proxy\n--------------\n\nTo test the API proxy revision, call the proxy just as you did in\n[Call an API proxy](/apigee/docs/api-platform/get-started/test-proxy).\n\nThis time, the mocktarget endpoint returns XML in the body of the response: \n\n```text\n\u003c?xml version=\"1.0\" encoding=\"UTF-8\"?\u003e\n\u003croot\u003e\n \u003ccity\u003eSan Jose\u003c/city\u003e\n \u003cfirstName\u003eJohn\u003c/firstName\u003e\n \u003clastName\u003eDoe\u003c/lastName\u003e\n \u003cstate\u003eCA\u003c/state\u003e\n\u003c/root\u003e\n```\n\nNow that the API proxy returns XML data, in the next step you will add a policy\nthat converts XML to JSON.\n[1](/apigee/docs/api-platform/get-started/create-proxy) [2](/apigee/docs/api-platform/get-started/deploy-proxy) [3](/apigee/docs/api-platform/get-started/test-proxy) [4](/apigee/docs/api-platform/get-started/change-endpoint) [(NEXT) Step 5: Add a policy](/apigee/docs/api-platform/get-started/add-policy)\n\n\u003cbr /\u003e"]]