本頁內容適用於 Apigee 和 Apigee Hybrid。
查看
Apigee Edge 說明文件。

Apigee API Proxy 有兩個端點:Proxy 端點和目標端點。Proxy 端點是用戶端介面。 接收來自用戶端的要求,並將回應傳回給用戶端。目標端點是 API 產生器介面。從 Apigee 與 API 產生者 (例如後端服務或 API) 通訊。如要進一步瞭解端點,請參閱「什麼是 API Proxy?」一文。
在這個步驟中,您會將 API 代理的目標端點變更為 https://mocktarget.apigee.net/xml,這個資源會傳回測試 XML 資料。完成變更後,請重新部署並測試修訂後的 API Proxy。
Cloud 控制台中的 Apigee
在 Google Cloud 控制台中,前往「Proxy development」(Proxy 開發) >「API proxies」(API Proxy) 頁面。
- 請確認頁面頂端下拉式選單中選取的 Google Cloud 專案,與您建立 API 代理的專案相同。
- 在 Proxy 資料表中,選取您在「步驟 1:建立 API Proxy」中建立的 Proxy「myproxy」。
- 按一下「開發」分頁標籤。
探索「開發」檢視畫面
在「開發」檢視畫面的左側窗格中,您可以執行下列操作:
- 在「搜尋 Proxy」欄位中搜尋 Proxy 中的文字。
- 新增政策。
- 新增 Proxy 和目標端點。
- 新增其他資源。
如不想查看左側窗格,可以點選關閉按鈕  將其收合。
將其收合。
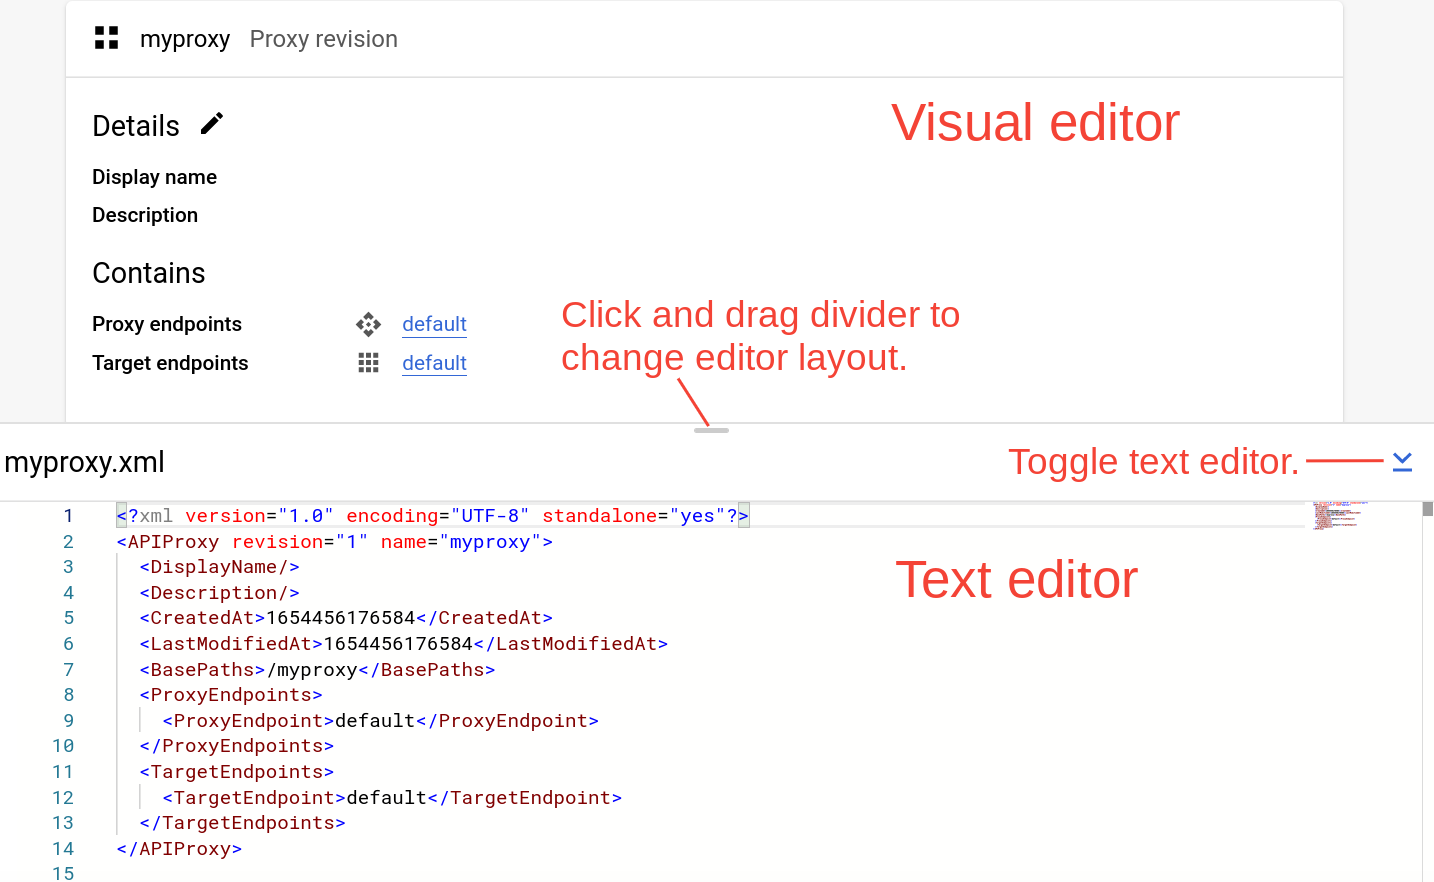
「Develop」(開發) 檢視畫面的右側窗格會顯示 Proxy 的視覺化和文字編輯器:
- 視覺化編輯器提供要求和回應流程的圖形檢視畫面。
- 您可以使用文字編輯器編輯 Proxy 或目標的 XML。
注意:
- 按一下並上下拖曳兩個編輯器之間的分隔線,即可擴大任一編輯器的顯示區域。
- 如要展開視覺化編輯器的顯示區域,請按一下文字編輯器右側的切換按鈕,關閉文字編輯器窗格。再次點選切換按鈕,即可重新開啟文字編輯器窗格。
變更目標端點
如要變更 Proxy 的目標端點:
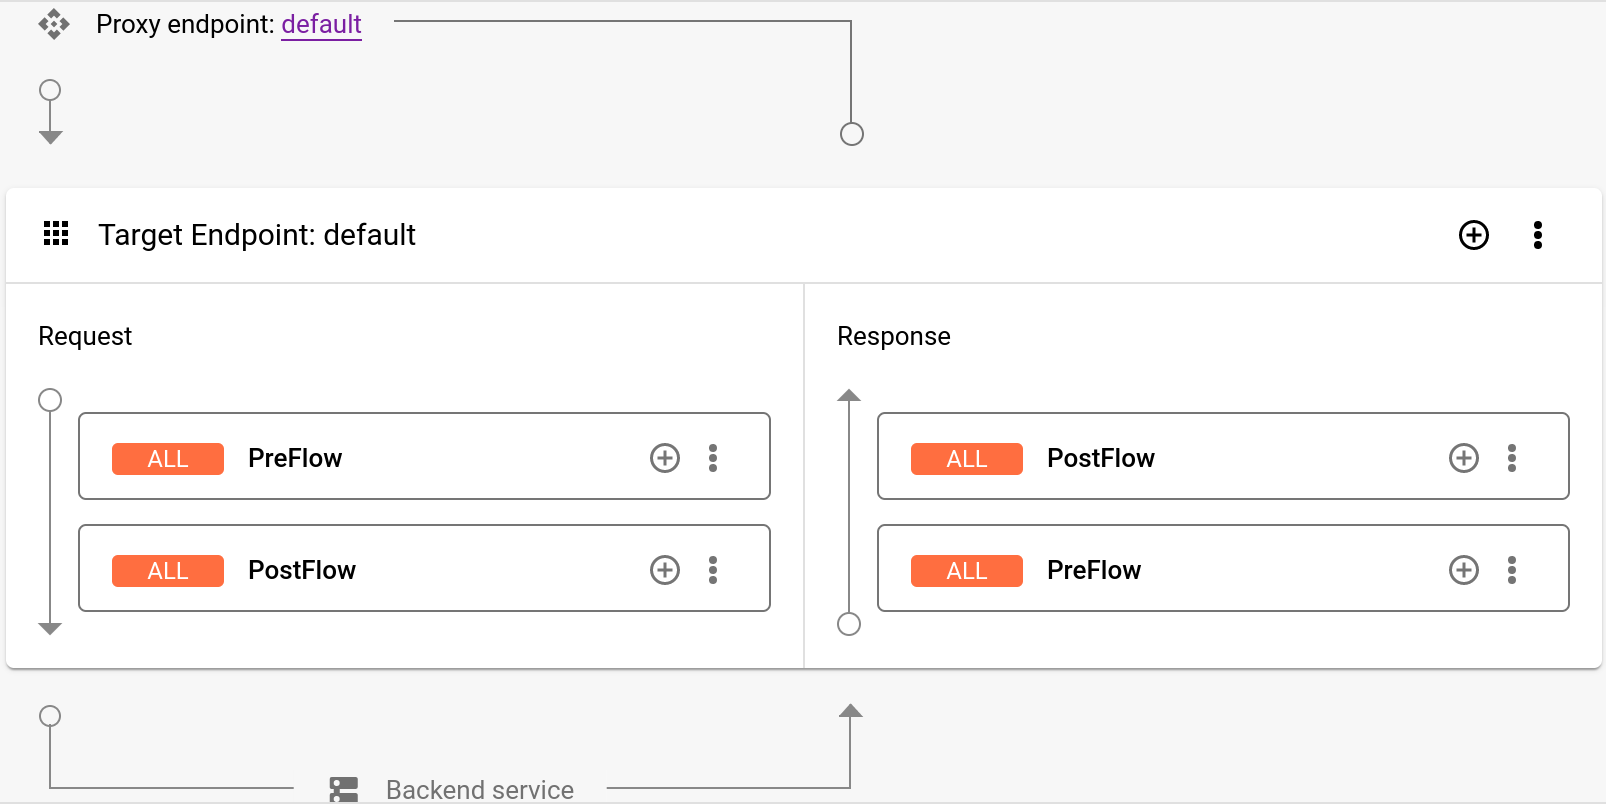
- 在「Proxy revision」窗格中,依序選取「Target Endpoints」>「default」。

視覺化編輯器會顯示目標端點的圖表:
在視覺化編輯器下方,文字編輯器會顯示目標端點的 XML 程式碼:
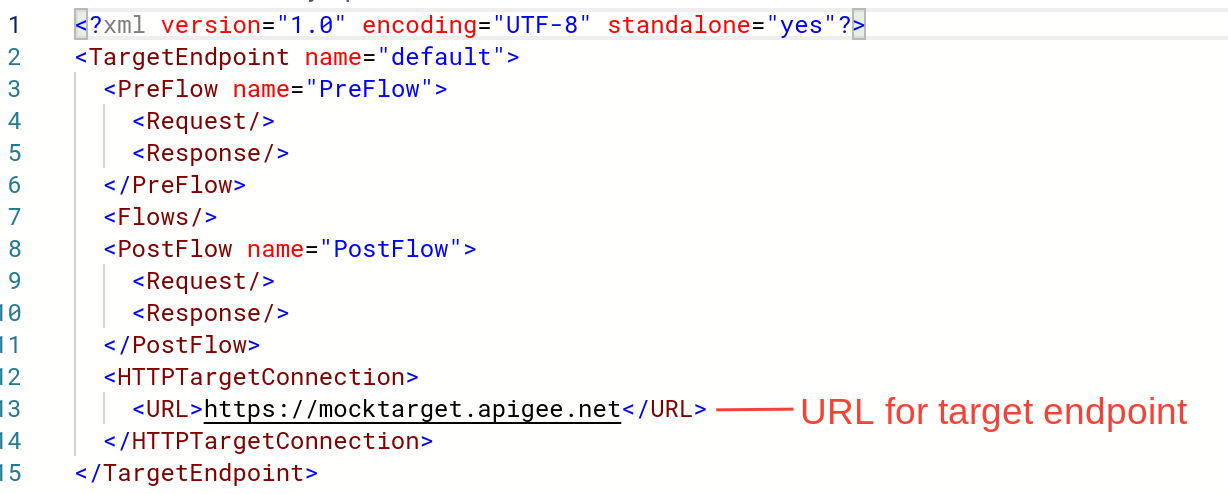
在文字編輯器中,將
<URL>變更為https://mocktarget.apigee.net/xml。(在現有網址後方附加「/xml」)。新網址如下所示:
...
<HTTPTargetConnection>
  <Properties/>
  <URL>https://mocktarget.apigee.net/xml</URL>
</HTTPTargetConnection>
...
- 按一下 Proxy 編輯器右上角「儲存」旁的箭頭, 然後選取「另存為新修訂版本」。
- 如要部署變更,請按一下「部署」。
- 在「Deploy」(部署) 對話方塊中,選取要部署的修訂版本和環境,然後按一下「Deploy」(部署)。
傳統版 Apigee UI
如要變更 Proxy 的目標端點:
- 登入 Apigee 使用者介面。
- 選取「Develop」>「API Proxies」。
- 從清單中選取 Proxy,即可顯示 API Proxy 詳細資料。如果清單中沒有顯示您的 Proxy,請確認您選取的機構正確無誤,如「在機構之間切換」一文所述。
按一下「開發」分頁標籤:

系統會將您導向 API Proxy 編輯器。您可以在 Proxy 編輯器中查看 API Proxy 的結構,並設定其流程。(流程只是 API Proxy 要求在 Apigee 平台中採取的逐步路徑。其他教學課程會介紹「流程」的概念。
- 在「Navigator」窗格中,依序選取「Target Endpoints」>「default」>「PreFlow」:
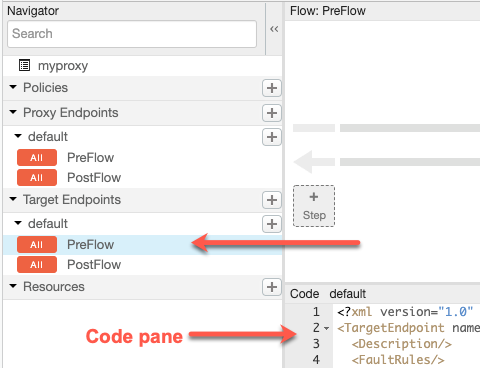
Apigee 會在「程式碼」窗格中顯示端點設定:
<TargetEndpoint name="default">
  <Description/>
  <FaultRules/>
  <PreFlow name="PreFlow">
    <Request/>
    <Response/>
  </PreFlow>
  <PostFlow name="PostFlow">
    <Request/>
    <Response/>
  </PostFlow>
  <Flows/>
  <HTTPTargetConnection>
    <Properties/>
    <URL>https://mocktarget.apigee.net</URL>
  </HTTPTargetConnection>
</TargetEndpoint>
目標端點是由
<HTTPTargetConnection>元素定義。 將網址變更為
"https://mocktarget.apigee.net/xml"。(在現有網址中附加「/xml」)。新網址會在回應主體中傳回一小段 XML。
端點設定現在應如下所示:
...
<HTTPTargetConnection>
  <Properties/>
  <URL>https://mocktarget.apigee.net/xml</URL>
</HTTPTargetConnection>
...
如要儲存 Proxy 設定變更,請按一下「儲存」按鈕。
Apigee 會將變更儲存為新的 Proxy 修訂版本。
- 如要部署新修訂版本,請選取「Deploy to: test」(部署至:測試),然後按一下「Deploy 2」(部署 2)。
- 在確認對話方塊中,按一下「部署」。
如有錯誤,Apigee 會儲存變更,但不會部署 Proxy。發生錯誤時:
- 修正 Proxy 設定。Apigee 可能會以彈出式視窗的形式提供語法指引。
- 如果 Apigee 沒有自動部署變更,請按一下「Deployment」>「test」,手動將變更部署到
test環境。
如要確認 Proxy 修訂版本是否已成功部署,請查看「部署」下拉式選單旁的部署修訂版本狀態。例如:

測試 Proxy
如要測試 API Proxy 修訂版本,請呼叫 Proxy,就像您在「呼叫 API Proxy」中執行的操作一樣。
這次,mocktarget 端點會在回應主體中傳回 XML:
<?xml version="1.0" encoding="UTF-8"?>
<root>
  <city>San Jose</city>
  <firstName>John</firstName>
  <lastName>Doe</lastName>
  <state>CA</state>
</root>
API Proxy 現在會傳回 XML 資料,接下來請新增政策,將 XML 轉換為 JSON。
1 2 3 4 (下一步) 步驟 5:新增政策