Crea un proxy nell'interfaccia utente Apigee o utilizzando l'API, come descritto nelle sezioni seguenti.
Campi principali del proxy API
Segui queste linee guida quando crei un proxy API:
Campo
Descrizione
Nome del proxy API
Nome visualizzato per l'API. Specifica caratteri alfanumerici, trattino (-) o trattino basso (_).
Percorso di base del proxy API
Frammento URI che viene visualizzato dopo l'indirizzo http://[host] o https://[host] del proxy API. Apigee utilizza l'URI del percorso di base per abbinare e instradare i messaggi di richiesta in entrata al proxy API corretto.
Utilizzare i caratteri jolly nei percorsi di base
Utilizza uno o più caratteri jolly nei percorsi di base dei proxy API per proteggere i tuoi proxy API in futuro.
Consentiamo la specifica di un singolo carattere jolly * tra due barre /: /*/.
Ad esempio, un percorso di base /team/*/members consente ai client di chiamare
https://[host]/team/blue/members e https://[host]/team/green/members senza
che tu debba creare nuovi proxy API per supportare nuovi team.
Puoi sostituire qualsiasi numero di token nel percorso di base seguendo questo pattern.
Altri pattern, inclusi /**, /something* o /*something, non sono supportati.
Descrizione
(Facoltativo) Una descrizione del proxy API.
URL di destinazione/di backend
URL (incluso HTTP o HTTPS) del servizio di backend richiamato da questo proxy API.
Spazio
(Facoltativo) Se la tua organizzazione ha abilitato Apigee Spaces, puoi associare il proxy API a uno spazio.
Per saperne di più, consulta la panoramica di Apigee Spaces.
Passaggi per creare un proxy API
Per creare un proxy API utilizzando la UI o le API:
Apigee nella console Cloud
Per creare un proxy in Apigee nella console Google Cloud:
Nella console Google Cloud , vai alla pagina Sviluppo proxy > Proxy API.
Nel riquadro Crea un proxy, in Modello di proxy,
seleziona Proxy inverso (il più comune).
Nella sezione Dettagli proxy, inserisci quanto segue:
Nome proxy:inserisci un nome per il proxy, ad esempio myproxy.
Base Path (Percorso di base): impostato automaticamente sul valore inserito per
Proxy name. Il percorso
di base fa parte dell'URL utilizzato per effettuare richieste alla tua API. Apigee utilizza l'URL per
corrispondere e instradare le richieste in entrata al proxy API appropriato.
Descrizione (facoltativo): inserisci una descrizione per il nuovo proxy API, ad esempio "Test di Apigee con un proxy semplice".
Target (API esistente): inserisci https://mocktarget.apigee.net.
Definisce l'URL di destinazione richiamato da Apigee in una richiesta al proxy API. Il servizio mocktarget è
ospitato su Apigee e restituisce dati semplici. Non richiede chiavi API o token di accesso.
Spazio (facoltativo): se la tua organizzazione ha attivato Apigee Spaces, puoi associare il proxy API a uno spazio selezionato dall'elenco delle opzioni disponibili.
Per saperne di più, consulta la panoramica di Apigee Spaces.
Fai clic su Avanti.
Deployment (facoltativo):
Deployment environments (ambienti di deployment): facoltativo. Utilizza le caselle di controllo per selezionare uno o più
ambienti in cui eseguire il deployment del proxy. Se preferisci non eseguire il deployment del proxy in questo
punto, lascia vuoto il campo Ambienti di deployment. Puoi sempre eseguire il deployment
del proxy in un secondo momento.
Service account: facoltativo. Collega un account di servizio al deployment per consentire al proxy di accedere ai servizi Google Cloud , come specificato nel ruolo e nelle autorizzazioni del account di servizio.
Fai clic su Crea.
Apigee crea il nuovo proxy e mostra un riepilogo dei dettagli del proxy nella visualizzazione
Riepilogo proxy.
Se scegli di eseguire il deployment del proxy, la sezione Deployment mostra il numero di Revisione, che è 1 al primo deployment. La colonna Stato mostra gli
ambienti in cui il proxy viene implementato con un indicatore di stato verde.
Apigee classico
Per creare un proxy API semplice nella UI Apigee classica:
Fai clic su Proxy API nella visualizzazione principale.
Dall'elenco a discesa Ambiente, seleziona l'ambiente in cui vuoi creare un nuovo proxy API.
La UI ibrida mostra un elenco di proxy API per quell'ambiente. Se non hai ancora creato
proxy, l'elenco è vuoto.
Fai clic su Crea nuovo.
Viene avviata la procedura guidata Crea proxy.
Fai clic su Reverse proxy (il più comune).
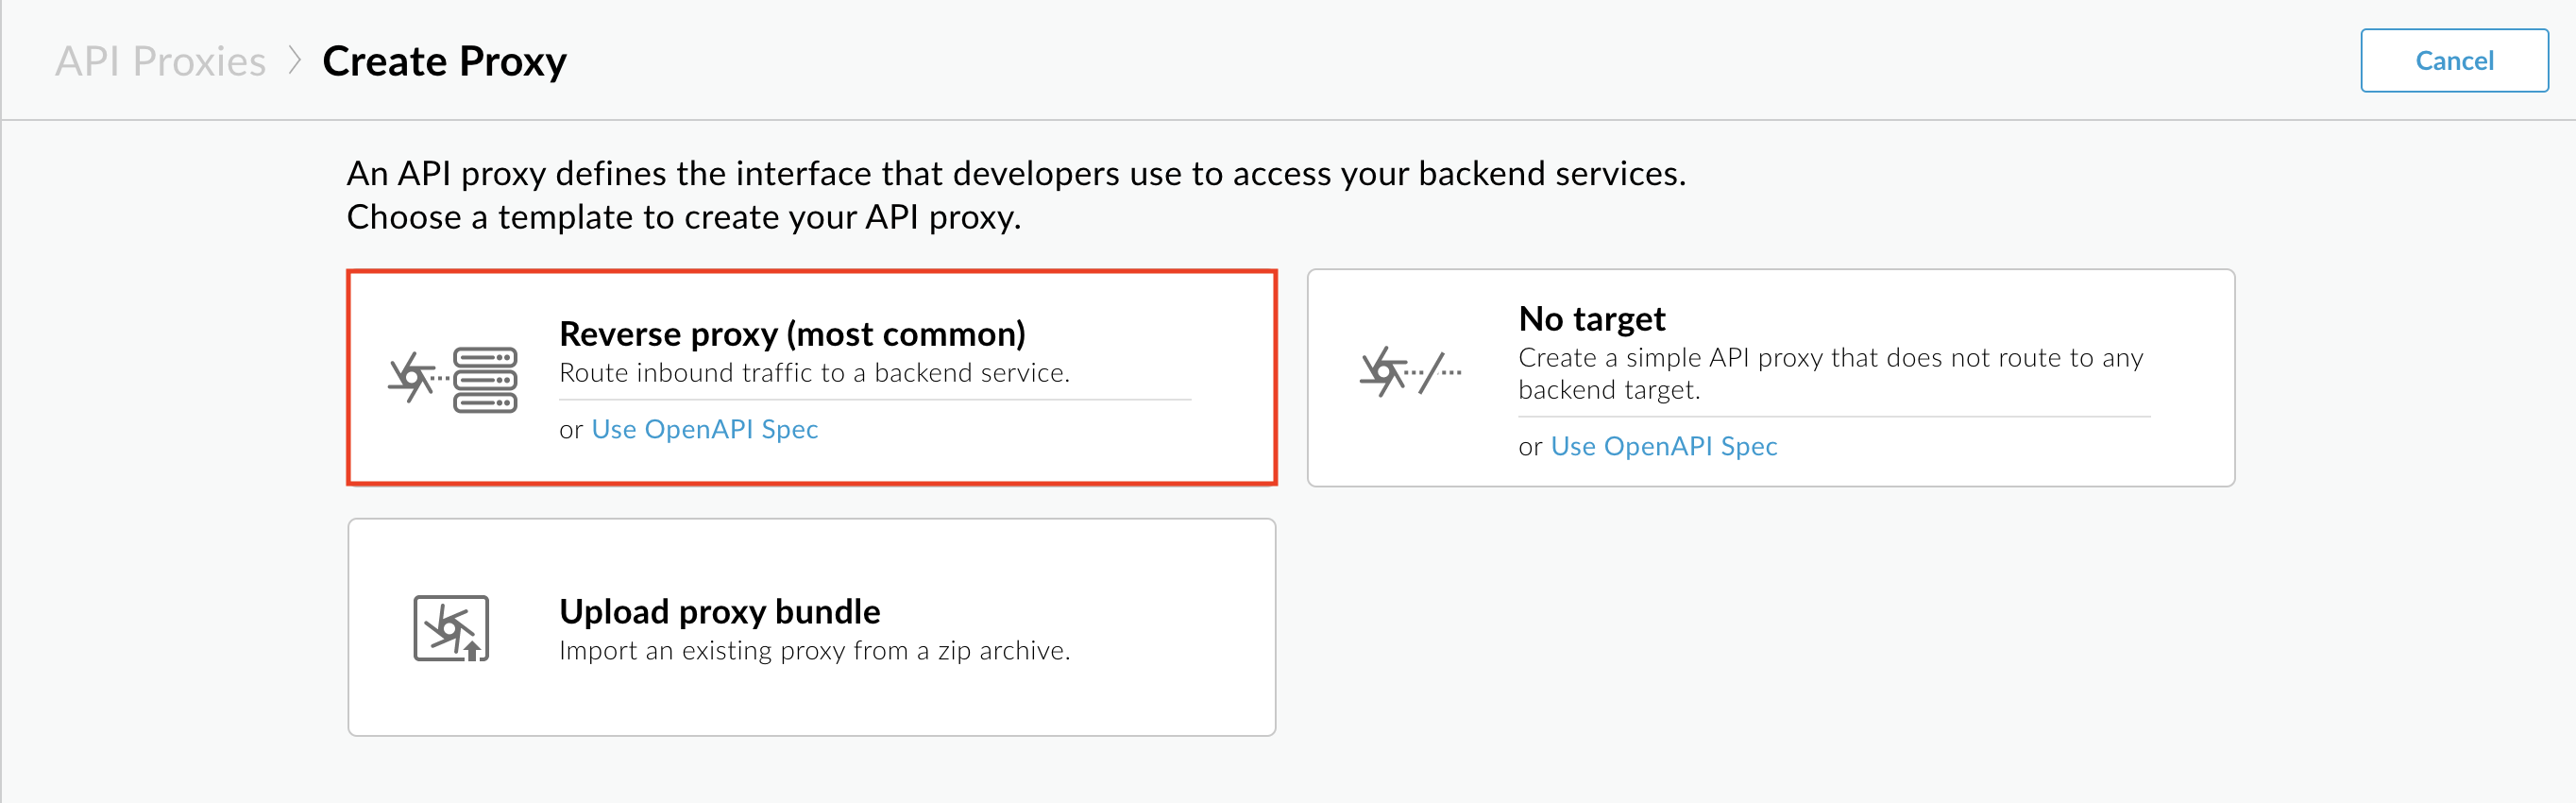
Viene visualizzata la pagina Dettagli proxy.
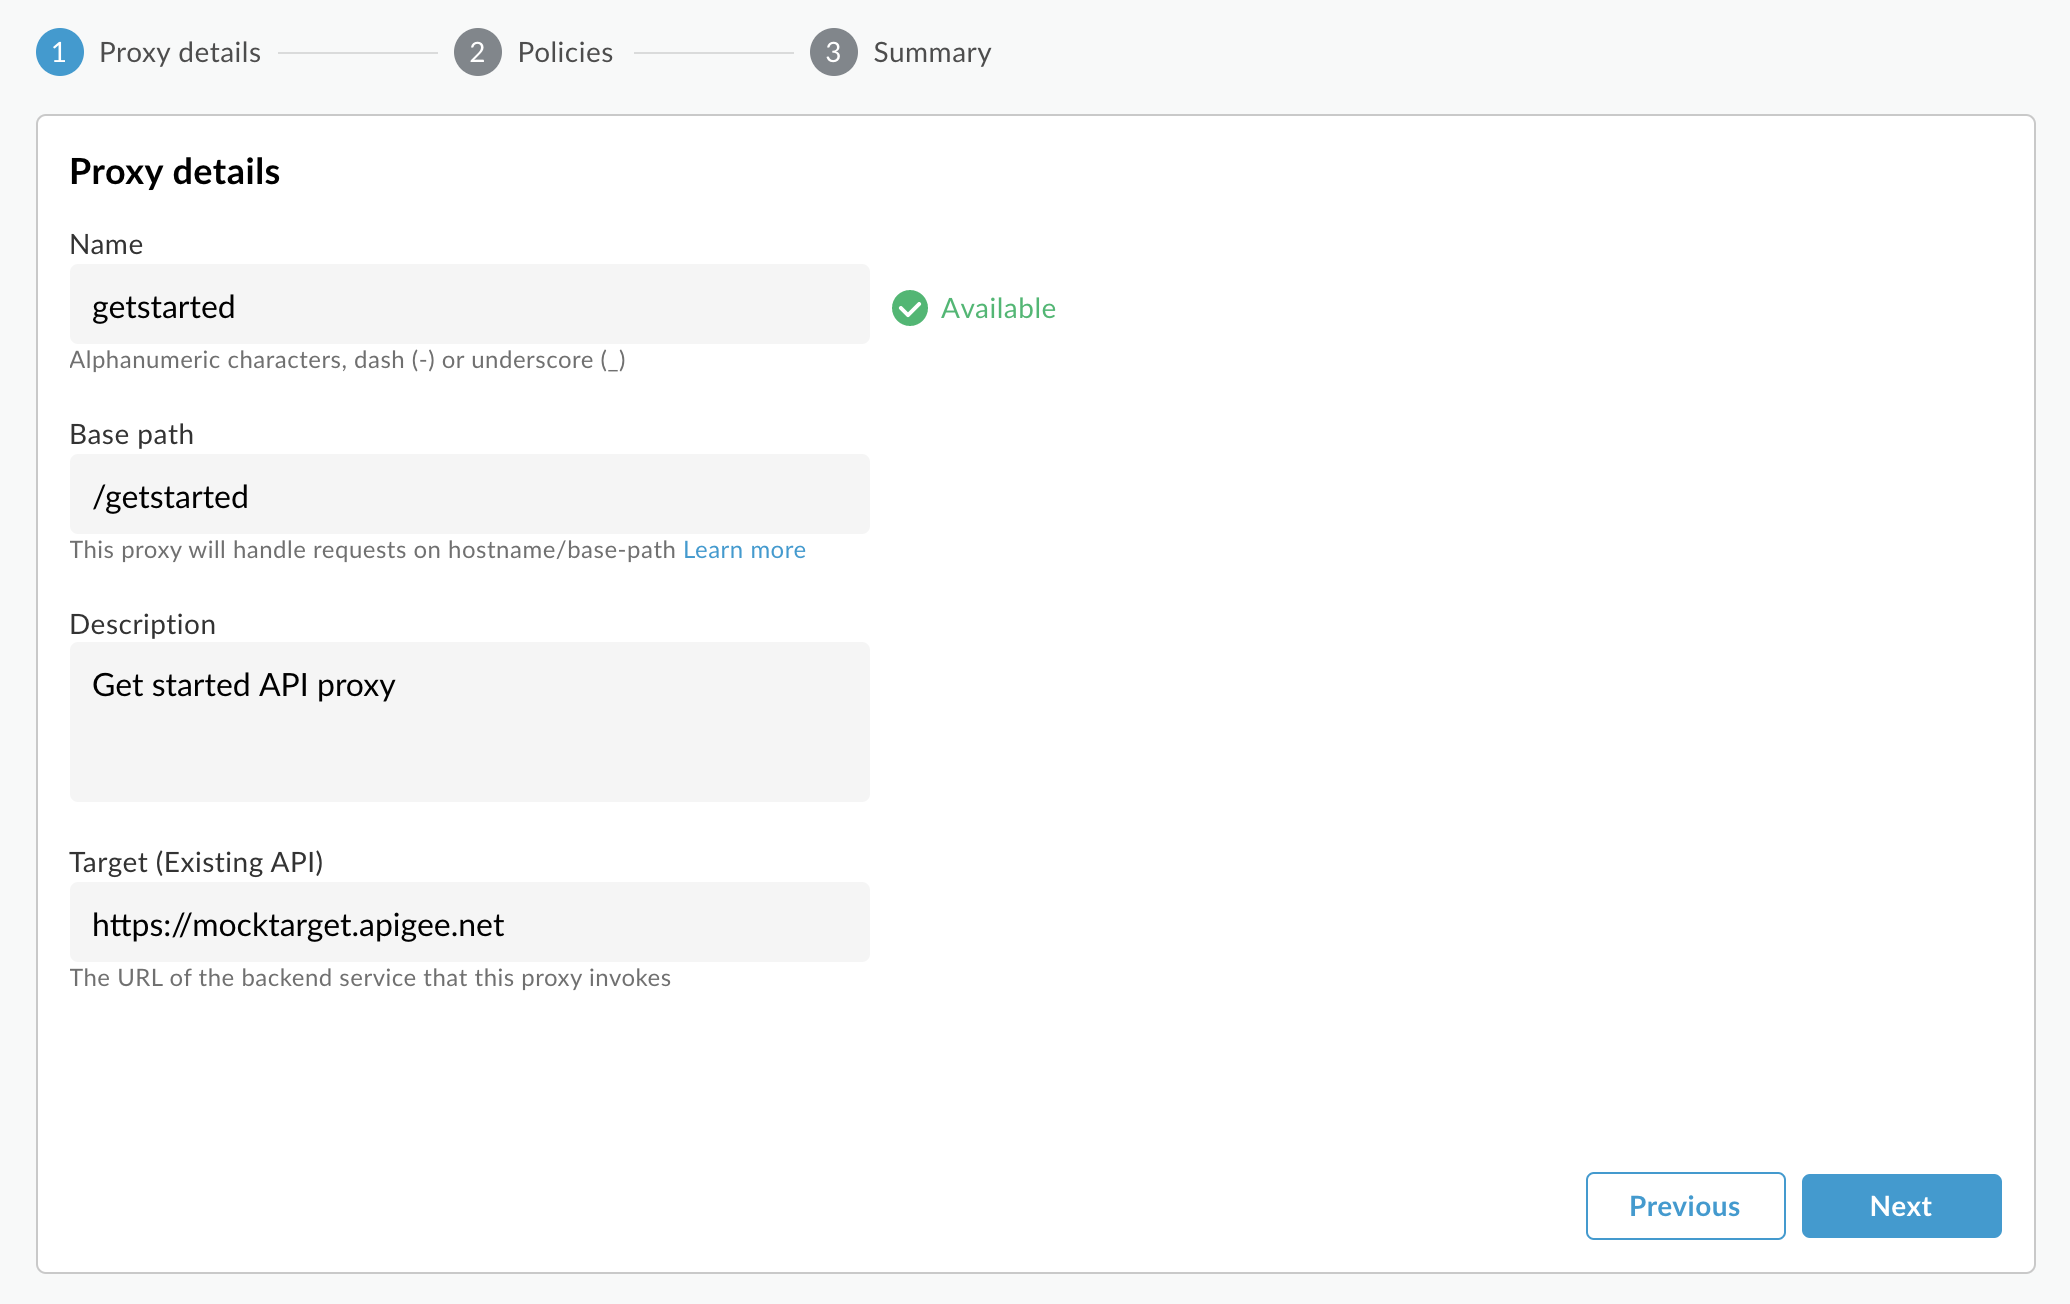
Configura il proxy con le seguenti impostazioni:
Nome:inserisci getstarted. Se esiste già un proxy con questo nome,
scegli un altro nome.
Percorso di base:lascia impostato il valore /getstarted. Il percorso
di base fa parte dell'URL utilizzato per effettuare richieste alla tua API. Apigee utilizza l'URL per
corrispondere e instradare le richieste in entrata al proxy API appropriato.
(Facoltativo) Descrizione: inserisci una descrizione per il nuovo proxy API, ad esempio
Get started API proxy.
Target (API esistente): inserisci https://mocktarget.apigee.net. Definisce l'URL di destinazione che Apigee richiama in una richiesta al proxy API. Il servizio mocktarget è
ospitato su Apigee e restituisce dati semplici. Non richiede chiavi API o token di accesso.
I dettagli del proxy API dovrebbero essere simili ai seguenti:
Fai clic su Avanti.
Nella visualizzazione Policy comuni, seleziona Pass-through (nessuna autorizzazione) in Sicurezza:
Autorizzazione.
Fai clic su Avanti.
Nella pagina Riepilogo, seleziona gli ambienti di deployment, se vuoi,
e fai clic su Crea ed esegui il deployment.
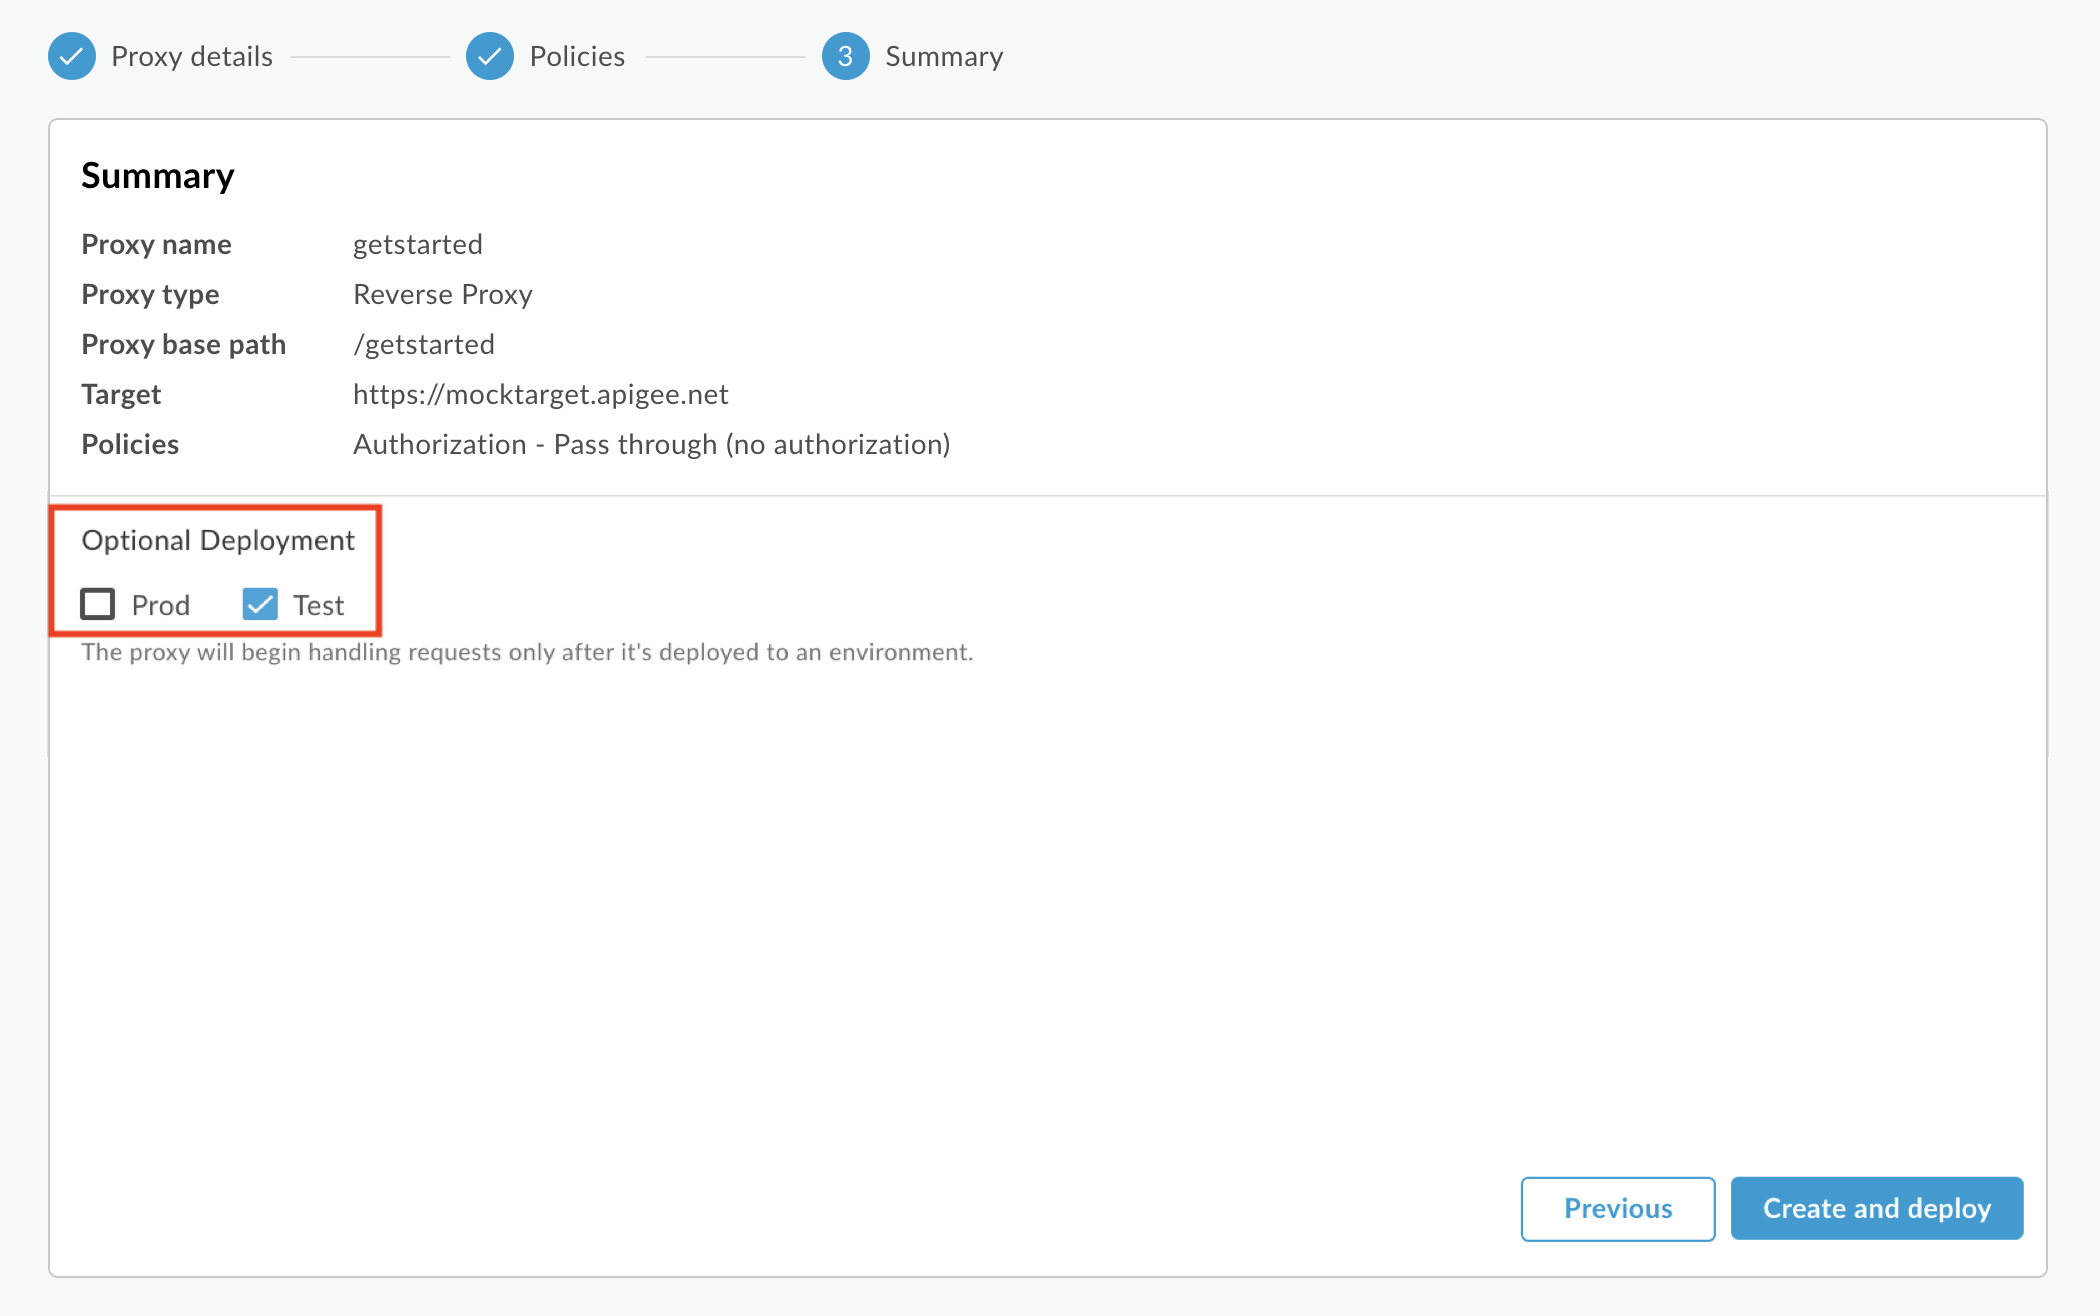
Il nuovo proxy API viene creato
e sottoposto a deployment nell'ambiente selezionato.
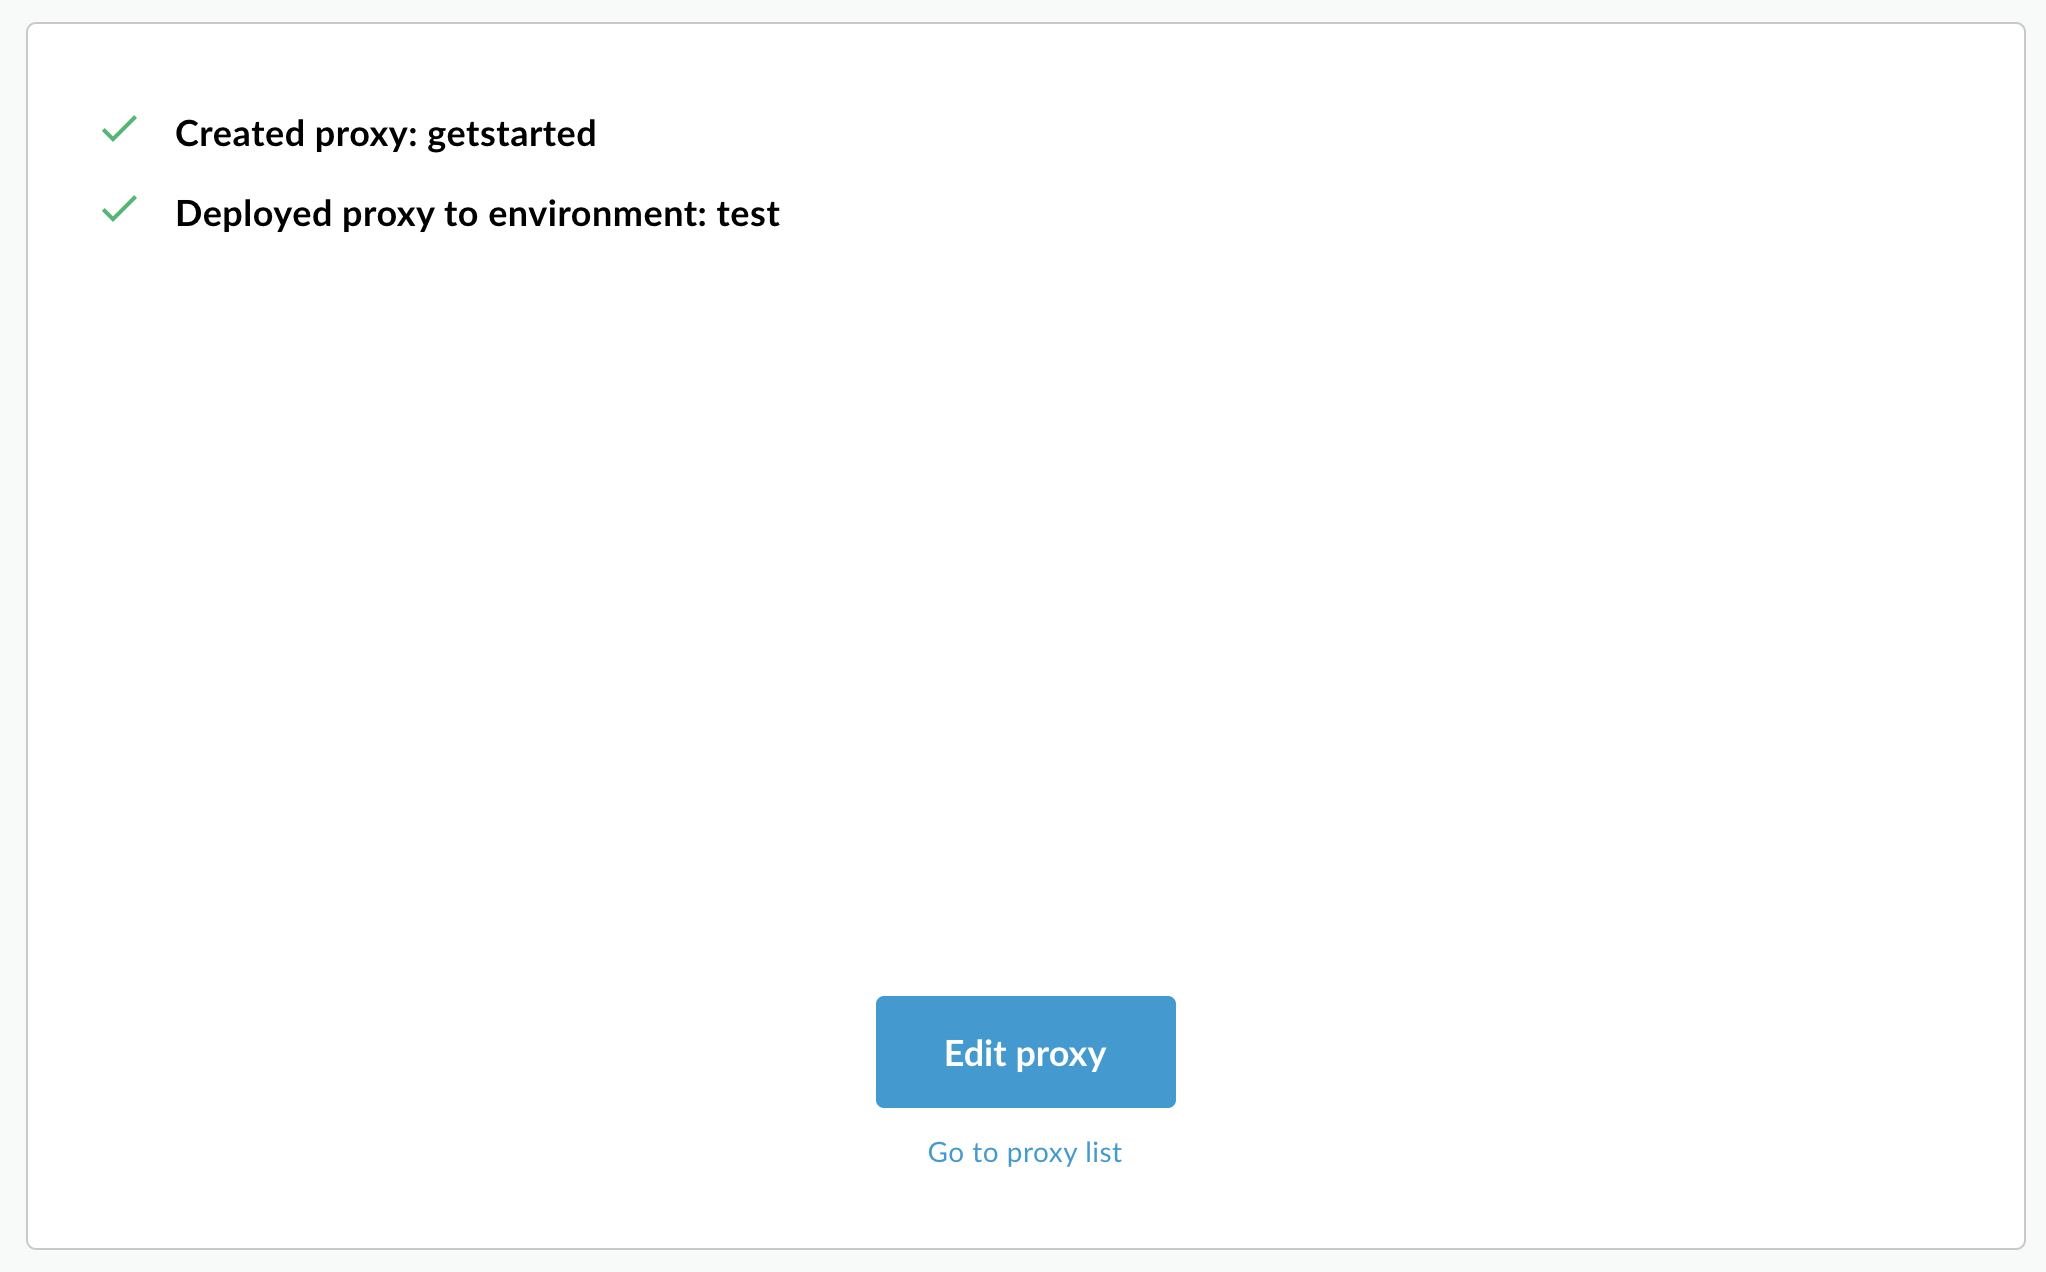
Fai clic su Modifica proxy per visualizzare
la scheda Panoramica nell'editor proxy.
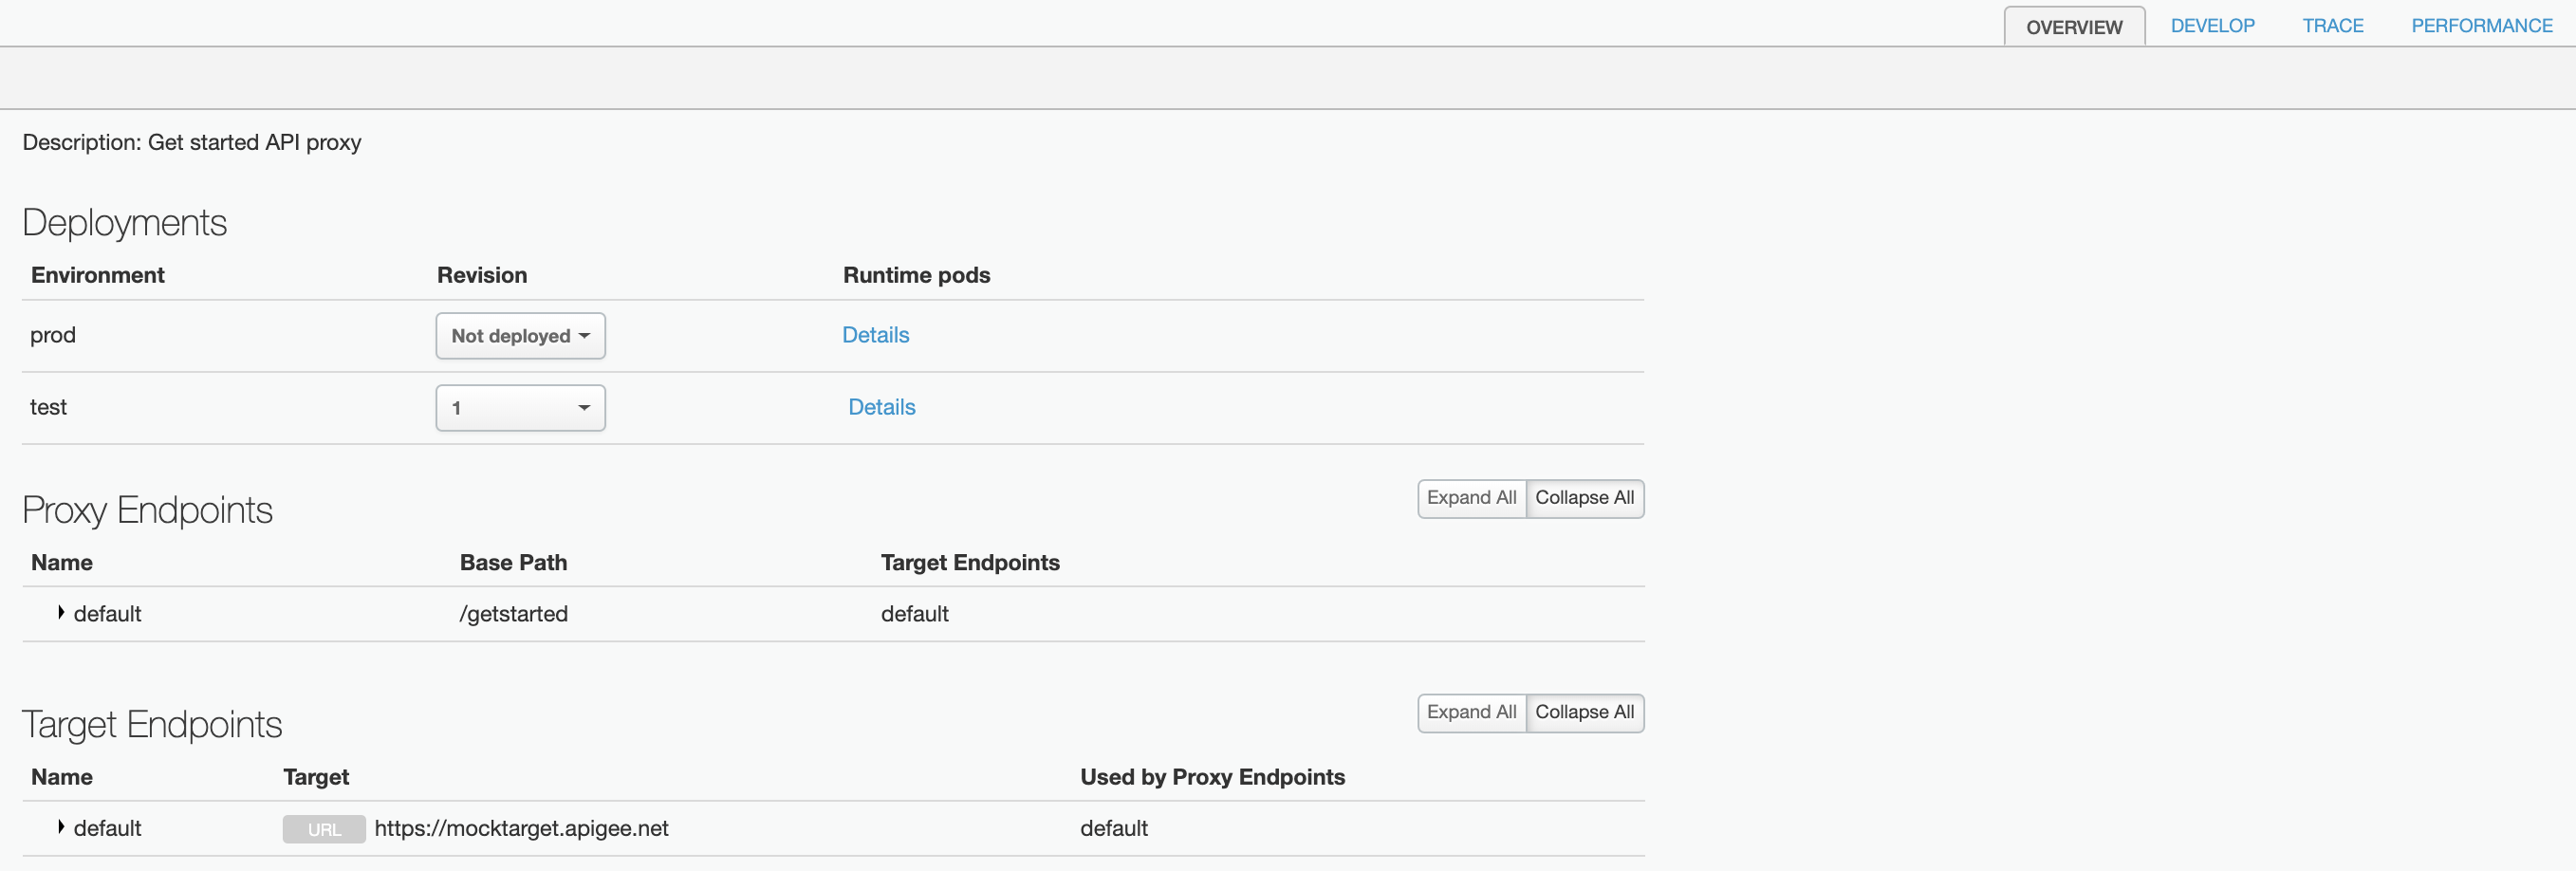
Nell'elenco dei proxy API, lo stato di deployment del proxy API getstarted è verde per l'ambiente test.
API Apigee
Crea un proxy API nella tua organizzazione Apigee inviando una richiesta POST
alla seguente risorsa:
Devi definire il nome del proxy API utilizzando il parametro di query name. Limita
i caratteri utilizzati nel nome ai seguenti: A-Za-z0-9._\-$ %
(Facoltativo) Puoi importare un pacchetto di configurazione del proxy API seguendo questi passaggi:
Imposta il parametro di query action su import
Imposta l'intestazione Content-type su multipart/form-data
Trasmetti il nome del pacchetto di configurazione del proxy API sul file system locale
L'esempio seguente mostra come creare un proxy API importando un pacchetto di configurazione del proxy API (helloworld-config.zip) nel file system locale utilizzando l'API.
Per saperne di più sulla creazione di un proxy API, consulta il metodo apis.create
nell'API Apigee. Per visualizzare tutti i metodi disponibili per i proxy API, consulta l'API proxy API.
Passaggi successivi
Dopo aver creato un proxy API semplice, in genere esegui una delle seguenti operazioni:
[[["Facile da capire","easyToUnderstand","thumb-up"],["Il problema è stato risolto","solvedMyProblem","thumb-up"],["Altra","otherUp","thumb-up"]],[["Difficile da capire","hardToUnderstand","thumb-down"],["Informazioni o codice di esempio errati","incorrectInformationOrSampleCode","thumb-down"],["Mancano le informazioni o gli esempi di cui ho bisogno","missingTheInformationSamplesINeed","thumb-down"],["Problema di traduzione","translationIssue","thumb-down"],["Altra","otherDown","thumb-down"]],["Ultimo aggiornamento 2025-09-05 UTC."],[[["\u003cp\u003eThis page outlines the process of creating API proxies in Apigee and Apigee hybrid, which includes instructions for using the Apigee UI, API, and Cloud console.\u003c/p\u003e\n"],["\u003cp\u003eWhen creating an API proxy, key fields include the proxy name, which must be unique within the organization and consist of alphanumeric characters, dashes, or underscores, and the base path, which defines the URI for routing incoming requests, and must also be unique.\u003c/p\u003e\n"],["\u003cp\u003eWildcards (\u003ccode\u003e/*/\u003c/code\u003e) can be used in API proxy base paths to allow flexibility for future expansions without creating new API proxies, such as \u003ccode\u003ehttps://[host]/team/blue/members\u003c/code\u003e and \u003ccode\u003ehttps://[host]/team/green/members\u003c/code\u003e from basepath \u003ccode\u003e/team/*/members\u003c/code\u003e.\u003c/p\u003e\n"],["\u003cp\u003eAPI proxies can be created through the Apigee UI in the Cloud console or the classic Apigee UI, and by sending a POST request to the Apigee API, offering flexibility in proxy creation methods.\u003c/p\u003e\n"],["\u003cp\u003eAfter creating a simple API proxy, you can add policies, security, and other features of the Apigee platform, as well as deploy it to your cluster.\u003c/p\u003e\n"]]],[],null,["# Creating an API proxy\n\n*This page\napplies to **Apigee** and **Apigee hybrid**.*\n\n\n*View [Apigee Edge](https://docs.apigee.com/api-platform/get-started/what-apigee-edge) documentation.*\n\n| **Note:** In environments enabled for [archive deployments](/apigee/docs/api-platform/fundamentals/environments-overview#deployment-types), you cannot develop API proxies using the Apigee UI, API, or gcloud. To develop API proxies for archive deployments using Apigee in VS Code,see [Developing API proxies](/apigee/docs/api-platform/local-development/vscode/develop-apiproxies) using Apigee in VS Code.\n\nCreate a proxy in the Apigee UI, or using the API, as described in the following sections.\n\nAPI proxy primary fields\n------------------------\n\nFollow these guidelines when creating an API proxy:\n\nSteps to create an API proxy\n----------------------------\n\nTo create an API proxy using the UI or APIs: \n\n### Apigee in Cloud console\n\nTo create a proxy in Apigee in Cloud console:\n\n1. In the Google Cloud console, go to the **Proxy development \\\u003e API proxies** page.\n\n [Go to API proxies](https://console.cloud.google.com/apigee/proxies)\n| **Note:** If you see the **Welcome to Apigee API Management** page, you need to [provision\n| your Apigee organization](/apigee/docs/api-platform/get-started/provisioning-intro) before proceeding further.\n|\n| \u003cbr /\u003e\n|\n| After you have provisioned Apigee, close the UI and reopen the\n| [Apigee UI in Cloud console](https://console.cloud.google.com/apigee).\n2. In the **API Proxies** pane, click **+ Create**.\n3. In the **Create a proxy** pane, under **Proxy template** , select **Reverse proxy (Most common)**.\n4. Under **Proxy details** , enter the following:\n - **Proxy name:** Enter a name for the proxy, such as `myproxy`.\n - **Base Path** : Automatically set to the value you enter for `Proxy name`. The **Base\n Path** is part of the URL used to make requests to your API. Apigee uses the URL to match and route incoming requests to the appropriate API proxy.\n - **Description (Optional)**: Enter a description for your new API proxy, such as \"Testing Apigee with a simple proxy.\"\n - **Target (Existing API):** Enter `https://mocktarget.apigee.net`. This defines the target URL that Apigee invokes on a request to the API proxy. The mocktarget service is hosted at Apigee and returns simple data. It requires no API key or access token.\n - **Space (Optional)** : If your organization has Apigee Spaces enabled, you can associate the API proxy with a Space selected from the list of available options. For more information, see [Apigee Spaces overview](/apigee/docs/api-platform/system-administration/spaces/apigee-spaces-overview).\n - Click **Next**.\n5. **Deploy (optional)** :\n - **Deployment environments** : Optional. Use the checkboxes to select one or more environments in which to deploy your proxy. If you prefer not to deploy the proxy at this point, leave the **Deployment environments** field empty. You can always deploy the proxy later.\n - **Service Account**: Optional. Attach a service account to your deployment to enable your proxy to access Google Cloud services, as specified in the service account's role and permissions.\n6. Click **Create**.\n\nApigee creates the new proxy and displays a summary of the proxy details in the\n**Proxy summary** view.\n\nIf you choose to deploy the proxy, the **Deployments** section displays the **Revision**\nnumber, which is 1 when you first deploy. The **Status** column displays the\nenvironments in which the proxy is deployed with a green status indicator.\n\n### Classic Apigee\n\nTo create a simple API proxy in the classic Apigee UI:\n\n1. Sign in to the [Apigee UI](https://apigee.google.com).\n2. Click **API Proxies** in the main view.\n3. From the **Environment** drop-down list, select the environment in which you want to create a new API proxy.\n\n The hybrid UI displays a list of API proxies for that environment. If you haven't created any\n proxies yet, the list is empty.\n4. Click **Create New** .\n\n The Create Proxy wizard starts.\n5. Click **Reverse proxy (most common)** .\n\n The **Proxy details** page is displayed.\n6. Configure your proxy with the following settings:\n - **Name:** Enter `getstarted`. If a proxy already exists with this name, choose a different name.\n - **Base Path:** Leave this set to `/getstarted`. The **Base\n Path** is part of the URL used to make requests to your API. Apigee uses the URL to match and route incoming requests to the appropriate API proxy.\n - **Description** (Optional): Enter a description for your new API proxy, such as `Get started API proxy`.\n - **Target (Existing API):** Enter `https://mocktarget.apigee.net`. This defines the target URL that Apigee invokes on a request to the API proxy. The mocktarget service is hosted at Apigee and returns simple data. It requires no API key or access token.\n\n Your API proxy's details should look like the following:\n\n7. Click **Next**.\n8. In the **Common policies** view, under **Security:\n Authorization** select **Pass through (no authorization)** .\n\n9. Click **Next**.\n10. On the **Summary** page, select the deployment environments, if desired, and click **Create and deploy** .\n\n | **Note:** If you don't select an environment below **Optional Deployment** , the button at the lower right is just labeled **Create**.\n | **Note:** After you deploy an API proxy revision, you cannot edit it. To edit the API proxy, you must create and deploy a new revision.\n |\n | For this reason, you may choose to create the API proxy without deploying it to any\n | environment. You can edit the API proxy and deploy the API proxy later, as described in\n | [Next steps](#next-steps).\n\n Your new API proxy is created\n and deployed in the selected environment.\n\n11. Click **Edit proxy** to display the Overview tab in the Proxy Editor.\n12. \n\n\nIn the API proxies list, the `getstarted` API proxy deployment status is **green** for the `test` environment.\n\n### Apigee API\n\nCreate an API proxy in your Apigee organization by issuing a `POST`\nrequest to the following resource: \n\n```\nhttps://apigee.googleapis.com/v1/organizations/$ORG/apis\n```\n\nYou must define the name of the API proxy using the `name` query parameter. Restrict\nthe characters used in the name to the following: `A-Za-z0-9._\\-$ %`\n\nOptionally, you can import an API proxy configuration bundle by performing the following steps:\n\n- Set the `action` query parameter to `import`\n- Set the `Content-type` header to `multipart/form-data`\n- Pass the name of the API proxy configuration bundle on your local file system\n\nThe following example demonstrates how to create an API proxy by importing an API proxy\nconfiguration bundle (`helloworld-config.zip`) on your local file system using the\nAPI. \n\n```\ncurl \"https://apigee.googleapis.com/v1/organizations/$ORG/apis?name=helloworld&action=import\" \\\n -X POST \\\n -H \"Authorization: Bearer $TOKEN\" \\\n -H \"Content-type: multipart/form-data\" \\\n -F \"file=@helloworld-config.zip\"\n```\n\nWhere `$TOKEN` is set to your OAuth 2.0 access token, as described in\n[Obtaining an OAuth 2.0 access token](/apigee/docs/api-platform/get-started/api-get-started#oauth20). For information about the `curl` options used in this example, see\n[Using curl](/apigee/docs/api-platform/get-started/api-get-started#curl). For a description of environment variables you can use, see\n[Setting\nenvironment variables for Apigee API requests](/apigee/docs/api-platform/get-started/api-get-started#api-environment-variables).\n\nThe following provides an example of the response output: \n\n```carbon\n{\n \"basepaths\": [\n \"/helloworld\"\n ],\n \"configurationVersion\": {\n \"majorVersion\": 4\n },\n \"createdAt\": \"1559145292799\",\n \"displayName\": \"helloworld\",\n \"entityMetaDataAsProperties\": {\n \"bundle_type\": \"zip\",\n \"subType\": \"Proxy\",\n \"lastModifiedAt\": \"1559145292799\",\n \"createdAt\": \"1559145292799\"\n },\n \"lastModifiedAt\": \"1559145292799\",\n \"name\": \"helloworld\",\n \"policies\": [\n \"verify-api-key\",\n \"remove-query-param-apikey\",\n \"OAuth-v20-1\"\n ],\n \"proxies\": [\n \"default\"\n ],\n \"proxyEndpoints\": [\n \"default\"\n ],\n \"resourceFiles\": {},\n \"targetEndpoints\": [\n \"default\"\n ],\n \"targets\": [\n \"default\"\n ],\n \"type\": \"Application\",\n \"revision\": \"1\",\n \"description\": \"Hello world\"\n}\n```\n\nFor more information on creating an API proxy, see the [`apis.create` method](/apigee/docs/reference/apis/apigee/rest/v1/organizations.apis/create)\nin the Apigee API. To see all the methods available for API proxies, see the [API proxies API](/apigee/docs/reference/apis/apigee/rest/v1/organizations.apis).\n\nNext steps\n----------\n\nAfter you create a simple API proxy, you typically do one of the following:\n\n- Add policies, security, and other features of the Apigee platform, as described in [Understanding APIs and\n API proxies](/apigee/docs/api-platform/fundamentals/understanding-apis-and-api-proxies).\n- Deploy it to your cluster, as described in [Deploy an API proxy](/apigee/docs/api-platform/deploy/ui-deploy-new)."]]