Esta página se aplica a Apigee y Apigee Hybrid.
Consulta la documentación de
Apigee Edge.

Mediante la política de GraphQL, se pueden analizar cargas útiles de solicitudes de GraphQL en variables de flujo de mensajes, así como verificar la solicitud con un esquema de GraphQL o realizar ambas opciones.
La política de GraphQL puede analizar cargas útiles de GraphQL en variables de flujo de mensajes, verificar solicitudes de GraphQL en un esquema o ambas.
Puedes usar la política de GraphQL para lo siguiente:
- Asegúrate de que tus API solo procesen solicitudes que se ajusten al esquema que proporciones.
- Para imponer restricciones en la carga útil estableciendo un máximo en la cantidad de fragmentos permitidos.
- Para asociar graphQL con productos de API.
- Para aprovechar las funciones de la política de Oauth2, VerifyAPIKey y Quota, como en REST.
GraphQL admite los siguientes tipos de cargas útiles:
- POST de cargas útiles de graphQL con
Content-Type : application/graphql - POST de cargas útiles de graphQL con
Content-Type: applcation/json - GET de las cargas útiles de graphQL en las que la carga útil es un parámetro de consulta
Para obtener un resumen rápido de las opciones de la política GraphQL, consulta las siguientes opciones de GraphQL.
Para obtener más información sobre GraphQL, visista GraphQL.org.
Ejemplo
En el siguiente ejemplo, se muestra cómo subir un esquema de GraphQL a Apigee y usarlo para validar solicitudes con contenido de GraphQL.
Crea un archivo de esquema
Para ejecutar el ejemplo, primero crea un archivo de esquema de GraphQL con el siguiente contenido:
type Query {
  allPersons(last: Int): [Person!]!
}

type Mutation {
  createPerson(name: String!, age: Int!): Person!
}

type Subscription {
  newPerson: Person!
}

type Person {
  name: String!
  sex: String!
  age: Int!
  posts: [Post!]!
}

type Post {
  title: String!
  author: Person!
}
Guarda el archivo con el nombre que quieras usar, seguido de la extensión .graphql.
Agrega la política de GraphQL en la IU de Apigee
Editor de proxies nuevo
Primero, crea la política de GraphQL de la siguiente manera:
- Accede a la IU de Apigee.
- En la barra de navegación, selecciona Desarrollar > Proxies de API.
- En la lista de proxies, selecciona el proxy de API para el que deseas usar la política de GraphQL.
- Haz clic en la pestaña DESARROLLAR.
- En el panel izquierdo, haz clic en el botón + junto a la carpeta Políticas.
En el cuadro de diálogo Crear política, haz clic en el campo Seleccionar tipo de política, desplázate hacia abajo hasta mediación y selecciona GraphQL.
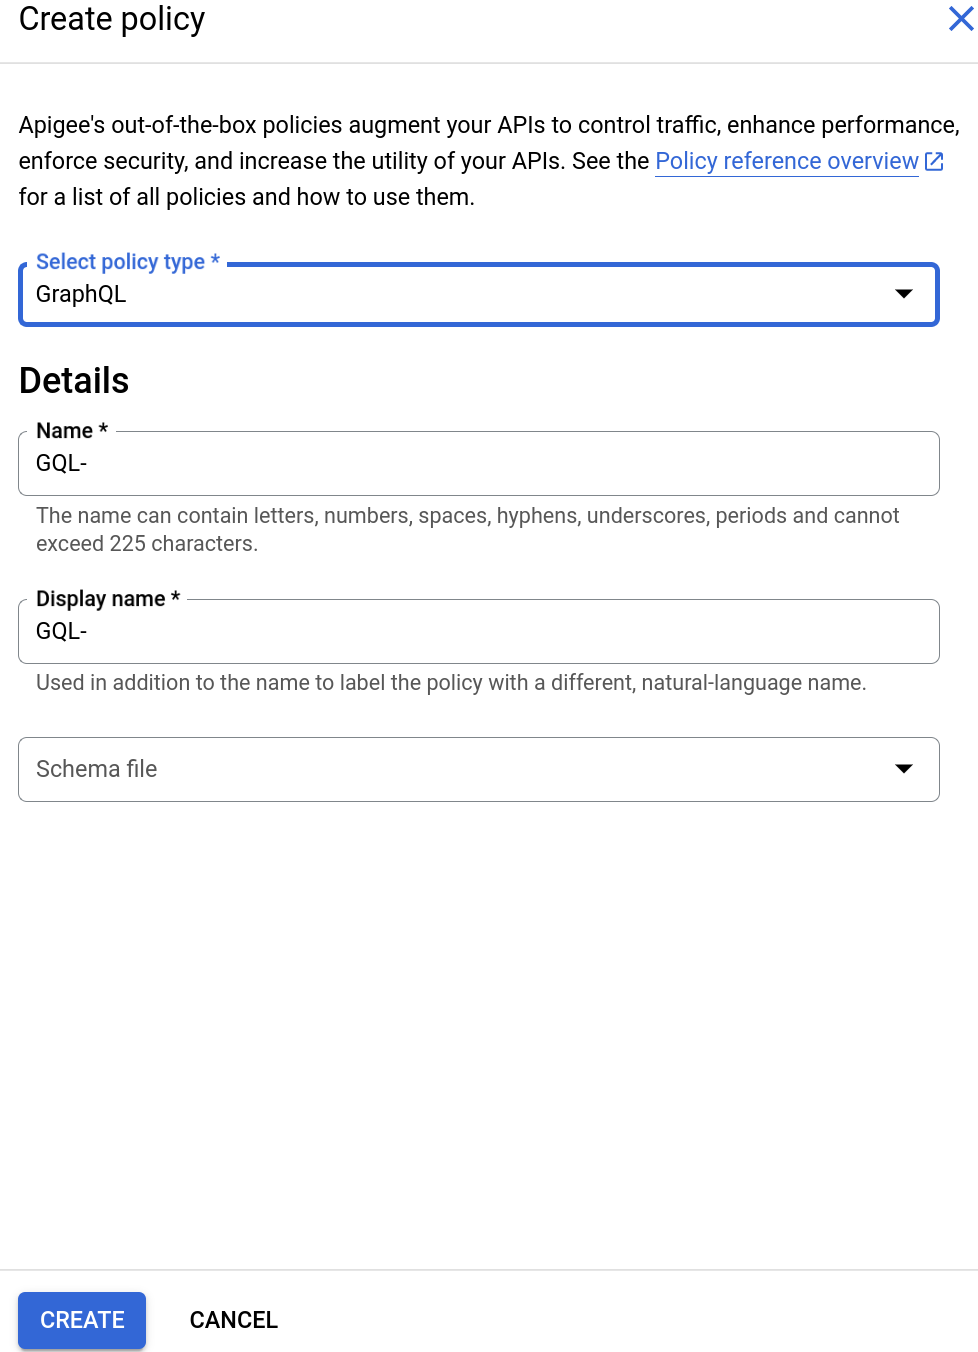
Ingresa un Nombre visible y un Nombre.
A continuación, selecciona un archivo de esquema de GraphQL de la siguiente manera:
- Haz clic en el campo Archivo de esquema. Se mostrarán las siguientes opciones:
- Sin esquema. Si seleccionas esta opción, Apigee no usará un esquema para validar las solicitudes.
- Importa el esquema de GraphQL (.graphql)
Selecciona Importar esquema de GraphQL (.graphql). Esto muestra lo siguiente:
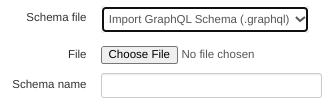
Haz clic en Elegir archivo y selecciona el archivo de esquema que creaste antes (que debe tener la extensión
.graphql). El archivo aparece en Nombre del esquema.
- Haz clic en el campo Archivo de esquema. Se mostrarán las siguientes opciones:
- Haz clic en Crear para crear la política.
Ahora que creaste la política de GraphQL, puedes adjuntarla a un paso en el PreFlow:
- Selecciona Extremos de Proxy > configuración predeterminada> PreFlow en el panel izquierdo:
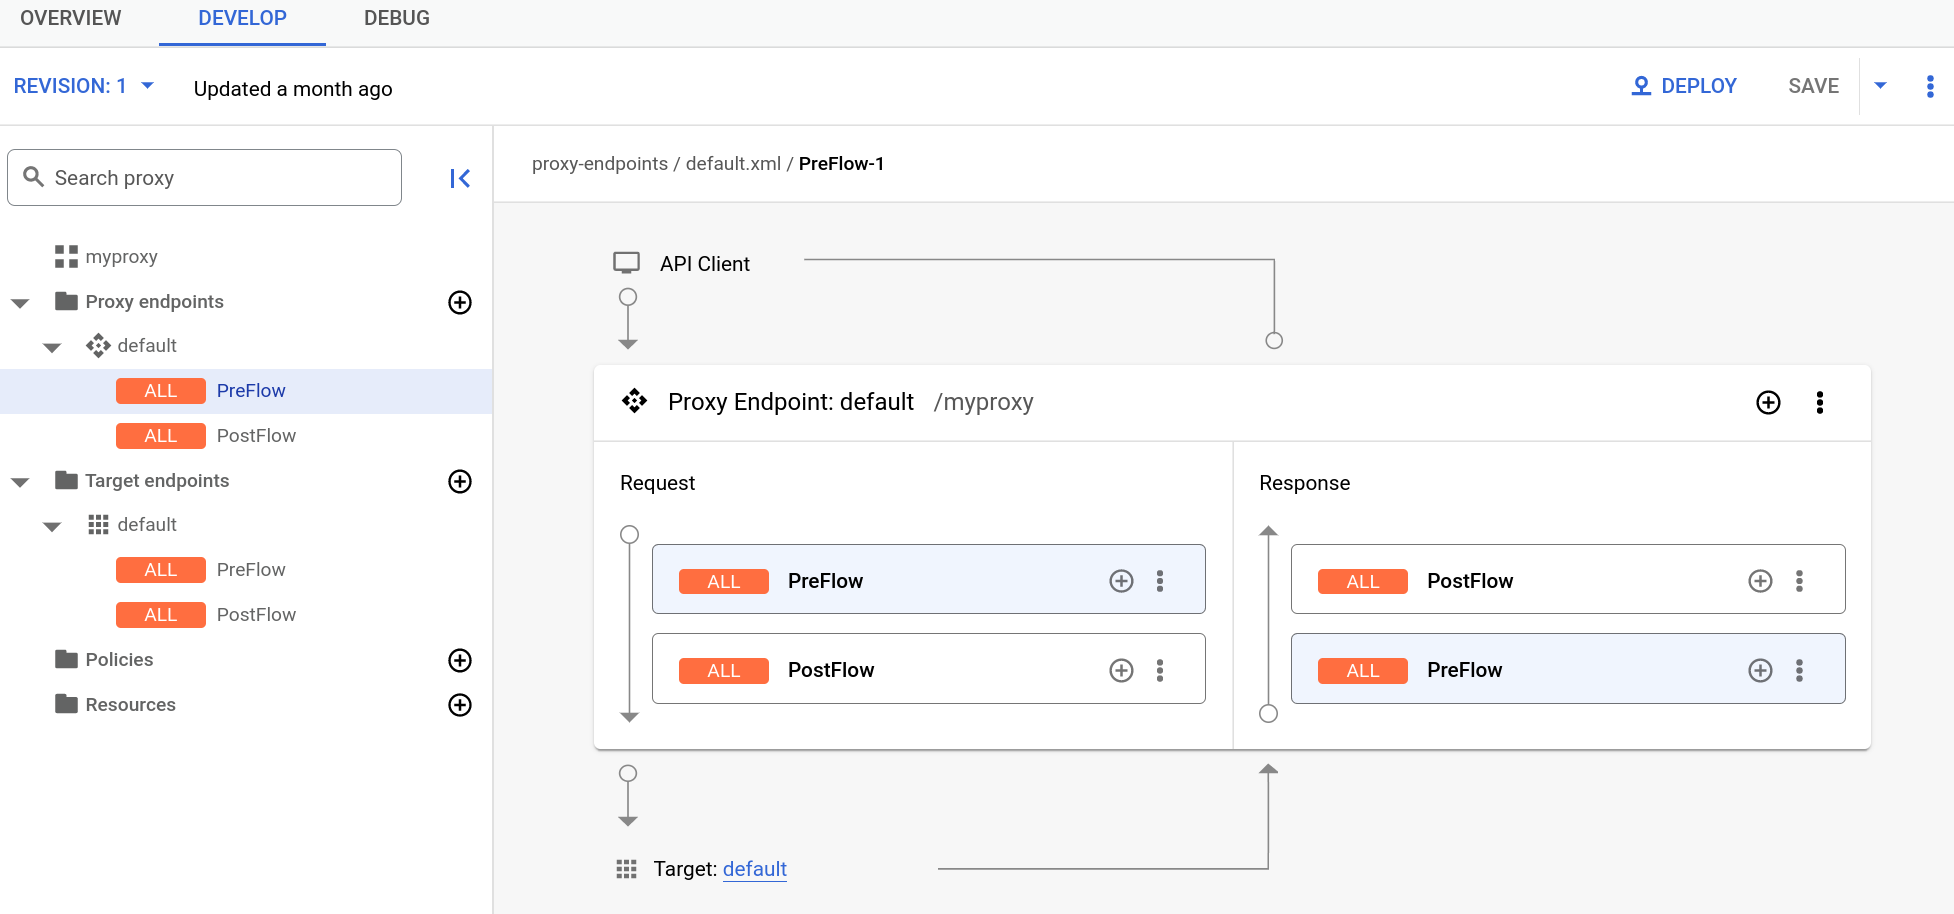
- Haz clic en el botón + junto a PreFlow en el panel Respuesta en la esquina inferior derecha del editor visual:
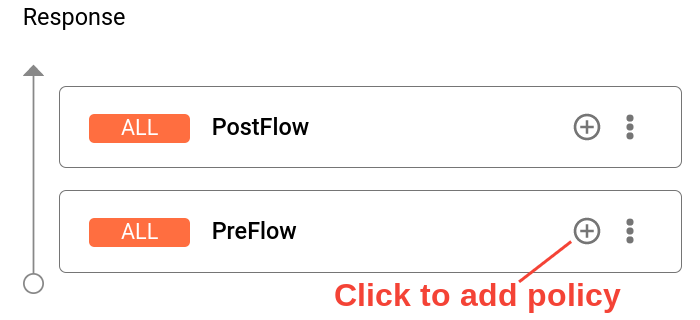
- En el cuadro de diálogo Agregar paso de la política, selecciona la política GQL.
- Haz clic en Agregar para adjuntar la política.
- Haz clic en Guardar para guardar la revisión actual con sus cambios.
- Para implementar los cambios, haz clic en la pestaña Descripción general y selecciona Implementar.
Consulta las siguientes Opciones de GraphQL para conocer lo que puedes configurar para la política de GraphQL.
Editor de proxies clásico
- Accede a la IU de Apigee.
- En la barra de navegación, selecciona Desarrollar > Proxies de API.
- En la lista de proxies, selecciona el proxy de API para el que deseas usar la política de GraphQL.
- Haz clic en la pestaña DESARROLLAR.
En el panel Flujo: PreFlow, haz clic en el botón Paso +.

En el panel Agregar paso, desplázate hasta la parte inferior de la sección Mediación y selecciona GraphQL.
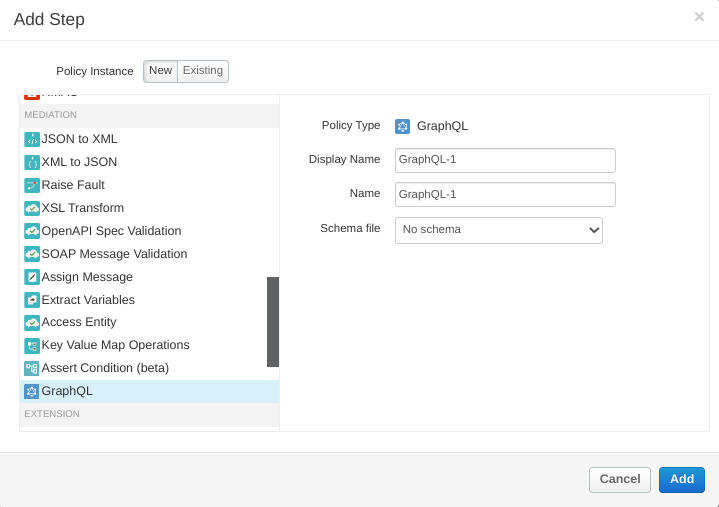
En el panel Agregar paso, se muestran las siguientes opciones:
- Nombre visible: Muestra el nombre de la política.
- Nombre: Nombre interno de la política.
- Archivo de esquema: Opción para subir un archivo con un esquema GraphQL que Apigee usará a fin de validar solicitudes con contenido de GraphQL.
Para usar un esquema, haz lo siguiente:
- Haz clic en el campo Archivo de esquema. Se mostrarán las siguientes opciones:
- Sin esquema. Si seleccionas esta opción, Apigee no usará un esquema para validar las solicitudes.
- Importa el esquema de GraphQL (.graphql)
Selecciona Importar esquema de GraphQL (.graphql). Esto muestra lo siguiente:
Haz clic en Elegir archivo y selecciona el archivo de esquema que creaste antes (que debe tener la extensión
.graphql). El archivo aparece en el campo Nombre del esquema.
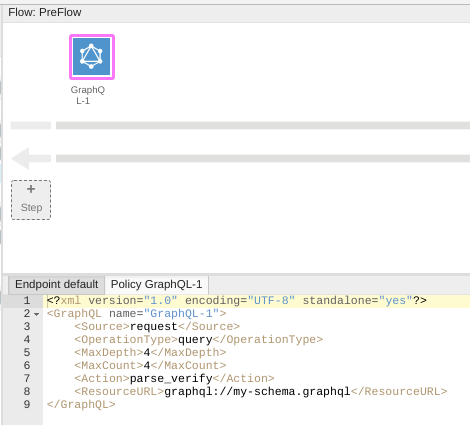
Haz clic en Agregar. El panel Flujo: Flujo previo ahora aparece como se muestra a continuación:
Consulta las siguientes Opciones de GraphQL para conocer lo que puedes configurar para la política de GraphQL. En este ejemplo, déjalas como están.
Para implementar tu proxy, haz clic en la pestaña Descripción general y selecciona Implementar.

Ahora, puedes probar la política de GraphQL con el siguiente comando curl:
curl --location --request POST 'https://PROXY_BASEPATH/HOST_NAME' --data-raw 'query query_name {allPersons {name}}' -kEn el ejemplo anterior, PROXY_BASEPATH es la ruta base del proxy y HOST_NAME es el nombre de tu proxy, incluido el número de revisión más reciente. Cuando ejecutas el comando, Apigee valida la solicitud en el esquema y muestra el siguiente resultado.
{
  "query query_name {allPersons {name}}": "",
  "id": 101
}
Este es otro ejemplo de una solicitud:
curl --location --request POST 'https://PROXY_BASEPATH/HOST_NAME' --data-raw 'query ilovegql {DEADBEEF}' -kEsta vez, la validación de la solicitud falla con el siguiente mensaje de error.
{"fault":{"faultstring":"steps.graphQL.SchemaValidationFailed","detail":{"errorcode":"steps.graphQL.SchemaValidationFailed"}}}Opciones de GraphQL
GraphPolicy tiene las siguientes opciones:
OperationType: El tipo de operación. Las opciones son las siguientes:query: El equivalente de GraphQL de la operaciónGETde RESTmutation: El equivalente de GraphQL de la operaciónPUTde RESTquery_mutation:queryymutation.
MaxDepth: La profundidad máxima de la consulta, cuando se representa como un árbolMaxDepthte permite bloquear consultas profundas en la carga útil, de modo que Apigee no necesite crear variables de flujo muy grandes para contener los valores. Sin embargo, la carga útil se envía tal y como está, sin importar el valor deMaxDepth.MaxCount: La cantidad máxima de fragmentos que pueden estar en la carga útil. Puedes usar esto para evitar que el servidor de backend de GraphQL del cliente ejecute consultas muy complejas que obligue a los clientes a dividir su lógica en cargas útiles más pequeñas.Action: Es una de las siguientes acciones de GraphQL:parseApigee analiza la carga útil de GraphQL en las variables de flujo. Luego, puedes usar el contenido de las variables de flujo en políticas como JavaCallout. Ten en cuenta queparsetambién verifica la carga útil.verify: Apigee verifica que la carga útil de GraphQL cumpla con el esquema subido al proxy. Puedes usarverifypara asegurarte de no recibir solicitudes que no se ajusten a tu esquema. Esto puede ahorrar tiempo de CPU valioso en el backend.parse_verify: Analiza y verifica la carga útil.
ResourceURL: La ruta de acceso al archivo de esquema de GraphQL que Apigee usa para verificar la solicitud de GraphQL.
Para obtener más información sobre estas opciones, consulta la página de referencia de la política de GraphQL.