A política GraphQL pode analisar payloads de solicitação do GraphQL em variáveis de fluxo de mensagens,
verificar a solicitação em um esquema do GraphQL ou ambos.
A política GraphQL pode analisar payloads do GraphQL em variáveis de fluxo
de mensagens, verificar as solicitações do GraphQL em relação a um esquema ou ambos.
Use a política GraphQL para:
Garanta que as APIs só processem solicitações em conformidade com o esquema fornecido.
Impor restrições no payload definindo um máximo no número de fragmentos permitidos.
Associar o GraphQL aos produtos de API.
Aproveitar os recursos das políticas Oauth2, VerifyAPIKey e Quota,
assim como em REST.
O GraphQL é compatível com os seguintes tipos de payloads:
POST de payloads do GraphQL com Content-Type : application/graphql
POST de payloads do GraphQL com Content-Type: applcation/json
GET de payloads do GraphQL em que o payload é um parâmetro de consulta
Para um resumo rápido das opções da política GraphQL, consulte as opções
do GraphQL abaixo.
Para saber mais sobre o GraphQL,
consulte GraphQL.org.
Exemplo
No exemplo a seguir, mostramos como fazer upload de um esquema GraphQL na Apigee e usá-lo para
validar solicitações com conteúdo GraphQL.
Criar um arquivo de esquema
Para executar o exemplo, primeiro crie um arquivo de esquema GraphQL com o seguinte conteúdo:
type Query {
  allPersons(last: Int): [Person!]!
}

type Mutation {
  createPerson(name: String!, age: Int!): Person!
}

type Subscription {
  newPerson: Person!
}

type Person {
  name: String!
  sex: String!
  age: Int!
  posts: [Post!]!
}

type Post {
  title: String!
  author: Person!
}
Salve o arquivo com o nome que você quer usar, seguido pela extensão .graphql.
Adicionar a política GraphQL na interface da Apigee
Novo Editor de Proxy
Primeiro, crie a política GraphQL da seguinte maneira:
Na barra de navegação, selecione Develop > API Proxies.
Na lista de proxies, selecione o proxy de API em que você quer usar a política GraphQL.
Clique na guia DEVELOP.
No painel à esquerda, clique no botão + ao lado da pasta Políticas.
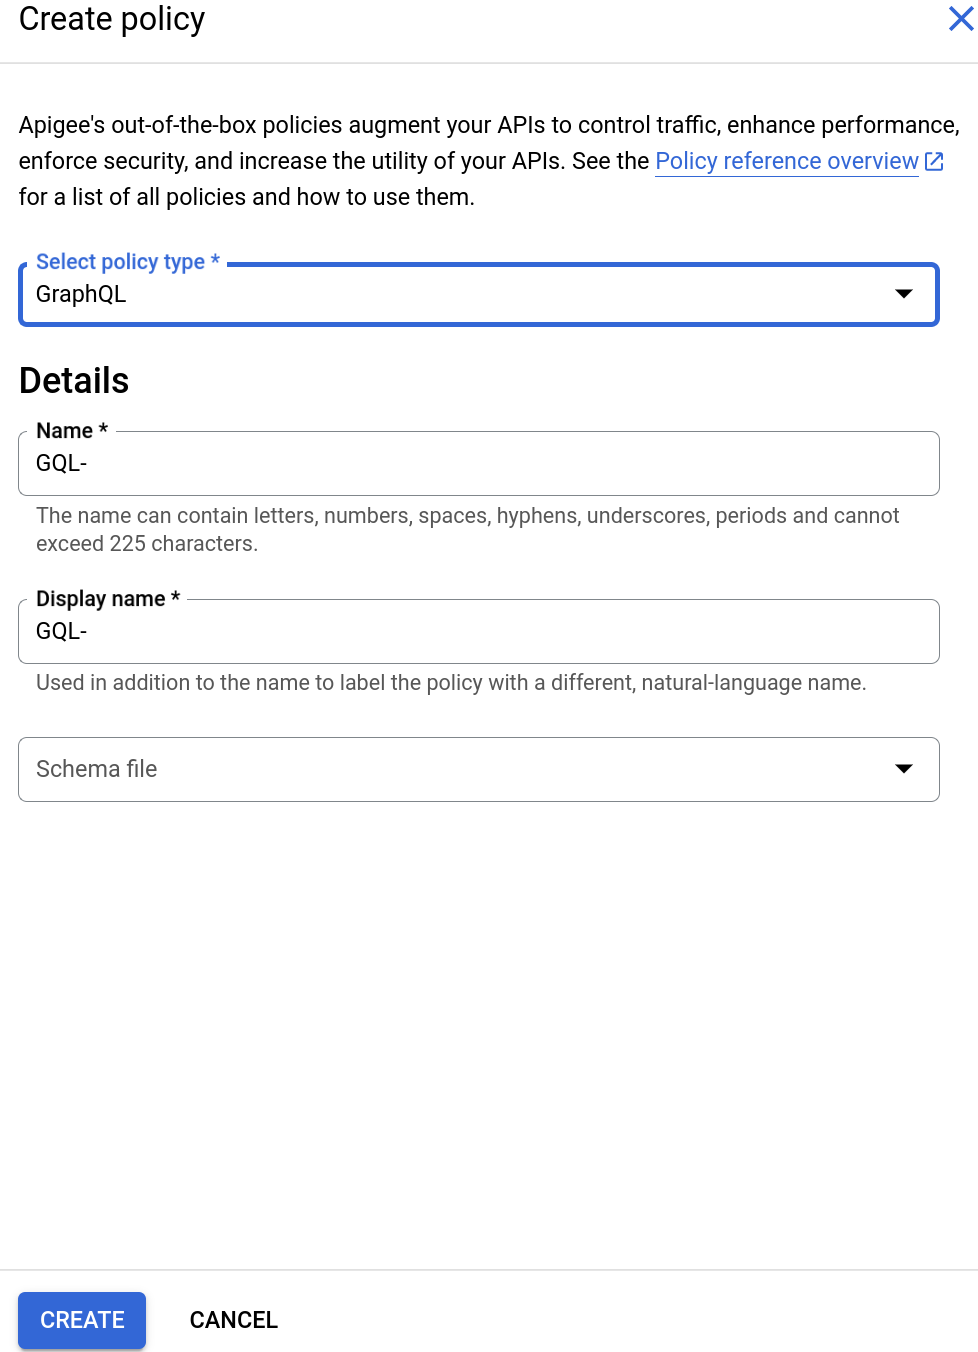
Na caixa de diálogo Criar política, clique no campo Selecionar tipo de política,
role para baixo até Mediação e selecione
GraphQL.
Insira um Nome de exibição e um Nome.
Em seguida, selecione um arquivo de esquema GraphQL da seguinte maneira:
Clique no campo Arquivo de esquema. Com isso, as seguintes opções serão exibidas:
Nenhum esquema. Se você selecionar essa opção, a Apigee não usará um esquema para
validar solicitações.
Importar esquema do GraphQL (.graphql)
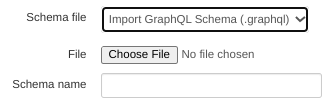
Selecione Importar esquema do GraphQL (.graphql). Com isso, você verá os campos a seguir:
Clique em Escolher arquivo e selecione o arquivo de esquema criado anteriormente
(que precisa ter a extensão .graphql).
O arquivo aparece no campo Nome do esquema.
Clique em Criar para criar a política.
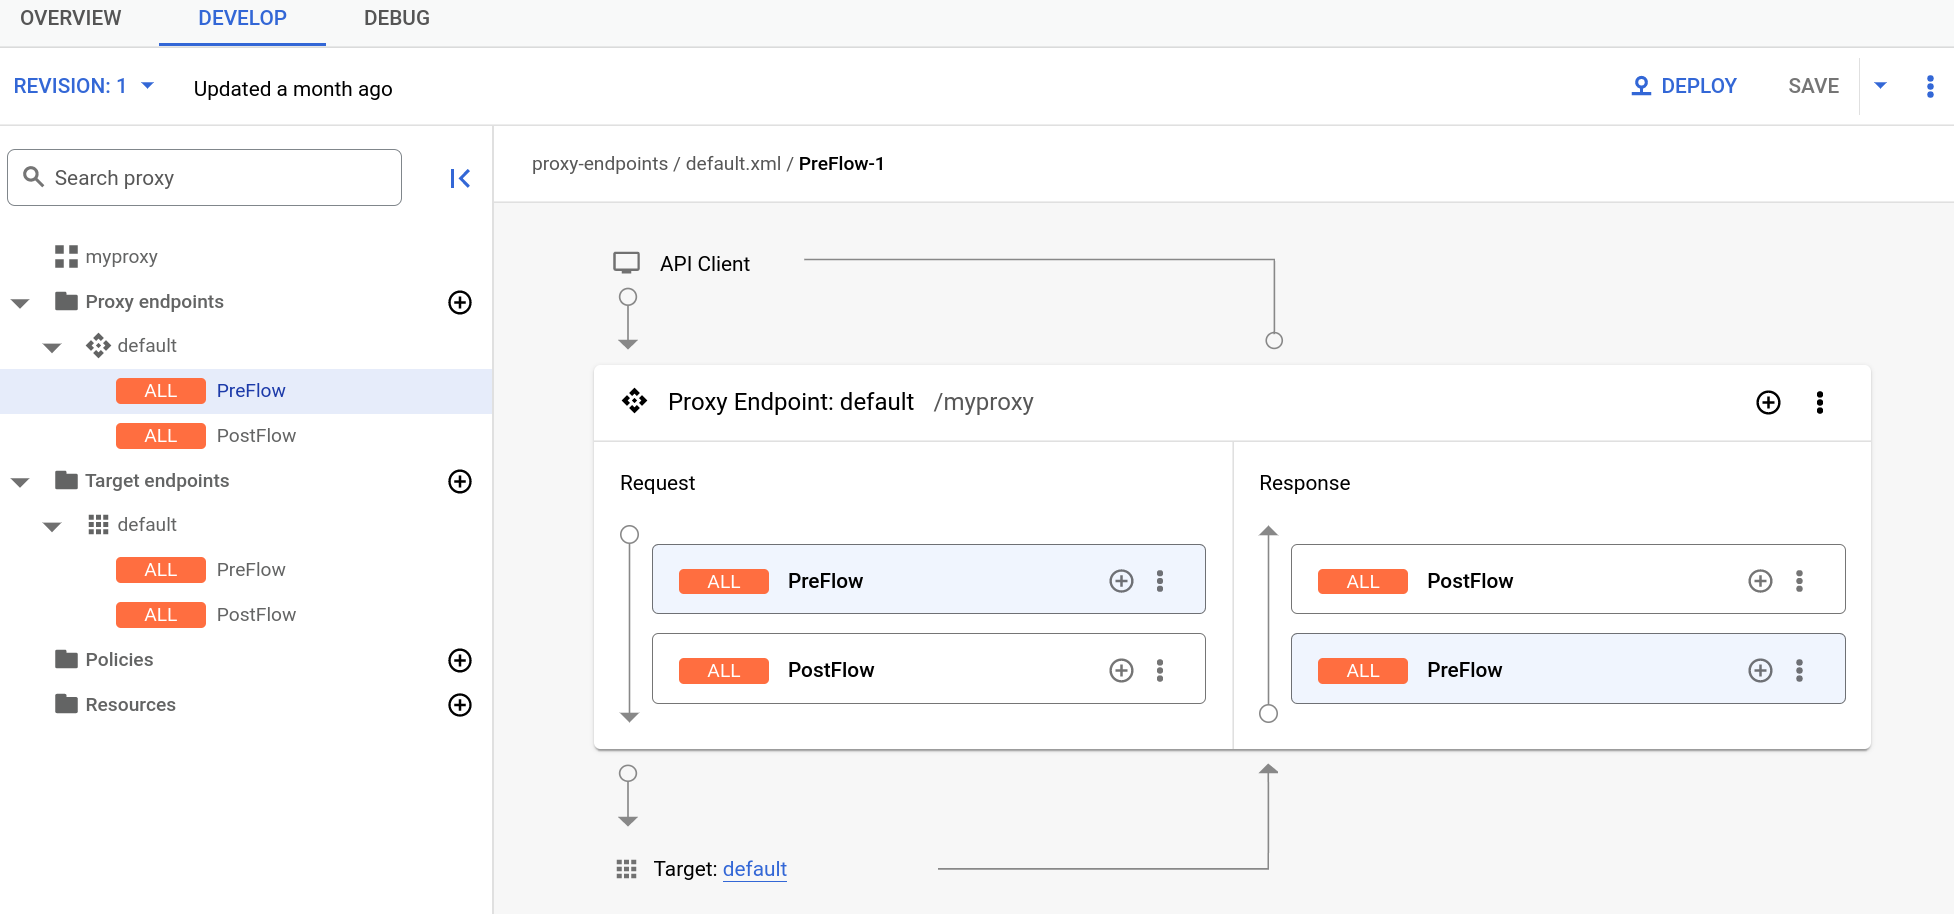
Agora que você criou a política GraphQL, pode anexá-la a uma etapa no
Pré-fluxo:
Selecione Endpoints de Proxy > padrão > Pré-fluxo no
painel à esquerda:
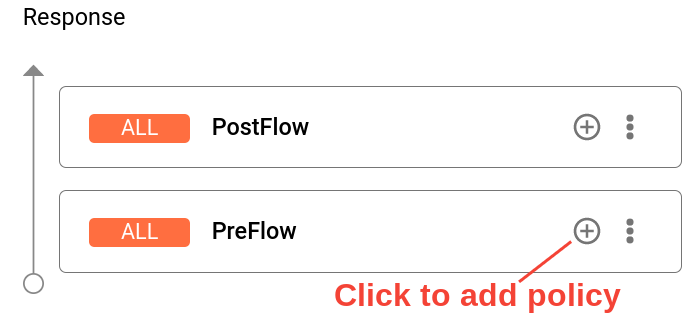
Clique no botão + ao lado de PreFlow no painel Response no canto inferior direito do Editor de recursos visuais:
Na caixa de diálogo Adicionar etapa de política, selecione a política GQL-.
Clique em Adicionar para anexar a política.
Clique em Salvar para salvar a revisão atual com as alterações.
Para implantar as alterações, clique na guia Visão geral e selecione Implantar.
Consulte as Opções do GraphQL abaixo para ver as opções que podem ser definidas
na política GraphQL.
Na barra de navegação, selecione Develop > API Proxies.
Na lista de proxies, selecione o proxy de API em que você quer usar a política GraphQL.
Clique na guia DEVELOP.
No painel Fluxo: Pré-fluxo, clique no botão + Etapa.
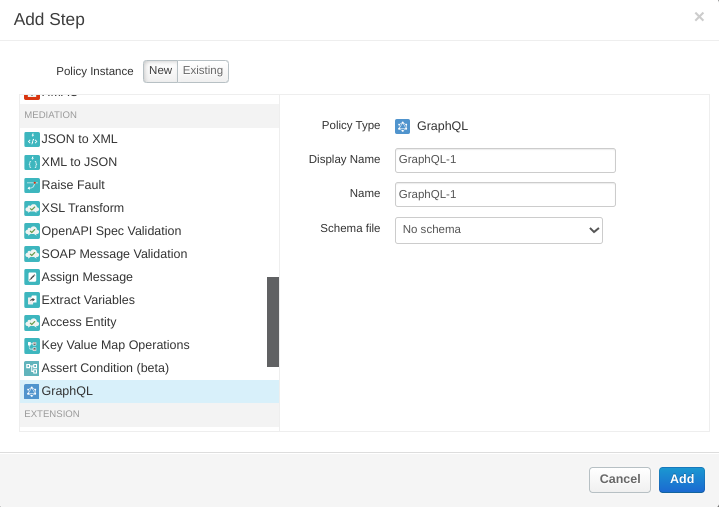
No painel Adicionar etapa, role para baixo até
o final da seção Mediação e selecione GraphQL.
O painel Adicionar etapa exibe as seguintes opções:
Nome de exibição: o nome de exibição da política.
Nome: nome interno da política.
Arquivo de esquema: opção de fazer upload de um arquivo contendo um esquema GraphQL
que a Apigee usará para validar solicitações com conteúdo do GraphQL.
Para usar um esquema, siga estas etapas:
Clique no campo Arquivo de esquema. Com isso, as seguintes opções serão exibidas:
Nenhum esquema. Se você selecionar essa opção, a Apigee não usará um esquema para
validar solicitações.
Importar esquema do GraphQL (.graphql)
Selecione Importar esquema do GraphQL (.graphql). Com isso, você verá os campos a seguir:
Clique em Escolher arquivo e selecione o arquivo de esquema
criado anteriormente
(que precisa ter a extensão .graphql).
O arquivo aparece no campo Nome do esquema.
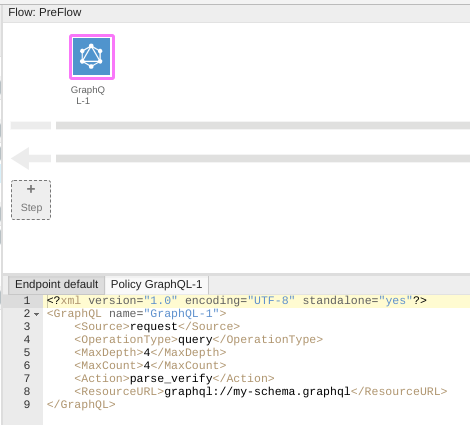
Clique em Adicionar. O painel Fluxo: Pré-fluxo agora aparece como mostrado abaixo:
Consulte as Opções do GraphQL abaixo para ver as opções que podem ser definidas
na política GraphQL. Neste exemplo, deixe-as como estão.
Para implantar o proxy, clique na guia Visão geral e selecione Implantar.
Agora você pode testar a política GraphQL com o seguinte comando curl:
Em que PROXY_BASEPATH é o caminho base do proxy e HOST_NAME é o nome do
proxy, incluindo o número de revisão mais recente. Quando você
executa o comando, a Apigee valida a solicitação em relação ao esquema e retorna a saída
a seguir.
query: o equivalente em GraphQL da operação REST GET.
mutation: o equivalente em GraphQL da operação REST PUT.
query_mutation: query e mutation.
MaxDepth: a profundidade máxima da consulta, quando representada como uma árvore.
MaxDepth permite bloquear consultas profundas no payload,
para que a Apigee não precise criar variáveis de fluxo muito grandes para armazenar os valores.
No entanto, o payload é enviado como está, independentemente do valor de MaxDepth.
MaxCount: o número máximo de fragmentos que podem estar no payload.
É possível usar isso para evitar que o servidor de back-end GraphQL do cliente execute consultas
altamente complexas, forçando os clientes a dividir a lógica em payloads menores.
Action: uma das seguintes ações do GraphQL:
parse: a Apigee analisa o payload GraphQL em variáveis de fluxo de mensagens. Em seguida, use o conteúdo das variáveis de fluxo em políticas como JavaCallout. Observe que parse também verifica o payload.
verify: a Apigee verifica se o payload do GraphQL está em conformidade com o esquema
enviado ao proxy. É possível usar verify para garantir que você não receba solicitações que não estejam em conformidade com o esquema. Isso pode economizar um tempo de CPU valioso no back-end.
parse_verify: analisa e verifica o payload.
ResourceURL: o caminho para o arquivo de esquema do GraphQL usado pela Apigee para verificar
a solicitação do GraphQL.
[[["Fácil de entender","easyToUnderstand","thumb-up"],["Meu problema foi resolvido","solvedMyProblem","thumb-up"],["Outro","otherUp","thumb-up"]],[["Difícil de entender","hardToUnderstand","thumb-down"],["Informações incorretas ou exemplo de código","incorrectInformationOrSampleCode","thumb-down"],["Não contém as informações/amostras de que eu preciso","missingTheInformationSamplesINeed","thumb-down"],["Problema na tradução","translationIssue","thumb-down"],["Outro","otherDown","thumb-down"]],["Última atualização 2025-09-04 UTC."],[[["\u003cp\u003eThe GraphQL policy in Apigee and Apigee hybrid allows parsing GraphQL request payloads into message flow variables, verifying requests against a GraphQL schema, or both.\u003c/p\u003e\n"],["\u003cp\u003eThis policy enables ensuring that APIs process only schema-conforming requests, setting limits on the number of fragments, and associating GraphQL with API products.\u003c/p\u003e\n"],["\u003cp\u003eApigee supports various GraphQL payload types, including POST with \u003ccode\u003eapplication/graphql\u003c/code\u003e or \u003ccode\u003eapplication/json\u003c/code\u003e, and GET with the payload as a query parameter.\u003c/p\u003e\n"],["\u003cp\u003eSchema validation is a resource-intensive operation, and only one schema per policy can be included, requiring multiple policies for multiple schemas, and the schema file needs to be uploaded during policy creation.\u003c/p\u003e\n"],["\u003cp\u003eThe GraphQL policy options include actions such as \u003ccode\u003eparse\u003c/code\u003e, \u003ccode\u003everify\u003c/code\u003e, and \u003ccode\u003eparse_verify\u003c/code\u003e, along with parameters like \u003ccode\u003eOperationType\u003c/code\u003e, \u003ccode\u003eMaxDepth\u003c/code\u003e, and \u003ccode\u003eMaxCount\u003c/code\u003e to manage GraphQL operations and payload complexity.\u003c/p\u003e\n"]]],[],null,["# Using GraphQL\n\n*This page\napplies to **Apigee** and **Apigee hybrid**.*\n\n\n*View [Apigee Edge](https://docs.apigee.com/api-platform/get-started/what-apigee-edge) documentation.*\n\nThe [GraphQL policy](/apigee/docs/api-platform/reference/policies/graphql-policy) can\nparse GraphQL request payloads into message flow\nvariables, verify the request against a GraphQL schema, or both.\n\nThe GraphQL policy can parse GraphQL payloads into message flow\nvariables, verify GraphQL requests against a schema, or both.\n\nYou can use the GraphQL policy to:\n\n- Ensure that your APIs only process requests that conform to the schema you provide.\n- Impose restrictions on the payload by setting a maximum on the number of fragments allowed.\n- Associate GraphQL with API products.\n- Leverage the Oauth2, VerifyAPIKey, and Quota policy features, just as in REST.\n\nGraphQL supports the following types of payloads:\n\n- POST of graphQL payloads with `Content-Type : application/graphql`\n- POST of graphQL payloads with `Content-Type: applcation/json`\n- GET of graphQL payloads where the payload is a query parameter\n\n| **Note:** For `application/json` payloads of the form \n|\n| ```\n| {\n| \"query\": \"...\",\n| \"operationName\": \"...\",\n| \"variables\": { \"myVariable\": \"someValue\", ... }\n| }\n| ```\n| Apigee currently ignores the optional `operationName` and `variables` fields.\n\nFor a quick summary of the options for the GraphQL policy, see [GraphQL\noptions](#graphql-options) below.\n\nTo learn more about GraphQL,\nsee [GraphQL.org](https://graphql.org/).\n\nExample\n-------\n\nThe following example shows how to upload a GraphQL schema to Apigee, and use it to\nvalidate requests with GraphQL content.\n| **Caution:** Verifying the payload against the schema is generally an expensive operation, and we recommend choosing to perform schema validation with care. Schema validation operations can be CPU intensive, especially when the payload and the schema are complex, and can result in significant latencies.\n| **Note:** You can only provide one schema per policy. If you need to include multiple schemas, add multiple GraphQL policies to your proxy.\n| **Notes:** For the classic Proxy Editor only:\n|\n| - You can only upload a GraphQL schema file when you add a GraphQL policy. You *cannot* upload it in the **Resources** pane in the Proxy Editor.\n| - After uploading a GraphQL schema file, you cannot view or edit it in the Proxy Editor.\n|\n| These limitations do not apply to the new Proxy Editor.\n\n### Create a schema file\n\nTo run the example, first create a GraphQL schema file with the following contents: \n\n```\ntype Query {\n allPersons(last: Int): [Person!]!\n}\n\ntype Mutation {\n createPerson(name: String!, age: Int!): Person!\n}\n\ntype Subscription {\n newPerson: Person!\n}\n\ntype Person {\n name: String!\n sex: String!\n age: Int!\n posts: [Post!]!\n}\n\ntype Post {\n title: String!\n author: Person!\n}\n```\n\nSave the file with whatever name you'd like to use, followed by the extension `.graphql`.\n\n### Add the GraphQL policy in the Apigee UI\n\n| **Note:** Apigee is introducing a new version of the Proxy\n| Editor, which will make it easier to manage proxies.\n|\n| The instructions in the first two tabs below explain how to\nuse either the new Proxy Editor or the classic Proxy Editor. \n\n### New Proxy Editor\n\nFirst, create the GraphQL policy as follows:\n\n1. Sign in to the [Apigee UI](https://apigee.google.com).\n2. In the navigation bar, select **Develop \\\u003e API Proxies**.\n3. In the list of proxies, select the API proxy for which you want to use the GraphQL policy.\n4. Click the **DEVELOP** tab.\n5. In the left-hand pane, click the **+** button next to the **Policies** folder.\n6. In the **Create policy** dialog, click in the **Select policy type** field and\n scroll down to **Mediation** and select\n [**GraphQL**](/apigee/docs/api-platform/reference/policies/graphql-policy).\n\n Enter a **Display name** and **Name**.\n\n Next, select a GraphQL schema file as follows:\n 1. Click the **Schema File** field. This displays the following choices:\n - **No Schema**. If you select this option, Apigee will not use a schema to validate requests.\n - **Import GraphQL schema (.graphql)**\n 2. Select **Import GraphQL schema (.graphql)**. This displays the\n following:\n\n 3. Click **Choose File** and select the schema file you created previously\n (which must have the extension `.graphql`).\n The file appears in the **Schema name** field.\n\n7. Click **Create** to create the policy.\n\nNow that you have created the **GraphQL** policy, you can attach it to a step in\nthe PreFlow:\n\n1. Select **Proxy Endpoints \\\u003e default \\\u003e PreFlow** in the left-hand pane:\n\n2. Click the **+** button next to **PreFlow** in the **Response** pane at the bottom-right of the Visual Editor:\n\n3. In the **Add policy step** dialog, select the **GQL-** policy. **Note:** This example uses the default name, **GQL** , for the GraphQL policy. You can change the name in the **DisplayName** element in the XML for the policy, by adding a descriptive phrase after **GQL-** . See [Change the policy name](/apigee/docs/api-platform/get-started/add-policy#change-the-policy-name).\n4. Click **Add** to attach the policy.\n5. Click **Save** to save the current revision with your changes.\n6. To deploy your changes, click the **Overview** tab and select **Deploy**.\n\nSee [GraphQL options](#graphql-options) below for the options you can set for\nthe GraphQL policy.\n\n### Classic Proxy Editor\n\n1. Sign in to the [Apigee UI](https://apigee.google.com).\n2. In the navigation bar, select **Develop \\\u003e API Proxies**.\n3. In the list of proxies, select the API proxy for which you want to use the GraphQL policy.\n4. Click the **DEVELOP** tab.\n5. In the **Flow: PreFlow** pane, click the **+ Step** button.\n\n6. In the **Add Step** pane, scroll down to\n the bottom of the **Mediation** section, and select **GraphQL**.\n\n The **Add Step** pane displays the following options:\n - **Display Name**: Display name of the policy.\n - **Name**: Internal name of the policy.\n - **Schema file**: Option to upload a file containing a GraphQL schema that Apigee will use to validate requests with GraphQL content.\n\n To use a schema, do the following:\n 1. Click the **Schema File** field. This displays the following choices:\n - **No Schema**. If you select this option, Apigee will not use a schema to validate requests.\n - **Import GraphQL schema (.graphql)**\n 2. Select **Import GraphQL schema (.graphql)**. This displays the\n following:\n\n 3. Click **Choose File** and select the schema file you\n [created previously](#create-a-schema-file)\n (which must have the extension `.graphql`).\n The file appears in the **Schema name** field.\n\n7. Click **Add** . The **Flow: PreFlow** pane now appears as shown below:\n\n\n See [GraphQL options](#graphql-options) below for the options you can set for\n the GraphQL policy. For this example, leave them as they are.\n8. To deploy your proxy, click the **Overview** tab and select **Deploy**.\n\n\nNow you can test the GraphQL policy with the following `curl` command: \n\n```\ncurl --location --request POST 'https://PROXY_BASEPATH/HOST_NAME' --data-raw 'query query_name {allPersons {name}}' -k\n```\n\nWhere \u003cvar translate=\"no\"\u003ePROXY_BASEPATH\u003c/var\u003e is the proxy basepath and \u003cvar translate=\"no\"\u003eHOST_NAME\u003c/var\u003e is the name of\nyour proxy, including the latest revision number. When you\nrun the command, Apigee validates the request against the schema and returns the following\noutput. \n\n```\n{\n \"query query_name {allPersons {name}}\": \"\",\n \"id\": 101\n}\n```\n\nHere's another example of a request: \n\n```\ncurl --location --request POST 'https://PROXY_BASEPATH/HOST_NAME' --data-raw 'query ilovegql {DEADBEEF}' -k\n```\n\nThis time the request validation fails with the following error message. \n\n```\n{\"fault\":{\"faultstring\":\"steps.graphQL.SchemaValidationFailed\",\"detail\":{\"errorcode\":\"steps.graphQL.SchemaValidationFailed\"}}}\n```\n\nGraphQL options\n---------------\n\nThe GraphPolicy has the following options:\n\n- `OperationType`: The operation type. The options are:\n - `query`: The GraphQL equivalent of the REST `GET` operation.\n - `mutation`: The GraphQL equivalent of the REST `PUT` operation.\n - `query_mutation`: Both `query` and `mutation`.\n- `MaxDepth`: The maximum depth of the query, when represented as a tree. `MaxDepth` allows you to block deep queries in the payload, so that Apigee does not need to create very large flow variables to hold the values. However, the payload is sent as is, regardless of the value of `MaxDepth`.\n- `MaxCount`: The maximum number of fragments that can be in the payload. You can use this to prevent the GraphQL back-end server of the customer from executing highly complex queries, forcing clients to break their logic into smaller payloads.\n- `Action`: One the following GraphQL actions:\n - `parse`Apigee parses the GraphQL payload into the flow variables. You can then use the contents of the flow variables in policies such as JavaCallout. Note that `parse` also verifies the payload.\n - `verify`: Apigee verifies that the GraphQL payload conforms to the schema uploaded to the proxy. You can use `verify` to ensure that you do not get requests that don't conform to your schema. This can save valuable CPU time in the backend.\n - `parse_verify`: Parse and verify the payload.\n- `ResourceURL`: The path to the GraphQL schema file that Apigee uses to verify the GraphQL request.\\`\n\nTo learn more about these options, see the\n[GraphQL policy reference\npage](/apigee/docs/api-platform/reference/policies/graphql-policy)."]]