이 주제는 예시일 뿐입니다. 인증 기관(CA) Let's Encrypt에서 TLS 인증서를 가져오는 방법을 설명합니다. 이러한 단계는 주로 CA에서 승인한 인증서/키 쌍을 가져올 수 있는 다른 방법이 없는 경우에 수행하는 예시입니다. 이 예시에서는 Let's Encrypt CA, Certbot 클라이언트, Google Cloud Platform Cloud DNS를 사용하여 인증서를 생성하는 방법을 보여줍니다.
이러한 인증서를 사용할 수 있는 경우
클러스터 외부에 노출된 런타임 인그레스 게이트웨이에 TLS 인증서를 제공해야 합니다.
외부 연결도 참조하세요.요구사항
도메인 이름 등록기관을 통해 가져온 도메인 이름이 필요합니다. Google Domains 또는 다른 원하는 도메인 등록기관을 통해 도메인 이름을 등록할 수 있습니다.
Cloud DNS 구성
승인된 TLS 인증서를 가져오려면 정규화된 도메인 이름이 있어야 합니다. 다음 단계에서는 Google Cloud DNS를 사용하여 도메인 이름을 가져오고 도메인 서버를 관리하는 방법을 설명합니다.- Google Cloud 콘솔을 열고 계정에 로그인합니다.
- Apigee Hybrid가 설치된 프로젝트를 선택합니다.
- 아직 Cloud DNS API를 사용 설정하지 않았으면 사용 설정하세요. API 사용 설정을 참조하세요.
- 고정 IP 주소를 만듭니다.
- GKE를 사용하는 경우 고정 외부 IP 주소 구성의 안내에 따라 외부 프로세스가 하이브리드 런타임 인그레스와 통신하는 데 사용할 수 있는 고정 IP 주소를 만듭니다. 이 주소에 원하는 이름을 지정할 수 있습니다(예:
apigee-hybrid-runtime). 완료되면 다음 단계의 클러스터 구성에서 IP 번호를 사용합니다. 예를 들면34.66.75.196입니다. - Google Distributed Cloud를 사용 중인 경우 IP 주소 계획 및 사용자 클러스터 만들기의 안내에 따라 고정 IP 주소를 만듭니다.
- GKE를 사용하는 경우 고정 외부 IP 주소 구성의 안내에 따라 외부 프로세스가 하이브리드 런타임 인그레스와 통신하는 데 사용할 수 있는 고정 IP 주소를 만듭니다. 이 주소에 원하는 이름을 지정할 수 있습니다(예:
- 방금 예약한 외부 IP를 가져옵니다.
- 런타임 Istio 인그레스 엔드포인트의 레코드 집합을 만듭니다. 이 주소는 하이브리드 게이트웨이에 대해 API 호출을 수행하기 위해 사용됩니다. 이전 단계에서 가져온 외부 IP를 입력하고 도메인 이름에 프리픽스를 추가합니다(예:
example-endpoint). 자세한 내용은 새 레코드 만들기를 참조하세요.- 관리형 공개 영역 만들기 자세한 내용은 관리형 공개 영역 만들기를 참조하세요.
- 다음을 사용하여 새 레코드 모음을 만듭니다.
- DNS 이름:
api-services또는example-endpoint와 같이 외부 API 호출이 통신할 엔드포인트의 이름입니다. - 리소스 레코드 유형: A
- TTL 및 TTL: 기본값 허용
- IP 주소: 생성한 고정 IP
- DNS 이름:
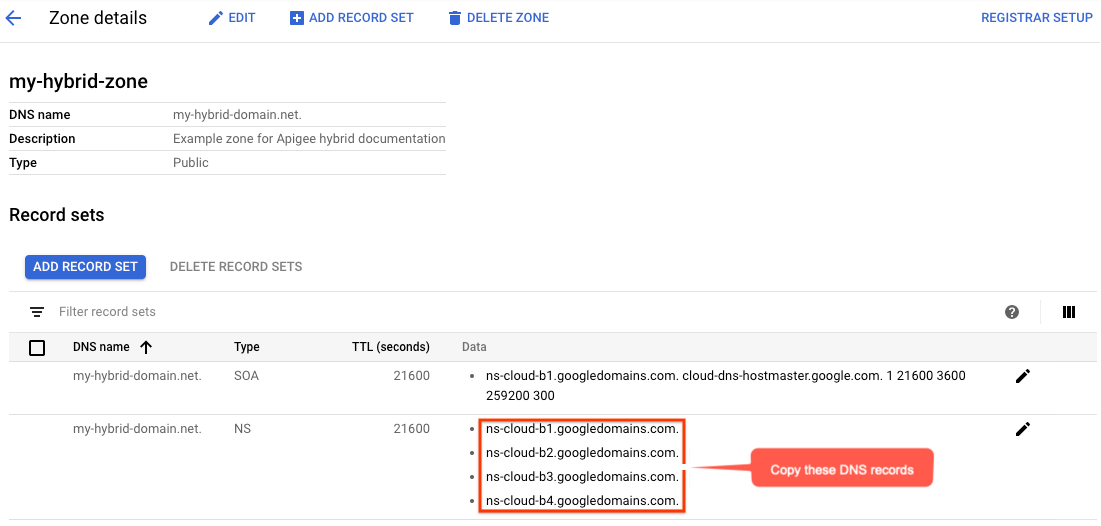
- 영역 세부정보 뷰에는 4개의 DNS 서버가 새 영역의 NS 데이터로 나열됩니다. 다음 예시와 같이 DNS 레코드 데이터를 복사합니다.
- 등록기관의 도메인 페이지 (예시: Google Domains)로 돌아갑니다.
- 도메인을 선택합니다.
- DNS를 선택합니다.
- 네임서버 섹션에서 수정을 클릭합니다.
네트워크 서비스 Cloud DNS 페이지에서 복사한 도메인 이름 서버를 입력합니다. 예를 들면 다음과 같습니다.
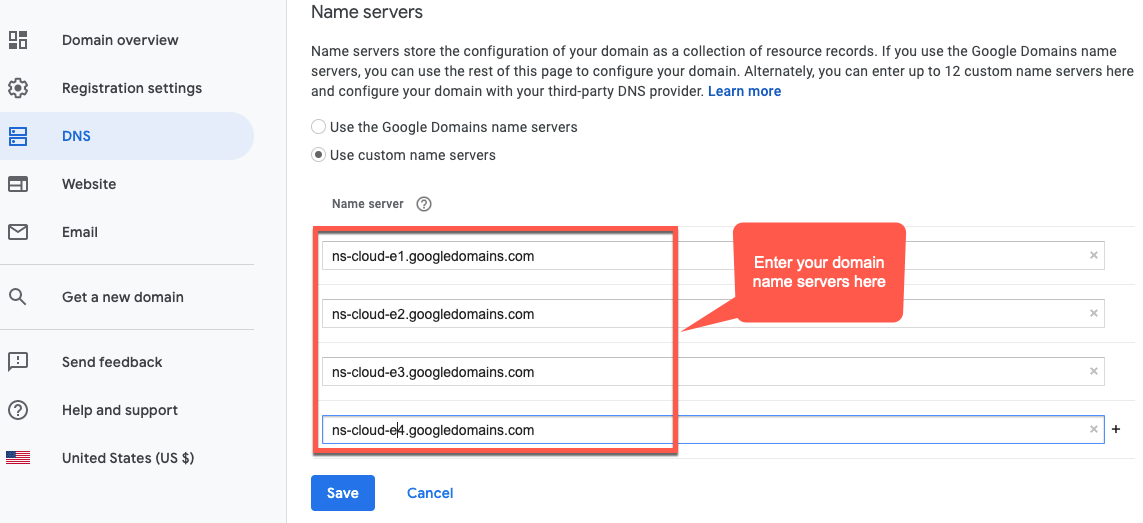
이제 Google Cloud DNS가 도메인의 DNS 레코드를 관리합니다.
VM에 Certbot 설치
도메인 서버를 관리하도록 Cloud DNS를 설정했으므로 이제 Cloud VM에서 dns_google 플러그인을 사용하여 Certbot 클라이언트를 설치합니다. 클라이언트를 사용 설정하면 Let's Encrypt 엔드포인트에서 도메인에 대해 승인된 인증서를 가져올 수 있습니다.
- Google Cloud 콘솔을 열고 1단계: Google Cloud 계정 만들기에서 만든 계정으로 로그인합니다.
- 2단계: Google Cloud 프로젝트 만들기에서 만든 프로젝트를 선택합니다.
- IAM 및 관리자 > 서비스 계정을 선택합니다.
서비스 계정 보기에 프로젝트의 서비스 계정 목록이 표시됩니다.
- 새 서비스 계정을 만들려면 뷰 상단에 있는 +서비스 계정 만들기를 클릭합니다.
서비스 계정 세부정보 보기가 표시됩니다.
- 서비스 계정 이름 필드에 서비스 계정 이름을 입력합니다.
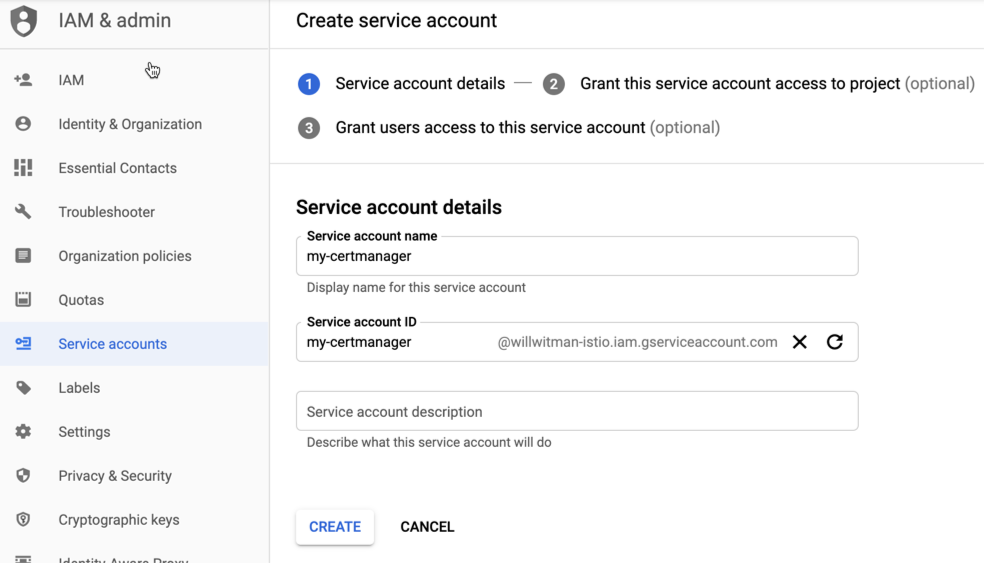
필요한 경우 서비스 계정 설명 필드에 설명을 추가할 수 있습니다. 설명은 특정 서비스 계정의 용도를 알리는 데 유용합니다.
- 만들기를 클릭합니다.
Google Cloud가 새로운 서비스 계정을 만들고 서비스 계정 권한 보기를 표시합니다. 이 보기를 사용하여 새 서비스 계정에 역할을 할당합니다.
- 역할 선택 드롭다운 목록을 클릭합니다.
- 프로젝트 소유자 역할을 선택합니다.
- 계속을 클릭합니다.
- 완료를 클릭합니다.
- Google Cloud 콘솔에서 Compute Engine > VM 인스턴스를 선택합니다.
- certmanager라는 VM 인스턴스를 만듭니다.
- 부팅 디스크 섹션에서 SSD 영구 드라이브에 CentOS7 및 20GB를 선택합니다.
- 서비스 계정을 위에서 만든 계정으로 설정합니다.
- 머신에 Certbot 및 dns_google 플러그인을 설치하고 Certbot 클라이언트를 실행합니다.
sudo su -yum -y install yum-utilsyum install certbot -yyum install certbot-dns-google -ycertbot certonly --dns-google -d *.your_domain_name,*.your_domain_name --server https://acme-v02.api.letsencrypt.org/directory예를 들면 다음과 같습니다.
sudo su -yum -y install yum-utilsyum install certbot -yyum install certbot-dns-google -ycertbot certonly --dns-google -d *.apigee-hybrid-docs.net,*.apigee-hybrid-docs.net --server https://acme-v02.api.letsencrypt.org/directory - 이제
cd /etc/letsencrypt/live/your_domain_name/디렉터리에서 승인된 인증서와 비공개 키 파일을 찾을 수 있습니다.예:
cd /etc/letsencrypt/live/apigee-hybrid-docs.netlscert.pem chain.pem fullchain.pem privkey.key README fullchain.pem파일과privkey.key파일을 로컬 머신에 복사합니다.- 선택사항: 인증서/키 쌍으로 Kubernetes 보안 비밀을 만듭니다. Istio 인그레스에서 TLS 및 mTLS 구성에서 옵션 2: Kubernetes 보안 비밀의 안내를 참조하세요.
- 인증서와 비공개 키를 가리키도록 재정의 파일을 업데이트합니다.
예:
...
envs:
  - name: test
    serviceAccountPaths:
      synchronizer: "your_keypath/synchronizer-manager-service-account.json
      udca: "your_keypath/analytic-agent-service-account.json

virtualhosts:
  - name: my-env-group
    sslCertPath: "$HOME/hybrid/apigee-hybrid-setup/tls/fullchain.pem"
    sslKeyPath: "$HOME/hybrid/apigee-hybrid-setup/tls/privkey.key"
또는 Kubernetes 보안 비밀을 사용하는 경우는 다음과 같습니다.
...
envs:
  - name: test
    serviceAccountPaths:
      synchronizer: "your_keypath/synchronizer-manager-service-account.json
      udca: "your_keypath/analytic-agent-service-account.json

virtualhosts:
  - name: my-env-group
    tlsMode: SIMPLE  # Note: SIMPLE is the default, MUTUAL is also an available value.
    sslSecret: myorg-test-policy-secret"

...
envs구성에 변경사항을 적용합니다.업데이트할 각 환경에 대한 helm 업그레이드 를 실행합니다.helm upgrade ENV_NAME apigee-env/ \ --namespace apigee \ --set env=ENV_NAME \ --atomic \ -f OVERRIDES_FILE.yaml
구성 테스트
프록시를 배포하고 테스트합니다. 첫 번째 API 프록시 빌드 개요를 참조하세요.