OAuth 보안이 설정된 Apigee에서 API 프록시를 호출할 때는 Apigee가 액세스 토큰 확인을 수행합니다. Apigee는 게이트키퍼 역할을 수행합니다. 확인 가능한 액세스 토큰이 없는 API 호출은 통과할 수 없습니다.
VerifyAccessToken 정책 추가
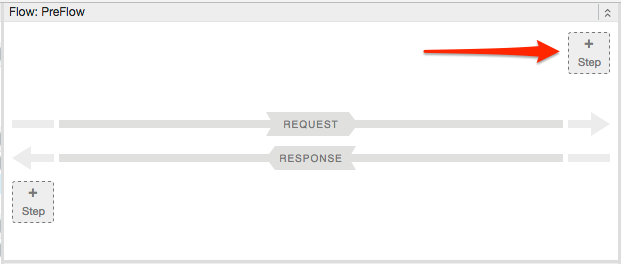
토큰 확인을 구성하려면 API 프록시 흐름의 시작 부분(ProxyEndpoint Preflow의 시작)에 VerifyAccessToken 작업이 포함된 OAuthV2 정책을 배치합니다. 여기에 배치하면 다른 토큰이 실행되기 전에 액세스 토큰이 확인됩니다. 토큰이 거부되면 Apigee가 처리를 중지하고 오류를 클라이언트에 다시 반환합니다.
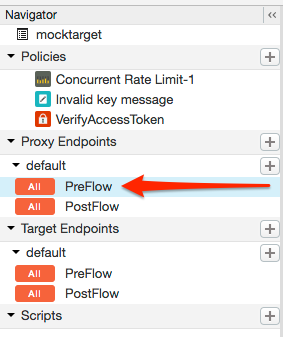
탐색기에서 프록시 엔드포인트 아래에 나열된 엔드포인트의 PreFlow를 선택합니다. 일반적으로 원하는 엔드포인트를 '기본값'이라고 하지만 프록시 엔드포인트를 여러 개 만들 수 있습니다. 엔드포인트가 여러 개이면 다음 단계를 따라 엔드포인트마다 토큰 확인을 수행할 수 있습니다.
프록시 흐름 편집기에서 + 단계를 클릭합니다.
새 정책 인스턴스를 선택합니다.
정책 목록에서 OAuth v2.0을 선택합니다.
선택적으로 정책 이름 및 표시 이름을 변경합니다. 예를 들어 가독성을 높이기 위해 표시 이름 및 정책 이름을 모두 'VerifyAccessToken'으로 변경할 수 있습니다.
추가를 클릭합니다.
기본 정책이 VerifyAccessToken 작업으로 이미 구성되었으므로 추가 작업이 필요하지 않습니다.
[[["이해하기 쉬움","easyToUnderstand","thumb-up"],["문제가 해결됨","solvedMyProblem","thumb-up"],["기타","otherUp","thumb-up"]],[["이해하기 어려움","hardToUnderstand","thumb-down"],["잘못된 정보 또는 샘플 코드","incorrectInformationOrSampleCode","thumb-down"],["필요한 정보/샘플이 없음","missingTheInformationSamplesINeed","thumb-down"],["번역 문제","translationIssue","thumb-down"],["기타","otherDown","thumb-down"]],["최종 업데이트: 2025-08-18(UTC)"],[[["\u003cp\u003eThis content focuses on configuring OAuth 2.0 access token verification within Apigee and Apigee hybrid API proxies.\u003c/p\u003e\n"],["\u003cp\u003eApigee acts as a gatekeeper, requiring and verifying access tokens for all API calls to ensure security.\u003c/p\u003e\n"],["\u003cp\u003eTo verify access tokens, an OAuthV2 policy with the VerifyAccessToken operation must be placed at the beginning of the API proxy's flow, specifically the ProxyEndpoint Preflow.\u003c/p\u003e\n"],["\u003cp\u003eThe default setting for the VerifyAccessToken policy expects the access token to be included in the Authorization header as a Bearer token, but it can be configured to support different types of tokens.\u003c/p\u003e\n"],["\u003cp\u003eIf encountering an "Invalid API call as no apiproduct match found" error, an external community article is provided for troubleshooting steps.\u003c/p\u003e\n"]]],[],null,["# Verifying access tokens\n\n*This page\napplies to **Apigee** and **Apigee hybrid**.*\n\n\n*View [Apigee Edge](https://docs.apigee.com/api-platform/get-started/what-apigee-edge) documentation.*\n\nWhen you call an API proxy on Apigee that has OAuth security, Apigee is responsible for\nverifying access tokens. Think of Apigee as the gatekeeper -- no API call can pass through that\ndoes not have an access token that can be verified.\n| **Tip:** When verifying an access token, if you happen to see this error: \"Invalid API call as no apiproduct match found\", go to this [Apigee Community article](https://community.apigee.com/content/kbentry/6831/oauth20-access-token-verification-throws-invalid-a.html) for details on the cause of this error and steps to correct it.\n\nAdding a VerifyAccessToken policy\n---------------------------------\n\nTo configure token verification, place an [OAuthV2 policy](/apigee/docs/api-platform/reference/policies/oauthv2-policy) with the\n**VerifyAccessToken** operation at the very beginning of the API proxy flow (the\nbeginning of the ProxyEndpoint Preflow). If placed there, access tokens will be verified before\nany other processing takes place, and if a token is rejected, Apigee stops processing and returns\nan error back to the client.\n\nTo access the API proxies page using the Apigee UI:\n\n1. Open the [Apigee UI](https://apigee.google.com).\n2. Select **Develop \\\u003e API Proxies** in the left navigation bar.\n3. From the list, select the proxy you wish to protect.\n4. In the overview page, click the **Develop** tab.\n5. In the Navigator, select **PreFlow** for an endpoint listed under Proxy Endpoints. Typically, the endpoint you want is called \"default\", although it is possible to create multiple proxy endpoints. If you do have multiple endpoints, you will probably want to follow these steps to perform token verification on each one. \n\n \u003cbr /\u003e\n\n6. In the proxy flow editor, click **+ Step** . \n\n \u003cbr /\u003e\n\n7. Select **Policy Instance New**.\n8. From the policy list, select **OAuth v2.0**.\n9. Optionally, change the policy name and display name. For example, for better readability, you might change the display name and name both to \"VerifyAccessToken\".\n10. Click **Add**.\n\nThe default policy is already configured with the VerifyAccessToken operation, so you do not\nhave to do anything further: \n\n```text\n\u003c?xml version=\"1.0\" encoding=\"UTF-8\" standalone=\"yes\"?\u003e\n\u003cOAuthV2 async=\"false\" continueOnError=\"false\" enabled=\"true\" name=\"OAuth-v20-1\"\u003e\n \u003cDisplayName\u003eOAuth v2.0 1\u003c/DisplayName\u003e\n \u003cFaultRules/\u003e\n \u003cProperties/\u003e\n \u003cAttributes/\u003e\n \u003cExternalAuthorization\u003efalse\u003c/ExternalAuthorization\u003e\n \u003cOperation\u003eVerifyAccessToken\u003c/Operation\u003e\n \u003cSupportedGrantTypes/\u003e\n \u003cGenerateResponse enabled=\"true\"/\u003e\n \u003cTokens/\u003e\n\u003c/OAuthV2\u003e\n```\n| **Note:** By default, VerifyAccessToken expects the access token to be sent in an Authorization header as a Bearer token. For example: \n|\n| ```text\n| -H \"Authorization: Bearer Rft3dqrs56Blirls56a\"\n| ```\n|\n| You can change this default in the `\u003cAccessToken\u003e ` element in the\n| OAuthV2 policy, as explained in the [OAuthV2 policy\n| documentation](/apigee/docs/api-platform/reference/policies/oauthv2-policy#accesstokenelement)."]]