Quando chiami un proxy API su Apigee con sicurezza OAuth, Apigee è responsabile della
verifica dei token di accesso. Considera Apigee come il guardiano: nessuna chiamata API può passare se non dispone di un token di accesso verificabile.
Aggiungere una policy VerifyAccessToken
Per configurare la verifica del token, inserisci un criterio OAuthV2 con l'operazione
VerifyAccessToken all'inizio del flusso del proxy API (all'inizio del pre-flusso ProxyEndpoint). Se inseriti qui, i token di accesso vengono verificati prima
di qualsiasi altra elaborazione e, se un token viene rifiutato, Apigee interrompe l'elaborazione e restituisce
un errore al client.
Per accedere alla pagina dei proxy API utilizzando la UI di Apigee:
Seleziona Sviluppa > Proxy API nella barra di navigazione a sinistra.
Seleziona il proxy che vuoi proteggere dall'elenco.
Nella pagina di panoramica, fai clic sulla scheda Sviluppa.
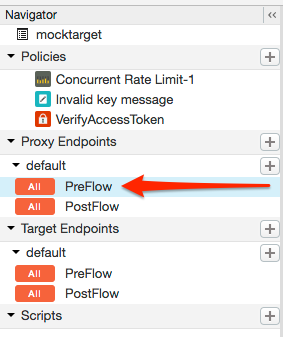
Nel navigatore, seleziona PreFlow per un endpoint elencato in Endpoint proxy. In genere, l'endpoint che ti interessa si chiama "default", anche se è possibile
creare più endpoint proxy. Se hai più endpoint, probabilmente ti consigliamo di
seguire questi passaggi per eseguire la verifica del token su ciascuno.
Nell'editor del flusso proxy, fai clic su + Passaggio.
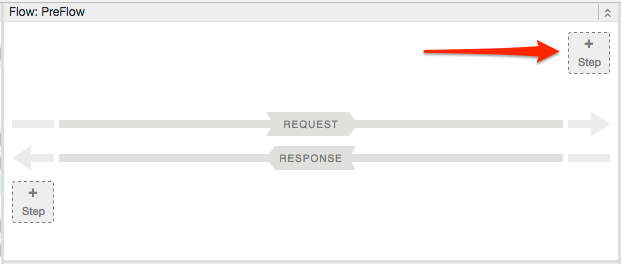
Seleziona Policy Instance New.
Dall'elenco delle norme, seleziona OAuth v2.0.
(Facoltativo) Modifica il nome e il nome visualizzato della norma. Ad esempio, per una migliore leggibilità,
potresti modificare sia il nome visualizzato che il nome in "VerifyAccessToken".
Fai clic su Aggiungi.
Il criterio predefinito è già configurato con l'operazione VerifyAccessToken, quindi non devi
fare altro:
[[["Facile da capire","easyToUnderstand","thumb-up"],["Il problema è stato risolto","solvedMyProblem","thumb-up"],["Altra","otherUp","thumb-up"]],[["Difficile da capire","hardToUnderstand","thumb-down"],["Informazioni o codice di esempio errati","incorrectInformationOrSampleCode","thumb-down"],["Mancano le informazioni o gli esempi di cui ho bisogno","missingTheInformationSamplesINeed","thumb-down"],["Problema di traduzione","translationIssue","thumb-down"],["Altra","otherDown","thumb-down"]],["Ultimo aggiornamento 2025-09-05 UTC."],[[["\u003cp\u003eThis content focuses on configuring OAuth 2.0 access token verification within Apigee and Apigee hybrid API proxies.\u003c/p\u003e\n"],["\u003cp\u003eApigee acts as a gatekeeper, requiring and verifying access tokens for all API calls to ensure security.\u003c/p\u003e\n"],["\u003cp\u003eTo verify access tokens, an OAuthV2 policy with the VerifyAccessToken operation must be placed at the beginning of the API proxy's flow, specifically the ProxyEndpoint Preflow.\u003c/p\u003e\n"],["\u003cp\u003eThe default setting for the VerifyAccessToken policy expects the access token to be included in the Authorization header as a Bearer token, but it can be configured to support different types of tokens.\u003c/p\u003e\n"],["\u003cp\u003eIf encountering an "Invalid API call as no apiproduct match found" error, an external community article is provided for troubleshooting steps.\u003c/p\u003e\n"]]],[],null,["# Verifying access tokens\n\n*This page\napplies to **Apigee** and **Apigee hybrid**.*\n\n\n*View [Apigee Edge](https://docs.apigee.com/api-platform/get-started/what-apigee-edge) documentation.*\n\nWhen you call an API proxy on Apigee that has OAuth security, Apigee is responsible for\nverifying access tokens. Think of Apigee as the gatekeeper -- no API call can pass through that\ndoes not have an access token that can be verified.\n| **Tip:** When verifying an access token, if you happen to see this error: \"Invalid API call as no apiproduct match found\", go to this [Apigee Community article](https://community.apigee.com/content/kbentry/6831/oauth20-access-token-verification-throws-invalid-a.html) for details on the cause of this error and steps to correct it.\n\nAdding a VerifyAccessToken policy\n---------------------------------\n\nTo configure token verification, place an [OAuthV2 policy](/apigee/docs/api-platform/reference/policies/oauthv2-policy) with the\n**VerifyAccessToken** operation at the very beginning of the API proxy flow (the\nbeginning of the ProxyEndpoint Preflow). If placed there, access tokens will be verified before\nany other processing takes place, and if a token is rejected, Apigee stops processing and returns\nan error back to the client.\n\nTo access the API proxies page using the Apigee UI:\n\n1. Open the [Apigee UI](https://apigee.google.com).\n2. Select **Develop \\\u003e API Proxies** in the left navigation bar.\n3. From the list, select the proxy you wish to protect.\n4. In the overview page, click the **Develop** tab.\n5. In the Navigator, select **PreFlow** for an endpoint listed under Proxy Endpoints. Typically, the endpoint you want is called \"default\", although it is possible to create multiple proxy endpoints. If you do have multiple endpoints, you will probably want to follow these steps to perform token verification on each one. \n\n \u003cbr /\u003e\n\n6. In the proxy flow editor, click **+ Step** . \n\n \u003cbr /\u003e\n\n7. Select **Policy Instance New**.\n8. From the policy list, select **OAuth v2.0**.\n9. Optionally, change the policy name and display name. For example, for better readability, you might change the display name and name both to \"VerifyAccessToken\".\n10. Click **Add**.\n\nThe default policy is already configured with the VerifyAccessToken operation, so you do not\nhave to do anything further: \n\n```text\n\u003c?xml version=\"1.0\" encoding=\"UTF-8\" standalone=\"yes\"?\u003e\n\u003cOAuthV2 async=\"false\" continueOnError=\"false\" enabled=\"true\" name=\"OAuth-v20-1\"\u003e\n \u003cDisplayName\u003eOAuth v2.0 1\u003c/DisplayName\u003e\n \u003cFaultRules/\u003e\n \u003cProperties/\u003e\n \u003cAttributes/\u003e\n \u003cExternalAuthorization\u003efalse\u003c/ExternalAuthorization\u003e\n \u003cOperation\u003eVerifyAccessToken\u003c/Operation\u003e\n \u003cSupportedGrantTypes/\u003e\n \u003cGenerateResponse enabled=\"true\"/\u003e\n \u003cTokens/\u003e\n\u003c/OAuthV2\u003e\n```\n| **Note:** By default, VerifyAccessToken expects the access token to be sent in an Authorization header as a Bearer token. For example: \n|\n| ```text\n| -H \"Authorization: Bearer Rft3dqrs56Blirls56a\"\n| ```\n|\n| You can change this default in the `\u003cAccessToken\u003e ` element in the\n| OAuthV2 policy, as explained in the [OAuthV2 policy\n| documentation](/apigee/docs/api-platform/reference/policies/oauthv2-policy#accesstokenelement)."]]