Esta página se aplica a Apigee y Apigee Hybrid.
Consulta la documentación de
Apigee Edge.

En este paso, publicará una API en el portal siguiendo estos pasos:
- Crear un proxy de API a partir de una especificación
- Crear un producto de API
- Publicar la API en tu portal
Paso 1: Crea un proxy de API a partir de una especificación
Crea un proxy de APIs a partir de una especificación de OpenAPI que describa la API.
Para crear un proxy de APIs a partir de una especificación de OpenAPI, sigue estos pasos:
Interfaz de usuario de Cloud Console
En la consola de Apigee en Cloud, ve a la página Desarrollo de proxy > Proxies de API.
Haz clic en Crear. Se abre el asistente Crear un proxy, que te pide que selecciones el tipo de proxy de API que quieres crear.
Haz clic en el cuadro Plantilla de proxy.
Haga clic en Plantilla de especificación de OpenAPI, proxy inverso (la más habitual).
Abre el siguiente archivo en un navegador y, a continuación, guárdalo:
https://raw.githubusercontent.com/apigee/api-platform-samples/master/default-proxies/helloworld/openapi/mocktarget3.0.yaml
En Paso 1: Especificaciones de OpenAPI, haga clic en Buscar.
Ve al archivo de especificación de OpenAPI que acabas de descargar, selecciónalo y haz clic en Abrir.
Haz clic en Siguiente.
En el paso 2: Detalles del proxy, los campos se rellenan automáticamente con los valores de la especificación OpenAPI. Edita el campo Description (Descripción) de la siguiente manera: API proxy for hello world. (Proxy de API para hello world).
Haz clic en Siguiente.
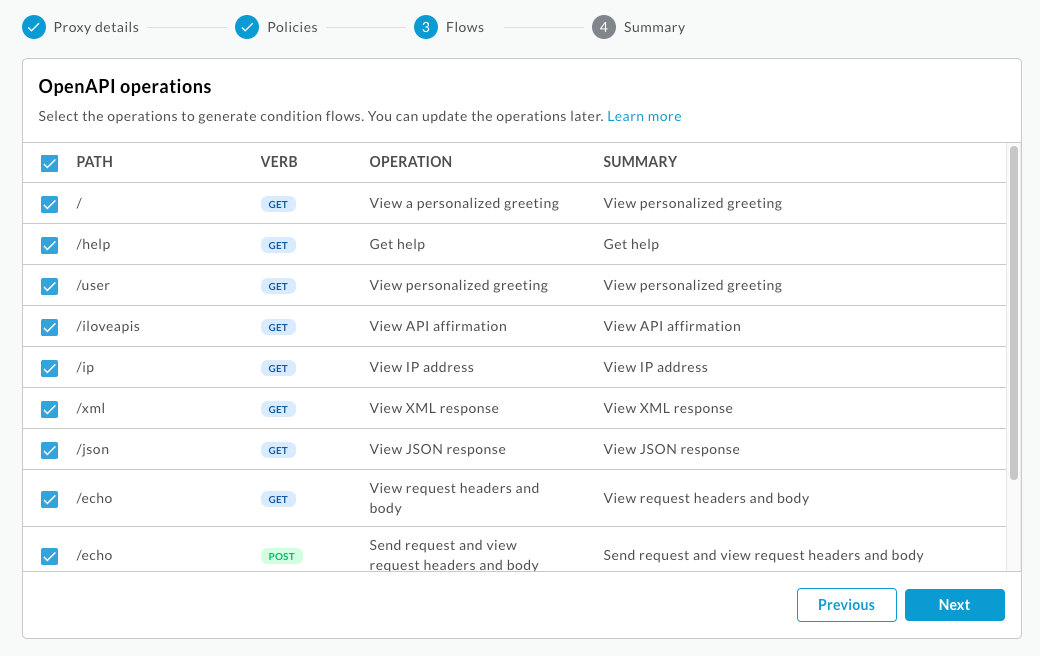
En Paso 3: Flujos, selecciona todas las operaciones.
Haz clic en Siguiente.
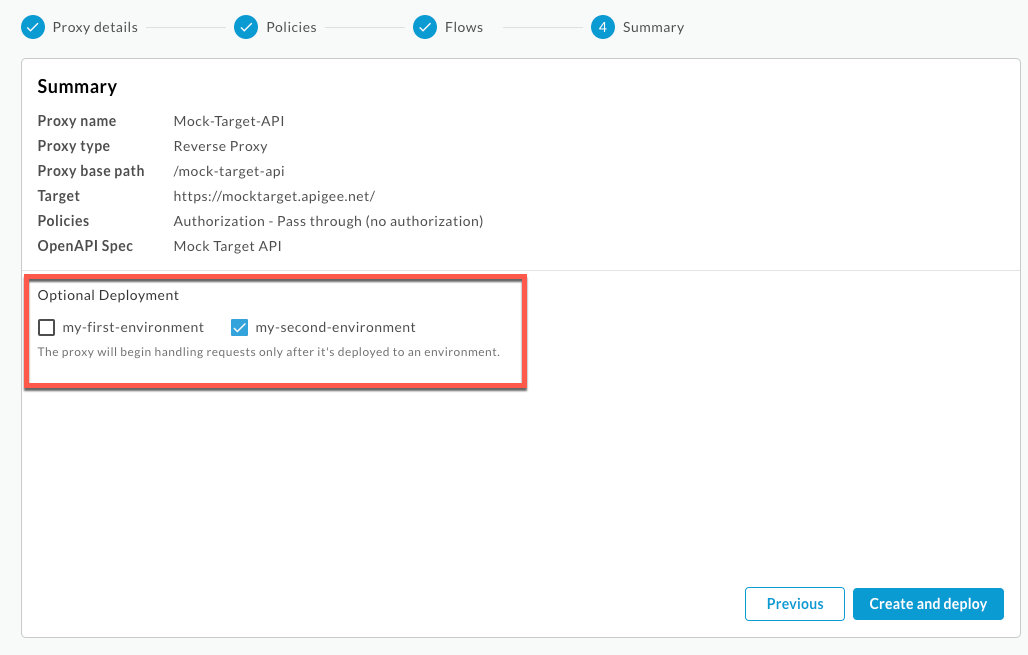
En Paso 4: Implementar, selecciona el entorno en el que quieres implementar.
Haz clic en Aceptar.
Haz clic en Crear.
Cuando se implementa el proxy, en la columna Estado de la sección Implementaciones se muestra un icono verde para indicar que se ha implementado la revisión del proxy de API. Puedes mantener el puntero sobre el icono de estado para ver más información sobre la implementación.
Interfaz clásica
- En la interfaz de usuario de Apigee, selecciona Desarrollo > Proxies de API en la barra de navegación de la izquierda para abrir la página Proxies de API.
Haz clic en Crear.

Se abre el asistente para crear proxy, que te pide que selecciones el tipo de proxy de API que quieres crear.
En Proxy inverso (el más habitual), haz clic en Usar especificación de OpenAPI.

Se muestra el cuadro de diálogo Usar especificación de OpenAPI.
Copia y pega la siguiente URL en el campo URL de especificación de OpenAPI de la pestaña URL:
https://raw.githubusercontent.com/apigee/api-platform-samples/master/default-proxies/helloworld/openapi/mocktarget3.0.yaml
Haz clic en Seleccionar. Se abre el asistente Crear proxy y la página Detalles del proxy se rellena automáticamente con los valores de la especificación de OpenAPI.

Edita el campo Description (Descripción) de la siguiente manera: API proxy for hello world. (Proxy de API para hola mundo).
Haz clic en Siguiente.
En la página Políticas:
- En Seguridad: Autorización, selecciona Transferencia (sin autorización).
- En Seguridad: navegador, selecciona Añadir encabezados CORS .

Haz clic en Siguiente.
En la página Flows (Flujos), asegúrate de que estén seleccionadas todas las operaciones y haz clic en Next (Siguiente).
En la página Resumen, selecciona el entorno en el que quieres realizar el despliegue en Despliegue opcional.
Haz clic en Crear y desplegar.
En la página Resumen, verás un mensaje que indica que el nuevo proxy de API se ha creado correctamente y se ha implementado en el entorno seleccionado.
Paso 2: Crea un producto de API
Crea un producto de API que contenga los recursos de API que quieras exponer a tus consumidores de APIs.
Para crear un producto de API, sigue estos pasos:
En la consola de Apigee en Cloud, ve a la página Distribución > Productos de API.
Haz clic en Crear. Se mostrará la página Detalles del producto. Introduce los detalles del producto de tu producto de API.
.Campo Valor Nombre Hola, mundo Nombre visible Hola, mundo Descripción Ejemplo sencillo de "Hola, mundo" Entorno Selecciona el entorno en el que se ha desplegado el proxy de API. Acceso Público Aprobar automáticamente las solicitudes de acceso Habilitado Cuota (dejar en blanco) Permisos de OAuth permitidos (dejar en blanco) En la sección Operaciones, haga clic en Añadir una operación para identificar las operaciones que quiere añadir a su producto de API.
- En Fuente, selecciona Proxy de API y, a continuación, Mock-Target-API en el menú desplegable.
- En Operation (Operación), introduce una barra inclinada (
/) en el campo Path (Ruta). Ignora los demás campos.
Haz clic en Guardar para guardar la operación.
Haga clic en Guardar para guardar el producto.
Paso 3: Publica la API en tu portal
Publica la API en tu portal para que tus clientes puedan informarse sobre ella y usarla.
Para publicar la API en tu portal, sigue estos pasos:
Interfaz de usuario de Cloud Console
En la consola de Apigee en Cloud, ve a la página Distribución > Portales.
Haz clic en la fila Mi primer portal para abrir el portal.
Haz clic en la pestaña APIs.
Haz clic en + API.
En Producto de API, selecciona Hello World.
Selecciona Publicado (aparece en el catálogo) para publicar la API en tu portal.
En Título visible, escribe Hola, mundo.
En Imagen de display, haz clic en Seleccionar.
Haz clic en Recursos.
Haz clic en Vista previa para
home-background.jpg.Haz clic en Seleccionar.
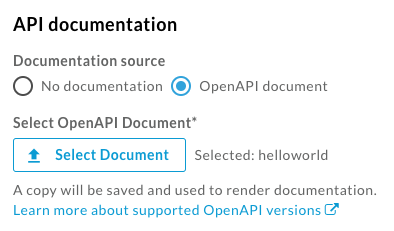
Para consultar la documentación de la API y generar automáticamente la documentación de referencia de la API a partir de una instantánea de tu especificación de OpenAPI, sigue estos pasos:
- Selecciona Documento de OpenAPI.
- Haz clic en Seleccionar.
- Haga clic en la pestaña URL.
- Escribe helloworld en el campo Nombre de especificación.
- Copia y pega la siguiente URL en el campo URL:
https://raw.githubusercontent.com/apigee/api-platform-samples/master/default-proxies/helloworld/openapi/mocktarget3.0.yaml
- Haz clic en Seleccionar.
Haz clic en Guardar.
Interfaz clásica
- En la interfaz de usuario de Apigee, vaya a la página APIs de su portal:
- En la barra de navegación de la izquierda, seleccione Publicar > Portales.
- Haz clic en la fila Mi primer portal para abrir el portal.
- Haz clic en Catálogo de APIs para mostrar la página de APIs.
- Haz clic en +.
- Selecciona Hello World en el cuadro de diálogo Add an API product to the catalog (Añadir un producto de API al catálogo) y haz clic en Next (Siguiente).
- En Detalles de la API, configura las siguientes opciones:
- Selecciona Publicado (aparece en el catálogo) para publicar la API en tu portal.
- Para Imagen visible:
- Haz clic en Seleccionar imagen.
- Haz clic en
home-background.jpgen la lista de imágenes del cuadro de diálogo Seleccionar imagen. - Haz clic en Seleccionar.
- Previsualiza la imagen y haz clic en Seleccionar.
- En Categorías, introduce Empezar y pulsa Intro.
Deja el resto de los valores con sus valores predeterminados.

- En Documentación de la API, para generar automáticamente la documentación de referencia de la API a partir de una instantánea de tu especificación de OpenAPI, sigue estos pasos:
- Selecciona Documento de OpenAPI.
- Haz clic en Seleccionar documento.
- Selecciona la pestaña Importar desde una URL.
- Introduce helloworld en el campo Spec name (Nombre de especificación).
- Copia y pega la siguiente URL en el campo URL y pulsa Intro:
https://raw.githubusercontent.com/apigee/api-platform-samples/master/default-proxies/helloworld/openapi/mocktarget3.0.yaml
- Haz clic en Seleccionar.
- Haz clic en Guardar.
Paso 4: Consulta la documentación de referencia de la API
Para ver la documentación de referencia de la API, siga estos pasos:
- En la interfaz de usuario de Apigee, haga clic en Portal activo para ver los cambios en el portal activo (o actualice el portal activo si ya está abierto en otra pestaña).
- En el portal de emisiones en directo:
- En la barra de navegación superior, haga clic en APIs para ver la API publicada.
- Haz clic en la tarjeta Hello World para ver la documentación de referencia de la API.
- ¡Prueba tu API!
