Questa pagina si applica ad Apigee e Apigee hybrid.
Visualizza la documentazione di
Apigee Edge.

In questo passaggio, pubblicherai un'API sul portale eseguendo i seguenti passaggi:
Passaggio 1: crea un proxy API da una specifica
Crea un proxy API da una specifica OpenAPI che descrive l'API.
Per creare un proxy API da una specifica OpenAPI:
UI di Cloud Console
Nella console Apigee in Cloud, vai alla pagina Proxy Development > API proxies (Sviluppo proxy > Proxy API).
Fai clic su Crea. Si apre la procedura guidata Crea un proxy che ti chiede di selezionare il tipo di proxy API da creare.
Fai clic nella casella Modello proxy.
Fai clic su Modello di specifica OpenAPI, proxy inverso (il più comune).
Apri il seguente file in un browser, quindi salvalo:
https://raw.githubusercontent.com/apigee/api-platform-samples/master/default-proxies/helloworld/openapi/mocktarget3.0.yaml
Nel passaggio 1: specifiche OpenAPI, fai clic su Sfoglia.
Vai a un file di specifica OpenAPI appena scaricato, selezionalo e fai clic su Apri.
Fai clic su Avanti.
In Passaggio 2: dettagli proxy, i campi vengono precompilati utilizzando i valori della specifica OpenAPI. Modifica il campo Descrizione nel seguente modo: Proxy API per Hello World.
Fai clic su Avanti.
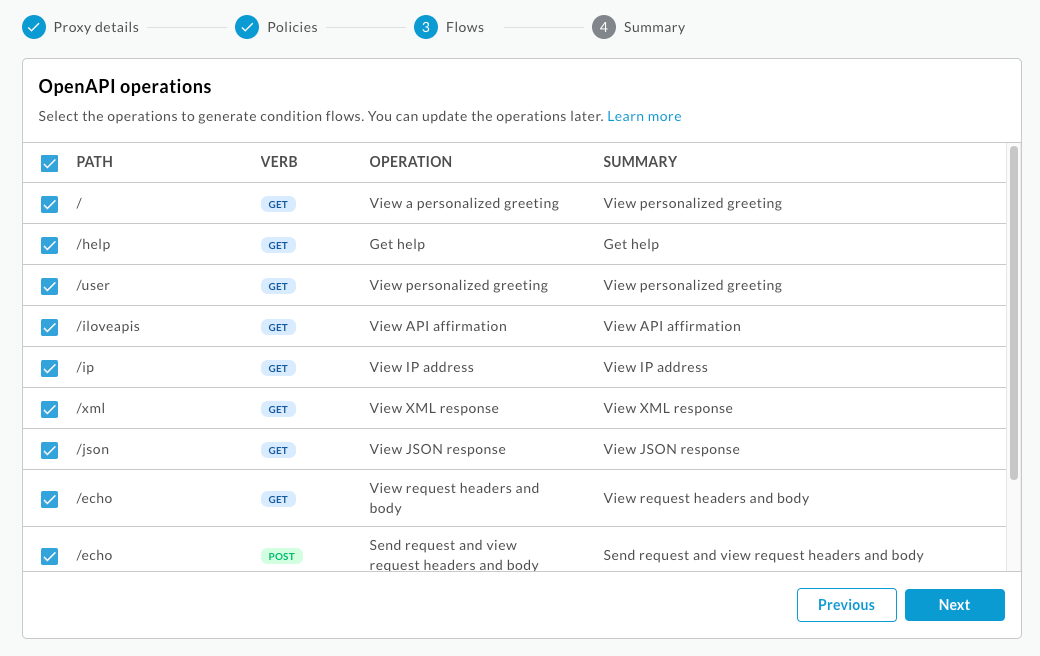
In Passaggio 3 Flussi, seleziona tutte le operazioni.
Fai clic su Avanti.
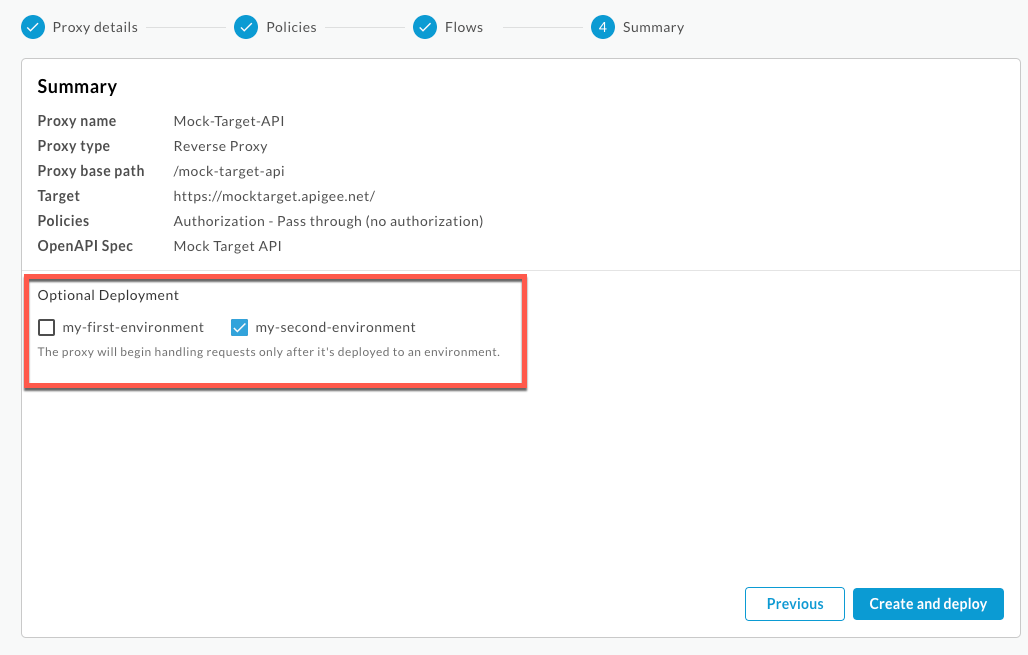
Nel passaggio 4 Esegui il deployment, seleziona l'ambiente in cui vuoi eseguire il deployment.
Fai clic su OK.
Fai clic su Crea.
Quando il proxy viene sottoposto a deployment, la colonna Stato nella sezione Deployment mostra un'icona verde per indicare che la revisione del proxy API è stata sottoposta a deployment. Puoi tenere il puntatore sopra l'icona di stato per visualizzare ulteriori informazioni sull'implementazione.
UI classica
- Nell'interfaccia utente Apigee, seleziona Sviluppa > Proxy API nella barra di navigazione a sinistra per aprire la pagina dei proxy API.
Fai clic su Crea nuovo.

Si apre la procedura guidata Crea proxy che ti chiede di selezionare il tipo di proxy API da creare.
In Reverse Proxy (il più comune), fai clic su Usa specifica OpenAPI.
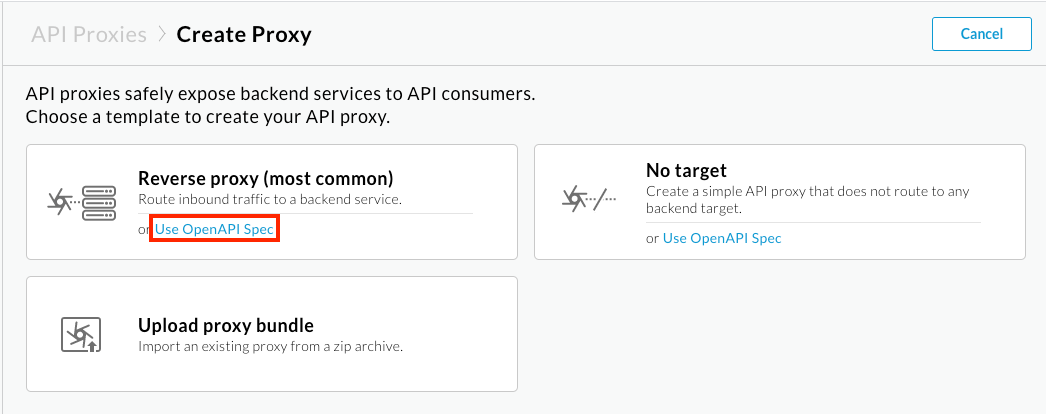
Viene visualizzata la finestra di dialogo Usa specifica OpenAPI.
Copia e incolla il seguente URL nel campo URL specifica OpenAPI nella scheda URL:
https://raw.githubusercontent.com/apigee/api-platform-samples/master/default-proxies/helloworld/openapi/mocktarget3.0.yaml
Fai clic su Seleziona. Si apre la procedura guidata Crea proxy e la pagina Dettagli proxy viene precompilata utilizzando i valori della specifica OpenAPI.
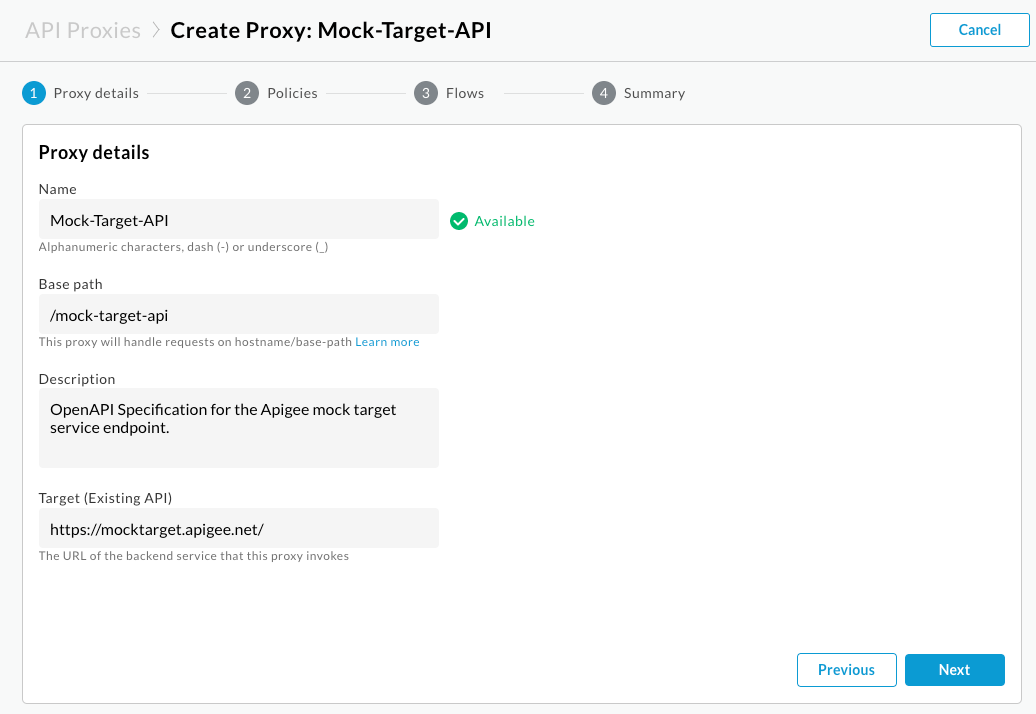
Modifica il campo Descrizione nel seguente modo: Proxy API per Hello World.
Fai clic su Avanti.
Nella pagina Policy:
- Nella sezione Sicurezza: autorizzazione, seleziona Pass through (no authorization).
- In Sicurezza: browser, seleziona Aggiungi intestazioni CORS .
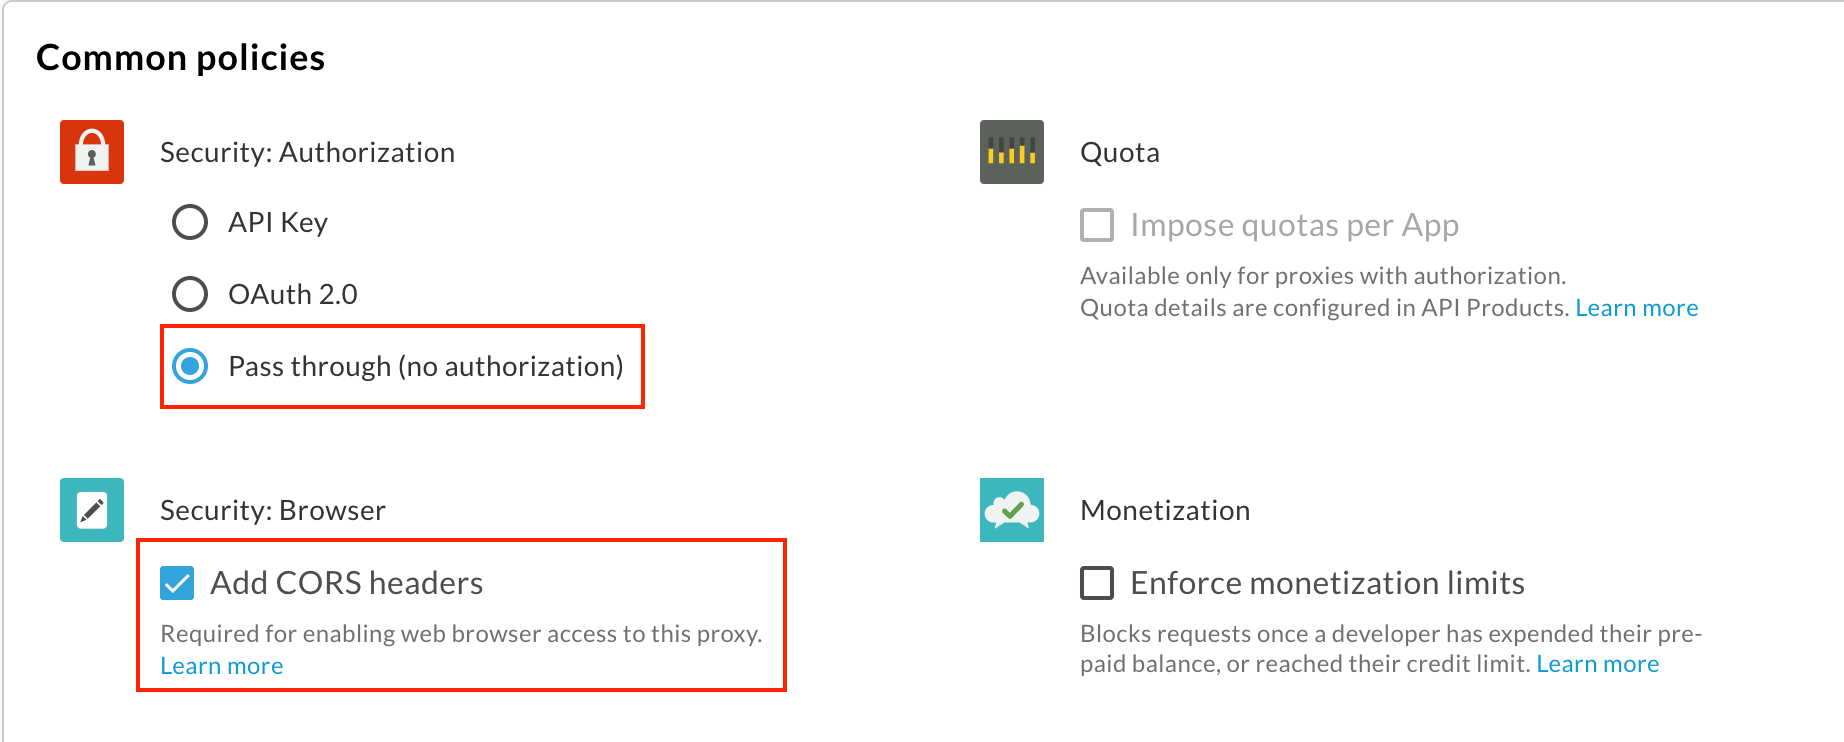
Fai clic su Avanti.
Nella pagina Flussi, assicurati che tutte le operazioni siano selezionate e fai clic su Avanti.
Nella pagina Riepilogo, seleziona l'ambiente in cui vuoi eseguire il deployment in Deployment facoltativo.
Fai clic su Crea ed esegui il deployment.
Nella pagina Riepilogo, vedrai una conferma che il nuovo proxy API è stato creato correttamente e il deployment è stato eseguito nell'ambiente selezionato.
Passaggio 2: crea un prodotto API
Crea un prodotto API che contenga le risorse API che vuoi esporre ai tuoi consumatori di API.
Per creare un prodotto API:
Nella console Apigee in Cloud, vai alla pagina Distribuzione > Prodotti API.
Fai clic su Crea. Viene visualizzata la pagina Dettagli prodotto. Inserisci i dettagli del prodotto per il tuo prodotto API.
Campo Valore Nome Hello World Nome visualizzato Hello World Descrizione Semplice esempio di Hello World Ambiente Seleziona l'ambiente in cui viene eseguito il deployment del proxy API. Accesso Pubblica Approvare automaticamente le richieste di accesso Abilitata Quota (lasciare vuoto) Ambiti OAuth consentiti (lasciare vuoto) Nella sezione Operazioni, fai clic su Aggiungi un'operazione per identificare le operazioni da aggiungere al prodotto API.
- In Origine, seleziona Proxy API e poi Mock-Target-API dal menu a discesa.
- In Operazione, inserisci una barra (
/) nel campo Percorso. Ignora gli altri campi.
Fai clic su Salva per salvare l'operazione.
Fai clic su Salva per salvare il prodotto.
Passaggio 3: pubblica l'API sul tuo portale
Pubblica l'API sul tuo portale per consentire ai tuoi clienti di conoscerla e utilizzarla.
Per pubblicare l'API sul tuo portale:
UI di Cloud Console
Nella console Apigee in Cloud, vai alla pagina Distribuzione > Portali.
Fai clic sulla riga Il mio primo portale per aprire il portale.
Fai clic sulla scheda API.
Fai clic su + API.
Per Prodotto API, seleziona Hello World.
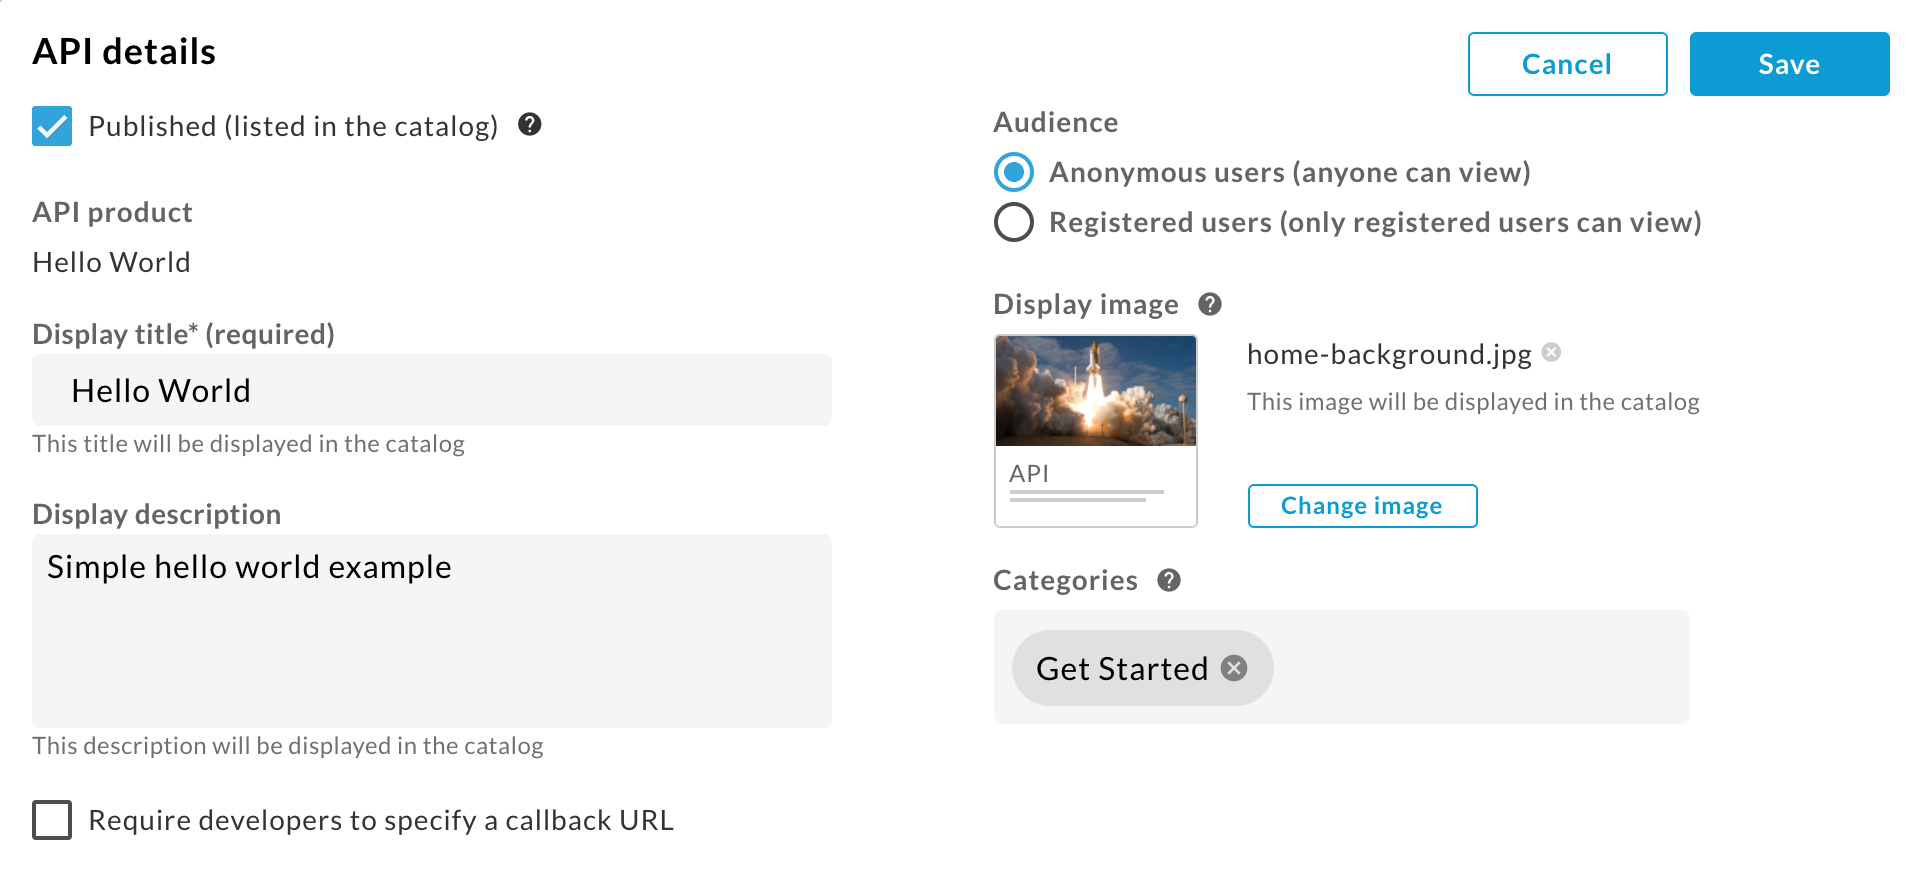
Seleziona Pubblicato (elencato nel catalogo) per pubblicare l'API nel portale.
In Titolo visualizzato, inserisci Hello World.
Per Immagine visualizzata, fai clic su Seleziona.
Fai clic su Asset.
Fai clic su Anteprima per
home-background.jpg.Fai clic su Seleziona.
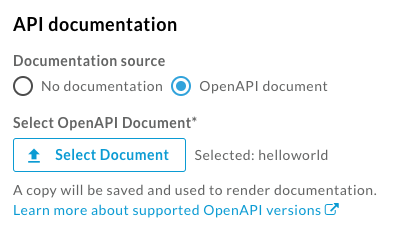
Per la documentazione dell'API, per generare automaticamente la documentazione di riferimento dell'API da uno snapshot della specifica OpenAPI:
- Seleziona Documento OpenAPI.
- Fai clic su Seleziona.
- Fai clic sulla scheda URL.
- Digita helloworld nel campo Nome specifica.
- Copia e incolla il seguente URL nel campo URL:
https://raw.githubusercontent.com/apigee/api-platform-samples/master/default-proxies/helloworld/openapi/mocktarget3.0.yaml
- Fai clic su Seleziona.
Fai clic su Salva.
UI classica
- Nell'interfaccia utente Apigee, vai alla pagina API del portale:
- Seleziona Pubblica > Portali nella barra di navigazione a sinistra.
- Fai clic sulla riga Il mio primo portale per aprire il portale.
- Fai clic su Catalogo API per visualizzare la pagina delle API.
- Fai clic su +.
- Seleziona Hello World nella finestra di dialogo Aggiungi un prodotto API al catalogo e fai clic su Avanti.
- Nella sezione Dettagli API, configura le seguenti opzioni:
- Seleziona Pubblicato (elencato nel catalogo) per pubblicare l'API nel portale.
- Per l'immagine di copertina:
- Fai clic su Seleziona immagine.
- Fai clic su
home-background.jpgnell'elenco delle immagini esistenti nella finestra di dialogo Seleziona immagine. - Fai clic su Seleziona.
- Visualizza l'anteprima dell'immagine e fai clic su Seleziona.
- Per Categorie, inserisci Inizia e premi Invio.
Lascia invariati tutti gli altri valori predefiniti.
- In Documentazione API, per generare automaticamente la documentazione di riferimento dell'API da uno snapshot della specifica OpenAPI:
- Seleziona Documento OpenAPI.
- Fai clic su Seleziona documento.
- Seleziona la scheda Importa da un URL.
- Inserisci helloworld nel campo Nome specifica.
- Copia e incolla il seguente URL nel campo URL e premi Invio:
https://raw.githubusercontent.com/apigee/api-platform-samples/master/default-proxies/helloworld/openapi/mocktarget3.0.yaml
- Fai clic su Seleziona.
- Fai clic su Salva.
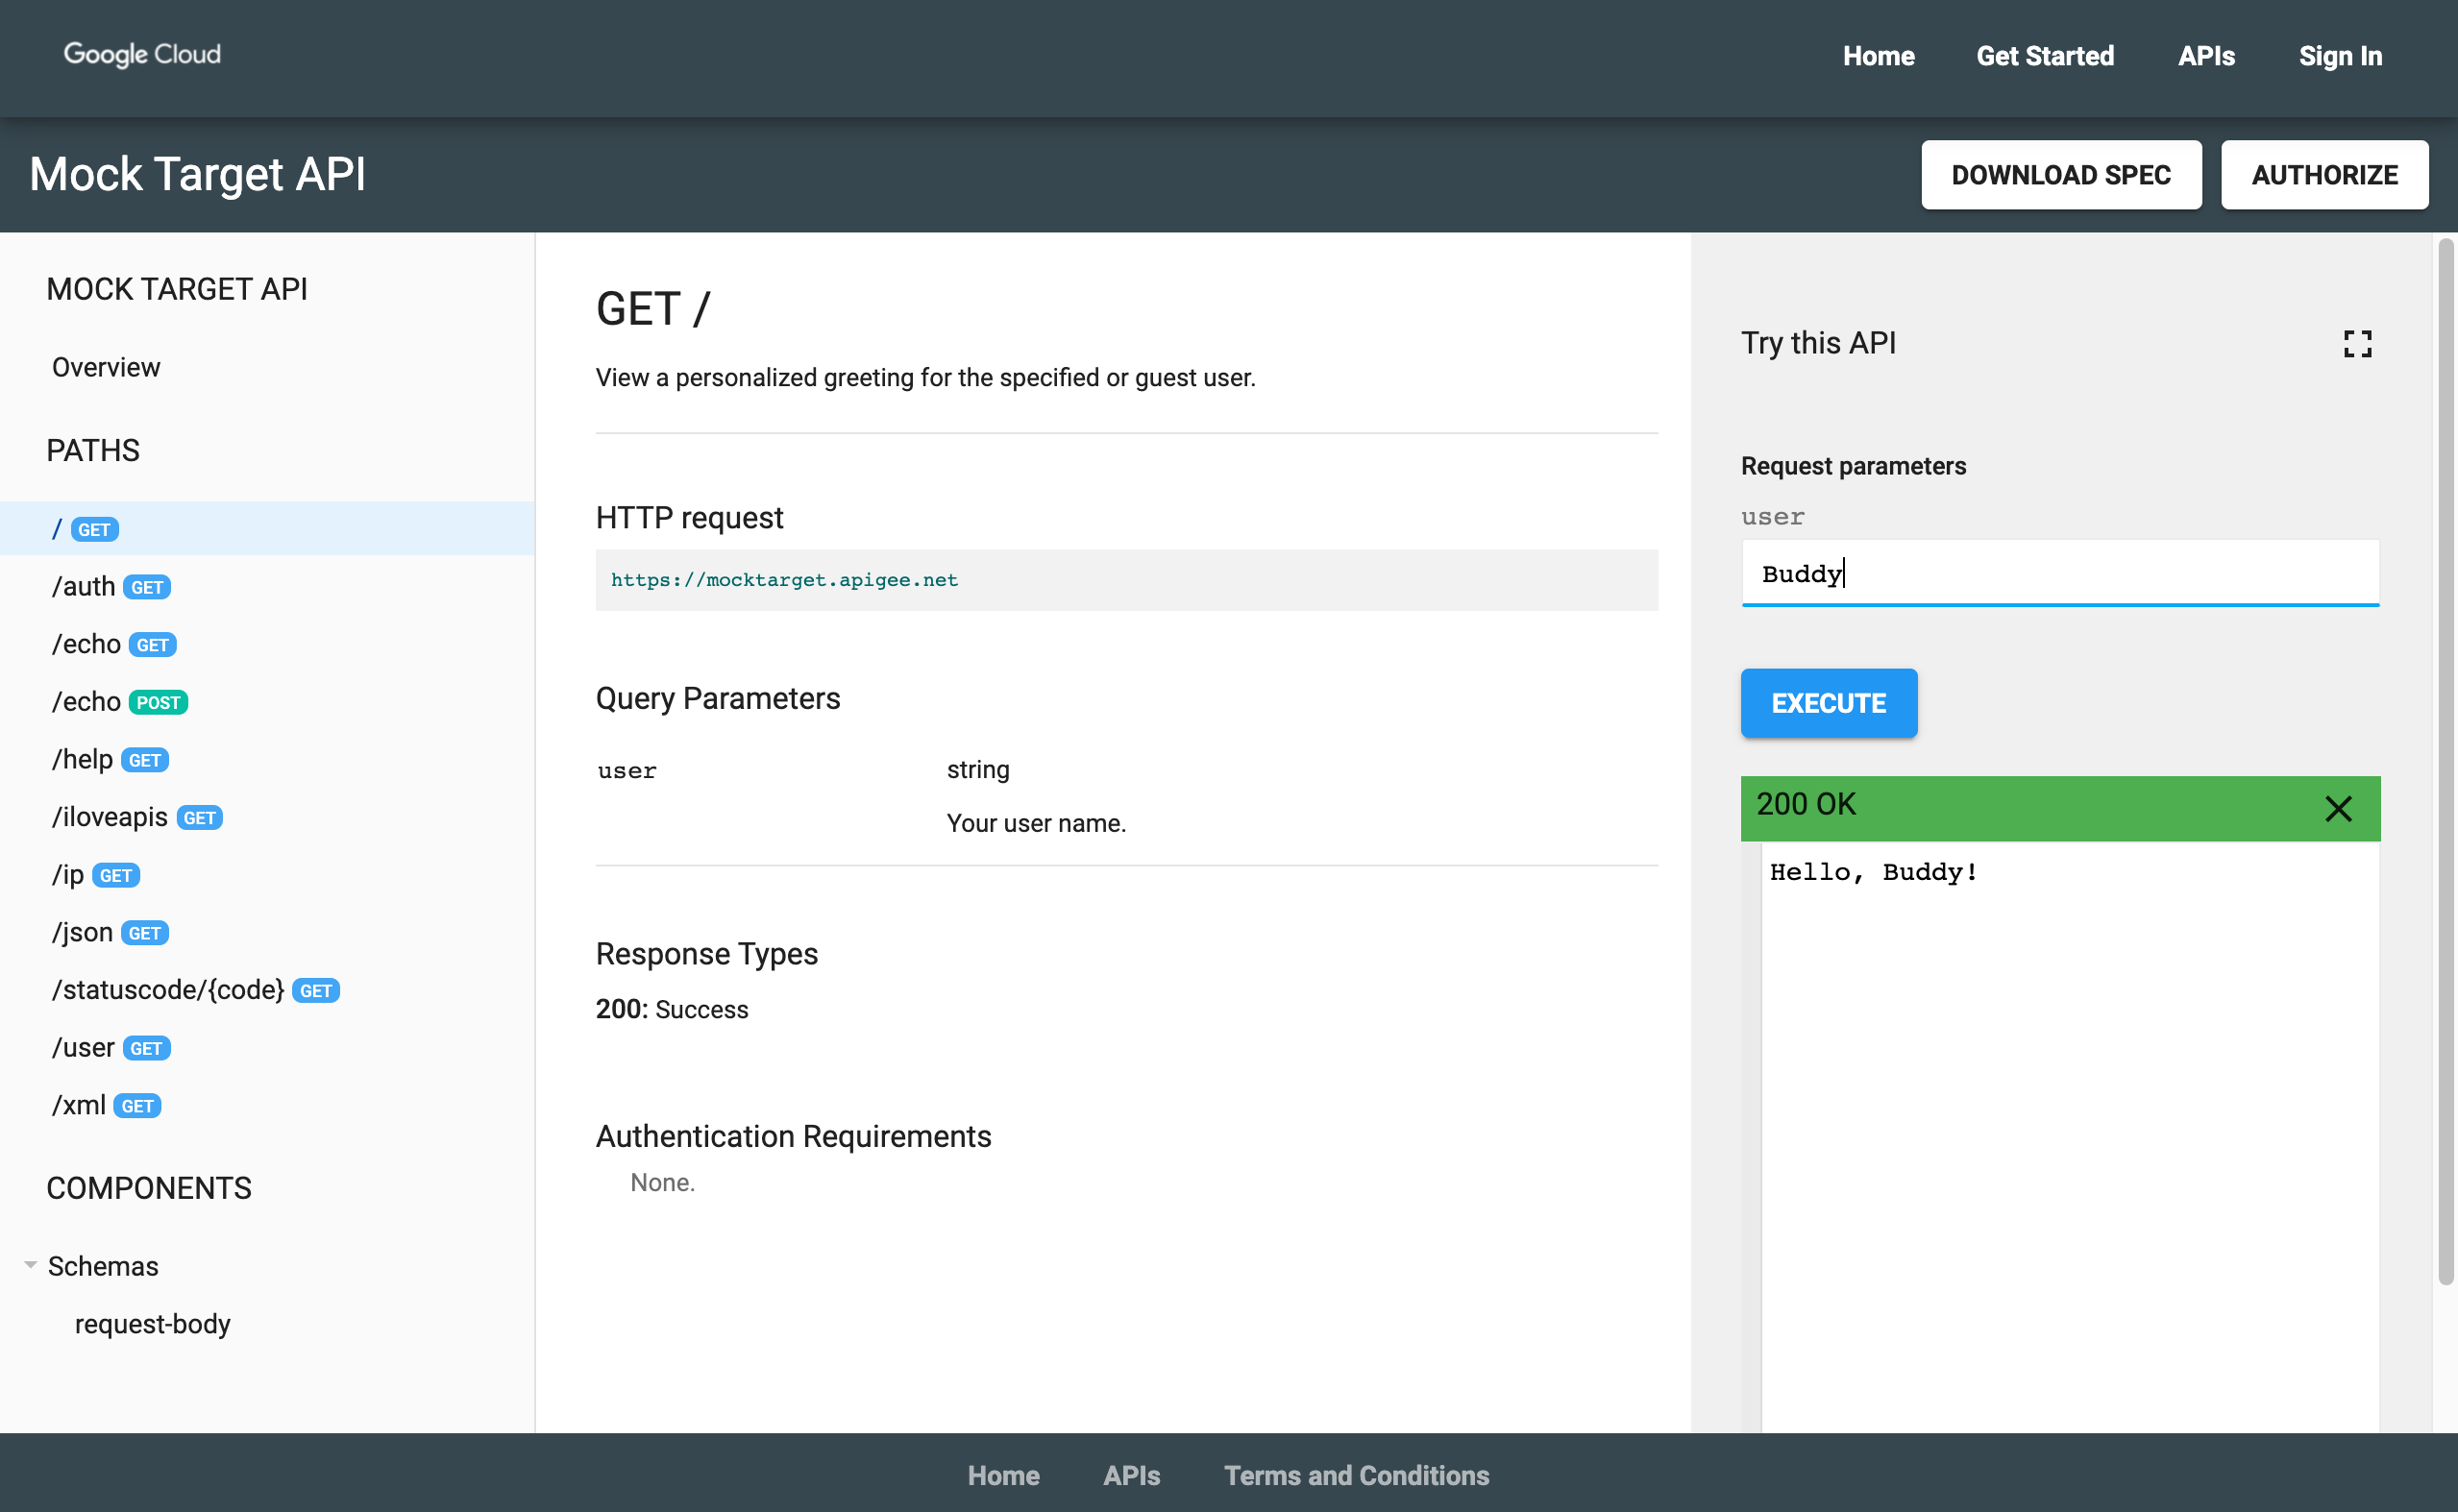
Passaggio 4: visualizza la documentazione di riferimento dell'API
Per visualizzare la documentazione di riferimento dell'API:
- Nell'interfaccia utente Apigee, fai clic su Portale live per visualizzare le modifiche nel portale live (o aggiorna il portale live se è già aperto in un'altra scheda).
- Nel portale live:
- Fai clic su API nella barra di navigazione in alto per visualizzare l'API pubblicata.
- Fai clic sulla scheda Hello World per visualizzare la documentazione di riferimento dell'API.
- Prova la tua API.