Agora que testou seu novo proxy, você está quase pronto para adicionar uma
política a ele. Antes de fazer isso, altere o endpoint de destino do proxy para um que retorne alguns dados.
Lembre-se de que na Etapa 1: criar um proxy de API, você definiu
o endpoint de destino (no campo API atual) como https://mocktarget.apigee.net.
Suponha que esse endpoint não tenha retornado dados interessantes. Em seguida, você pode alterar o
endpoint para um que retorne um XML útil. Esta seção explica como fazer isso.
Novo Editor de Proxy
É possível alterar o endpoint de destino do proxy na visualização Desenvolver do Editor de proxy.
Para abrir a visualização Develop:
Selecione Desenvolver > Proxies de API
e, no painel Proxies, selecione o ambiente para o proxy.
Clique na guia Develop para mostrar a visualização Develop:
Desenvolver visualização
No painel esquerdo da visualização Dsvelop, você pode fazer o seguinte:
Pesquise texto no proxy no campo Search proxy.
Adicionar novas políticas.
Adicionar endpoints de proxy e destino.
Adicionar outros recursos.
Se não quiser ver o painel à esquerda, recolha-o clicando no botão de fechar .
O painel à direita da visualização Develop exibe os editores visuais e de texto
para o proxy:
O editor visual oferece uma visualização gráfica
do fluxo de solicitação e resposta.
O editor de texto permite editar o XML do proxy ou do destino.
Observações:
Clique e arraste o divisor entre os dois editores para cima ou para baixo para expandir
a área de exibição de cada editor.
É possível expandir a área de exibição do
editor visual clicando no botão de alternância à
direita do editor de texto, que fecha o painel do editor de texto. Clique no botão ativar novamente para reabrir o painel do editor de texto.
Alterar o endpoint de destino
Para alterar o endpoint de destino do proxy:
Na páginaRevisão de proxy painel, selecionarEndpoints de destino > padrão.
Isso mostra um diagrama do endpoint de destino no editor visual:
Abaixo do editor visual, o código XML do endpoint de destino é exibido no editor de texto:
No editor de texto, mude <URL> para
https://mocktarget.apigee.net/xml. (Anexe "/xml" ao URL atual.)
Selecione seu proxy na lista para exibir os detalhes do proxy da API. Se você não vir seu proxy na lista, verifique
se selecionou a organização correta, conforme descrito em Como alternar entre organizações.
Clique na guia Desenvolver:
Isso direciona você para o Editor de proxy de API. O Editor de proxy permite que você veja a estrutura do
proxy da API e configure o fluxo dele. Um fluxo é apenas o caminho passo a passo que uma solicitação de proxy de API leva
pela plataforma Apigee. Outros tutoriais cobrirão o conceito de
fluxos.
No painel Navigator, selecione Target Endpoints >
default > PreFlow:
A Apigee exibe as configurações do endpoint no painel Code:
Para salvar as alterações na configuração do proxy, clique no botão
Salvar.
O Apigee salva suas alterações em uma nova revisão de proxy.
Para implantar a nova revisão, selecione Implantar em: teste e clique em Implantar 2.
Na caixa de diálogo de confirmação, clique em Implantar.
Se houver um erro, a Apigee salvará suas alterações, mas não implantará o proxy. No caso
de um erro:
Corrija a configuração de proxy. A Apigee pode fornecer orientação de sintaxe como um pop-up.
Implante manualmente as alterações no ambiente test clicando em
Implantação > teste se a Apigee não a implantar automaticamente.
É possível verificar se a revisão de proxy foi implantada com sucesso visualizando o
status da revisão de implantação adjacente à lista suspensa "Implantar". Exemplo:
Testar o proxy
É possível testar suas alterações enviando uma solicitação para o proxy, assim como você fez em Chamar o proxy de API. No exemplo a seguir, pressupomos que o proxy tenha o nome myproxy:
[[["Fácil de entender","easyToUnderstand","thumb-up"],["Meu problema foi resolvido","solvedMyProblem","thumb-up"],["Outro","otherUp","thumb-up"]],[["Difícil de entender","hardToUnderstand","thumb-down"],["Informações incorretas ou exemplo de código","incorrectInformationOrSampleCode","thumb-down"],["Não contém as informações/amostras de que eu preciso","missingTheInformationSamplesINeed","thumb-down"],["Problema na tradução","translationIssue","thumb-down"],["Outro","otherDown","thumb-down"]],["Última atualização 2025-08-07 UTC."],[[["\u003cp\u003eThis page details how to modify an Apigee API proxy's target endpoint to interact with a resource returning XML data, applicable to both Apigee and Apigee hybrid.\u003c/p\u003e\n"],["\u003cp\u003eThe process involves accessing the Apigee UI, either through the Google Cloud console or the classic interface, and navigating to the API proxy editor to adjust the target endpoint settings.\u003c/p\u003e\n"],["\u003cp\u003eThe target endpoint URL is updated to \u003ccode\u003ehttps://mocktarget.apigee.net/xml\u003c/code\u003e, which directs the proxy to a resource providing test XML data.\u003c/p\u003e\n"],["\u003cp\u003eAfter updating the URL in the visual or text editor, the changes must be saved as a new revision and then deployed to the appropriate environment for testing.\u003c/p\u003e\n"],["\u003cp\u003eOnce the API proxy's target endpoint has been updated, you can then test it to confirm it now returns an XML response.\u003c/p\u003e\n"]]],[],null,["*This page\napplies to **Apigee** and **Apigee hybrid**.*\n\n\n*View [Apigee Edge](https://docs.apigee.com/api-platform/get-started/what-apigee-edge) documentation.*\n\nAn Apigee API proxy has two endpoints: a proxy endpoint and a target endpoint. The proxy endpoint is the client interface.\nIt receives requests from clients and\nsends responses back to clients.\nThe target endpoint is the API producer interface. It communicates from Apigee to an API producer, such as a backend\nservice or API. To learn more about endpoints, see [What is an API proxy?](/apigee/docs/api-platform/fundamentals/understanding-apis-and-api-proxies#whatisanapiproxy)\n\nIn this step, you will change the API proxy's target endpoint to `https://mocktarget.apigee.net/xml`, a resource that\nreturns test XML data. After making the change, you will redeploy and test the revised API proxy. \n\nApigee in Cloud console\n\n1. In the Google Cloud console, go to the **Proxy development \\\u003e API proxies** page.\n\n [Go to API proxies](https://console.cloud.google.com/apigee/proxies)\n2. Make sure the same Google Cloud project where you created the API proxy is selected from the dropdown at the top of the page.\n3. In the proxies table, select the proxy **myproxy** , which you created in [Step 1: Create an API proxy](/apigee/docs/api-platform/get-started/create-proxy).\n4. Click the **Develop** tab.\n\nExplore the Develop view\n\nIn the left-hand pane of the **Develop** view, you can:\n\n- Search for text in the proxy in the **Search proxy** field.\n- Add new policies.\n- Add proxy and target endpoints.\n- Add other resources.\n\nIf you don't want to view the left-hand pane, you can collapse it by clicking the\nclose button .\n\nThe right-hand pane of the **Develop** view displays the visual and text editors\nfor the proxy:\n\n- The visual editor provides a graphical view of the request and response flow.\n- The text editor lets you edit the XML for the proxy or target.\n\n**Notes:**\n\n- You can click and drag the divider between the two editors up or down to expand the display area of either editor.\n- You can expand the display area of the visual editor by clicking the toggle button on the right side of the text editor, which closes the text editor pane. Click the toggle button again to re-open the text editor pane.\n\nChange the target endpoint\n\nTo change the target endpoint of the proxy:
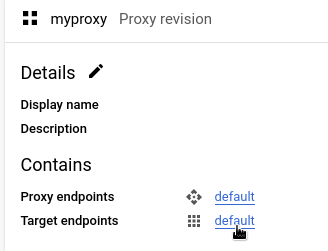
\n\n1. In the **Proxy revision** pane, select **Target Endpoints \\\u003e default** .\n\n 
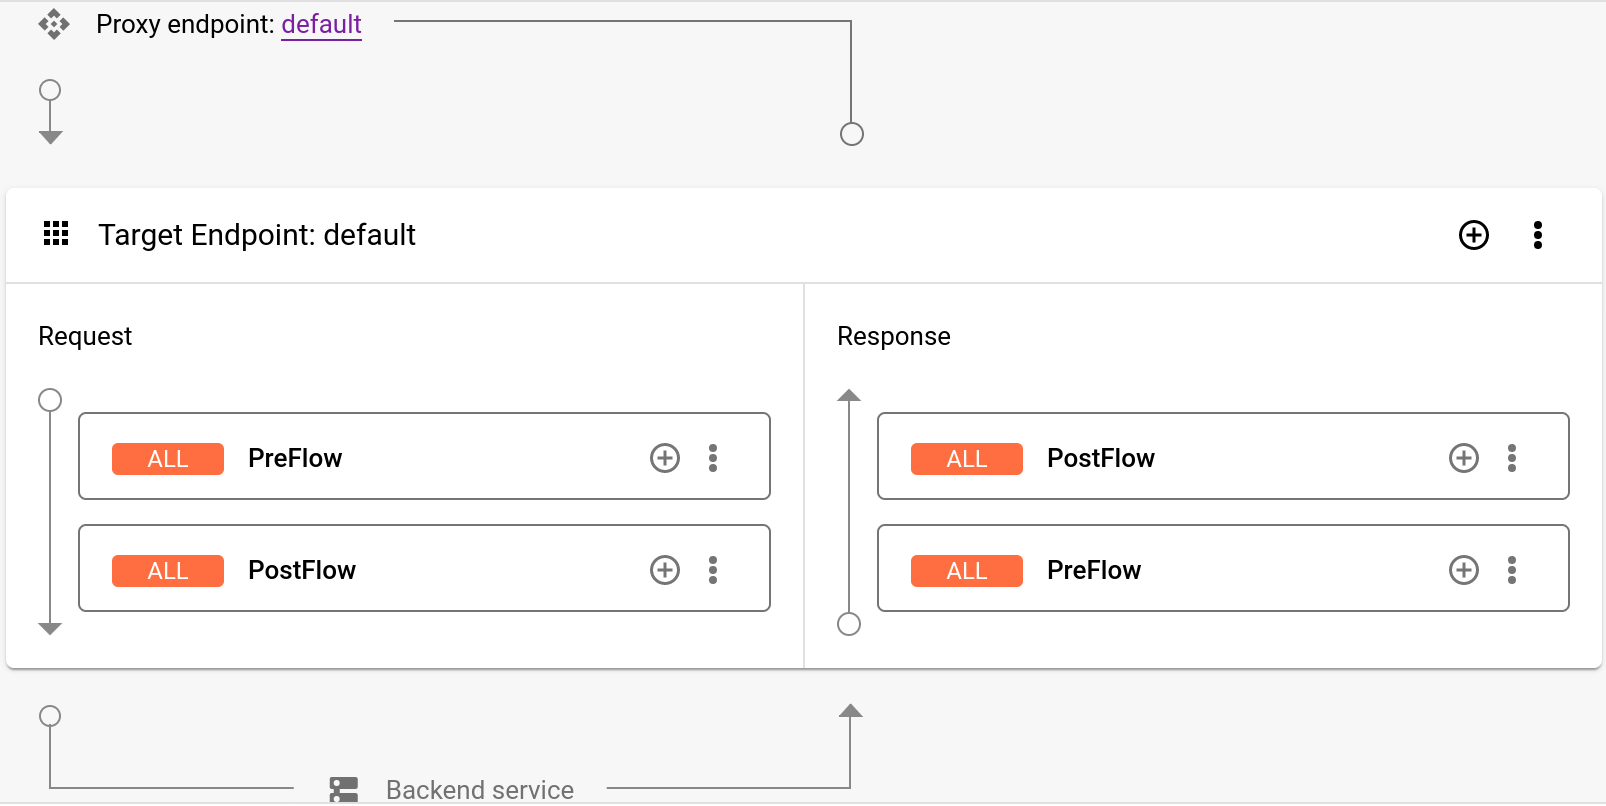
This displays a diagram of the target endpoint in the visual editor:\n\n Below the visual editor, the XML code for the target endpoint is displayed in the text editor:\n\n2. 
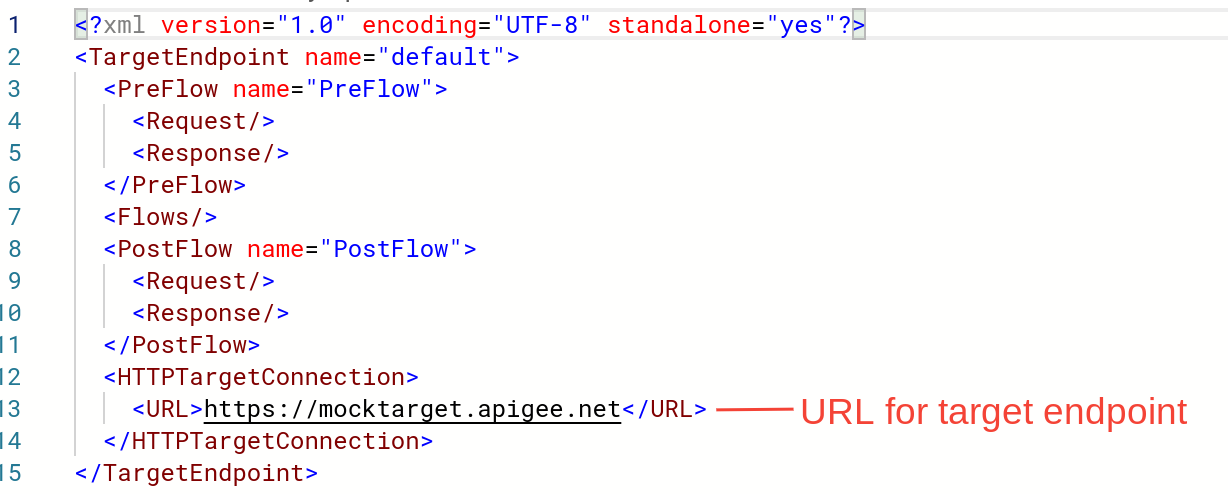
In the text editor, change the `\u003cURL\u003e` to\n `https://mocktarget.apigee.net`**/xml**. (Append \"/xml\" to the existing URL.)\n\n The new URL is shown below: \n\n ```text\n ...\n \u003cHTTPTargetConnection\u003e\n \u003cProperties/\u003e\n \u003cURL\u003ehttps://mocktarget.apigee.net/xml\u003c/URL\u003e\n \u003c/HTTPTargetConnection\u003e\n ...\n ```\n3. Click the arrow next to **Save** at the top right of the Proxy Editor, and select **Save as new revision**.\n4. To deploy your changes, click **Deploy**.\n5. In the **Deploy** dialog, select the revision and environment in which to deploy, and click **Deploy**.\n\nClassic Apigee UI\n\nTo change your proxy's target endpoint:\n\n1. Sign in to the [Apigee UI](https://apigee.google.com).\n2. Select **Develop \\\u003e API Proxies**.\n3. Select your proxy from the list to display the API proxy details. If you don't see your proxy in the list, be sure that you selected the right organization, as described in [Switching between your organizations](/apigee/docs/api-platform/get-started/switch-org).\n4. Click the **Develop** tab:\n\n This takes you to the API Proxy Editor. The Proxy Editor lets you see the structure of your\n API proxy and configure its flow. (A flow is just the stepwise path an API proxy request takes\n through the Apigee platform. Other tutorials will cover the concept of\n *flows*.)\n5. In the **Navigator** pane, select **Target Endpoints \\\u003e\n default \\\u003e PreFlow** :\n\n 
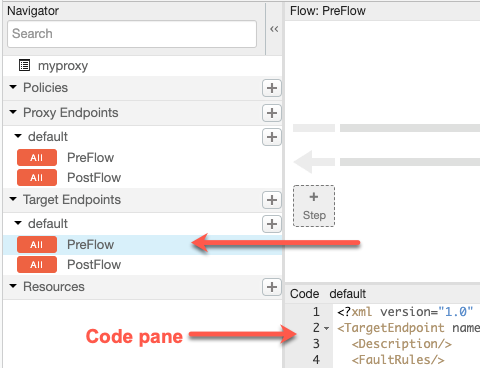
Apigee displays the endpoint settings in the **Code** pane: \n\n ```text\n \u003cTargetEndpoint name=\"default\"\u003e\n \u003cDescription/\u003e\n \u003cFaultRules/\u003e\n \u003cPreFlow name=\"PreFlow\"\u003e\n \u003cRequest/\u003e\n \u003cResponse/\u003e\n \u003c/PreFlow\u003e\n \u003cPostFlow name=\"PostFlow\"\u003e\n \u003cRequest/\u003e\n \u003cResponse/\u003e\n \u003c/PostFlow\u003e\n \u003cFlows/\u003e\n \u003cHTTPTargetConnection\u003e\n \u003cProperties/\u003e\n \u003cURL\u003ehttps://mocktarget.apigee.net\u003c/URL\u003e\n \u003c/HTTPTargetConnection\u003e\n \u003c/TargetEndpoint\u003e\n ```\n\n The target endpoint is defined by the `\u003cHTTPTargetConnection\u003e`\n element.\n6. Change the URL to `\"https://mocktarget.apigee.net`**/xml**`\"`. (Append \"/xml\"\n to the existing URL.)\n\n The new URL returns a small block of XML in the body of the response.\n\n Your endpoint configuration should now look like the following: \n\n ```text\n ...\n \u003cHTTPTargetConnection\u003e\n \u003cProperties/\u003e\n \u003cURL\u003ehttps://mocktarget.apigee.net/xml\u003c/URL\u003e\n \u003c/HTTPTargetConnection\u003e\n ...\n ```\n7. To save your changes to the proxy configuration, click the **Save**\n button.\n\n Apigee saves your changes in a new proxy revision.\n8. To deploy the new revision, select **Deploy to: test** and click **Deploy 2**.\n9. In the confirmation dialog, click **Deploy** .\n\n If there is an error, Apigee will save your changes but not deploy the proxy. In the\n case of an error:\n 1. Fix your proxy configuration. Apigee may provide syntax guidance as a pop-up.\n 2. Manually deploy your changes to the `test` environment by clicking **Deployment \\\u003e test** if Apigee does not automatically deploy it.\n\n You can check if your proxy revision was deployed successfully by viewing the\n deployment revision status adjacent to the Deploy drop-down. For example:\n\nTest the proxy\n\nTo test the API proxy revision, call the proxy just as you did in\n[Call an API proxy](/apigee/docs/api-platform/get-started/test-proxy).\n\nThis time, the mocktarget endpoint returns XML in the body of the response: \n\n```text\n\u003c?xml version=\"1.0\" encoding=\"UTF-8\"?\u003e\n\u003croot\u003e\n \u003ccity\u003eSan Jose\u003c/city\u003e\n \u003cfirstName\u003eJohn\u003c/firstName\u003e\n \u003clastName\u003eDoe\u003c/lastName\u003e\n \u003cstate\u003eCA\u003c/state\u003e\n\u003c/root\u003e\n```\n\nNow that the API proxy returns XML data, in the next step you will add a policy\nthat converts XML to JSON.\n[1](/apigee/docs/api-platform/get-started/create-proxy) [2](/apigee/docs/api-platform/get-started/deploy-proxy) [3](/apigee/docs/api-platform/get-started/test-proxy) [4](/apigee/docs/api-platform/get-started/change-endpoint) [(NEXT) Step 5: Add a policy](/apigee/docs/api-platform/get-started/add-policy)\n\n\u003cbr /\u003e"]]