Diese Seite gilt für Apigee und Apigee Hybrid.
Apigee Edge-Dokumentation aufrufen

Verwenden Sie die Apigee-Benutzeroberfläche oder die API, um einen API-Proxy zu bearbeiten. Das Bearbeiten eines API-Proxys kann das Konfigurieren von Richtlinien, das Konfigurieren von Proxy-Endpunkten, Zielendpunkten und Integrationsendpunkten, das Hinzufügen oder Entfernen von Ablauf-Hooks und das Bereitstellen des Proxys umfassen.
Beim Bearbeiten eines API-Proxys können Sie entscheiden, was mit den resultierenden Änderungen geschehen soll:
- Speichern Sie die Änderungen auf dem Server, erstellen Sie jedoch keine neue Überarbeitung. Dies geschieht, wenn Sie Ihre gespeicherten Änderungen nicht bereitstellen möchten, aber einfach verhindern möchten, dass sie verloren gehen.
OR
- Eine neue API-Proxy-Revision erstellen und im Cluster bereitstellen Sie können keine Änderungen an einem API-Proxy vornehmen, ohne eine neue Version erstellen zu müssen.
Apigee in der Cloud Console
So bearbeiten Sie einen API-Proxy und speichern Ihre Änderungen über die Apigee Cloud Console:
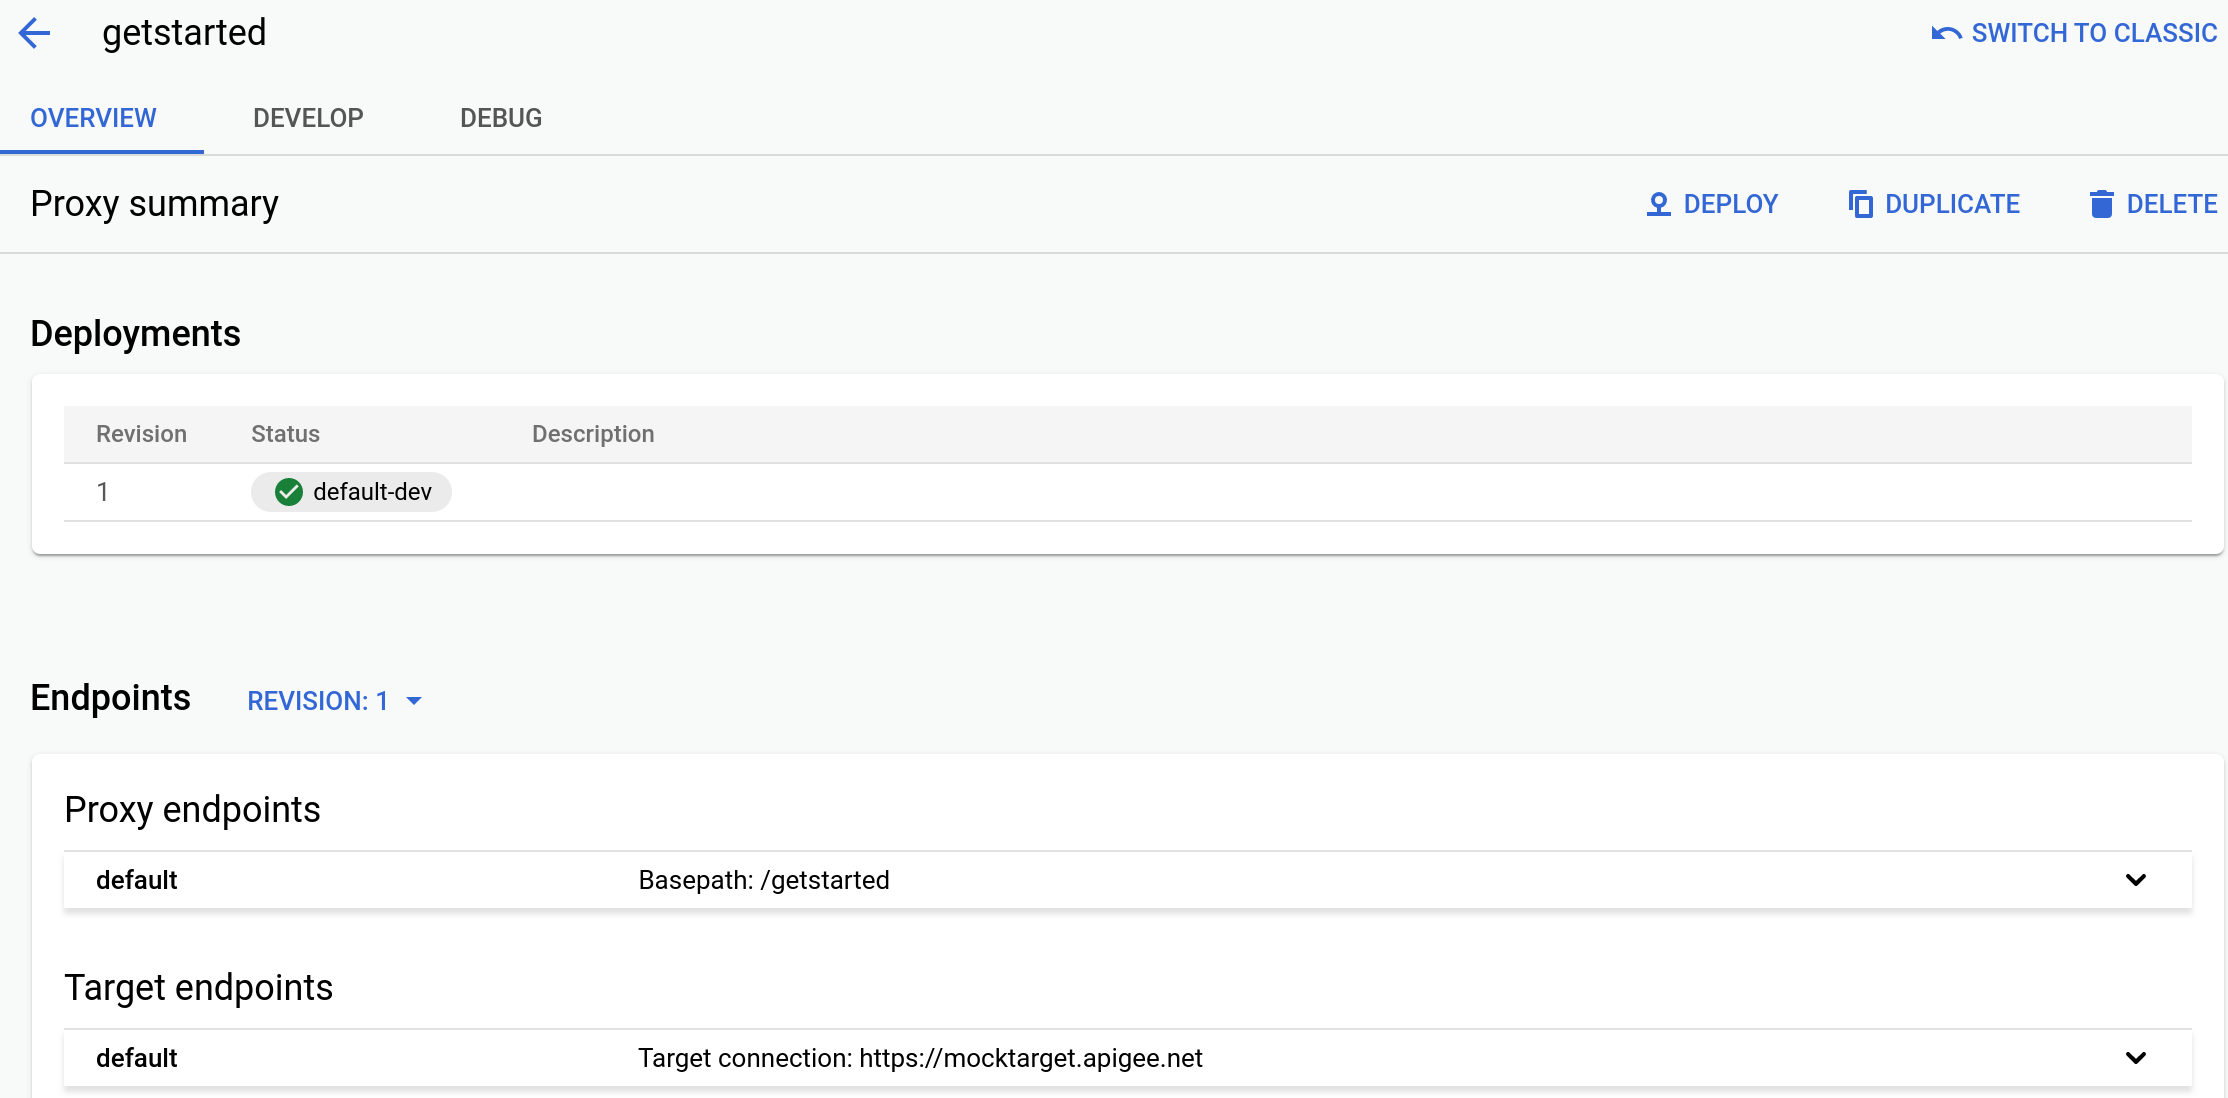
Rufen Sie in der Google Cloud -Konsole die Seite Proxy-Entwicklung > API-Proxys auf.
Wählen Sie den Proxy aus, den Sie bearbeiten möchten. In der Benutzeroberfläche wird der Tab Übersicht für diesen Proxy in der Google Cloud Konsole angezeigt.
- Klicken Sie auf den Tab Entwickeln, um Änderungen am Proxy vorzunehmen.
Wenn Sie beispielsweise eine Richtlinie hinzufügen möchten, klicken Sie neben Richtlinien auf das Symbol +, wählen Sie die hinzuzufügende Richtlinie aus, geben Sie einen Namen und einen optionalen Anzeigenamen ein, klicken Sie auf Erstellen und konfigurieren Sie die Richtlinie in der Benutzeroberfläche.
- Wenn Sie die Änderungen vorgenommen haben, können Sie einen der folgenden Schritte ausführen:
- Klicken Sie auf die Schaltfläche Speichern, um Ihre Änderungen zu speichern, aber keine neue Überarbeitung zu erstellen. Sie sollten dies regelmäßig tun, um sicherzustellen, dass Ihre Änderungen nicht verloren gehen, wenn Sie die Sitzung beenden.
- Klicken Sie auf das Drop-down-Menü neben der Schaltfläche Speichern und wählen Sie Als neue Überarbeitung speichern, um Ihre Änderungen als neue Überarbeitung zu speichern:
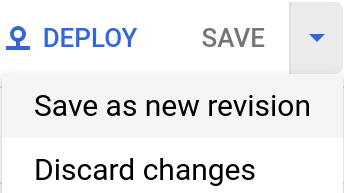
Die Apigee-UI speichert Ihre Änderungen und generiert eine neue Überarbeitung des Proxys für Sie. Das neue Bundle wird nicht in der Laufzeit bereitgestellt. Sie müssen dies explizit tun, wie unter API-Proxy bereitstellen beschrieben.
Klassisches Apigee
So bearbeiten Sie mit dem klassischen Proxy-Editor einen API-Proxy und speichern Ihre Änderungen:
- Melden Sie sich bei der Apigee-UI an.
- Klicken Sie in der Hauptansicht auf API-Proxys.
Alternativ können Sie im linken Navigationsmenü die Option Entwickeln auswählen.
Wählen Sie die Umgebung aus, die den Proxy enthält, den Sie bearbeiten möchten.
In der Apigee-Benutzeroberfläche wird eine Liste der API-Proxys für die ausgewählte Umgebung angezeigt:

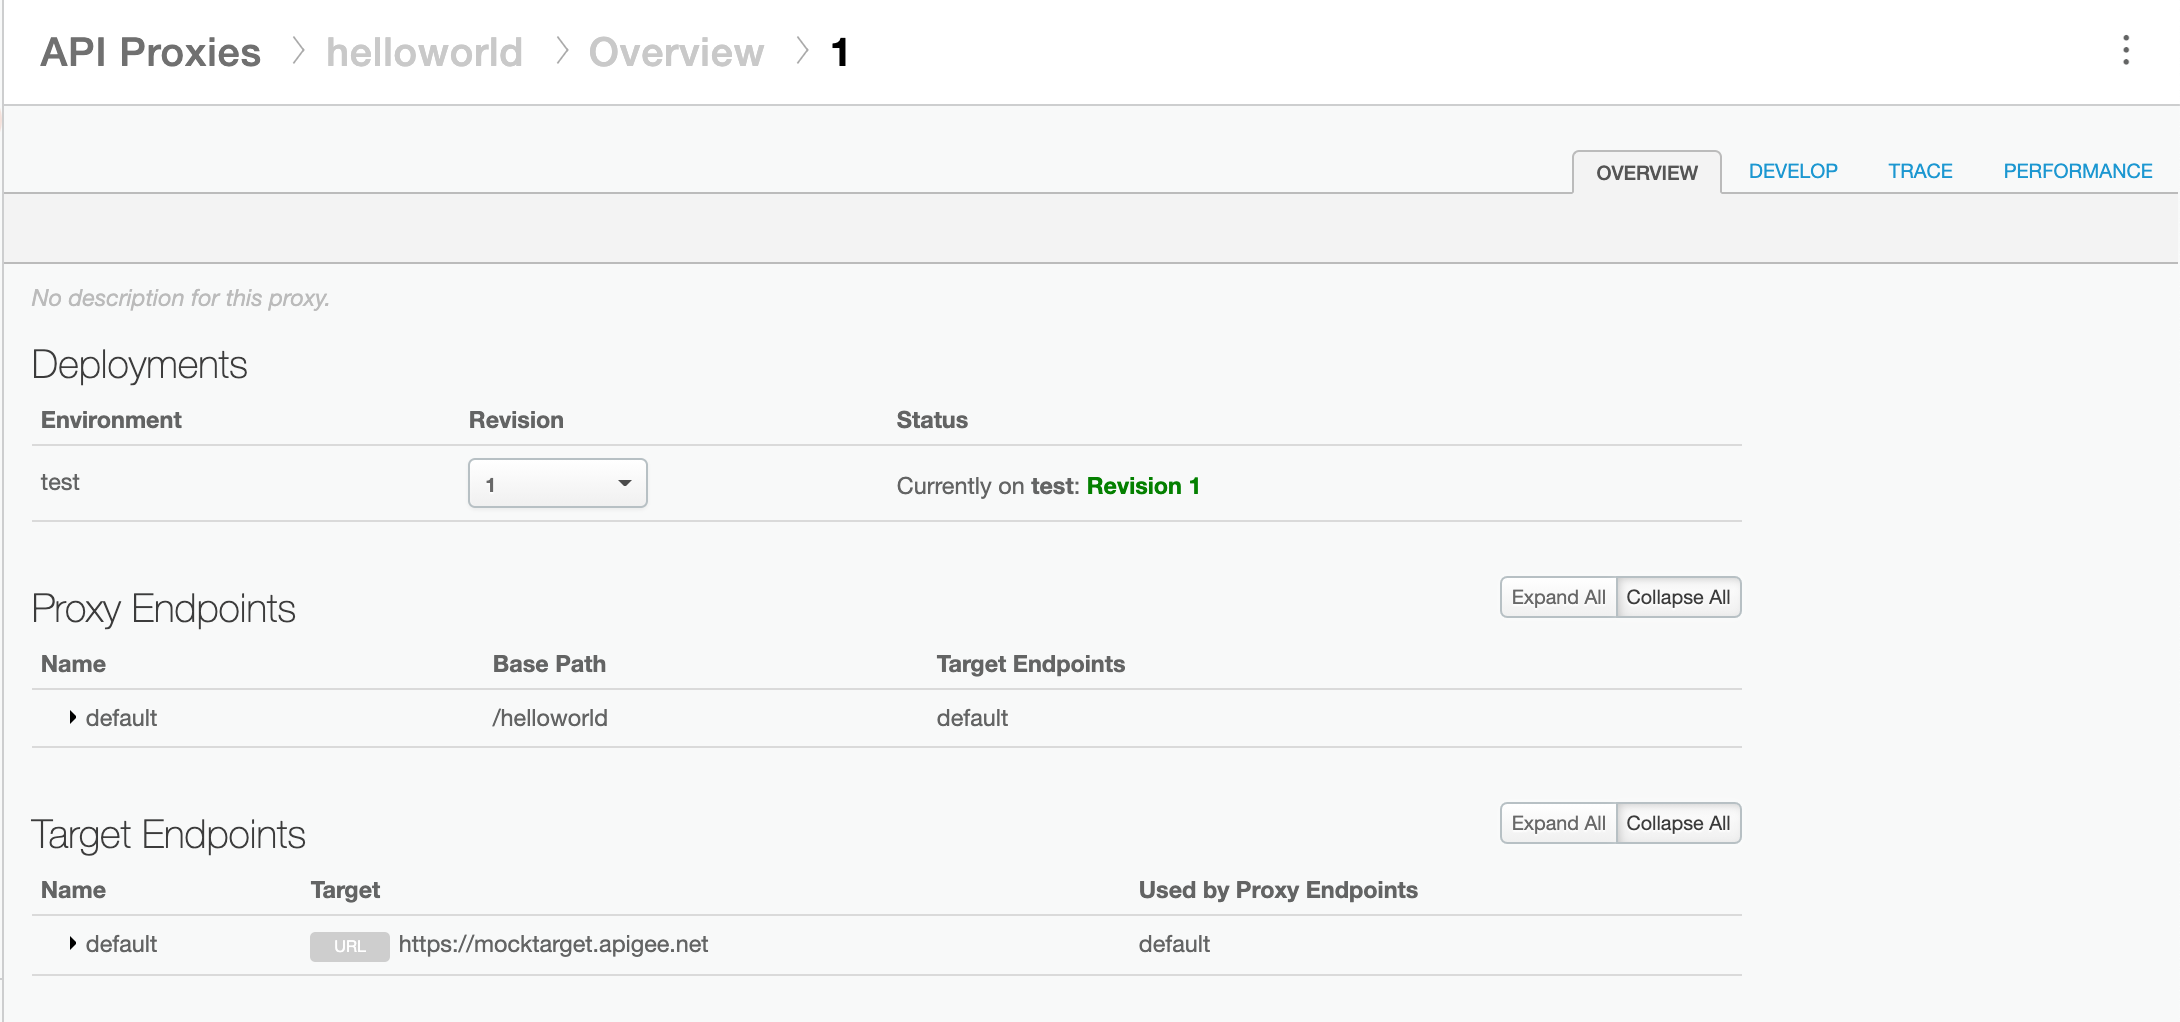
- Klicken Sie auf den Proxy, den Sie bearbeiten möchten. In der UI wird der Tab Übersicht für diesen Proxy im Proxy-Editor angezeigt:
- Klicken Sie oben rechts in der Ansicht auf den Tab Entwickeln.
- Verwenden Sie den Proxy-Editor, um Änderungen am Proxy vorzunehmen. Wenn Sie die Änderungen vorgenommen haben, können Sie einen der folgenden Schritte ausführen:
- Speichern Sie Ihre Änderungen, erstellen Sie aber keine neue Überarbeitung (häufig verwendet). Sie sollten dies regelmäßig tun, um sicherzustellen, dass Ihre Änderungen nicht verloren gehen, wenn Sie die Sitzung beenden.
- Speichern Sie die Änderungen als neue Überarbeitung, wenn Sie für die Bereitstellung und den Test bereit sind.
- Um zu speichern, aber keine neue Überarbeitung zu erstellen, klicken Sie oben rechts in der Benutzeroberfläche auf Speichern:

Die Apigee-UI speichert Ihre Änderungen, damit Sie die Seite verlassen und später weiterarbeiten können.
- So speichern Sie Ihre Änderungen als neue Überarbeitung: Klicken Sie auf den Drop-down-Pfeil neben der Schaltfläche Speichern und wählen Sie Als neue Überarbeitung speichern aus:
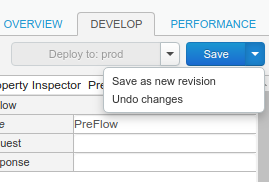
Die Apigee-UI speichert Ihre Änderungen und generiert ein neues Proxy-Bundle für Sie. Das neue Bundle wird nicht in der Laufzeit bereitgestellt. Sie müssen dies explizit tun, wie unter API-Proxy bereitstellen beschrieben.
In der UI wird die Meldung Neue Überarbeitung gespeichert angezeigt:

Nachdem Sie eine neue Überarbeitung erstellt haben, stellen Sie diese normalerweise in Ihrem Cluster bereit, wie unter API-Proxy bereitstellen erläutert.
Apigee API
Bearbeiten Sie einen API-Proxy, um eine Überarbeitung in Ihrer Apigee-Organisation zu erstellen. Senden Sie dazu eine POST-Anfrage an die folgende Ressource:
https://apigee.googleapis.com/v1/organizations/$ORG/apis
Sie müssen den Namen des API-Proxys mit dem Abfrageparameter name definieren. Die im Namen verwendeten Zeichen sollten auf folgende begrenzt sein: A-Za-z0-9._\-$ %
Optional können Sie ein API-Proxy-Konfigurationsset mit den folgenden Schritten importieren:
- Setzen Sie den Abfrageparameter
actionaufimport. - Setzen Sie den
Content-type-Header aufmultipart/form-data. - Übergeben Sie den Namen des API-Proxy-Konfigurationssets auf Ihrem lokalen Dateisystem.
Das folgende Beispiel zeigt, wie Sie einen API-Proxy erstellen, indem Sie mithilfe der API ein API-Proxy-Konfigurations-Bundle (helloworld-config.zip) in Ihr lokales Dateisystem importieren.
export TOKEN=$(gcloud auth print-access-token)
export ORG=ORGANIZATION_NAME
curl "https://apigee.googleapis.com/v1/organizations/$ORG/apis?name=helloworld&action=import" \
  -X POST \
  -H "Authorization: Bearer $TOKEN" \
  -H "Content-type: multipart/form-data" \
  -F "file=@helloworld-config.zip"
Dabei ist $TOKEN auf Ihr OAuth 2.0-Zugriffstoken festgelegt. Weitere Informationen hierzu finden Sie unter OAuth 2.0-Zugriffstoken abrufen. Informationen zu den in diesem Beispiel verwendeten curl-Optionen finden Sie unter curl verwenden. Eine Beschreibung der Umgebungsvariablen, die Sie verwenden können, finden Sie unter Umgebungsvariablen für Apigee API-Anfragen festlegen.
Im Folgenden finden Sie ein Beispiel für die Antwortausgabe:
{
  "basepaths": [
    "/helloworld"
  ],
  "configurationVersion": {
    "majorVersion": 4
  },
  "createdAt": "1559145292799",
  "displayName": "helloworld",
  "entityMetaDataAsProperties": {
    "bundle_type": "zip",
    "subType": "Proxy",
    "lastModifiedAt": "1559145292799",
    "createdAt": "1559145292799"
  },
  "lastModifiedAt": "1559145292799",
  "name": "helloworld",
  "policies": [
    "verify-api-key",
    "remove-query-param-apikey",
    "OAuth-v20-1"
  ],
  "proxies": [
    "default"
  ],
  "proxyEndpoints": [
    "default"
  ],
  "resourceFiles": {},
  "targetEndpoints": [
    "default"
  ],
  "targets": [
    "default"
  ],
  "type": "Application",
  "revision": "1",
  "description": "Hello world"
}
Weitere Informationen zum Erstellen eines API-Proxys finden Sie in der Apigee API unter der Methode apis.create. Alle für API-Proxys verfügbaren Methoden finden Sie unter API Proxies API.