이 페이지는 Apigee 및 Apigee Hybrid에 적용됩니다.
Apigee Edge 문서 보기

다음 섹션에 설명된 대로 Apigee UI 또는 API를 사용해서 프록시를 만듭니다.
API 프록시 기본 필드
API 프록시를 만들 때는 다음 가이드라인을 따르세요.
| 필드 | 설명 |
|---|---|
| API 프록시 이름 | API에 표시되는 이름입니다. 영숫자 문자, 대시(-) 또는 밑줄 (_)을 사용하여 지정하세요. |
| API 프록시 기본 경로 | API 프록시의 http://[host] 또는 https://[host] 주소 뒤에 표시되는 URI 프래그먼트입니다. Apigee는 기본 경로 URI를 사용하여 수신되는 요청 메시지를 적절한 API 프록시에 일치시키고 라우팅합니다.
기본 경로에 와일드 카드 사용 API 프록시 기본 경로에서 하나 이상의 와일드 카드를 사용하여 API 프록시를 향후에 대해 보호합니다.
두 개의 |
| 설명 | (선택사항) API 프록시에 대한 설명입니다. |
| 대상/백엔드 대상 URL | 이 API 프록시가 호출하는 백엔드 서비스의 URL(HTTP 또는 HTTPS 포함)입니다. |
| 스페이스바 | (선택사항) 조직에 Apigee 스페이스가 사용 설정된 경우 API 프록시를 스페이스와 연결할 수 있습니다. 자세한 내용은 Apigee 스페이스 개요를 참고하세요. |
API 프록시를 만드는 단계
UI 또는 API를 사용하여 API 프록시를 만들려면 다음 단계를 따르세요.
Cloud 콘솔의 Apigee
Cloud 콘솔의 Apigee에서 프록시를 만들려면 다음 안내를 따르세요.
Google Cloud 콘솔에서 프록시 개발 > API 프록시 페이지로 이동합니다.
- API 프록시 창에서 + 만들기를 클릭합니다.
- 프록시 만들기 창의 프록시 템플릿에서 리버스 프록시(가장 일반적)를 선택합니다.
- 프록시 세부정보 아래에서 다음을 입력합니다.
- 프록시 이름:
myproxy와 같은 프록시 이름을 입력합니다. - 기본 경로:
Proxy name에 입력하는 값으로 자동 설정됩니다. 기본 경로는 API에 요청을 수행하는 데 사용되는 URL의 일부입니다. Apigee는 URL을 사용하여 수신 요청을 적절한 API 프록시로 일치시키며 라우팅합니다. - 설명(선택사항): '간단한 프록시로 Apigee 테스트'와 같이 새 API 프록시에 설명을 입력합니다.
- 대상(기존 API):
https://mocktarget.apigee.net을 입력합니다. 이는 Apigee가 API 프록시에 대한 요청에서 호출하는 대상 URL을 정의합니다. mocktarget 서비스는 Apigee에서 호스팅되며 간단한 데이터를 반환합니다. API 키 또는 액세스 토큰이 필요하지 않습니다. - 스페이스(선택사항): 조직에서 Apigee 스페이스를 사용 설정한 경우 사용 가능한 옵션 목록에서 선택한 스페이스와 API 프록시를 연결할 수 있습니다. 자세한 내용은 Apigee 스페이스 개요를 참고하세요.
- 다음을 클릭합니다.
- 프록시 이름:
- 배포(선택사항):
- 배포 환경: 선택사항. 체크박스를 사용해서 프록시를 배포하려는 환경을 하나 이상 선택합니다. 이 시점에서 프록시를 배포하지 않으려면 배포 환경 필드를 비워 둡니다. 나중에 언제든지 프록시를 배포할 수 있습니다.
- 서비스 계정: 선택사항. 서비스 계정의 역할 및 권한에 지정된 대로 배포에 서비스 계정을 연결하여 Google Cloud 서비스에 액세스하도록 프록시를 사용 설정합니다.
- 만들기를 클릭합니다.
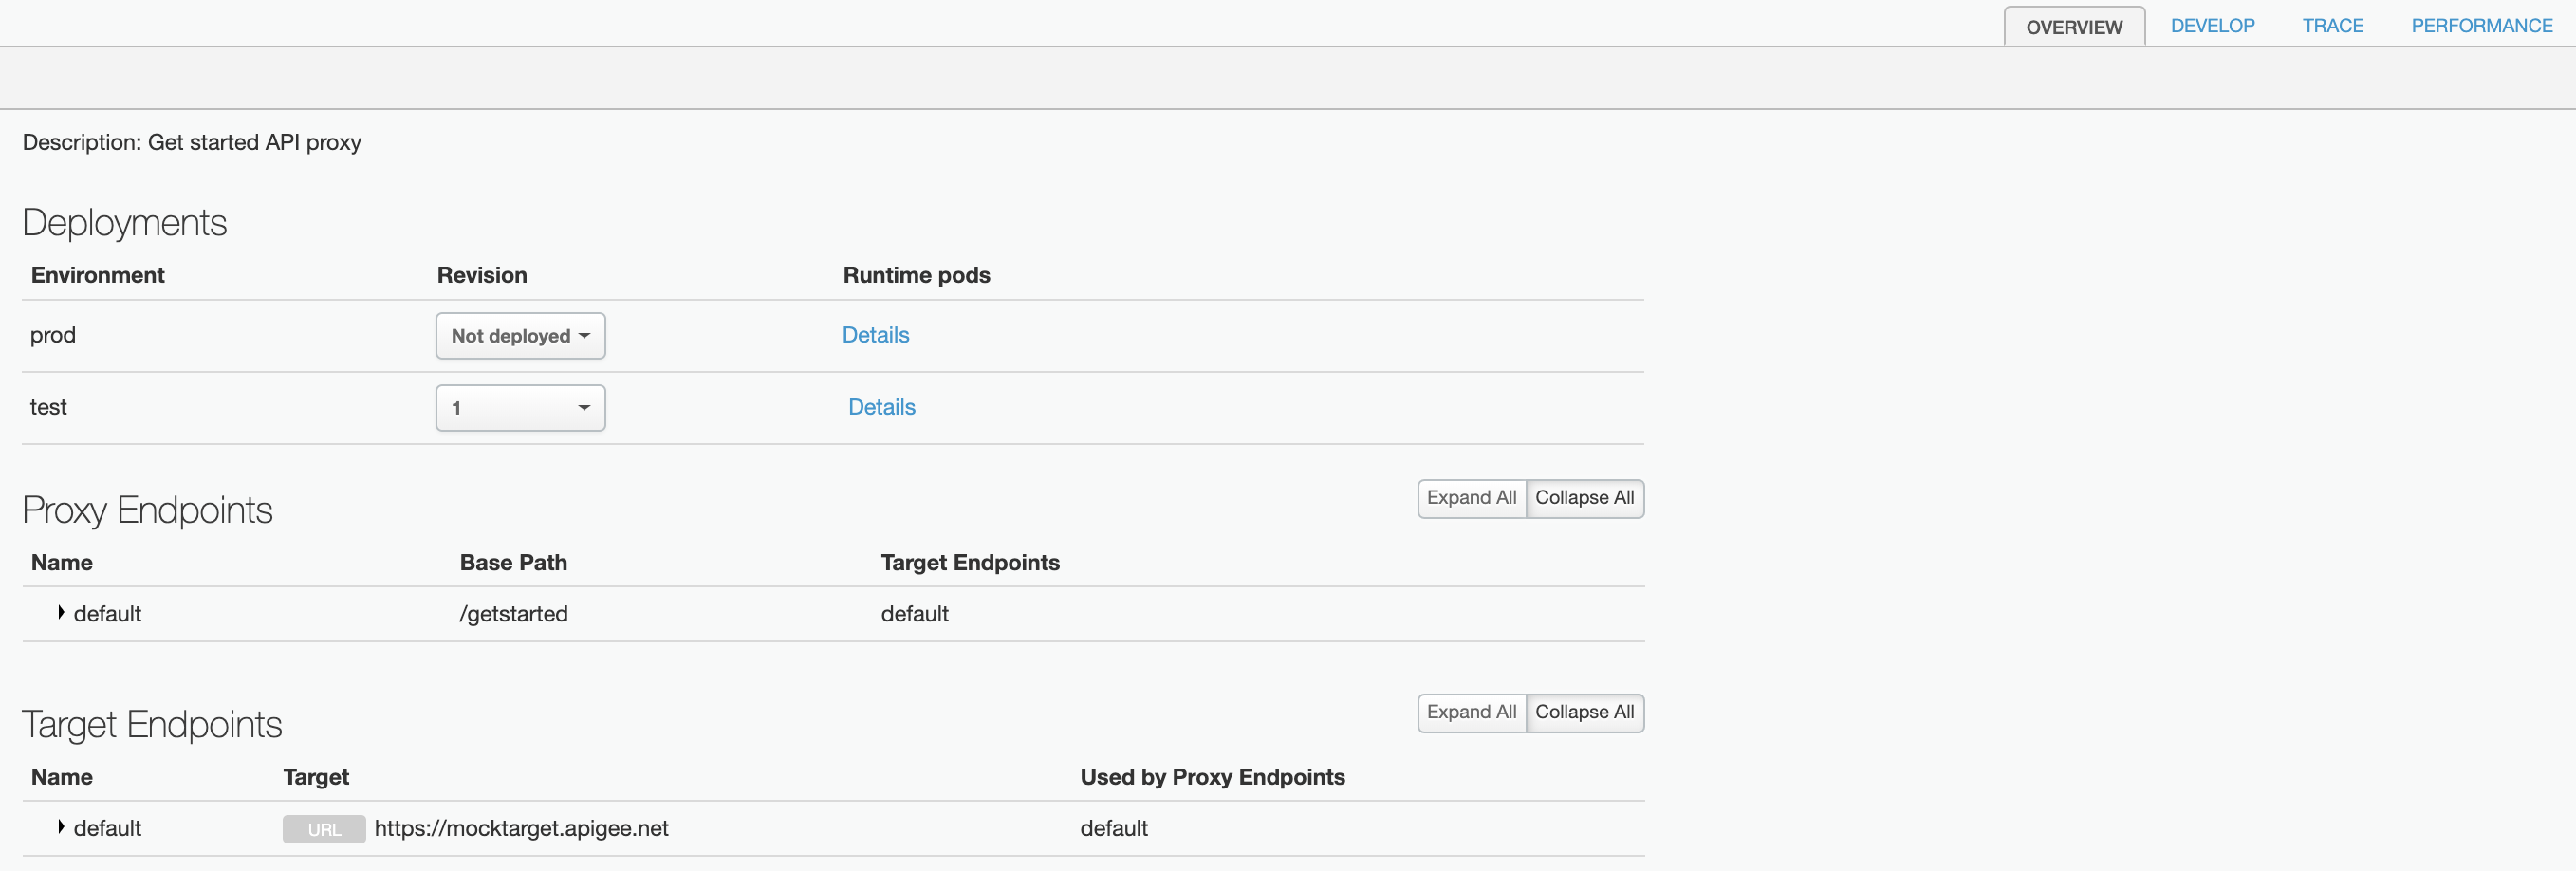
Apigee는 새 프록시를 만들고 프록시 요약 뷰에 프록시 세부정보 요약을 표시합니다.
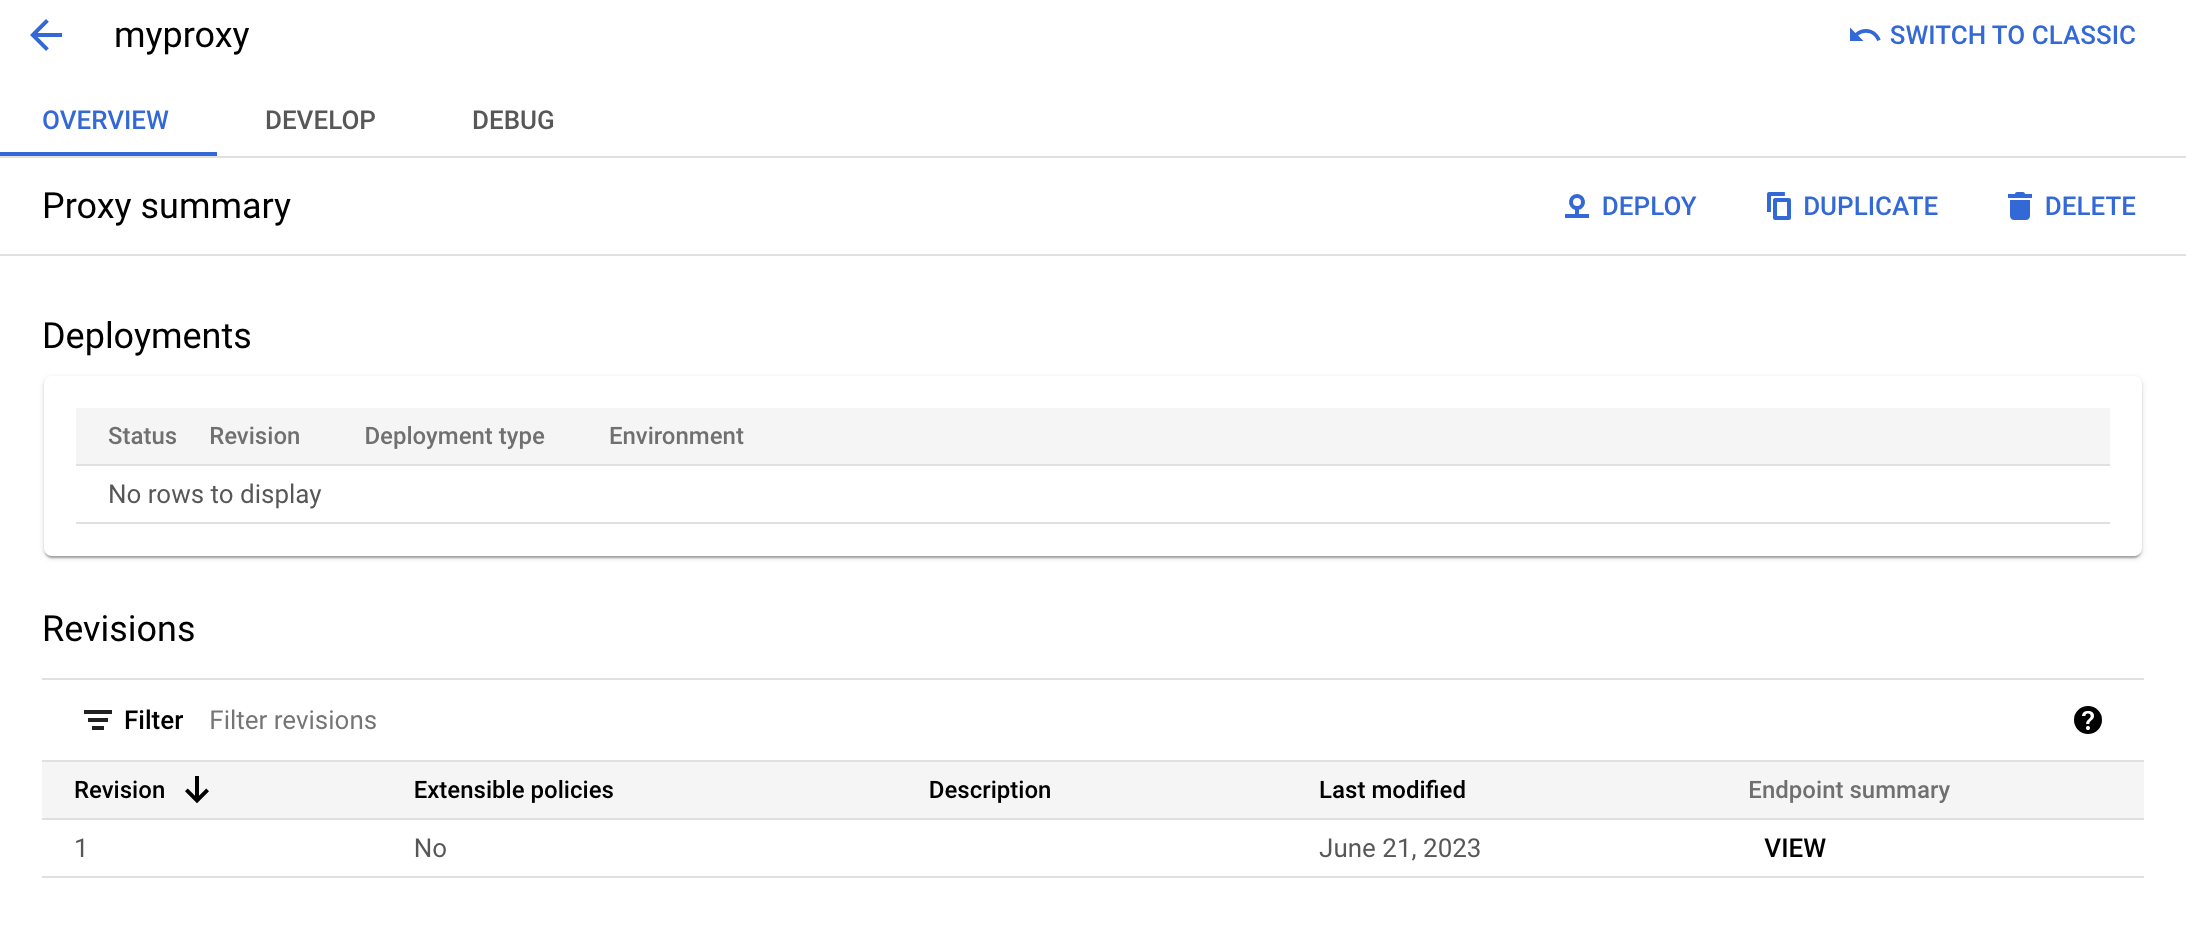
프록시를 배포하도록 선택하는 경우 배포 섹션에 처음 배포할 때 버전 번호 1이 표시됩니다. 상태 열에 프록시가 배포된 환경이 녹색 상태 표시기와 함께 표시됩니다.
기본 Apigee
기본 Apigee UI에서 간단한 API 프록시를 만들려면 다음 안내를 따르세요.
- Apigee UI에 로그인합니다.
- 기본 뷰에서 API 프록시를 클릭합니다.
- 환경 드롭다운 목록에서 새 API 프록시를 만들 환경을 선택합니다.
하이브리드 UI는 해당 환경의 API 프록시 목록을 표시합니다. 아직 프록시를 만들지 않았다면 목록은 비어 있습니다.
- 새로 만들기를 클릭합니다.
프록시 만들기 마법사가 시작됩니다.
- 리버스 프록시(가장 일반적)를 클릭합니다.

프록시 세부정보 페이지가 표시됩니다.
- 다음 설정으로 프록시를 구성합니다.
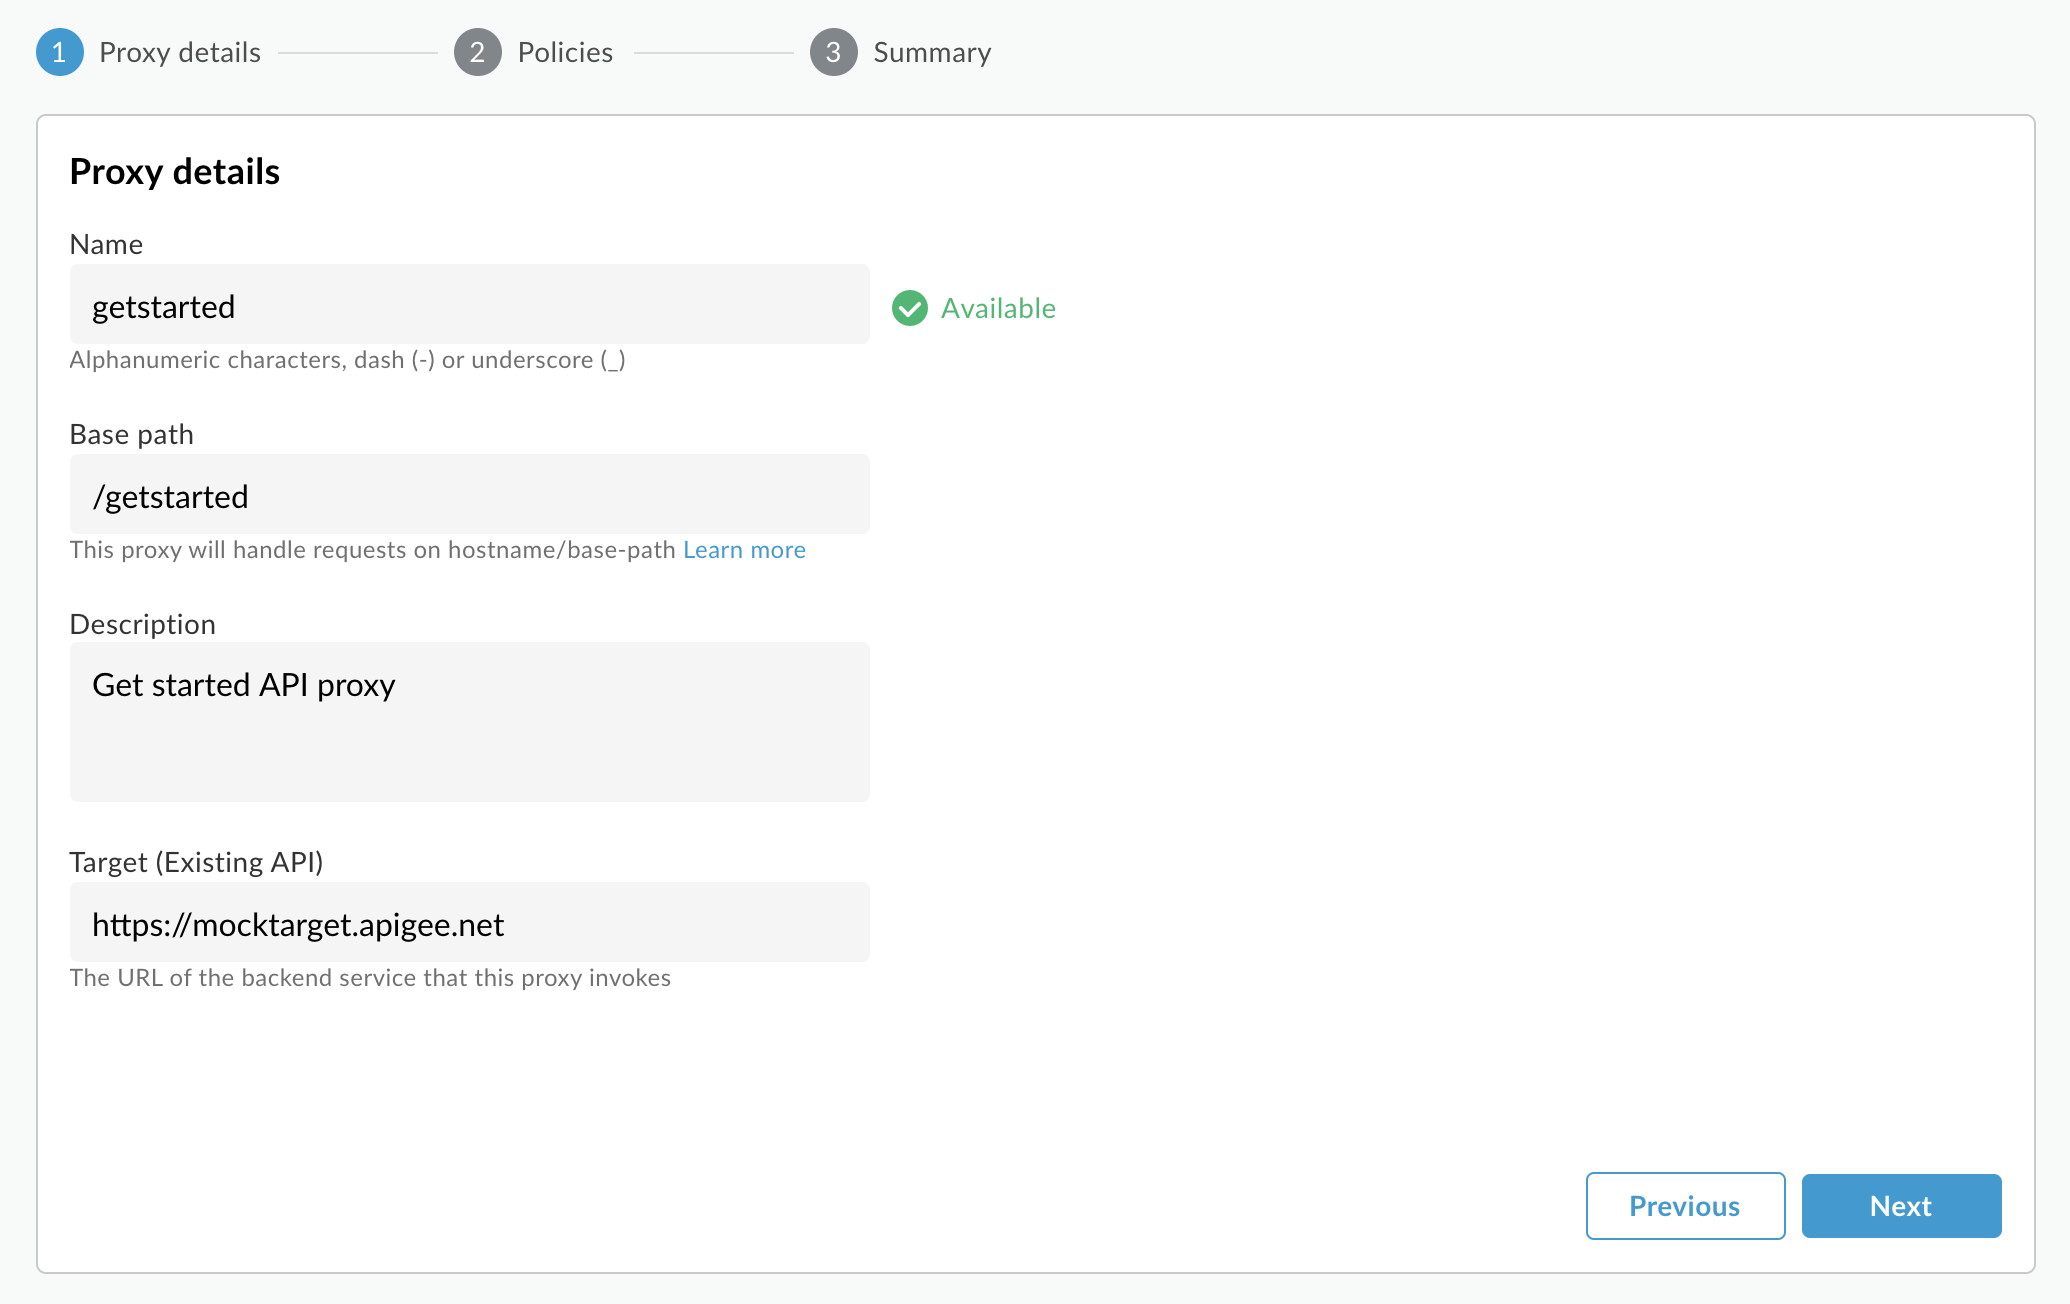
- 이름:
getstarted를 입력합니다. 이 이름을 가진 프록시가 이미 있는 경우 다른 이름을 선택합니다. - 기본 경로:
/getstarted로 설정된 상태로 둡니다. 기본 경로는 API에 요청을 수행하는 데 사용되는 URL의 일부입니다. Apigee는 URL을 사용하여 수신 요청을 적절한 API 프록시로 일치시키며 라우팅합니다. - 설명(선택사항): 새 API 프록시에 대한 설명을 입력합니다(예:
Get started API proxy). - 대상(기존 API):
https://mocktarget.apigee.net을 입력합니다. 이는 Apigee가 API 프록시에 대한 요청에서 호출하는 대상 URL을 정의합니다. mocktarget 서비스는 Apigee에서 호스팅되며 간단한 데이터를 반환합니다. API 키 또는 액세스 토큰이 필요하지 않습니다.
API 프록시의 세부정보는 다음과 같아야 합니다.
- 이름:
- 다음을 클릭합니다.
- 일반 정책 보기의 보안: 승인에서 통과(승인 없음)를 선택합니다.
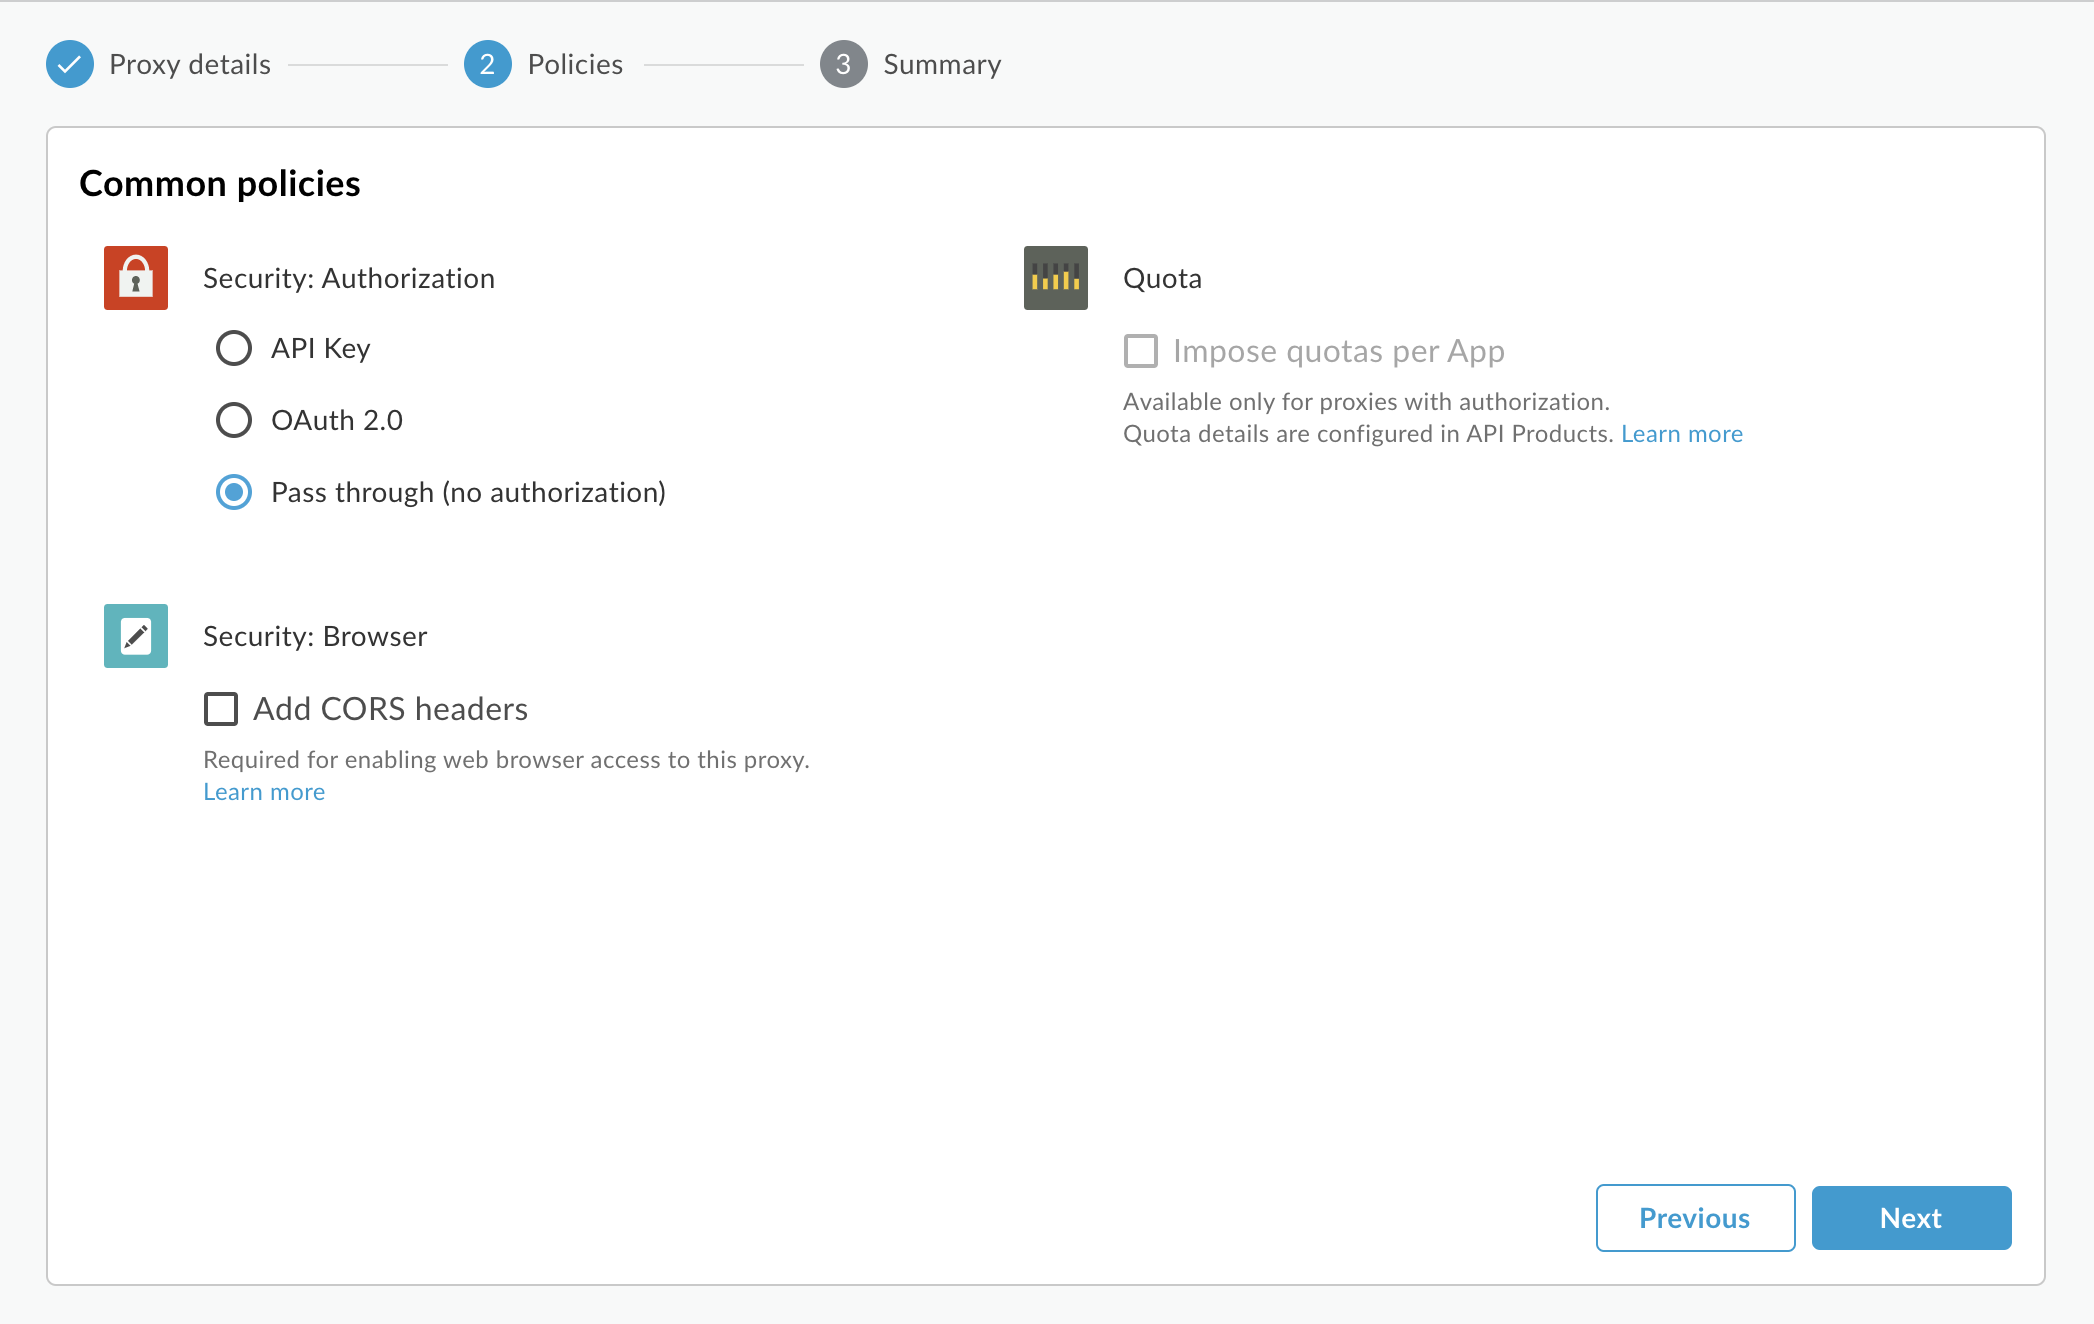
- 다음을 클릭합니다.
- 요약 페이지에서 배포 환경을 선택하고, 원하는 경우 만들기 및 배포를 클릭합니다.
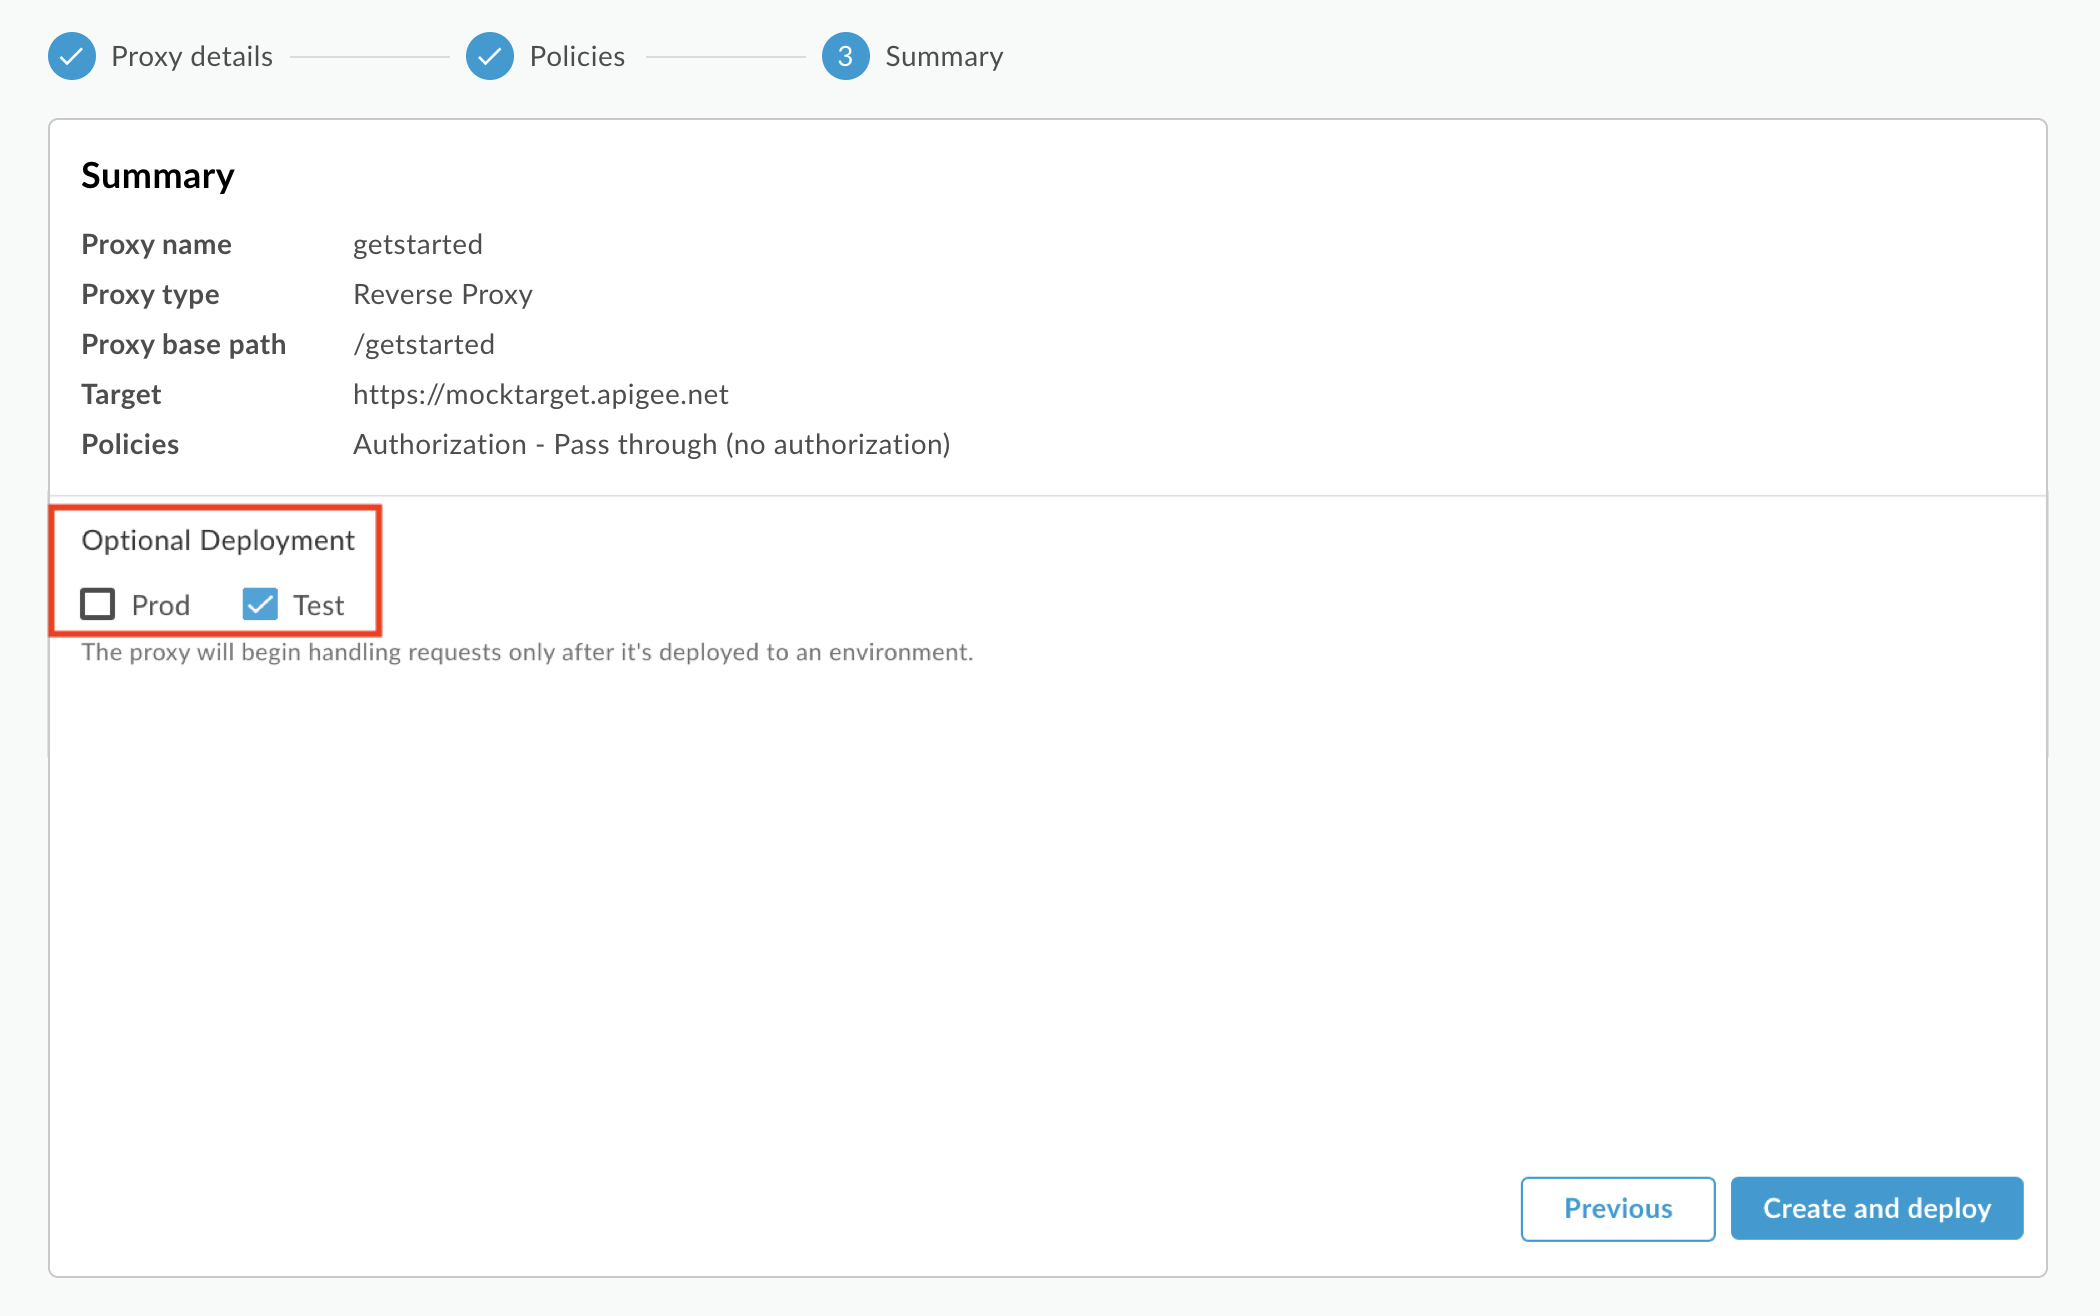
새 API 프록시가 생성되고 선택한 환경에 배포됩니다.
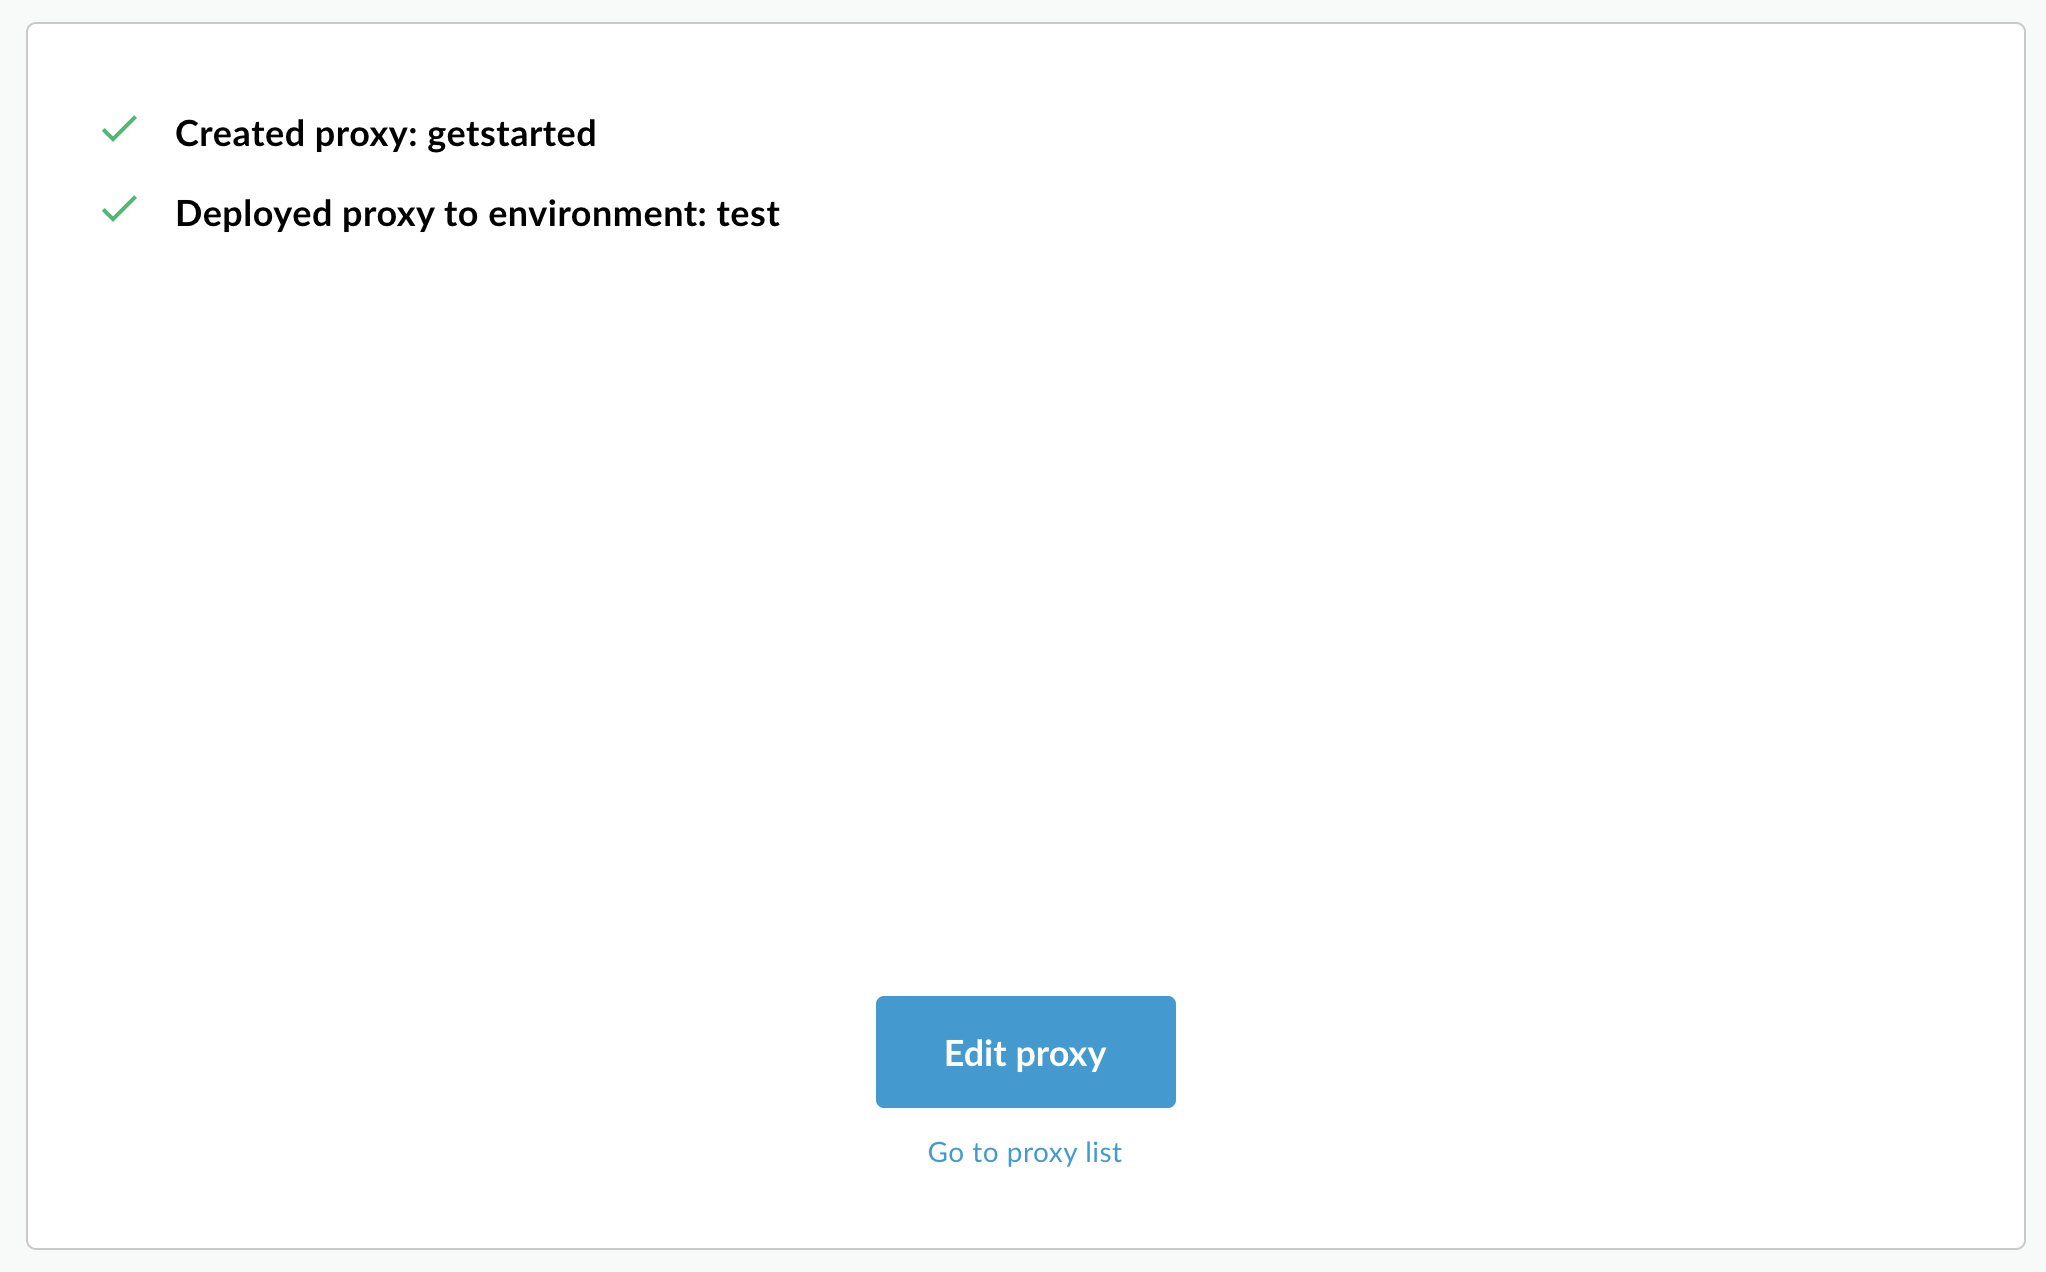
- 프록시 수정을 클릭하여 프록시 편집기의 개요 탭을 표시합니다.
API 프록시 목록에서 getstarted API 프록시 배포 상태는 test 환경의 녹색입니다.

Apigee API
다음 리소스에 POST 요청을 실행하여 Apigee 조직에 API 프록시를 만듭니다.
https://apigee.googleapis.com/v1/organizations/$ORG/apis
name 쿼리 매개변수를 사용하여 API 프록시의 이름을 정의해야 합니다. 이름에 사용된 문자를 A-Za-z0-9._\-$ %로 제한합니다.
선택적으로 다음 단계를 수행하여 API 프록시 구성 번들을 가져올 수 있습니다.
action쿼리 매개변수를import로 설정합니다.Content-type헤더를multipart/form-data로 설정합니다.- 로컬 파일 시스템에서 API 프록시 구성 번들의 이름을 전달합니다.
다음 예시에서는 API를 사용하여 로컬 파일 시스템에서 API 프록시 구성 번들(helloworld-config.zip)을 가져와 API 프록시를 만드는 방법을 보여줍니다.
curl "https://apigee.googleapis.com/v1/organizations/$ORG/apis?name=helloworld&action=import" \
  -X POST \
  -H "Authorization: Bearer $TOKEN" \
  -H "Content-type: multipart/form-data" \
  -F "file=@helloworld-config.zip"
$TOKEN를 OAuth 2.0 액세스 토큰 가져오기에 설명된 대로 OAuth 2.0 액세스 토큰으로 설정합니다. 이 예시에서 사용된 curl 옵션에 대한 자세한 내용은 curl 사용을 참조하세요. 사용할 수 있는 환경 변수에 대한 설명은 Apigee API 요청에 대한 환경 변수 설정을 참고하세요.
다음은 응답 출력의 예시입니다.
{
  "basepaths": [
    "/helloworld"
  ],
  "configurationVersion": {
    "majorVersion": 4
  },
  "createdAt": "1559145292799",
  "displayName": "helloworld",
  "entityMetaDataAsProperties": {
    "bundle_type": "zip",
    "subType": "Proxy",
    "lastModifiedAt": "1559145292799",
    "createdAt": "1559145292799"
  },
  "lastModifiedAt": "1559145292799",
  "name": "helloworld",
  "policies": [
    "verify-api-key",
    "remove-query-param-apikey",
    "OAuth-v20-1"
  ],
  "proxies": [
    "default"
  ],
  "proxyEndpoints": [
    "default"
  ],
  "resourceFiles": {},
  "targetEndpoints": [
    "default"
  ],
  "targets": [
    "default"
  ],
  "type": "Application",
  "revision": "1",
  "description": "Hello world"
}
API 프록시 만들기에 대한 자세한 내용은 Apigee API에서 apis.create 메서드를 참조하세요. API 프록시에 사용할 수 있는 모든 메서드를 보려면 API 프록시 API를 참조하세요.
다음 단계
간단한 API 프록시를 만든 후에는 일반적으로 다음 중 하나를 수행합니다.
- API 및 API 프록시 이해에 설명된 대로 Apigee 플랫폼의 정책, 보안, 기타 기능을 추가합니다.
- API 프록시 배포에 설명된 대로 클러스터에 배포합니다.