Crie um proxy na IU da Apigee ou usando a API, conforme descrito nas seções a seguir.
Campos principais do proxy de API
Siga estas diretrizes ao criar um proxy de API:
Campo
Descrição
Nome do proxy da API
Nome exibido para a API. Especifique caracteres alfanuméricos, traço (-) ou sublinhado (_).
Caminho básico do proxy de API
Fragmento de URI que aparece após o endereço http://[host] ou https://[host] do proxy de
API. A Apigee usa o URI do caminho base para corresponder e encaminhar as mensagens de solicitação recebidas
para o proxy da API adequado.
Usar caracteres curinga em caminhos de base
Use um ou mais caracteres curinga nos caminhos de base do proxy de API para preparar seus proxies para o futuro.
Permitimos a especificação de um único caractere curinga * entre duas barras /: /*/.
Por exemplo, um caminho base de /team/*/members permite que os clientes chamem
https://[host]/team/blue/members e https://[host]/team/green/members sem
que você precise criar novos proxies de API para dar suporte a novas equipes.
É possível substituir qualquer número de tokens no basepath seguindo este padrão.
Outros padrões, incluindo /**, /something* ou /*something, não são compatíveis.
Descrição
(Opcional). Uma descrição do proxy de API.
URL de destino/destino de back-end
URL (incluindo HTTP ou HTTPS) do serviço de back-end que este proxy de API invoca.
Espaço
(Opcional) Se a sua organização tiver o Apigee Spaces ativado, você poderá associar o proxy de API a um espaço.
Para mais informações, consulte Visão geral do Apigee Spaces.
Etapas para criar um proxy de API
Para criar um proxy de API usando a UI ou as APIs:
Apigee no console do Cloud
Para criar um proxy na Apigee no Console do Cloud:
No console do Google Cloud , acesse a página Desenvolvimento de proxy > Proxies de API.
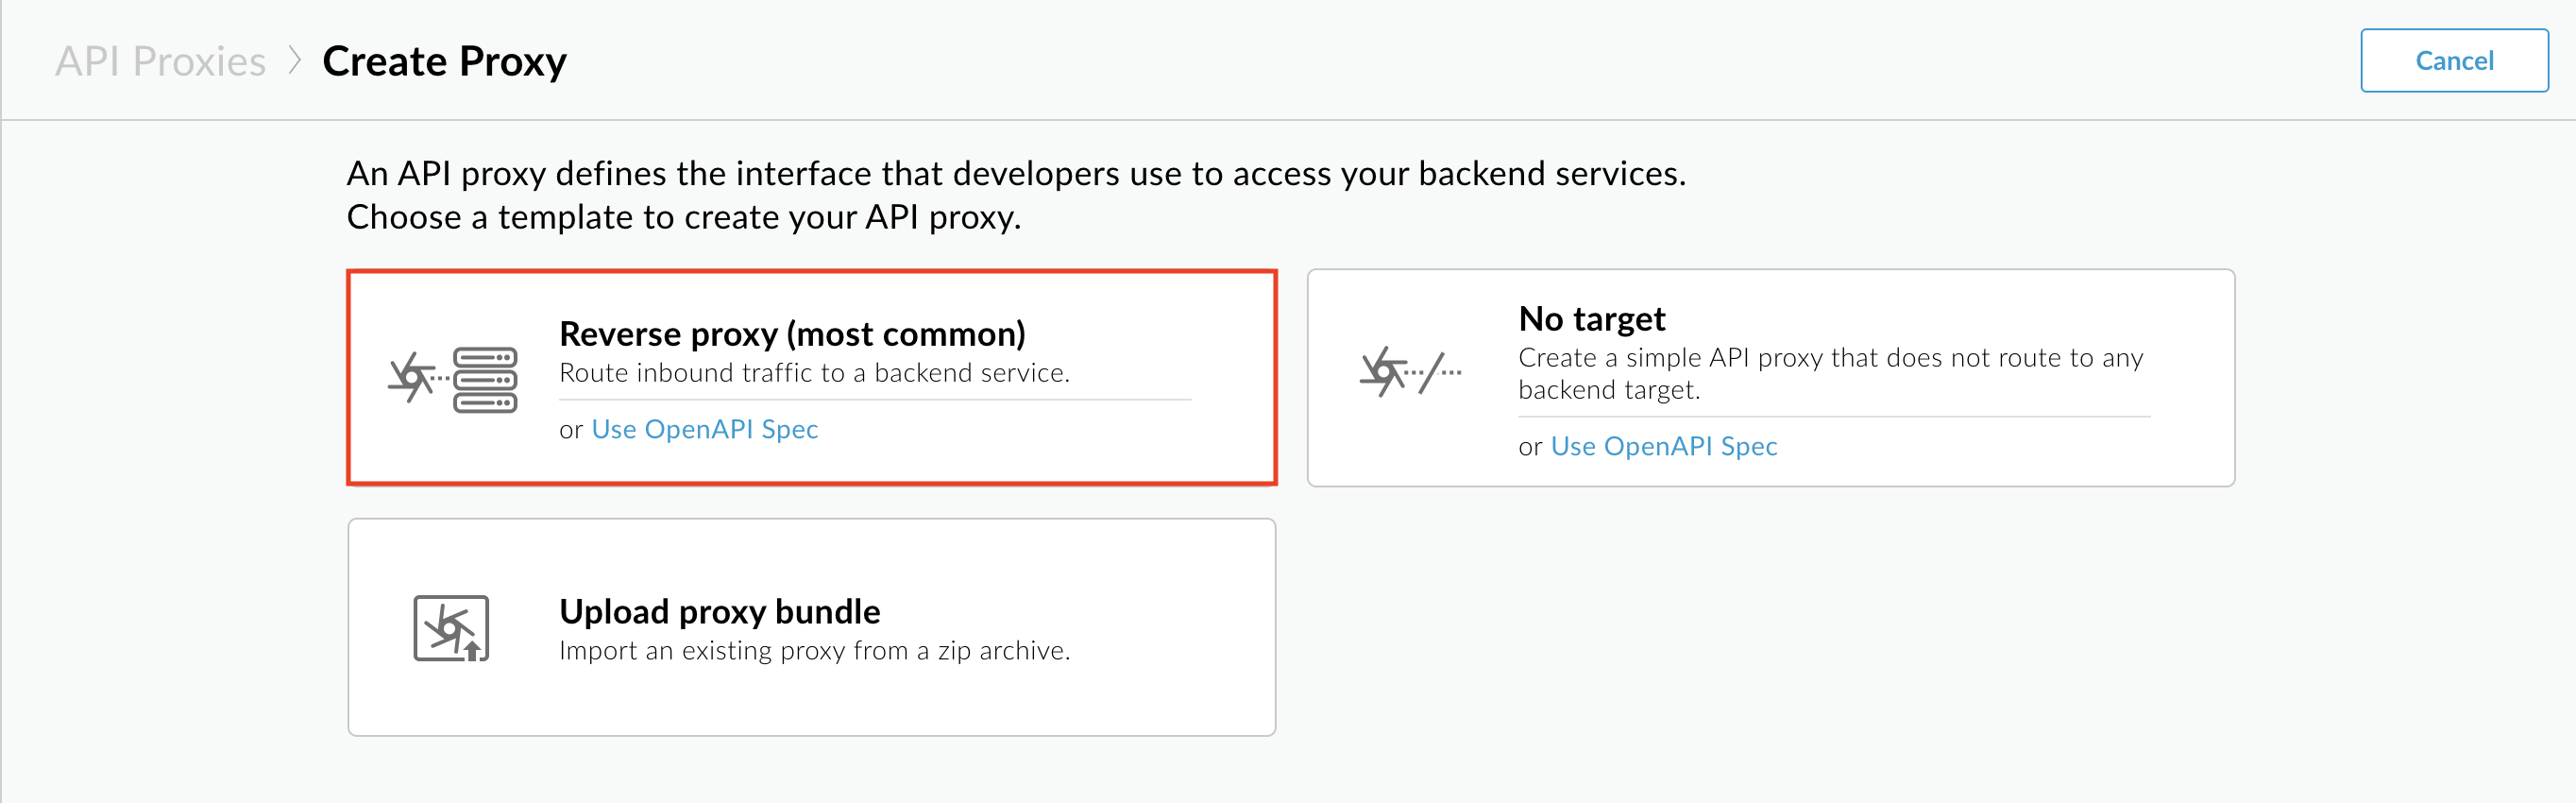
No painel Criar um proxy, em Modelo de proxy,
selecione Proxy reverso (mais comum).
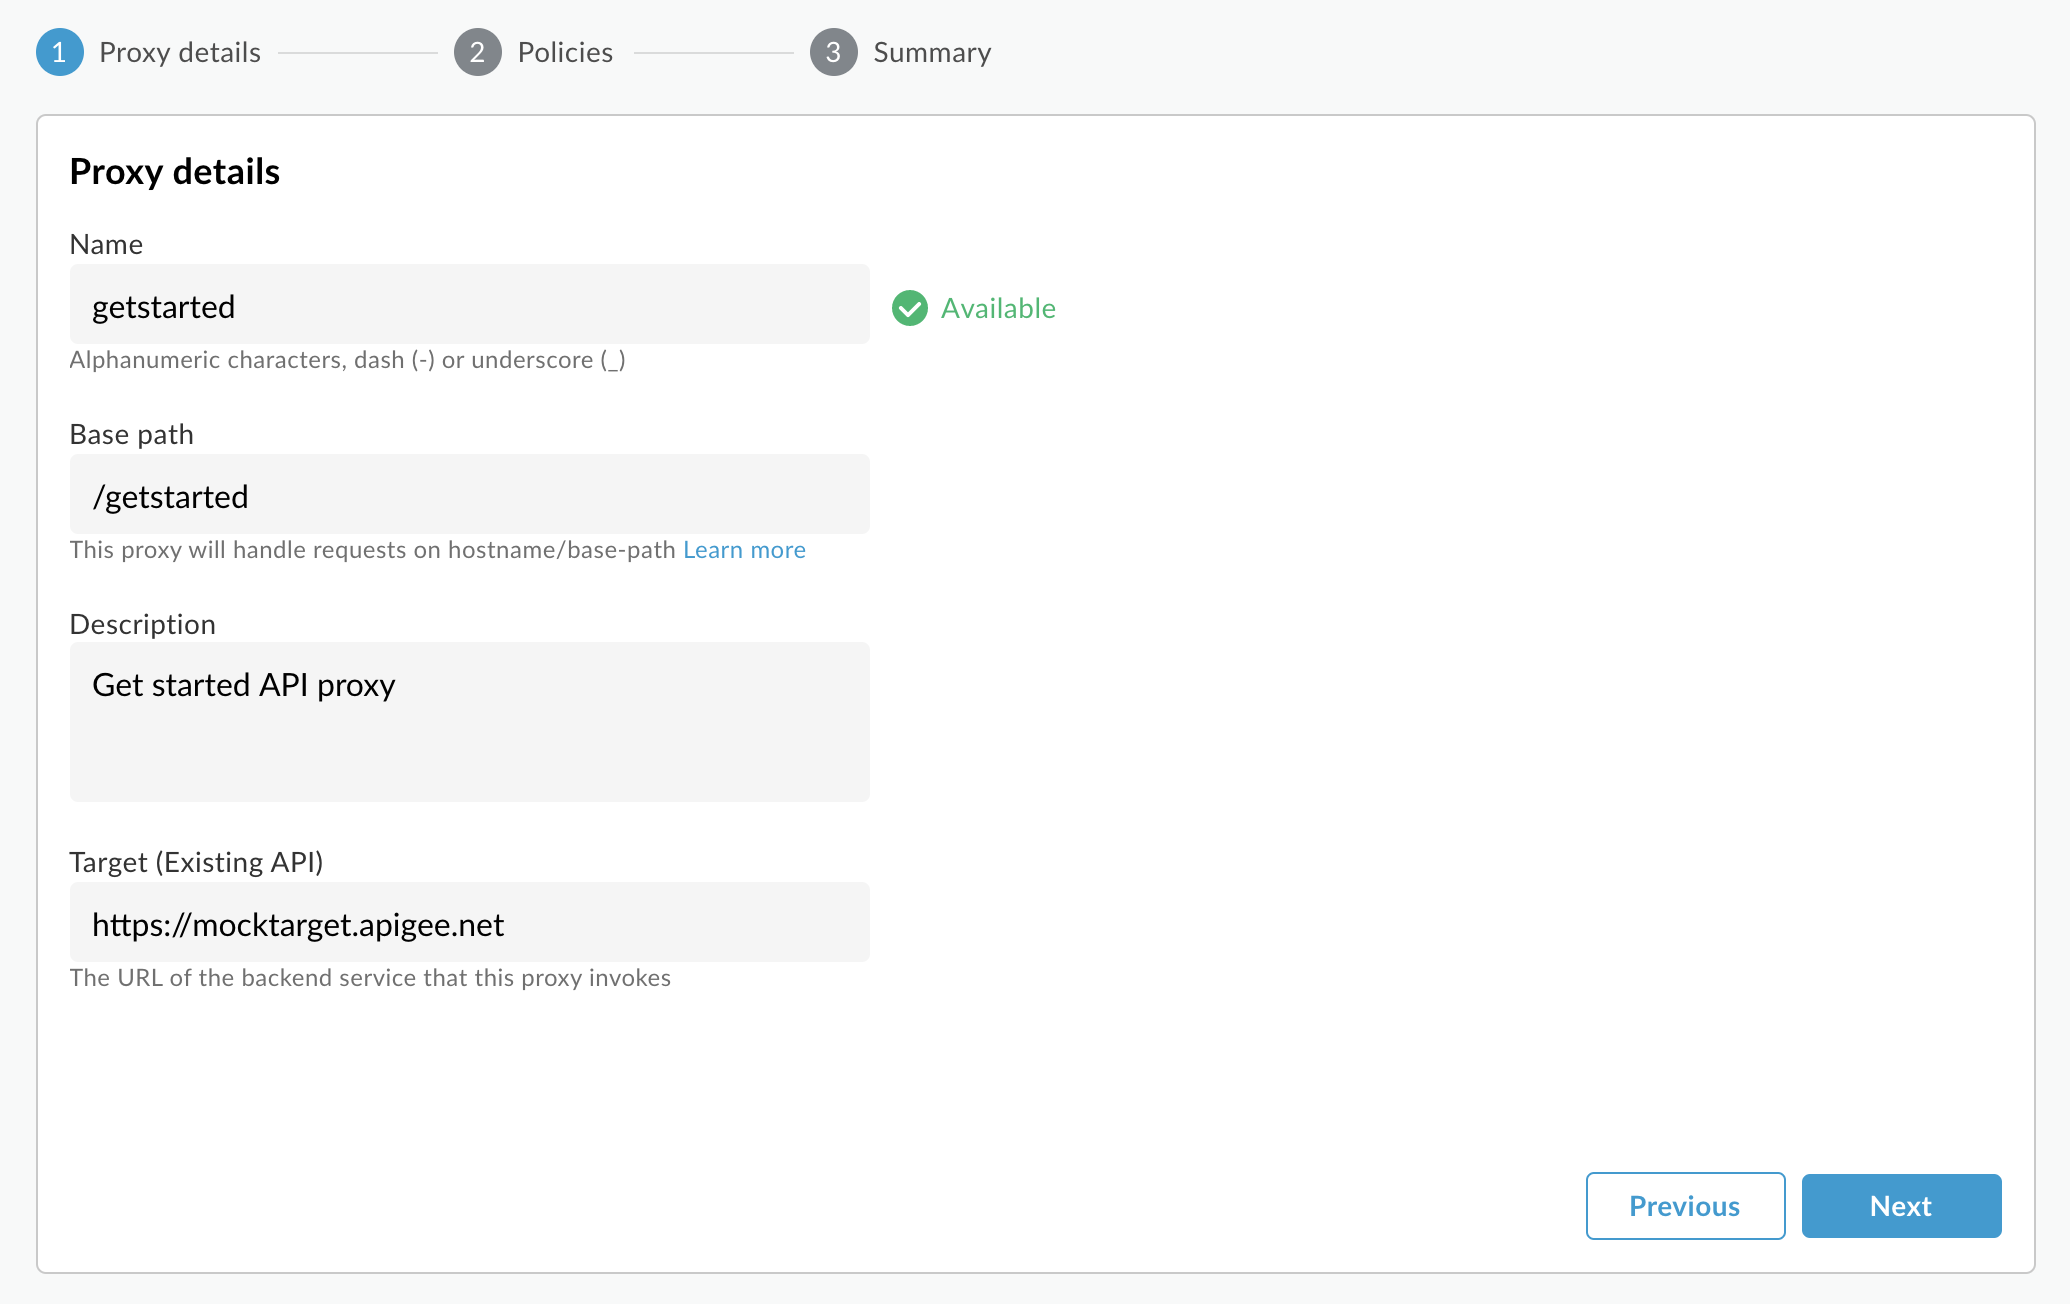
Em Detalhes do proxy, insira o seguinte:
Nome do proxy: insira um nome para o proxy, como myproxy.
Caminho base: definido automaticamente para o valor inserido para
Proxy name. Caminho
base faz parte do URL usado para fazer solicitações à API. A Apigee usa o URL para
corresponder e rotear solicitações recebidas para o proxy de API apropriado.
Descrição (opcional): insira uma descrição para o novo proxy de API,
como "Como testar a Apigee com um proxy simples".
Destino (API existente): insira https://mocktarget.apigee.net.
Isso define o
URL de destino que a Apigee invoca em uma solicitação para o proxy de API. O serviço simulado está
hospedado na Apigee e retorna dados simples. Ele não requer nenhuma chave de API nem um token de acesso.
Espaço (opcional): se a sua organização tiver o Apigee Spaces ativado, você poderá associar o proxy de API a um espaço selecionado na lista de opções disponíveis.
Para mais informações, consulte Visão geral do Apigee Spaces.
Clique em Próxima.
Implantar (opcional):
Ambientes de implantação: opcional. Use as caixas de seleção para escolher um ou mais
ambientes em que o proxy vai ser implantado. Se preferir não implantar o proxy neste ponto, deixe o campo Ambientes de implantação em branco. O proxy poderá ser implantado posteriormente.
Conta de serviço: opcional Anexe uma conta de serviço à implantação para permitir que seu
proxy acesse os serviços do Google Cloud , conforme especificado no papel e nas permissões da conta de serviço.
Clique em Criar.
A Apigee cria o novo proxy e exibe um resumo dos detalhes do proxy na visualização Resumo do proxy.
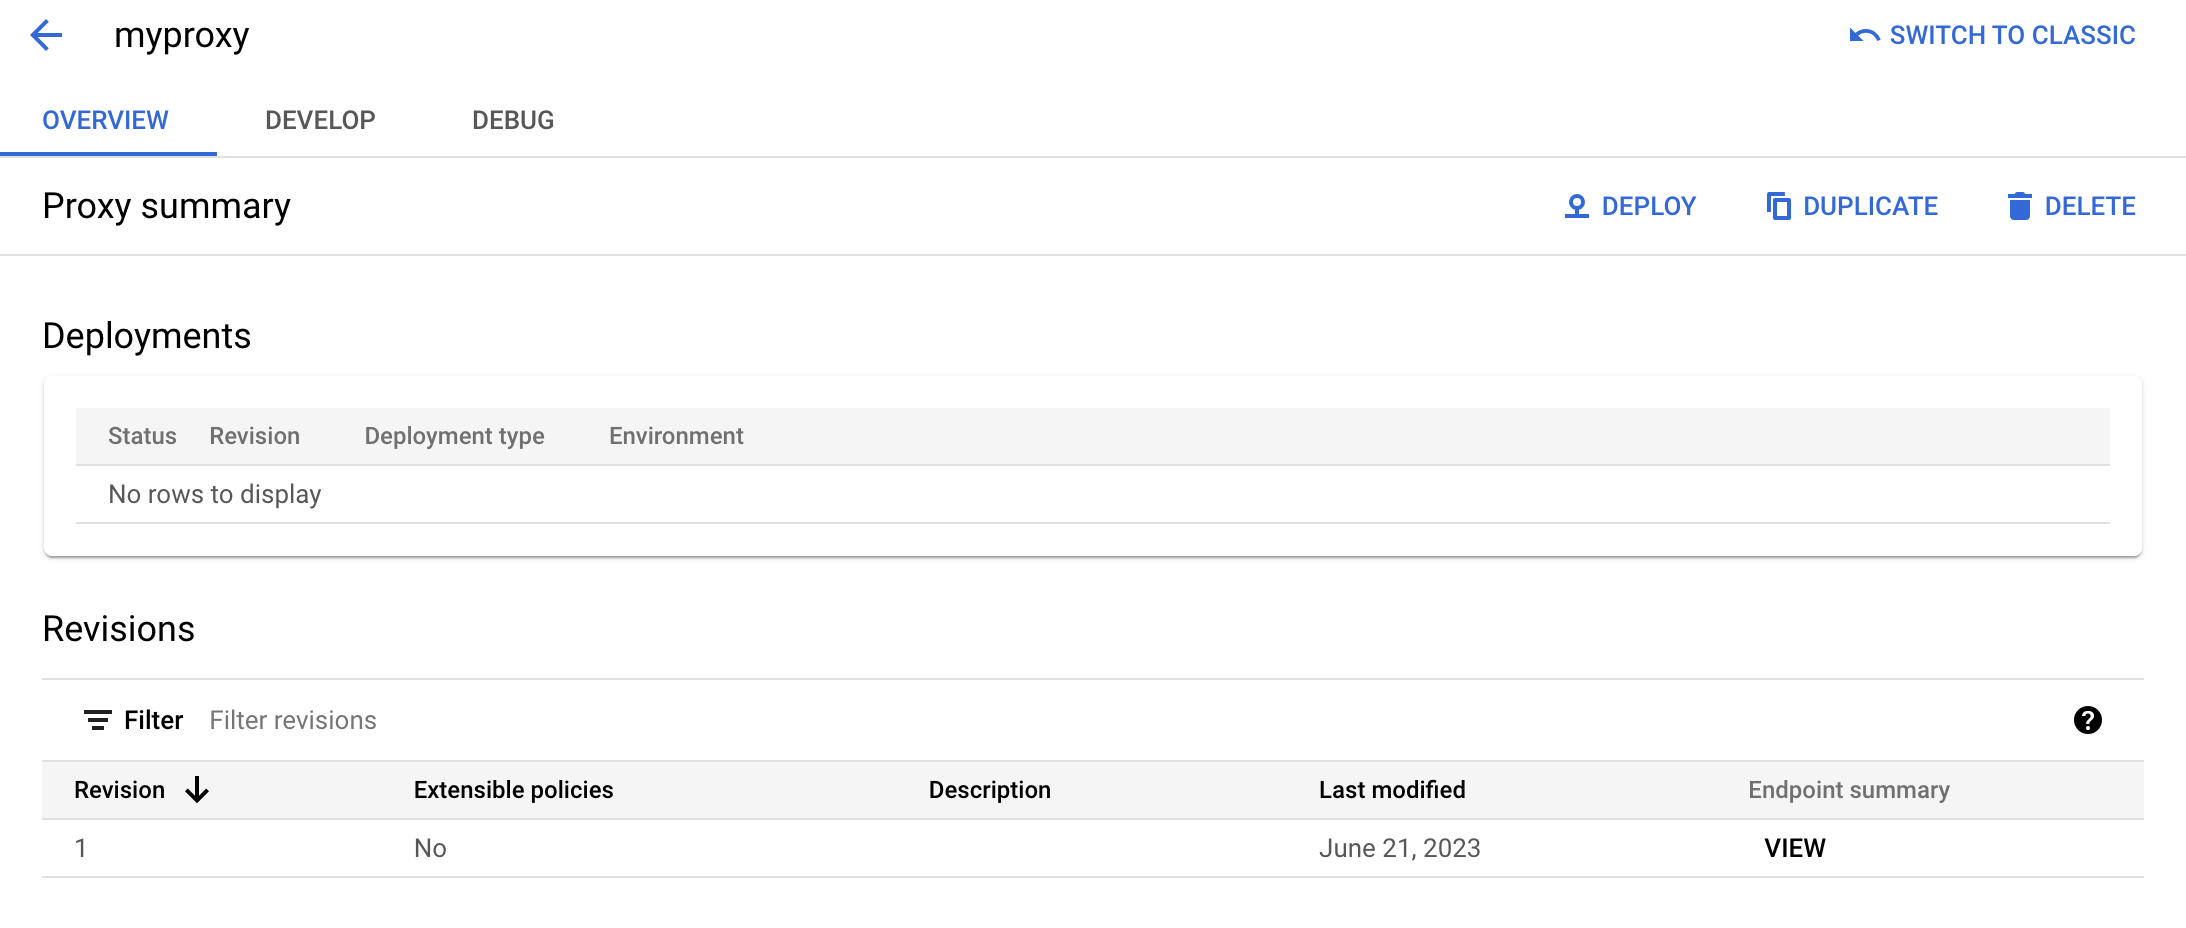
Se você optar por implantar o proxy, a seção Implantações exibe o número de revisão, que é 1 na primeira implantação. A coluna Status exibe os ambientes em que o proxy está implantado com um indicador de status verde.
Apigee clássica
Para criar um proxy de API simples na interface clássica da Apigee:
Na lista suspensa Environment, selecione o ambiente em que você quer
criar um novo proxy de API.
A IU híbrida exibe uma lista de proxies de API para esse ambiente. Se você ainda não tiver criado nenhum
proxy, a lista estará vazia.
Clique em Criar nova.
O assistente de criação de proxy será iniciado.
Clique em Proxy reverso (mais comum).
A página Proxy details é exibida.
Defina seu proxy com as seguintes configurações:
Nome: insira getstarted. Se já existir um proxy com esse nome,
escolha um nome diferente.
Base Path: deixe este conjunto definido como /getstarted. Caminho
base faz parte do URL usado para fazer solicitações à API. A Apigee usa o URL para
corresponder e rotear solicitações recebidas para o proxy de API apropriado.
Description (opcional): insira uma descrição para o novo proxy da API, como
Get started API proxy.
Destino (API existente): insira https://mocktarget.apigee.net. Isso define o
URL de destino que a Apigee invoca em uma solicitação para o proxy da API. O serviço simulado está
hospedado na Apigee e retorna dados simples. Ele não requer nenhuma chave de API nem um token de acesso.
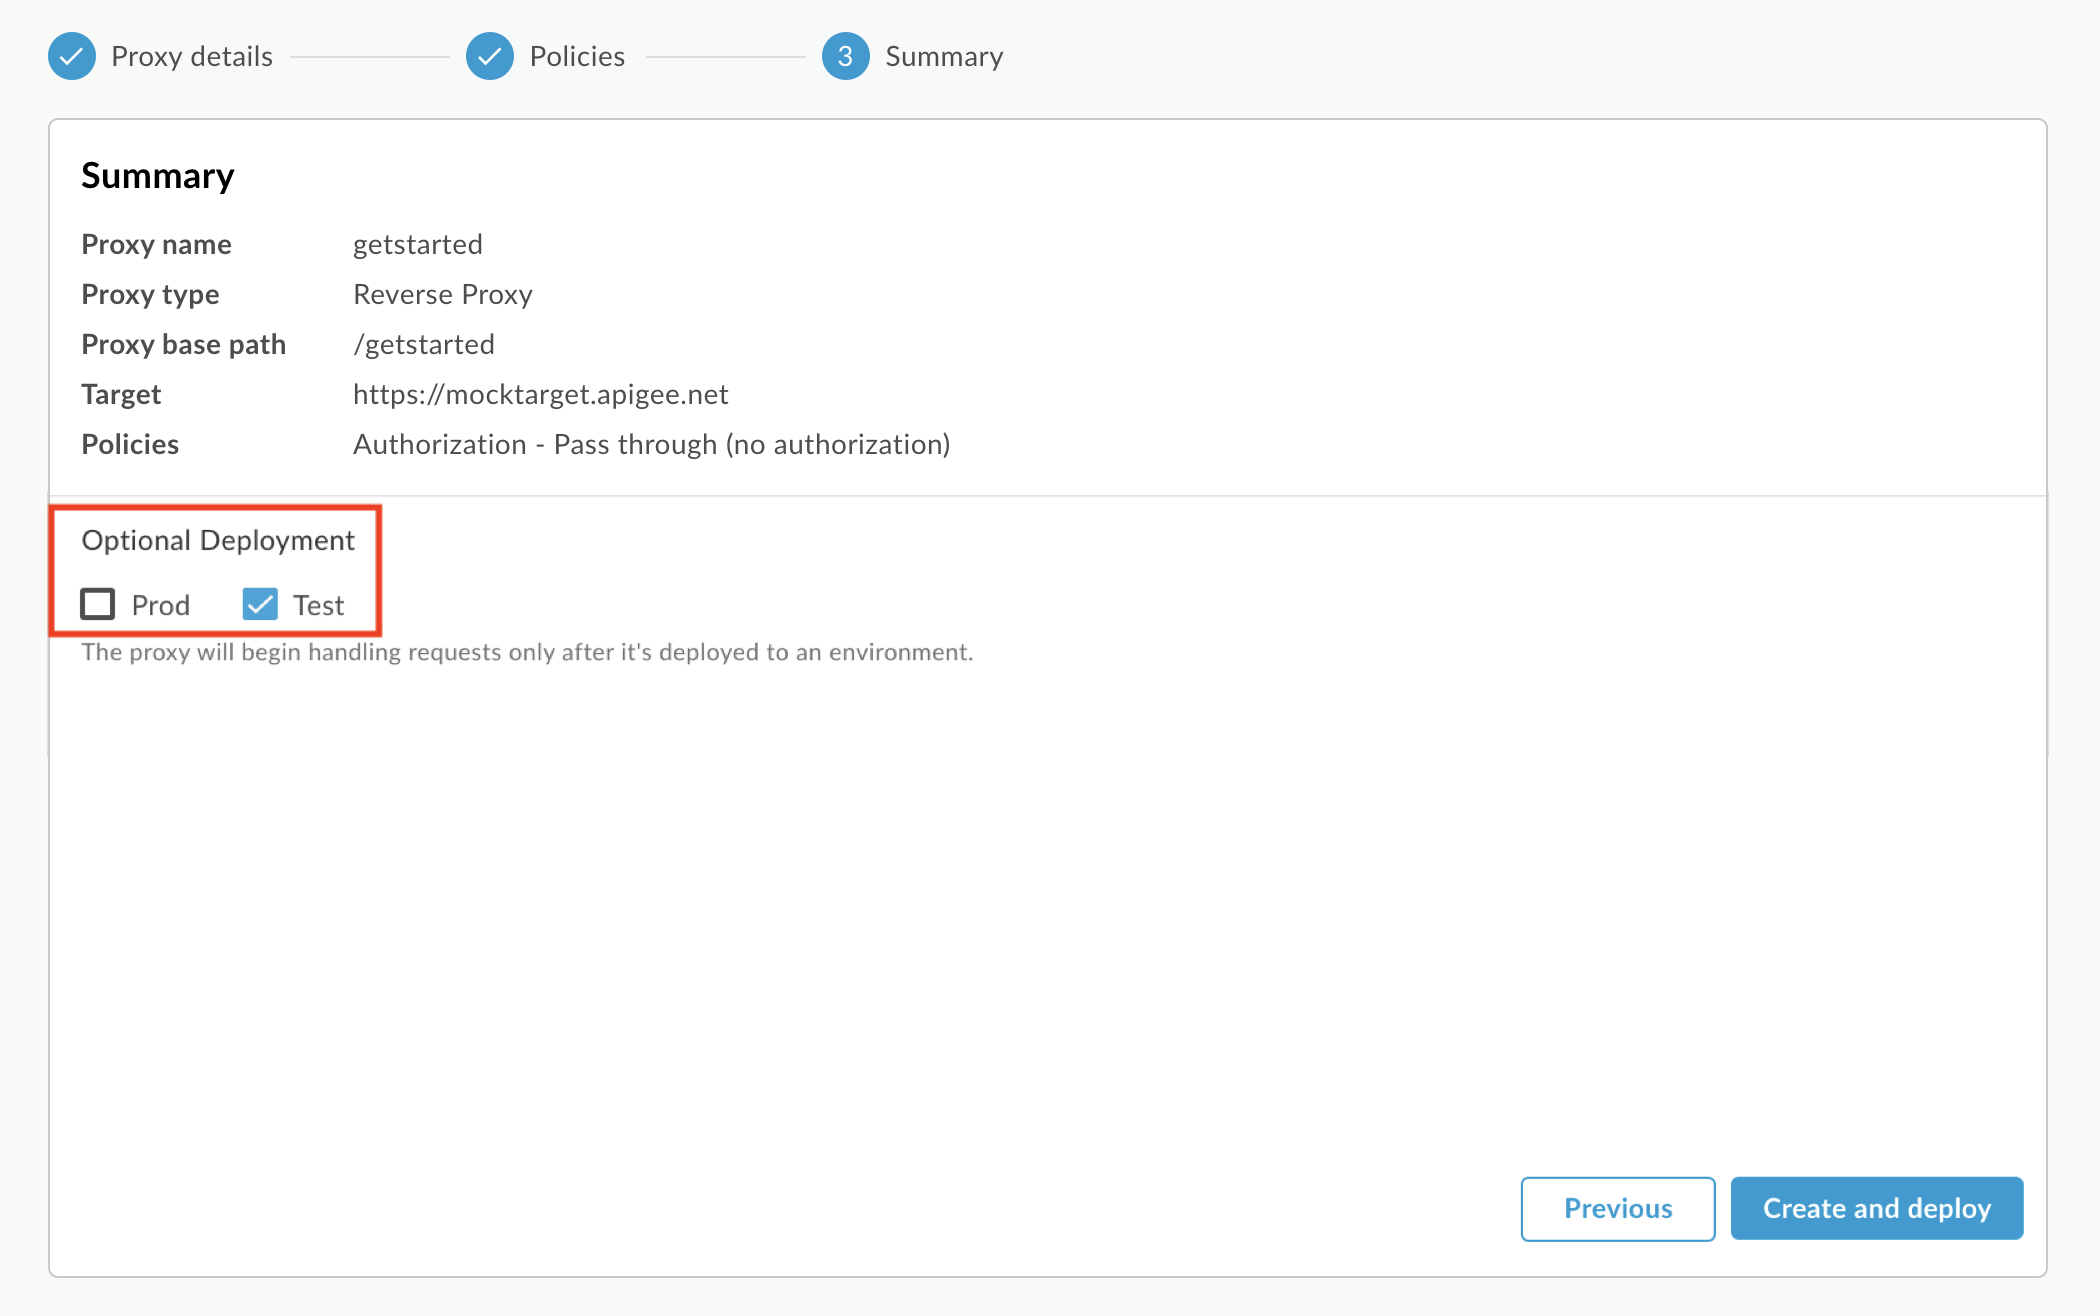
Os detalhes do proxy da API precisam ser semelhantes a este:
Clique em Próxima.
Na visualização Common policies, em Security:
Authorization, selecione Pass through (no authorization).
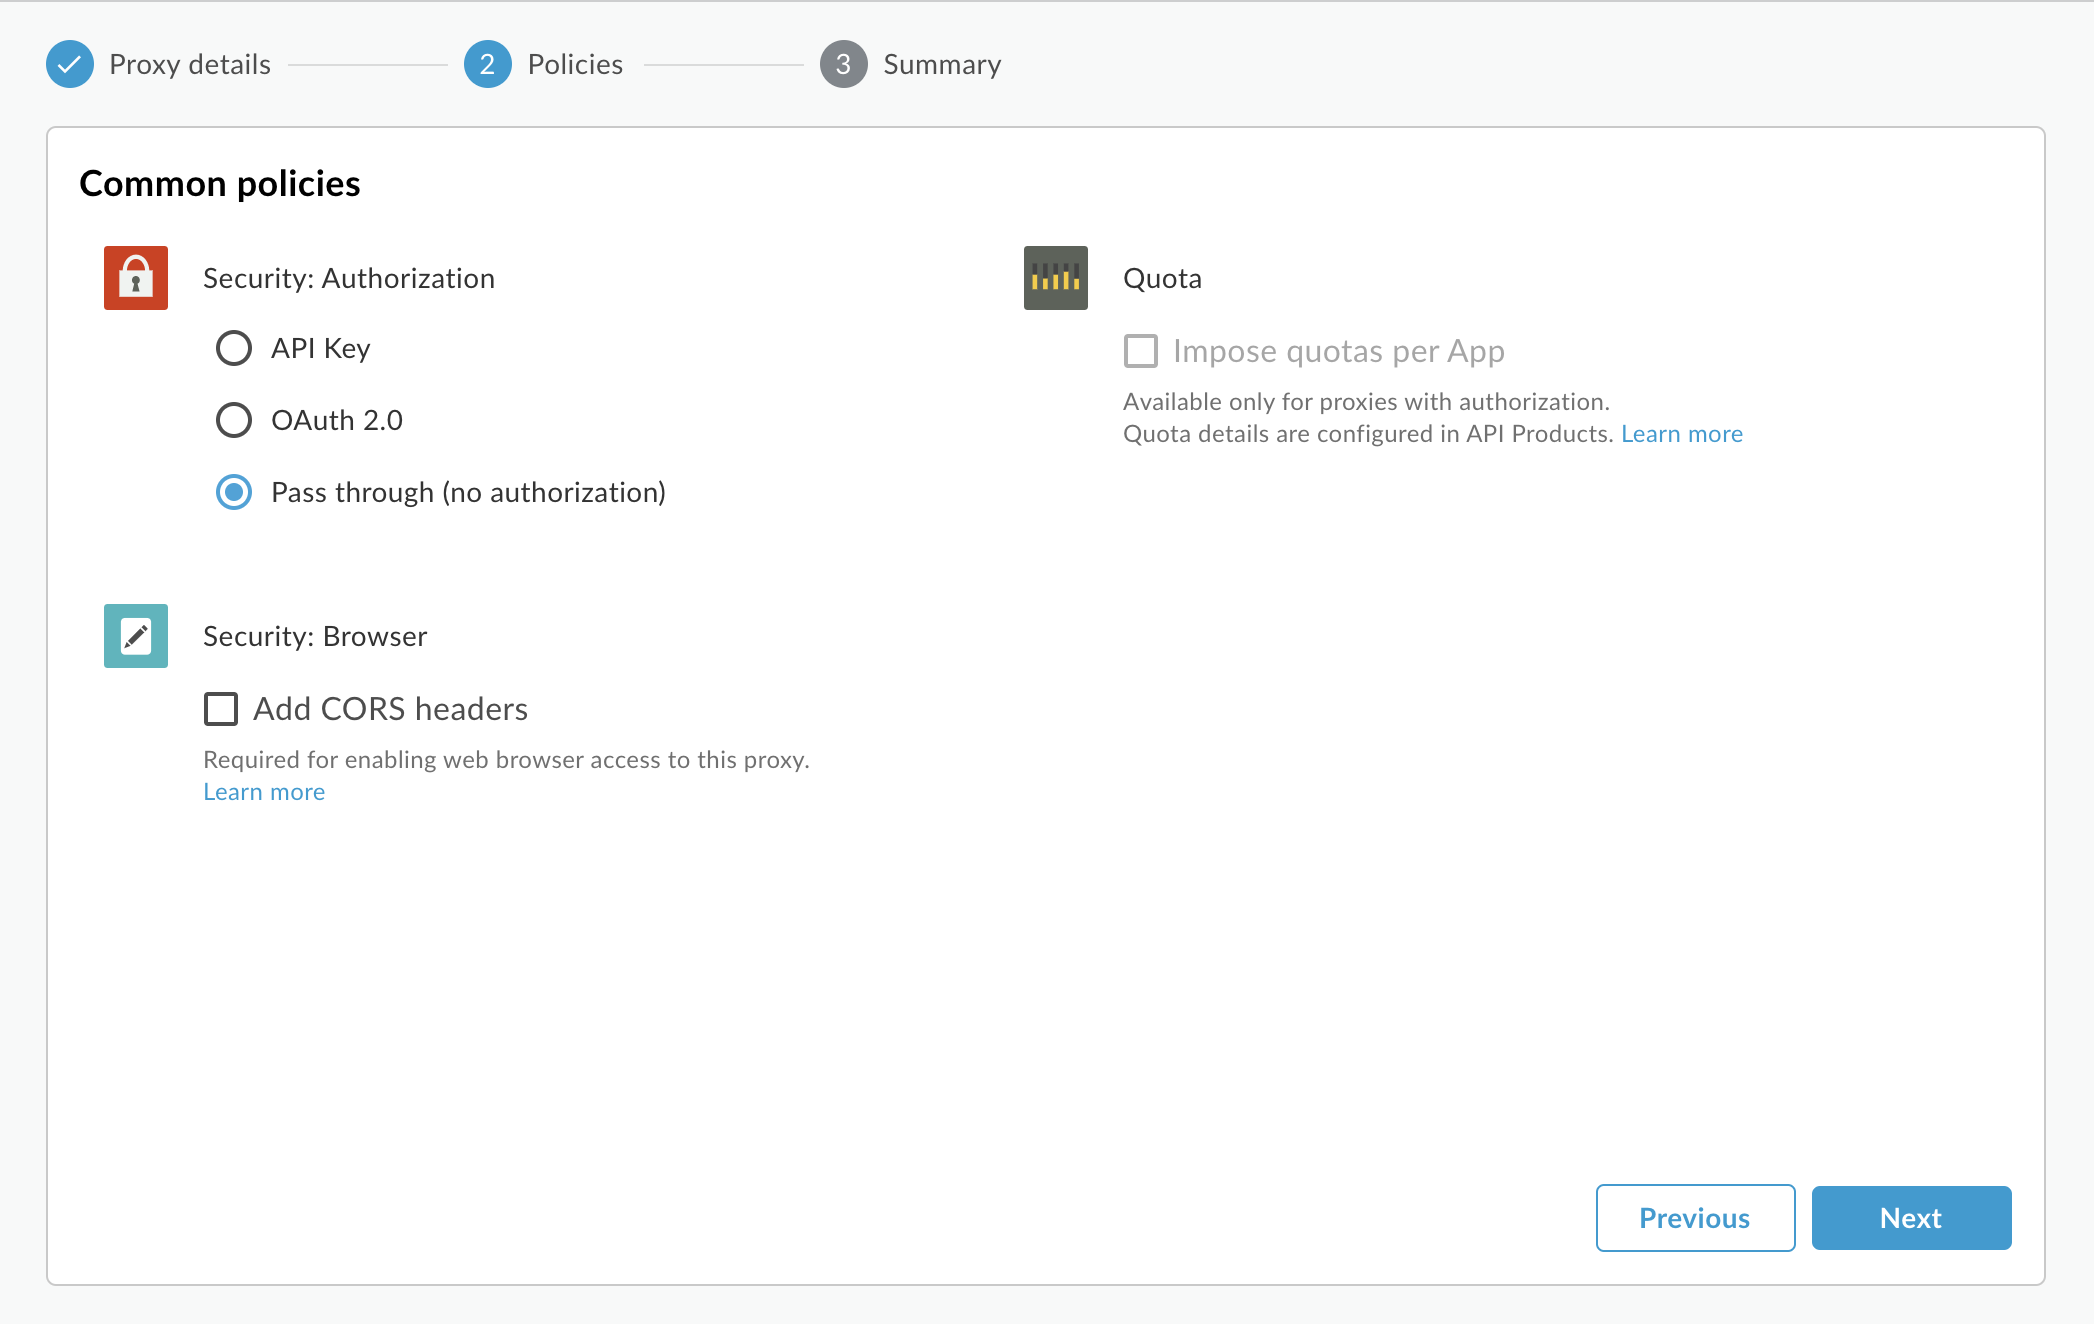
Clique em Próxima.
Na página Summary, selecione os ambientes de implantação, se quiser,
e clique em Create and deploy.
Seu novo proxy de API é criado
e implantado no ambiente selecionado.
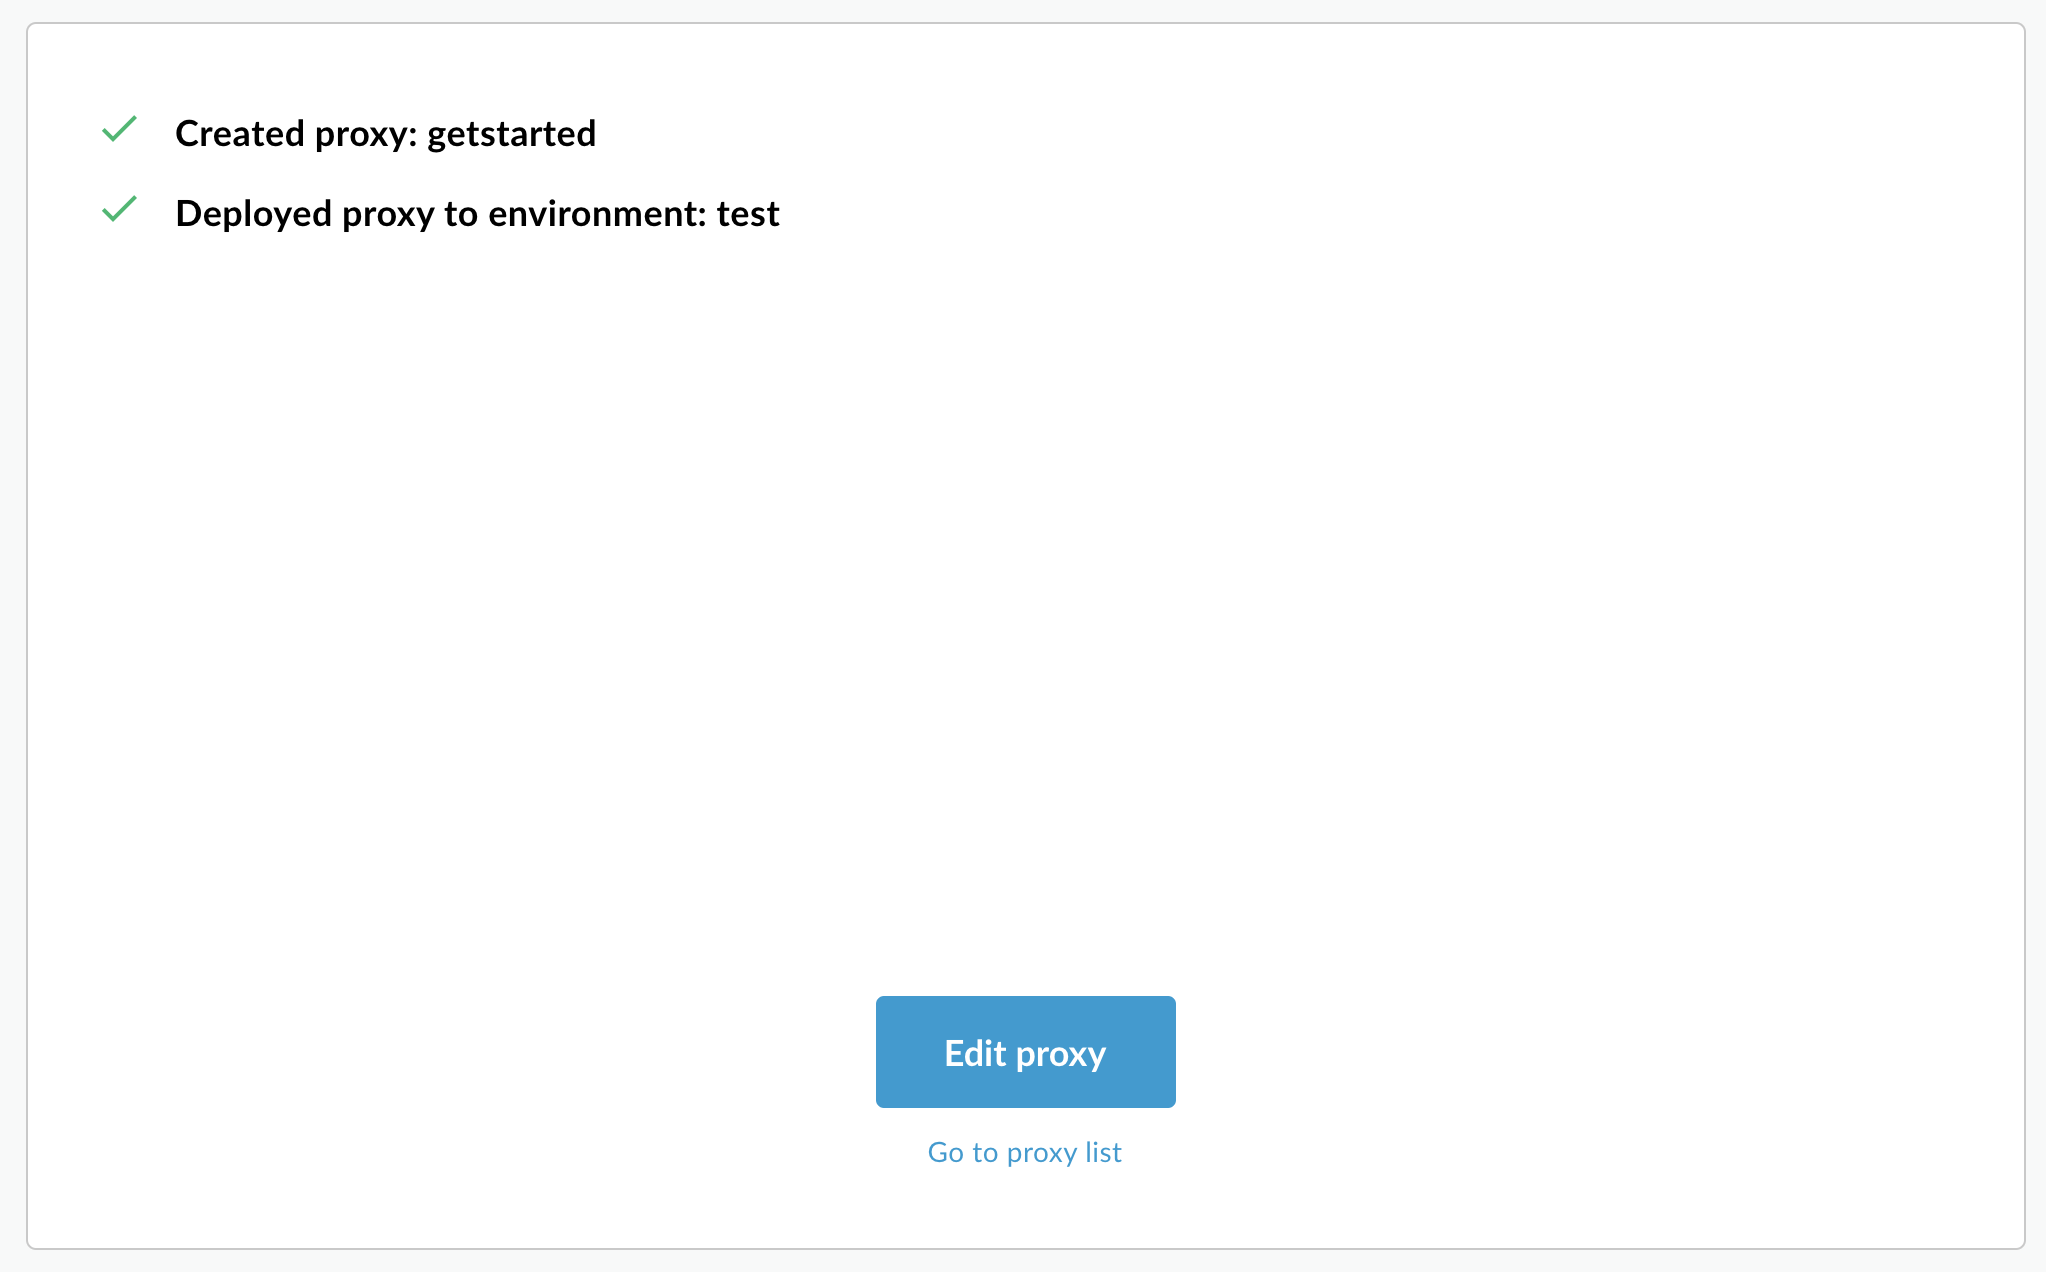
Clique em Editar proxy para exibir
a guia "Visão geral" no Editor de Proxy.
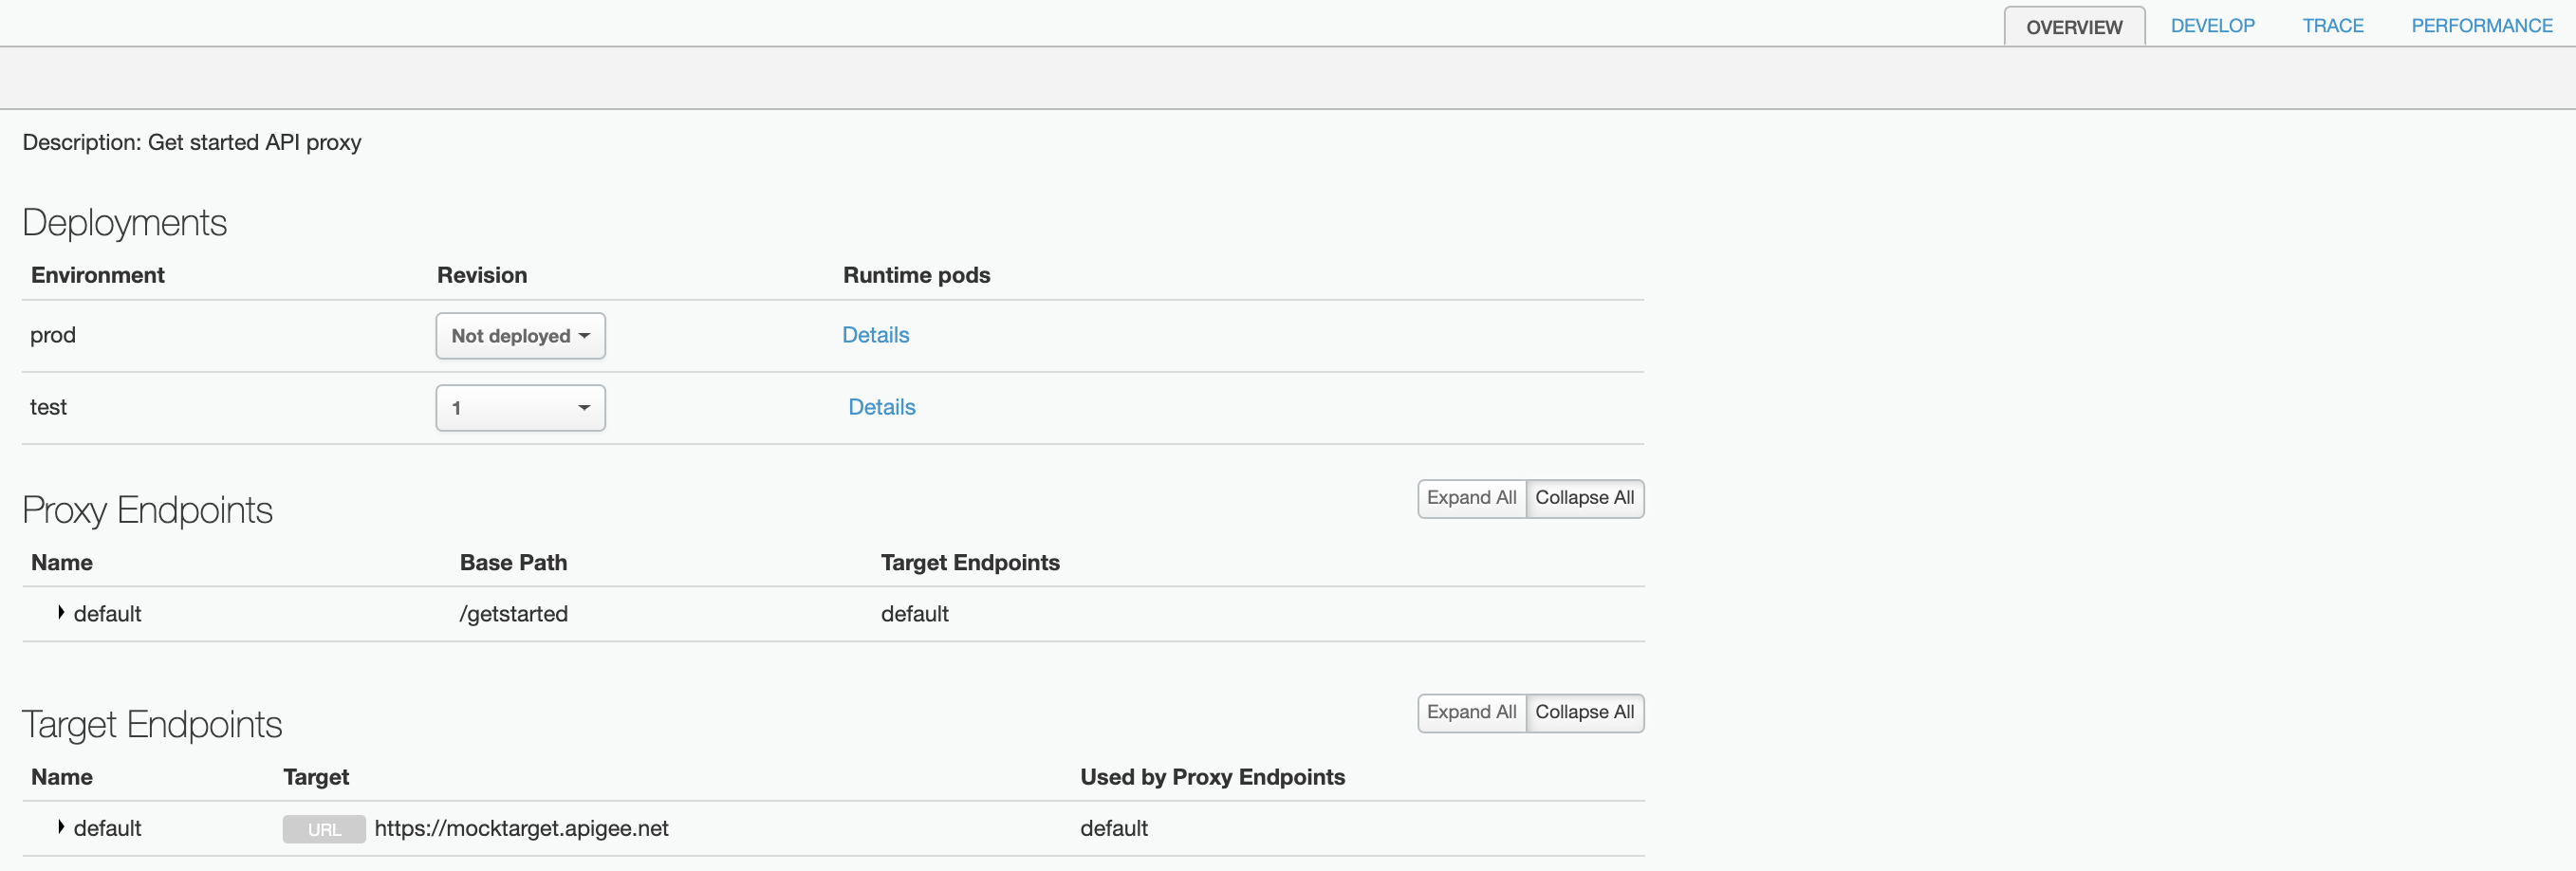
Na lista de proxies da API, o status de implantação do proxygetstarted é verde para o ambiente test.
API Apigee
Crie um proxy de API na organização da Apigee emitindo uma solicitação
POST para o seguinte recurso:
Defina o nome do proxy de API usando o parâmetro de consulta name. Restrinja
os caracteres usados no nome ao seguinte: A-Za-z0-9._\-$ %
Se quiser, importe um pacote de configuração de proxy da API seguindo estas etapas:
Defina o parâmetro de consulta action como import.
Defina o cabeçalho Content-type como multipart/form-data.
Passe o nome do pacote de configuração de proxy da API em seu sistema de arquivos local.
O exemplo a seguir demonstra como criar um proxy de API importando um pacote de configuração
de proxy de API (helloworld-config.zip) no seu sistema de arquivos local usando a
API.
Para mais informações sobre como criar um proxy de API, consulte o método apis.create
na API da Apigee. Para ver todos os métodos disponíveis para proxies de API, consulte API Proxies de API.
Próximas etapas
Depois de criar um proxy de API simples, normalmente uma das seguintes ações é feita:
[[["Fácil de entender","easyToUnderstand","thumb-up"],["Meu problema foi resolvido","solvedMyProblem","thumb-up"],["Outro","otherUp","thumb-up"]],[["Difícil de entender","hardToUnderstand","thumb-down"],["Informações incorretas ou exemplo de código","incorrectInformationOrSampleCode","thumb-down"],["Não contém as informações/amostras de que eu preciso","missingTheInformationSamplesINeed","thumb-down"],["Problema na tradução","translationIssue","thumb-down"],["Outro","otherDown","thumb-down"]],["Última atualização 2025-09-05 UTC."],[[["\u003cp\u003eThis page outlines the process of creating API proxies in Apigee and Apigee hybrid, which includes instructions for using the Apigee UI, API, and Cloud console.\u003c/p\u003e\n"],["\u003cp\u003eWhen creating an API proxy, key fields include the proxy name, which must be unique within the organization and consist of alphanumeric characters, dashes, or underscores, and the base path, which defines the URI for routing incoming requests, and must also be unique.\u003c/p\u003e\n"],["\u003cp\u003eWildcards (\u003ccode\u003e/*/\u003c/code\u003e) can be used in API proxy base paths to allow flexibility for future expansions without creating new API proxies, such as \u003ccode\u003ehttps://[host]/team/blue/members\u003c/code\u003e and \u003ccode\u003ehttps://[host]/team/green/members\u003c/code\u003e from basepath \u003ccode\u003e/team/*/members\u003c/code\u003e.\u003c/p\u003e\n"],["\u003cp\u003eAPI proxies can be created through the Apigee UI in the Cloud console or the classic Apigee UI, and by sending a POST request to the Apigee API, offering flexibility in proxy creation methods.\u003c/p\u003e\n"],["\u003cp\u003eAfter creating a simple API proxy, you can add policies, security, and other features of the Apigee platform, as well as deploy it to your cluster.\u003c/p\u003e\n"]]],[],null,["# Creating an API proxy\n\n*This page\napplies to **Apigee** and **Apigee hybrid**.*\n\n\n*View [Apigee Edge](https://docs.apigee.com/api-platform/get-started/what-apigee-edge) documentation.*\n\n| **Note:** In environments enabled for [archive deployments](/apigee/docs/api-platform/fundamentals/environments-overview#deployment-types), you cannot develop API proxies using the Apigee UI, API, or gcloud. To develop API proxies for archive deployments using Apigee in VS Code,see [Developing API proxies](/apigee/docs/api-platform/local-development/vscode/develop-apiproxies) using Apigee in VS Code.\n\nCreate a proxy in the Apigee UI, or using the API, as described in the following sections.\n\nAPI proxy primary fields\n------------------------\n\nFollow these guidelines when creating an API proxy:\n\nSteps to create an API proxy\n----------------------------\n\nTo create an API proxy using the UI or APIs: \n\n### Apigee in Cloud console\n\nTo create a proxy in Apigee in Cloud console:\n\n1. In the Google Cloud console, go to the **Proxy development \\\u003e API proxies** page.\n\n [Go to API proxies](https://console.cloud.google.com/apigee/proxies)\n| **Note:** If you see the **Welcome to Apigee API Management** page, you need to [provision\n| your Apigee organization](/apigee/docs/api-platform/get-started/provisioning-intro) before proceeding further.\n|\n| \u003cbr /\u003e\n|\n| After you have provisioned Apigee, close the UI and reopen the\n| [Apigee UI in Cloud console](https://console.cloud.google.com/apigee).\n2. In the **API Proxies** pane, click **+ Create**.\n3. In the **Create a proxy** pane, under **Proxy template** , select **Reverse proxy (Most common)**.\n4. Under **Proxy details** , enter the following:\n - **Proxy name:** Enter a name for the proxy, such as `myproxy`.\n - **Base Path** : Automatically set to the value you enter for `Proxy name`. The **Base\n Path** is part of the URL used to make requests to your API. Apigee uses the URL to match and route incoming requests to the appropriate API proxy.\n - **Description (Optional)**: Enter a description for your new API proxy, such as \"Testing Apigee with a simple proxy.\"\n - **Target (Existing API):** Enter `https://mocktarget.apigee.net`. This defines the target URL that Apigee invokes on a request to the API proxy. The mocktarget service is hosted at Apigee and returns simple data. It requires no API key or access token.\n - **Space (Optional)** : If your organization has Apigee Spaces enabled, you can associate the API proxy with a Space selected from the list of available options. For more information, see [Apigee Spaces overview](/apigee/docs/api-platform/system-administration/spaces/apigee-spaces-overview).\n - Click **Next**.\n5. **Deploy (optional)** :\n - **Deployment environments** : Optional. Use the checkboxes to select one or more environments in which to deploy your proxy. If you prefer not to deploy the proxy at this point, leave the **Deployment environments** field empty. You can always deploy the proxy later.\n - **Service Account**: Optional. Attach a service account to your deployment to enable your proxy to access Google Cloud services, as specified in the service account's role and permissions.\n6. Click **Create**.\n\nApigee creates the new proxy and displays a summary of the proxy details in the\n**Proxy summary** view.\n\nIf you choose to deploy the proxy, the **Deployments** section displays the **Revision**\nnumber, which is 1 when you first deploy. The **Status** column displays the\nenvironments in which the proxy is deployed with a green status indicator.\n\n### Classic Apigee\n\nTo create a simple API proxy in the classic Apigee UI:\n\n1. Sign in to the [Apigee UI](https://apigee.google.com).\n2. Click **API Proxies** in the main view.\n3. From the **Environment** drop-down list, select the environment in which you want to create a new API proxy.\n\n The hybrid UI displays a list of API proxies for that environment. If you haven't created any\n proxies yet, the list is empty.\n4. Click **Create New** .\n\n The Create Proxy wizard starts.\n5. Click **Reverse proxy (most common)** .\n\n The **Proxy details** page is displayed.\n6. Configure your proxy with the following settings:\n - **Name:** Enter `getstarted`. If a proxy already exists with this name, choose a different name.\n - **Base Path:** Leave this set to `/getstarted`. The **Base\n Path** is part of the URL used to make requests to your API. Apigee uses the URL to match and route incoming requests to the appropriate API proxy.\n - **Description** (Optional): Enter a description for your new API proxy, such as `Get started API proxy`.\n - **Target (Existing API):** Enter `https://mocktarget.apigee.net`. This defines the target URL that Apigee invokes on a request to the API proxy. The mocktarget service is hosted at Apigee and returns simple data. It requires no API key or access token.\n\n Your API proxy's details should look like the following:\n\n7. Click **Next**.\n8. In the **Common policies** view, under **Security:\n Authorization** select **Pass through (no authorization)** .\n\n9. Click **Next**.\n10. On the **Summary** page, select the deployment environments, if desired, and click **Create and deploy** .\n\n | **Note:** If you don't select an environment below **Optional Deployment** , the button at the lower right is just labeled **Create**.\n | **Note:** After you deploy an API proxy revision, you cannot edit it. To edit the API proxy, you must create and deploy a new revision.\n |\n | For this reason, you may choose to create the API proxy without deploying it to any\n | environment. You can edit the API proxy and deploy the API proxy later, as described in\n | [Next steps](#next-steps).\n\n Your new API proxy is created\n and deployed in the selected environment.\n\n11. Click **Edit proxy** to display the Overview tab in the Proxy Editor.\n12. \n\n\nIn the API proxies list, the `getstarted` API proxy deployment status is **green** for the `test` environment.\n\n### Apigee API\n\nCreate an API proxy in your Apigee organization by issuing a `POST`\nrequest to the following resource: \n\n```\nhttps://apigee.googleapis.com/v1/organizations/$ORG/apis\n```\n\nYou must define the name of the API proxy using the `name` query parameter. Restrict\nthe characters used in the name to the following: `A-Za-z0-9._\\-$ %`\n\nOptionally, you can import an API proxy configuration bundle by performing the following steps:\n\n- Set the `action` query parameter to `import`\n- Set the `Content-type` header to `multipart/form-data`\n- Pass the name of the API proxy configuration bundle on your local file system\n\nThe following example demonstrates how to create an API proxy by importing an API proxy\nconfiguration bundle (`helloworld-config.zip`) on your local file system using the\nAPI. \n\n```\ncurl \"https://apigee.googleapis.com/v1/organizations/$ORG/apis?name=helloworld&action=import\" \\\n -X POST \\\n -H \"Authorization: Bearer $TOKEN\" \\\n -H \"Content-type: multipart/form-data\" \\\n -F \"file=@helloworld-config.zip\"\n```\n\nWhere `$TOKEN` is set to your OAuth 2.0 access token, as described in\n[Obtaining an OAuth 2.0 access token](/apigee/docs/api-platform/get-started/api-get-started#oauth20). For information about the `curl` options used in this example, see\n[Using curl](/apigee/docs/api-platform/get-started/api-get-started#curl). For a description of environment variables you can use, see\n[Setting\nenvironment variables for Apigee API requests](/apigee/docs/api-platform/get-started/api-get-started#api-environment-variables).\n\nThe following provides an example of the response output: \n\n```carbon\n{\n \"basepaths\": [\n \"/helloworld\"\n ],\n \"configurationVersion\": {\n \"majorVersion\": 4\n },\n \"createdAt\": \"1559145292799\",\n \"displayName\": \"helloworld\",\n \"entityMetaDataAsProperties\": {\n \"bundle_type\": \"zip\",\n \"subType\": \"Proxy\",\n \"lastModifiedAt\": \"1559145292799\",\n \"createdAt\": \"1559145292799\"\n },\n \"lastModifiedAt\": \"1559145292799\",\n \"name\": \"helloworld\",\n \"policies\": [\n \"verify-api-key\",\n \"remove-query-param-apikey\",\n \"OAuth-v20-1\"\n ],\n \"proxies\": [\n \"default\"\n ],\n \"proxyEndpoints\": [\n \"default\"\n ],\n \"resourceFiles\": {},\n \"targetEndpoints\": [\n \"default\"\n ],\n \"targets\": [\n \"default\"\n ],\n \"type\": \"Application\",\n \"revision\": \"1\",\n \"description\": \"Hello world\"\n}\n```\n\nFor more information on creating an API proxy, see the [`apis.create` method](/apigee/docs/reference/apis/apigee/rest/v1/organizations.apis/create)\nin the Apigee API. To see all the methods available for API proxies, see the [API proxies API](/apigee/docs/reference/apis/apigee/rest/v1/organizations.apis).\n\nNext steps\n----------\n\nAfter you create a simple API proxy, you typically do one of the following:\n\n- Add policies, security, and other features of the Apigee platform, as described in [Understanding APIs and\n API proxies](/apigee/docs/api-platform/fundamentals/understanding-apis-and-api-proxies).\n- Deploy it to your cluster, as described in [Deploy an API proxy](/apigee/docs/api-platform/deploy/ui-deploy-new)."]]