Diese Seite gilt für Apigee und Apigee Hybrid.
Apigee Edge-Dokumentation aufrufen

Erstellen Sie einen Proxy in der Apigee-Benutzeroberfläche oder mithilfe der API, wie in den folgenden Abschnitten beschrieben.
Primärfelder für API-Proxys
Beachten Sie beim Erstellen eines API-Proxys die folgenden Richtlinien:
| Feld | Beschreibung |
|---|---|
| Name des API-Proxys | Für Ihre API angezeigter Name. Geben Sie alphanumerische Zeichen, einen Bindestrich (-) oder Unterstrich (_) ein. |
| Basispfad des API-Proxys | URI-Fragment, das nach der Adresse http://[host] oder https://[host] des API-Proxys angezeigt wird. Apigee verwendet den Basispfad-URI, um eingehende Anfragenachrichten mit dem passenden API-Proxy abzugleichen und zu diesem weiterzuleiten.
Platzhalter in Basispfaden verwenden Verwenden Sie einen oder mehrere Platzhalter in API-Proxy-Basispfaden, um Ihre API-Proxys zukunftssicher zu machen.
Wir erlauben die Angabe eines einzelnen Platzhalterzeichens |
| Beschreibung | Optional: Eine Beschreibung des API-Proxys. |
| Ziel-URL/Backend-Ziel-URL | URL (einschließlich HTTP oder HTTPS) des Back-End-Dienstes, der von diesem API-Proxy aufgerufen wird. |
| Weltraum | (Optional) Wenn in Ihrer Organisation Apigee Spaces aktiviert ist, können Sie den API-Proxy einem Space zuordnen. Weitere Informationen finden Sie unter Apigee Spaces-Übersicht. |
Schritte zum Erstellen eines API-Proxys
So erstellen Sie einen API-Proxy über die Benutzeroberfläche oder APIs:
Apigee in der Cloud Console
So erstellen Sie einen Proxy in Apigee in der Cloud Console:
Rufen Sie in der Google Cloud -Konsole die Seite Proxy-Entwicklung > API-Proxys auf.
- Klicken Sie im Bereich API-Proxys auf + Erstellen.
- Wählen Sie im Bereich Proxy erstellen unter Proxy-Vorlage die Option Reverse-Proxy (häufigste Quelle) aus.
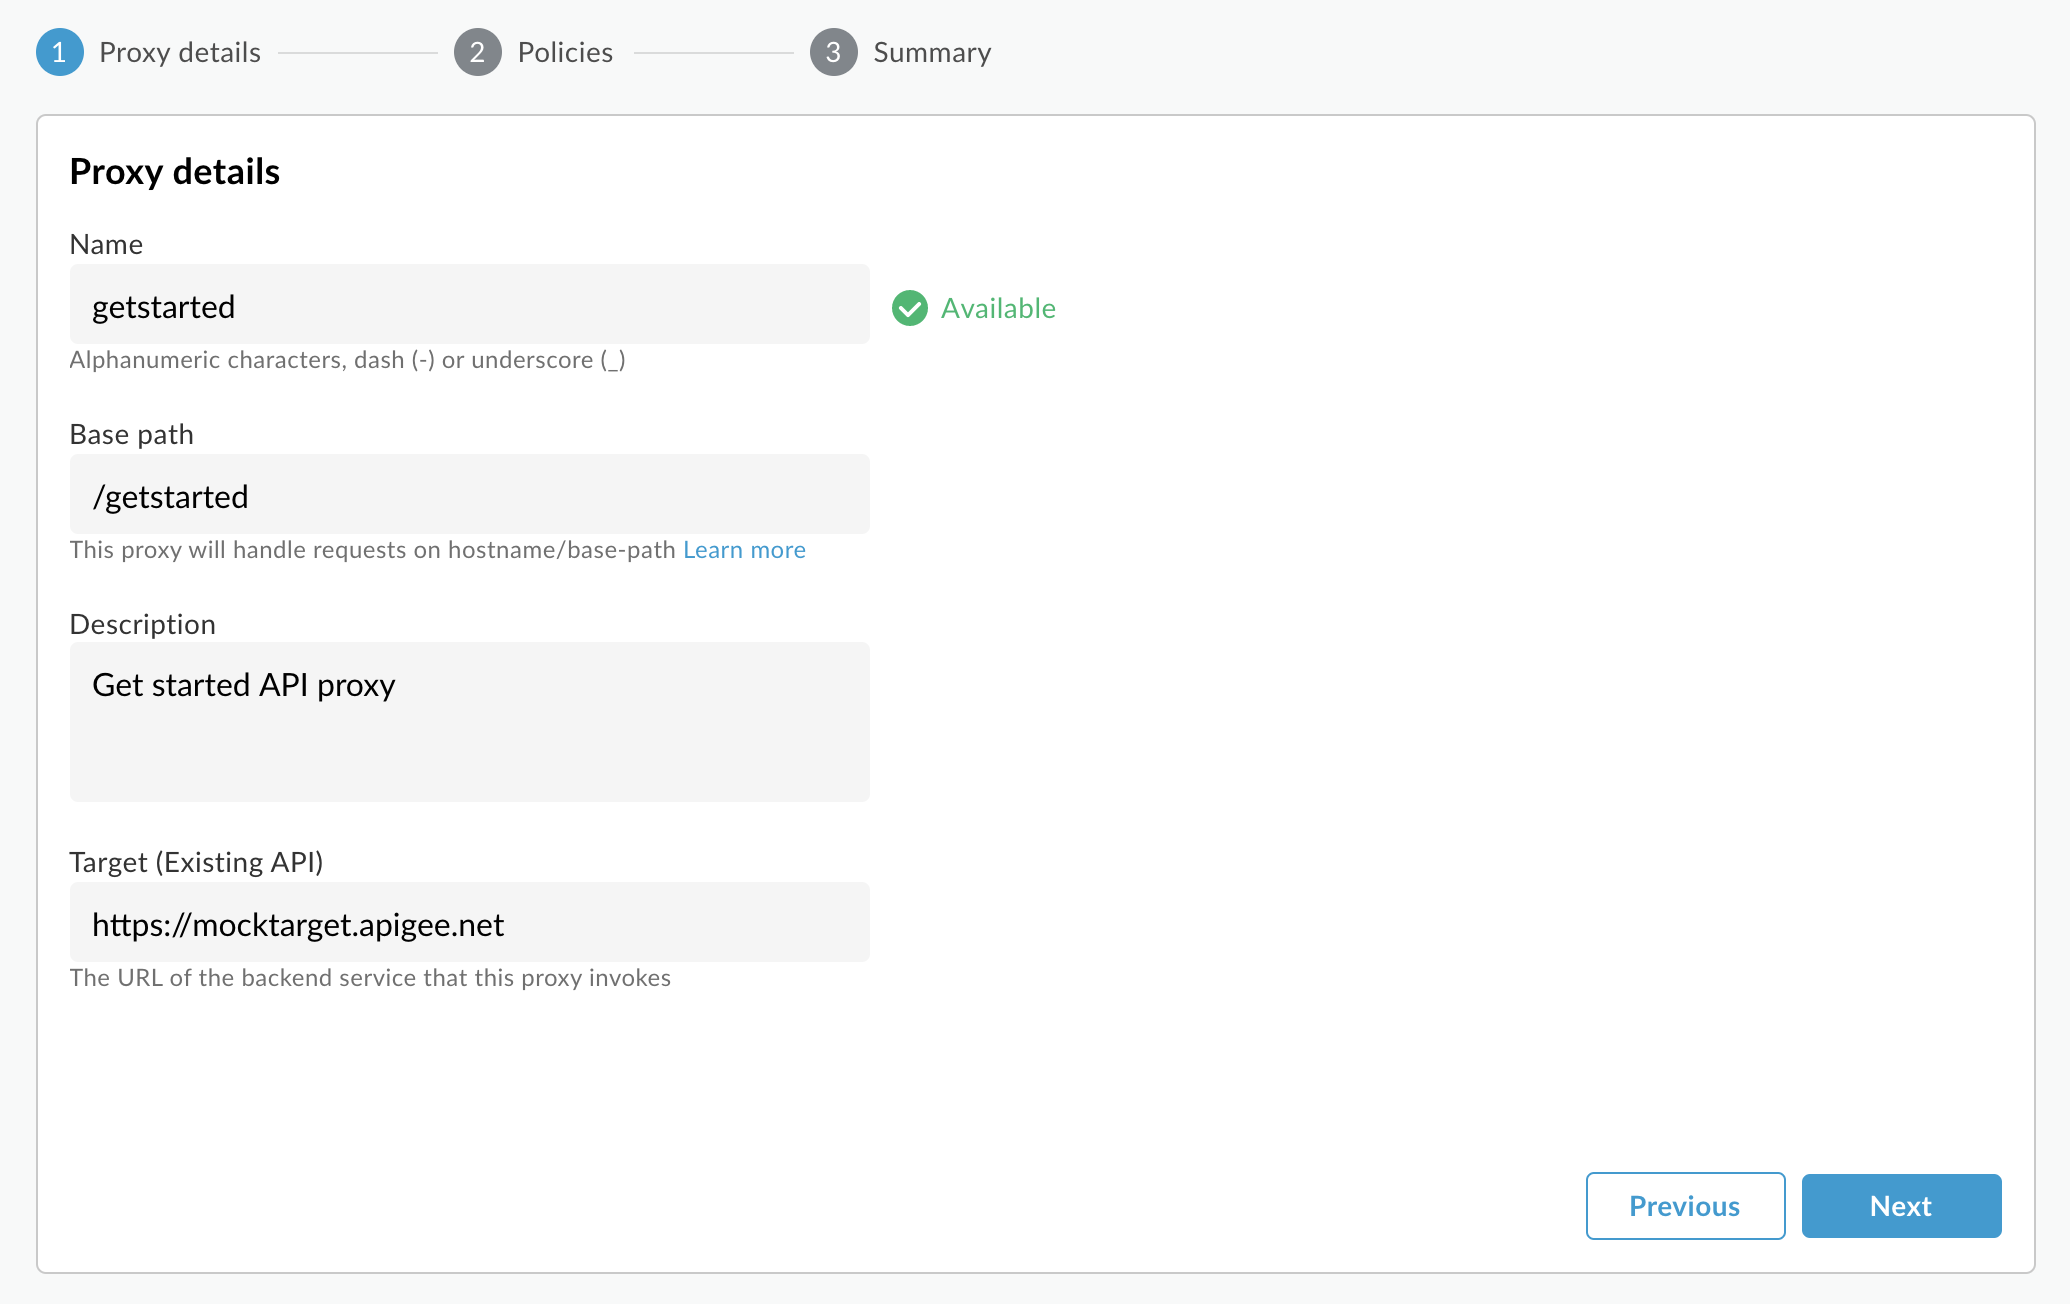
- Geben Sie unter Proxydetails Folgendes ein:
- Proxyname: Geben Sie einen Namen für den Proxy ein, z. B.
myproxy. - Basispfad: Wird automatisch auf den Wert festgelegt, den Sie für
Proxy nameeingeben. Der Basispfad ist Teil der URL, die zum Senden von Anfragen an Ihre API verwendet wird. Apigee verwendet die URL, um eingehende Anfragen zuzuordnen und an den richtigen API-Proxy weiterzuleiten. - Beschreibung (Optional): Geben Sie eine Beschreibung für den neuen API-Proxy ein, z. B. „Apigee mit einem einfachen Proxy testen“.
- Ziel (vorhandene API): Geben Sie
https://mocktarget.apigee.netein. Dies definiert die Ziel-URL, die Apigee für eine Anfrage an den API-Proxy aufruft. Der simulierte Zieldienst wird bei Apigee gehostet und gibt einfache Daten zurück. Ein API-Schlüssel oder ein Zugriffstoken sind nicht erforderlich. - Space (optional): Wenn Apigee Spaces für Ihre Organisation aktiviert ist, können Sie den API-Proxy einem Space zuordnen, der aus der Liste der verfügbaren Optionen ausgewählt wird. Weitere Informationen finden Sie unter Apigee Spaces-Übersicht.
- Klicken Sie auf Weiter.
- Proxyname: Geben Sie einen Namen für den Proxy ein, z. B.
- Bereitstellen (optional):
- Bereitstellungsumgebungen: Optional. Wählen Sie durch die Kästchen eine oder mehrere Umgebungen aus, in denen Sie Ihren Proxy bereitstellen möchten. Wenn Sie den Proxy zu diesem Zeitpunkt nicht bereitstellen möchten, lassen Sie das Feld Bereitstellungsumgebungen leer. Sie können den Proxy später jederzeit bereitstellen.
- Dienstkonto: (optional) Hängen Sie ein Dienstkonto an Ihre Bereitstellung an, damit der Proxy auf Google Cloud -Dienste zugreifen kann, wie in der Rolle und den Berechtigungen des Dienstkontos angegeben.
- Klicken Sie auf Erstellen.
Apigee erstellt den neuen Proxy und zeigt eine Zusammenfassung der Proxydetails in der Ansicht Proxy-Zusammenfassung an.
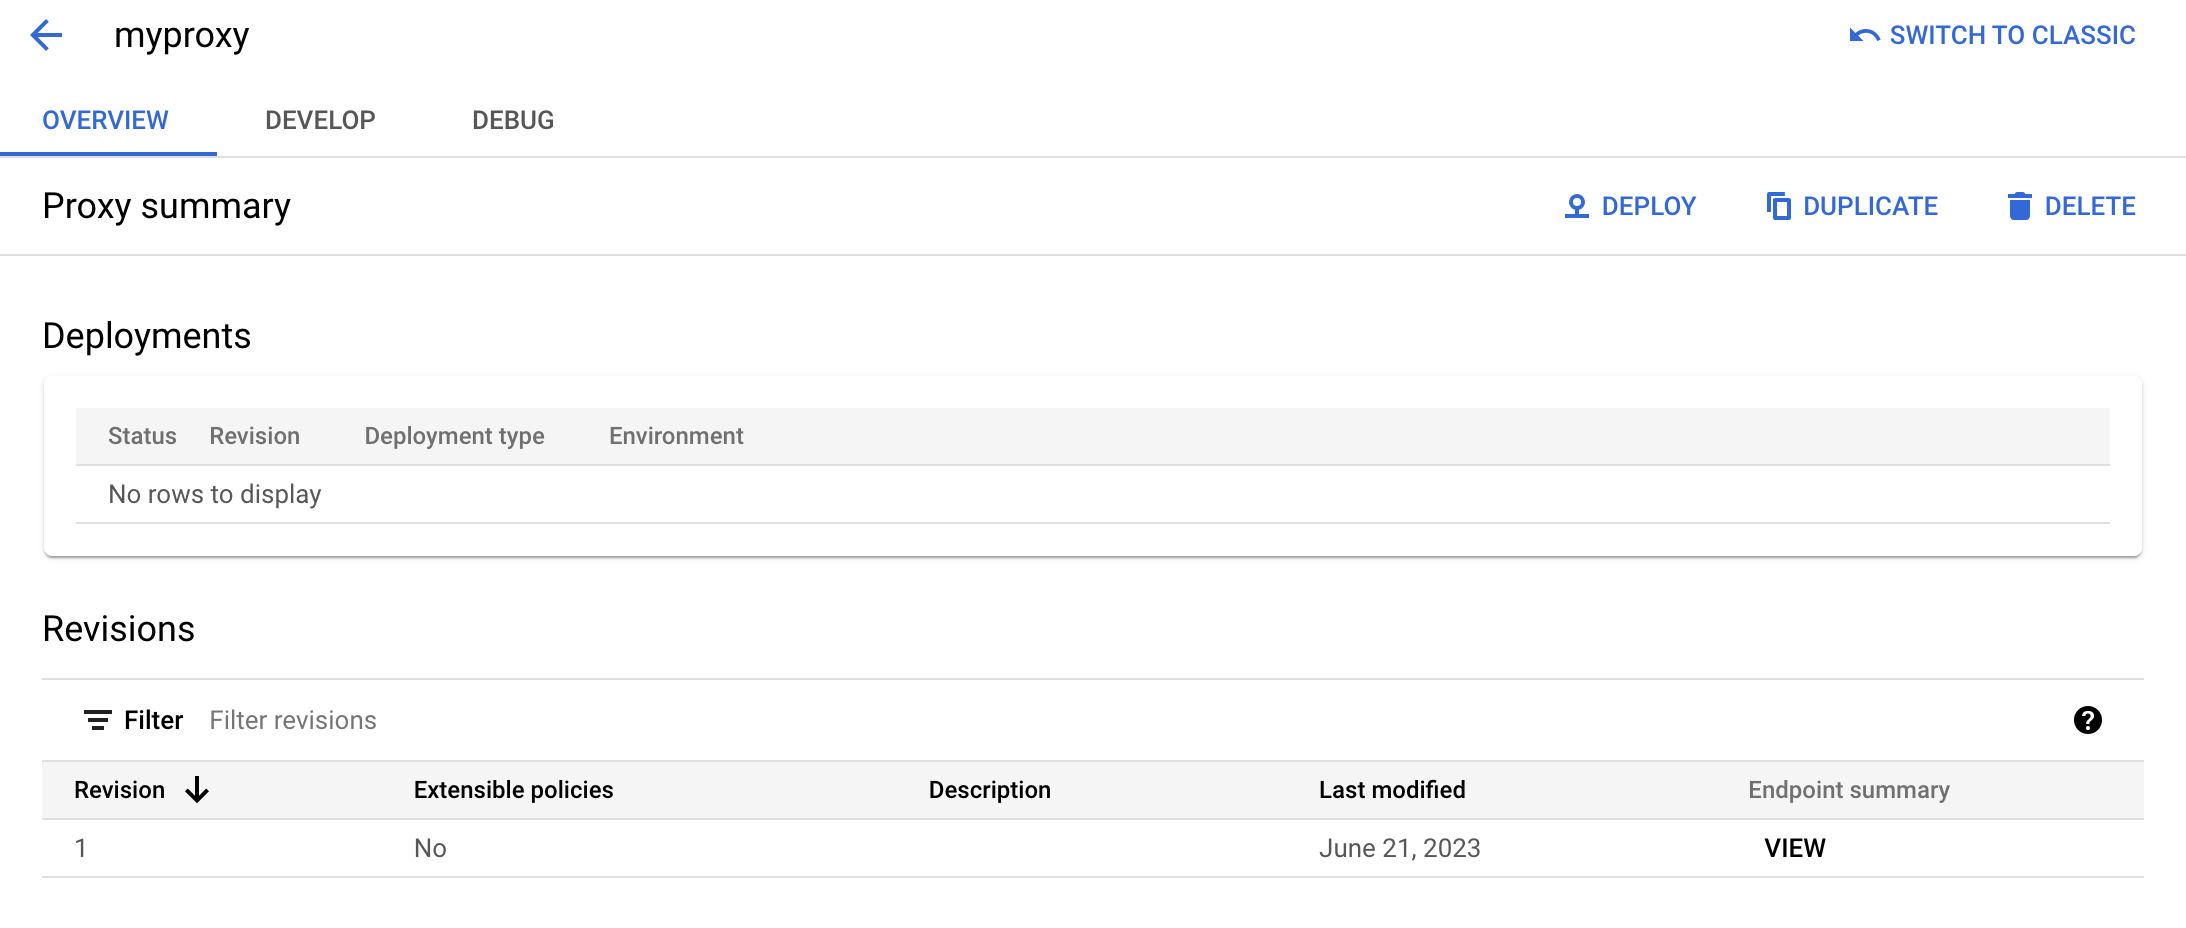
Wenn Sie den Proxy bereitstellen, wird im Abschnitt Bereitstellungen die Nummer der Überarbeitung angezeigt, die 1 ist, wenn Sie das erste Mal bereitstellen. In der Spalte Status werden mit einer grünen Statusanzeige die Umgebungen angezeigt, in denen der Proxy bereitgestellt wird.
Klassisches Apigee
So erstellen Sie einen einfachen API-Proxy in der klassischen Apigee-Benutzeroberfläche:
- Melden Sie sich bei der Apigee-UI an.
- Klicken Sie in der Hauptansicht auf API-Proxys.
- Wählen Sie in der Drop-down-Liste Umgebung die Umgebung aus, in der Sie einen neuen API-Proxy erstellen möchten.
Die Hybrid-Benutzeroberfläche zeigt eine Liste der API-Proxys für diese Umgebung an. Wenn Sie noch keine Proxys erstellt haben, ist die Liste leer.
- Klicken Sie auf Neu erstellen.
Der Assistent zum Erstellen von Proxys wird gestartet.
- Klicken Sie auf Proxy umkehren (am häufigsten).

Die Seite Proxy-Details wird angezeigt.
- Konfigurieren Sie den Proxy mit den folgenden Einstellungen:
- Name: Geben Sie
getstartedein. Wenn bereits ein Proxy mit diesem Namen vorhanden ist, wählen Sie einen anderen Namen. - Basispfad: Behalten Sie die Einstellung
/getstartedbei. Der Basispfad ist Teil der URL, die zum Senden von Anfragen an Ihre API verwendet wird. Apigee verwendet die URL, um eingehende Anfragen zuzuordnen und an den richtigen API-Proxy weiterzuleiten. - Beschreibung (optional): Geben Sie eine Beschreibung für Ihren neuen API-Proxy ein, z. B.
Get started API proxy. - Ziel (vorhandene API): Geben Sie
https://mocktarget.apigee.netein. Dies definiert die Ziel-URL, die Apigee für eine Anfrage an den API-Proxy aufruft. Der simulierte Zieldienst wird bei Apigee gehostet und gibt einfache Daten zurück. Ein API-Schlüssel oder ein Zugriffstoken sind nicht erforderlich.
Die Details Ihres API-Proxys sollten so aussehen:
- Name: Geben Sie
- Klicken Sie auf Weiter.
- Wählen Sie in der Ansicht Allgemeine Richtlinien unter Sicherheit: Autorisierung die Option Passthrough (keine Autorisierung) aus.
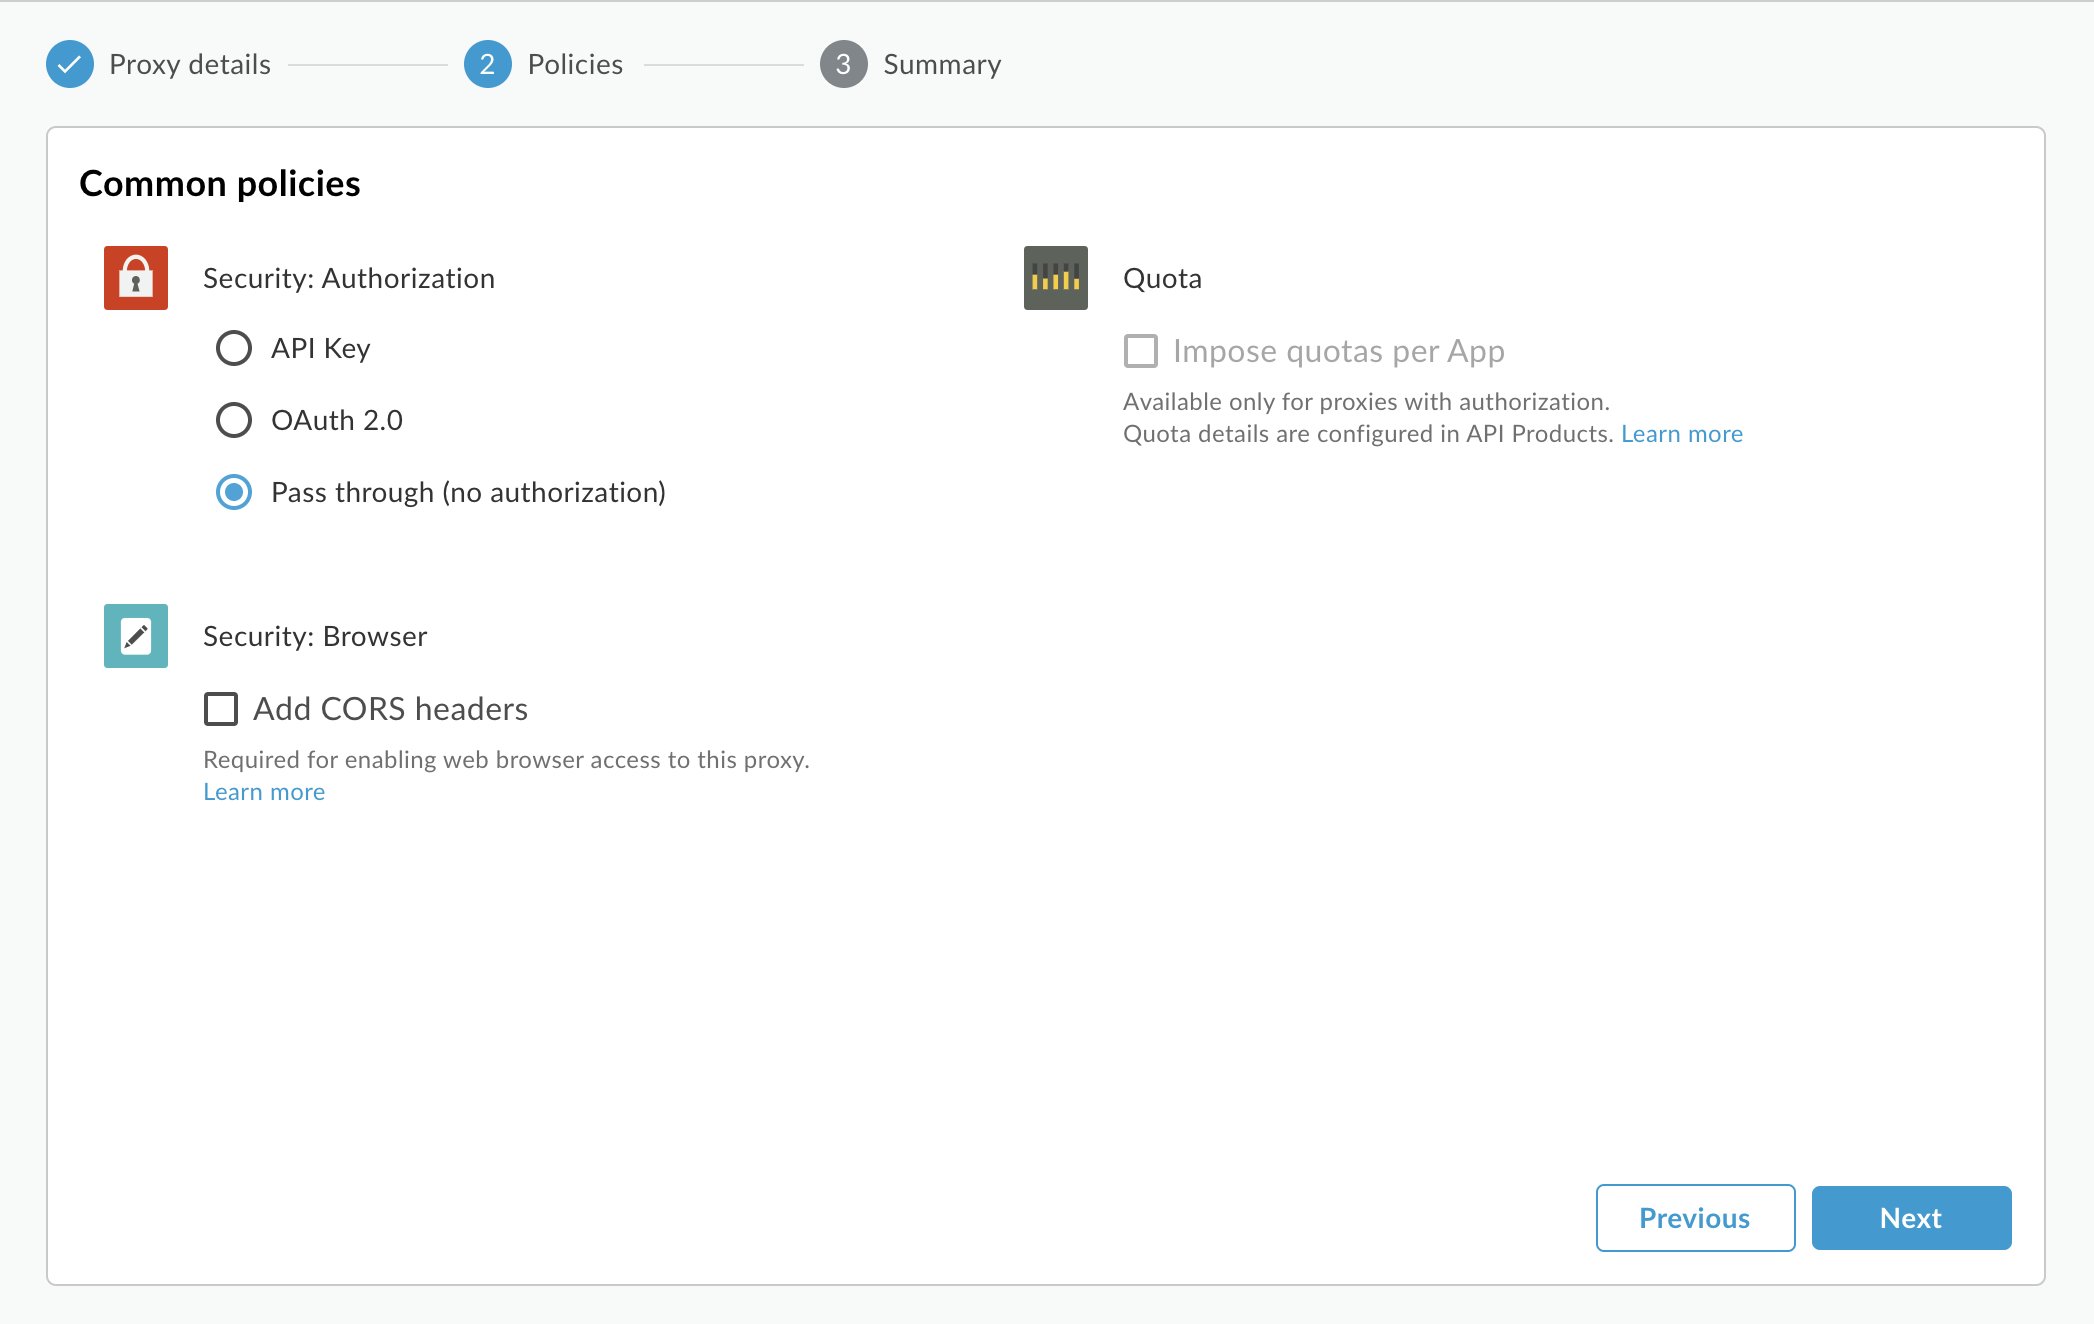
- Klicken Sie auf Weiter.
- Wählen Sie auf der Seite Zusammenfassung die gewünschte Umgebung aus und klicken Sie auf Erstellen und bereitstellen.
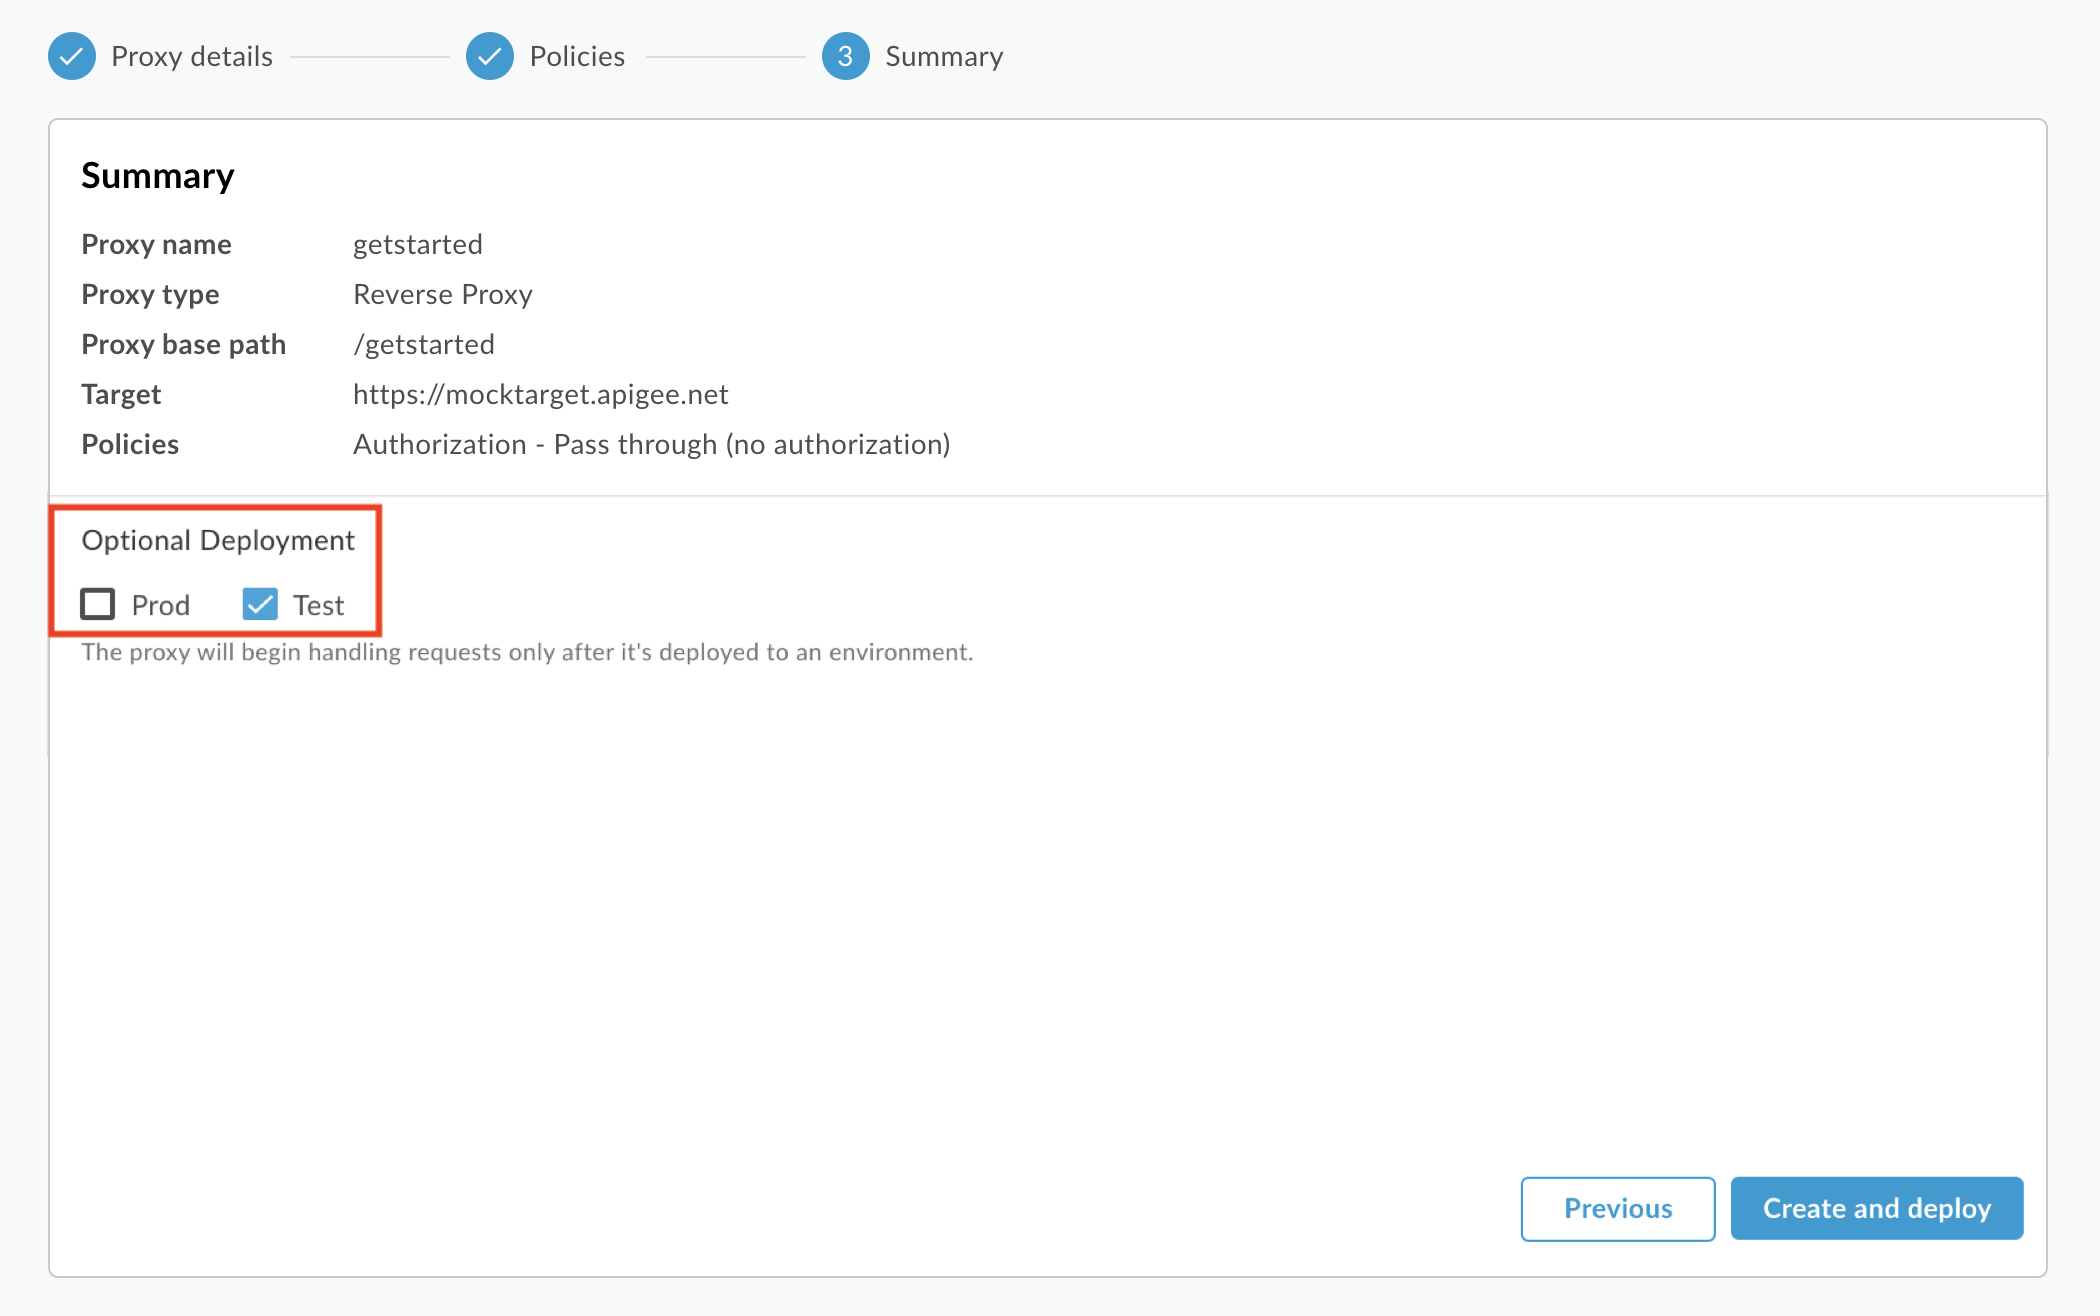
Der neue API-Proxy wird erstellt und in der ausgewählten Umgebung bereitgestellt.
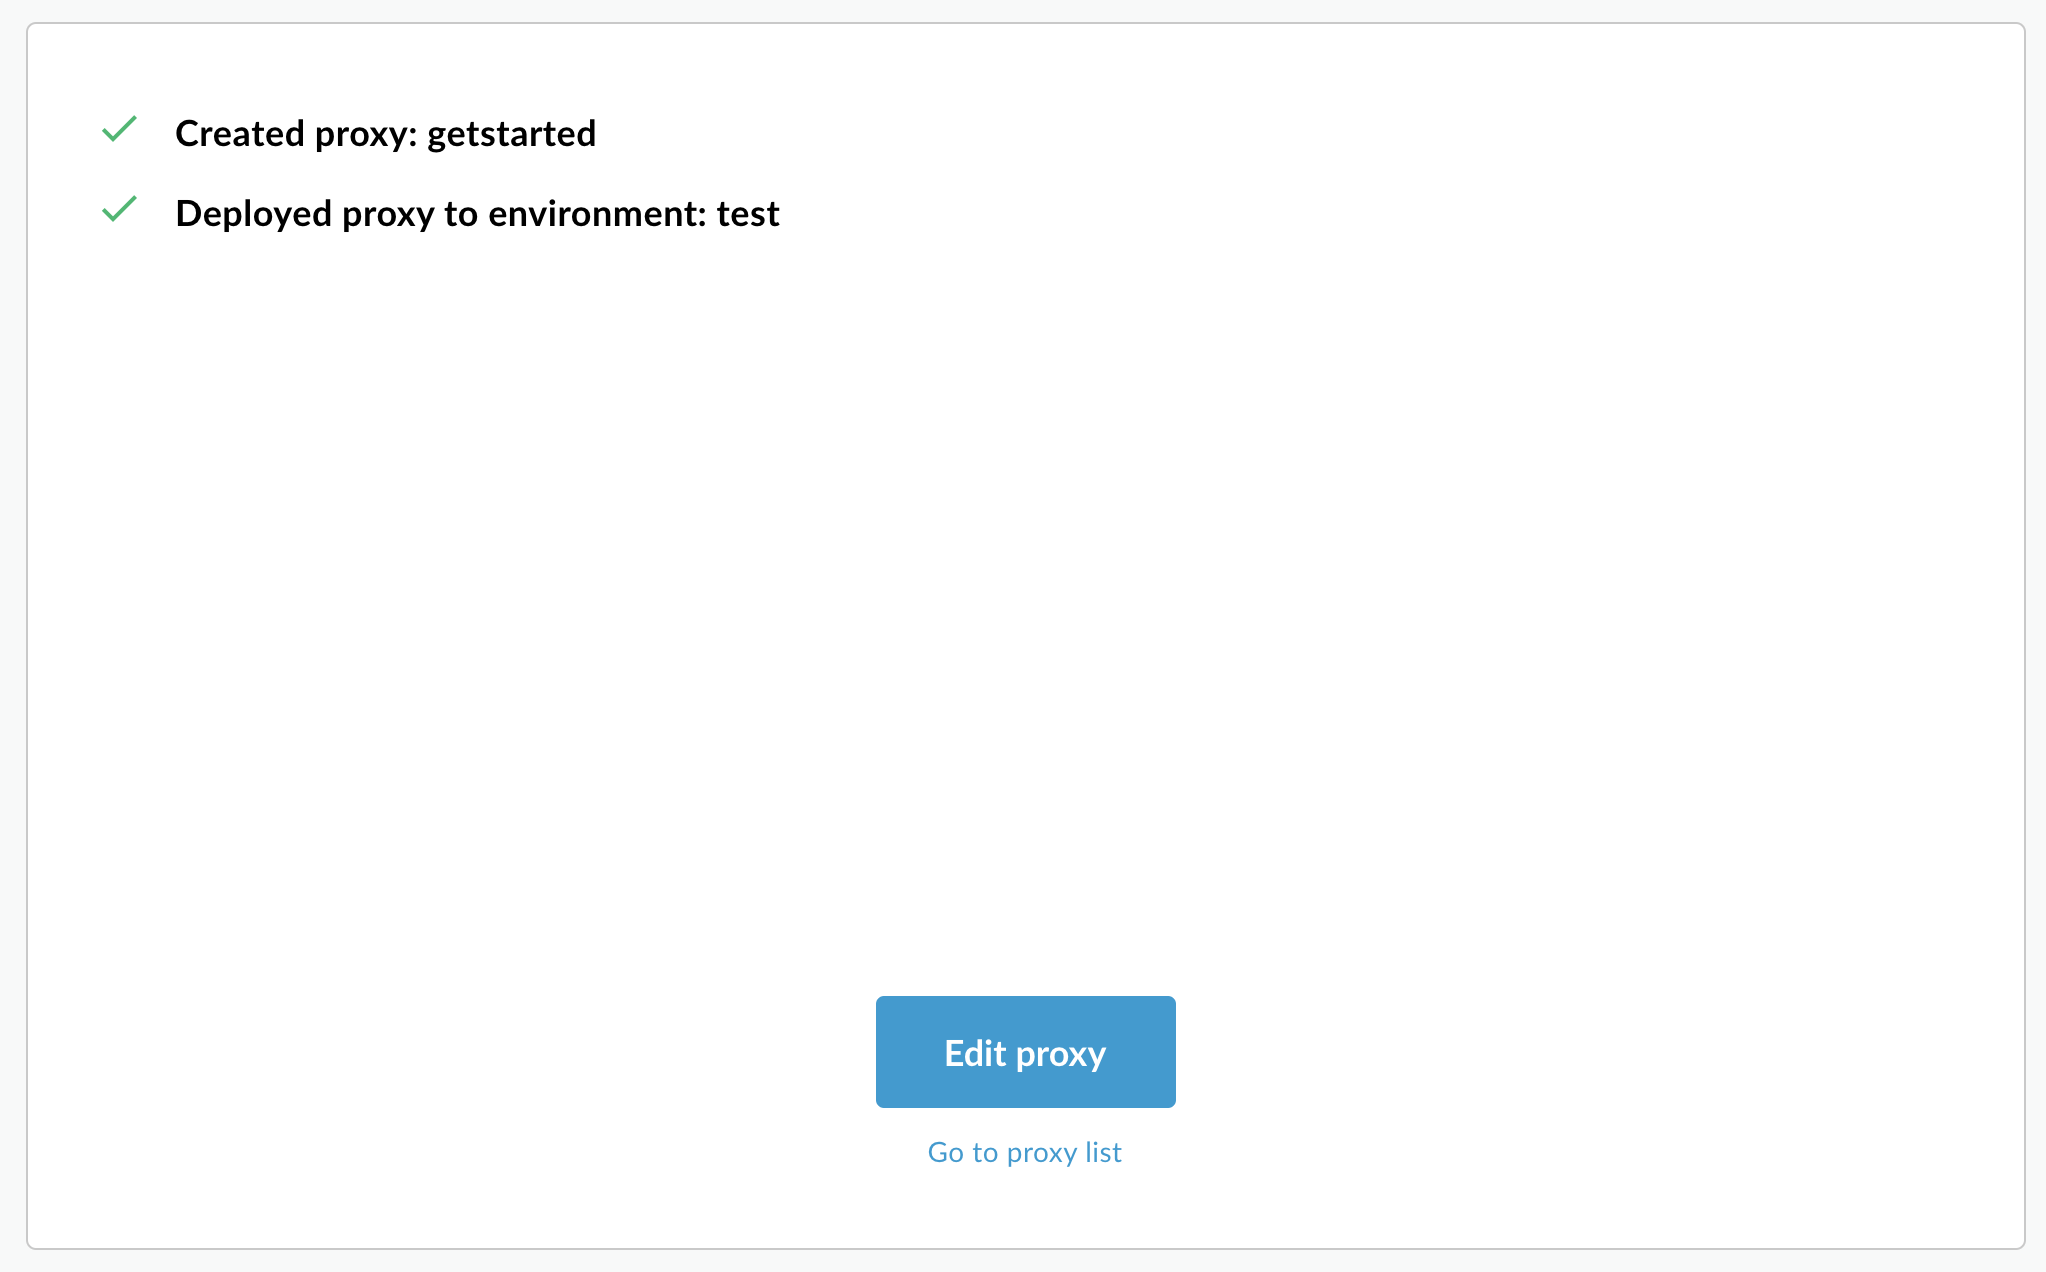
- Klicken Sie auf Proxy bearbeiten, um den Tab "Übersicht" im Proxy-Editor aufzurufen.

In der Liste der API-Proxys ist der Bereitstellungsstatus des API-Proxys getstarted für die Umgebung test grün.

Apigee API
Erstellen Sie einen API-Proxy in Ihrer Apigee-Organisation, indem Sie eine POST-Anfrage an die folgende Ressource senden:
https://apigee.googleapis.com/v1/organizations/$ORG/apis
Sie müssen den Namen des API-Proxys mit dem Abfrageparameter name definieren. Die im Namen verwendeten Zeichen sollten auf folgende begrenzt sein: A-Za-z0-9._\-$ %
Optional können Sie ein API-Proxy-Konfigurationsset mit den folgenden Schritten importieren:
- Setzen Sie den Abfrageparameter
actionaufimport. - Setzen Sie den
Content-type-Header aufmultipart/form-data. - Übergeben Sie den Namen des API-Proxy-Konfigurationssets auf Ihrem lokalen Dateisystem.
Das folgende Beispiel zeigt, wie Sie einen API-Proxy erstellen, indem Sie mithilfe der API ein API-Proxy-Konfigurations-Bundle (helloworld-config.zip) in Ihr lokales Dateisystem importieren.
curl "https://apigee.googleapis.com/v1/organizations/$ORG/apis?name=helloworld&action=import" \
  -X POST \
  -H "Authorization: Bearer $TOKEN" \
  -H "Content-type: multipart/form-data" \
  -F "file=@helloworld-config.zip"
Dabei ist $TOKEN auf Ihr OAuth 2.0-Zugriffstoken festgelegt. Weitere Informationen hierzu finden Sie unter OAuth 2.0-Zugriffstoken abrufen. Informationen zu den in diesem Beispiel verwendeten curl-Optionen finden Sie unter curl verwenden. Eine Beschreibung der Umgebungsvariablen, die Sie verwenden können, finden Sie unter Umgebungsvariablen für Apigee API-Anfragen festlegen.
Im Folgenden finden Sie ein Beispiel für die Antwortausgabe:
{
  "basepaths": [
    "/helloworld"
  ],
  "configurationVersion": {
    "majorVersion": 4
  },
  "createdAt": "1559145292799",
  "displayName": "helloworld",
  "entityMetaDataAsProperties": {
    "bundle_type": "zip",
    "subType": "Proxy",
    "lastModifiedAt": "1559145292799",
    "createdAt": "1559145292799"
  },
  "lastModifiedAt": "1559145292799",
  "name": "helloworld",
  "policies": [
    "verify-api-key",
    "remove-query-param-apikey",
    "OAuth-v20-1"
  ],
  "proxies": [
    "default"
  ],
  "proxyEndpoints": [
    "default"
  ],
  "resourceFiles": {},
  "targetEndpoints": [
    "default"
  ],
  "targets": [
    "default"
  ],
  "type": "Application",
  "revision": "1",
  "description": "Hello world"
}
Weitere Informationen zum Erstellen eines API-Proxys finden Sie in der Apigee API unter der Methode apis.create. Alle für API-Proxys verfügbaren Methoden finden Sie unter API Proxies API.
Nächste Schritte
Nachdem Sie einen einfachen API-Proxy erstellt haben, führen Sie in der Regel einen der folgenden Schritte aus:
- Fügen Sie Richtlinien, Sicherheit und andere Features der Apigee-Plattform hinzu, wie unter Grundlegendes zu APIs und API-Proxys beschrieben.
- Stellen Sie das Feature in Ihrem Cluster bereit, wie unter API-Proxy bereitstellen beschrieben.