Buat proxy di UI Apigee, atau menggunakan API, seperti yang dijelaskan di bagian berikut.
Kolom utama proxy API
Ikuti panduan berikut saat membuat proxy API:
Kolom
Deskripsi
Nama proxy API
Nama yang ditampilkan untuk API Anda. Tentukan karakter alfanumerik, tanda hubung (-), atau garis bawah (_).
Jalur dasar proxy API
Fragmen URI yang muncul setelah alamat http://[host] atau https://[host] proxy API Anda. Apigee menggunakan URI jalur dasar untuk mencocokkan dan merutekan pesan permintaan masuk ke proxy API yang tepat.
Menggunakan karakter pengganti di jalur dasar
Gunakan satu atau beberapa karakter pengganti di jalur dasar proxy API untuk memastikan proxy API Anda siap digunakan pada masa mendatang.
Kami mengizinkan penentuan satu karakter pengganti * di antara dua karakter garis miring /: /*/.
Misalnya, jalur dasar /team/*/members memungkinkan klien memanggil
https://[host]/team/blue/members dan https://[host]/team/green/members tanpa
Anda perlu membuat proxy API baru untuk mendukung tim baru.
Anda dapat mengganti sejumlah token di basepath dengan mengikuti pola ini.
Pola lainnya, termasuk /**, /something*, atau /*something, tidak didukung.
Deskripsi
(Opsional). Deskripsi untuk proxy API.
URL target/Target backend
URL (termasuk HTTP atau HTTPS) layanan backend yang dipanggil oleh proxy API ini.
Space
(Opsional) Jika organisasi Anda telah mengaktifkan Apigee Spaces, Anda dapat mengaitkan proxy API dengan Ruang.
Untuk mengetahui informasi selengkapnya, lihat Ringkasan Ruang Apigee.
Langkah-langkah untuk membuat proxy API
Untuk membuat proxy API menggunakan UI atau API:
Apigee di Konsol Cloud
Untuk membuat proxy di Apigee di konsol Cloud:
Di konsol Google Cloud , buka halaman Proxy development > API proxies.
Di panel Create a proxy, di bagian Proxy template,
pilih Reverse proxy (Most common).
Di bagian Detail proxy, masukkan informasi berikut:
Nama proxy: Masukkan nama untuk proxy, seperti myproxy.
Jalur Dasar: Otomatis ditetapkan ke nilai yang Anda masukkan untuk
Proxy name. Jalur
Dasar adalah bagian dari URL yang digunakan untuk membuat permintaan ke API Anda. Apigee menggunakan URL untuk
mencocokkan dan merutekan permintaan masuk ke proxy API yang sesuai.
Deskripsi (Opsional): Masukkan deskripsi untuk proxy API baru Anda, seperti "Menguji Apigee dengan proxy sederhana".
Target (API yang Ada): Masukkan https://mocktarget.apigee.net.
Ini menentukan
URL target yang dipanggil Apigee pada permintaan ke proxy API. Layanan mocktarget dihosting di Apigee dan menampilkan data sederhana. Tidak memerlukan kunci API atau token akses.
Ruang (Opsional): Jika organisasi Anda mengaktifkan Apigee Spaces, Anda dapat mengaitkan proxy API dengan Ruang yang dipilih dari daftar opsi yang tersedia.
Untuk mengetahui informasi selengkapnya, lihat Ringkasan Ruang Apigee.
Klik Berikutnya.
Deploy (opsional):
Lingkungan deployment: Opsional. Gunakan kotak centang untuk memilih satu atau beberapa lingkungan tempat Anda akan men-deploy proxy. Jika Anda memilih untuk tidak men-deploy proxy pada saat ini, biarkan kolom Lingkungan deployment kosong. Anda dapat men-deploy
proxy nanti.
Akun Layanan: Opsional. Lampirkan akun layanan ke deployment Anda untuk memungkinkan
proxy Anda mengakses layanan Google Cloud , seperti yang ditentukan dalam peran dan izin akun layanan.
Klik Buat.
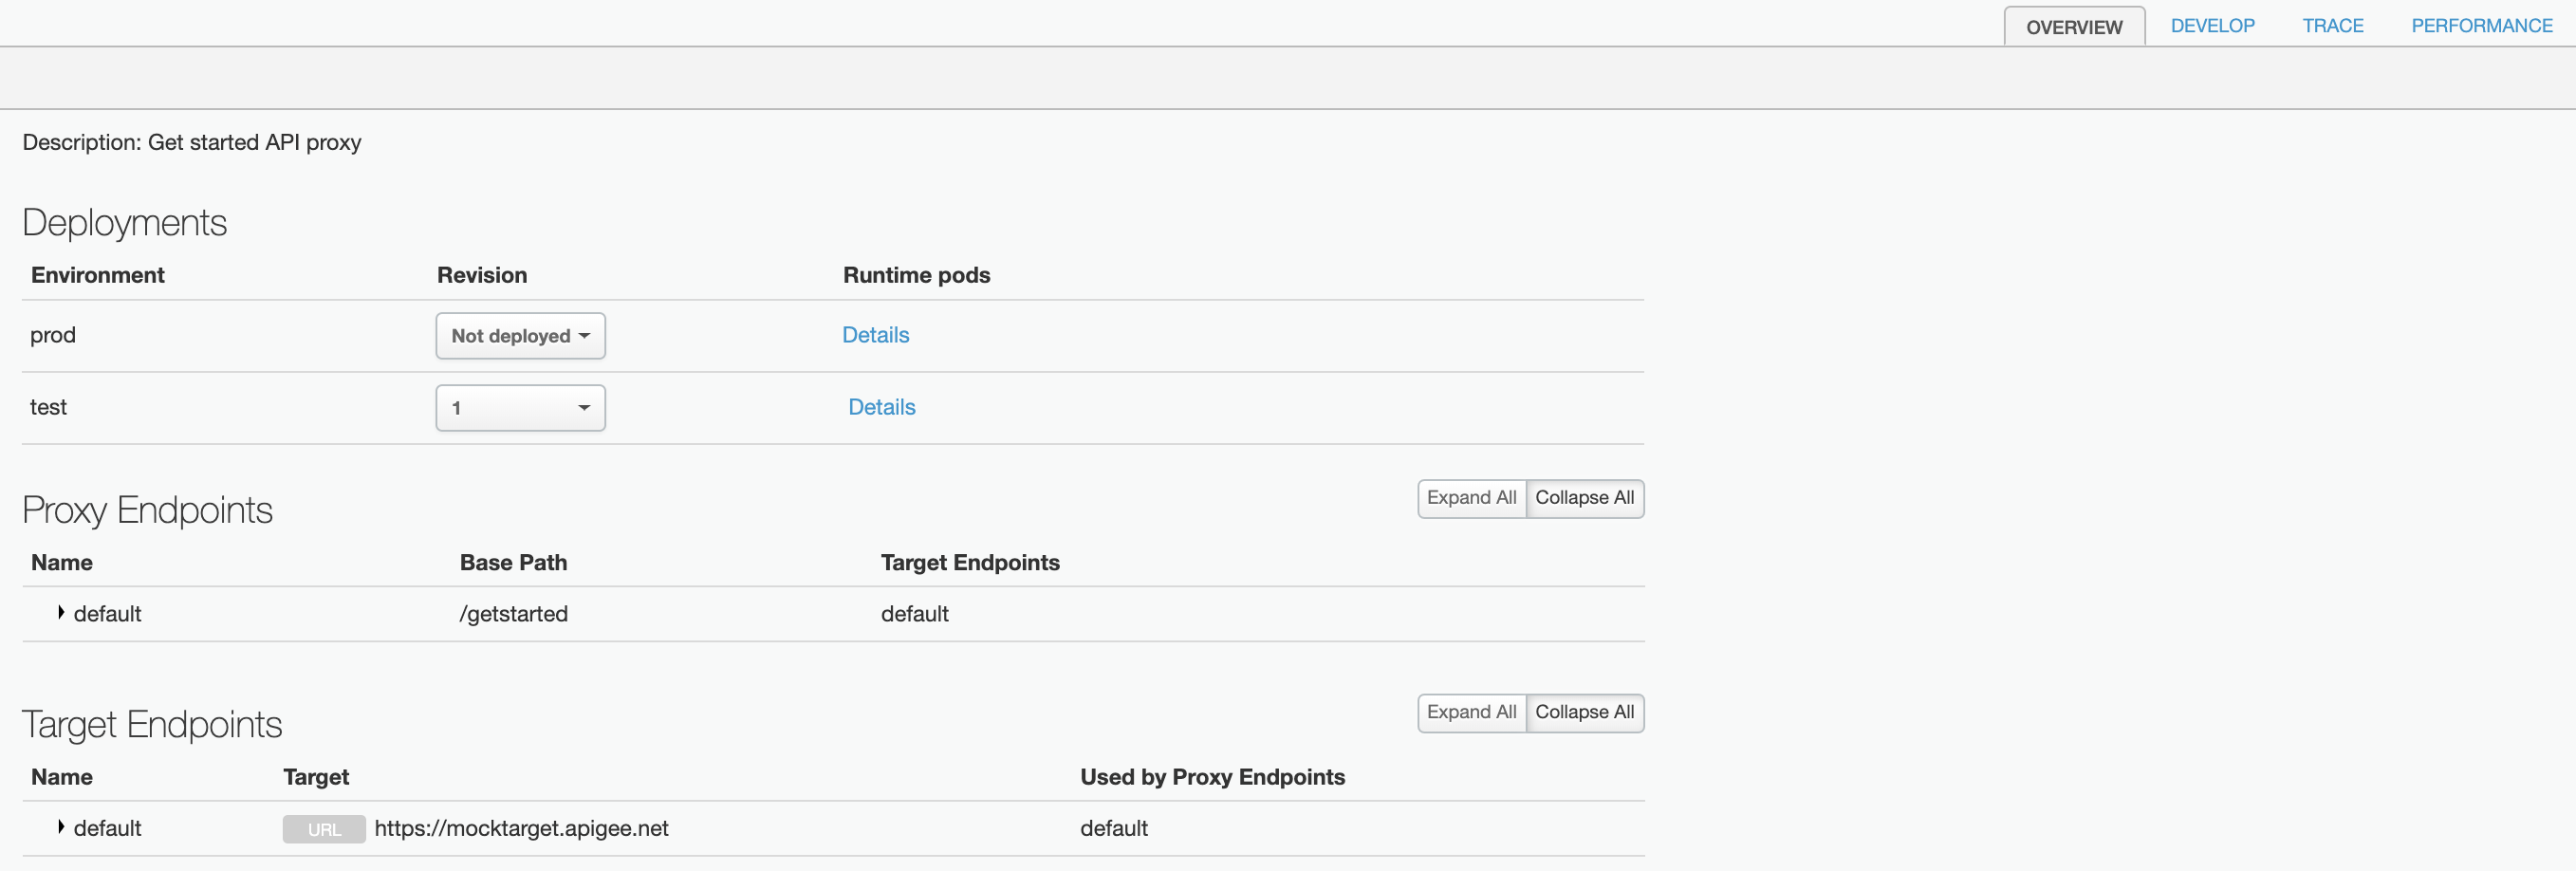
Apigee akan membuat proxy baru dan menampilkan ringkasan detail proxy di tampilan
Proxy summary.
Jika Anda memilih untuk men-deploy proxy, bagian Deployments akan menampilkan nomor Revision, yang bernilai 1 saat Anda pertama kali men-deploy. Kolom Status menampilkan
lingkungan tempat proxy di-deploy dengan indikator status hijau.
Apigee Klasik
Untuk membuat proxy API sederhana di UI Apigee klasik:
Dari menu drop-down Environment, pilih lingkungan tempat Anda ingin
membuat proxy API baru.
UI hybrid menampilkan daftar proxy API untuk lingkungan tersebut. Jika Anda belum membuat
proxy, daftar akan kosong.
Klik Buat Baru.
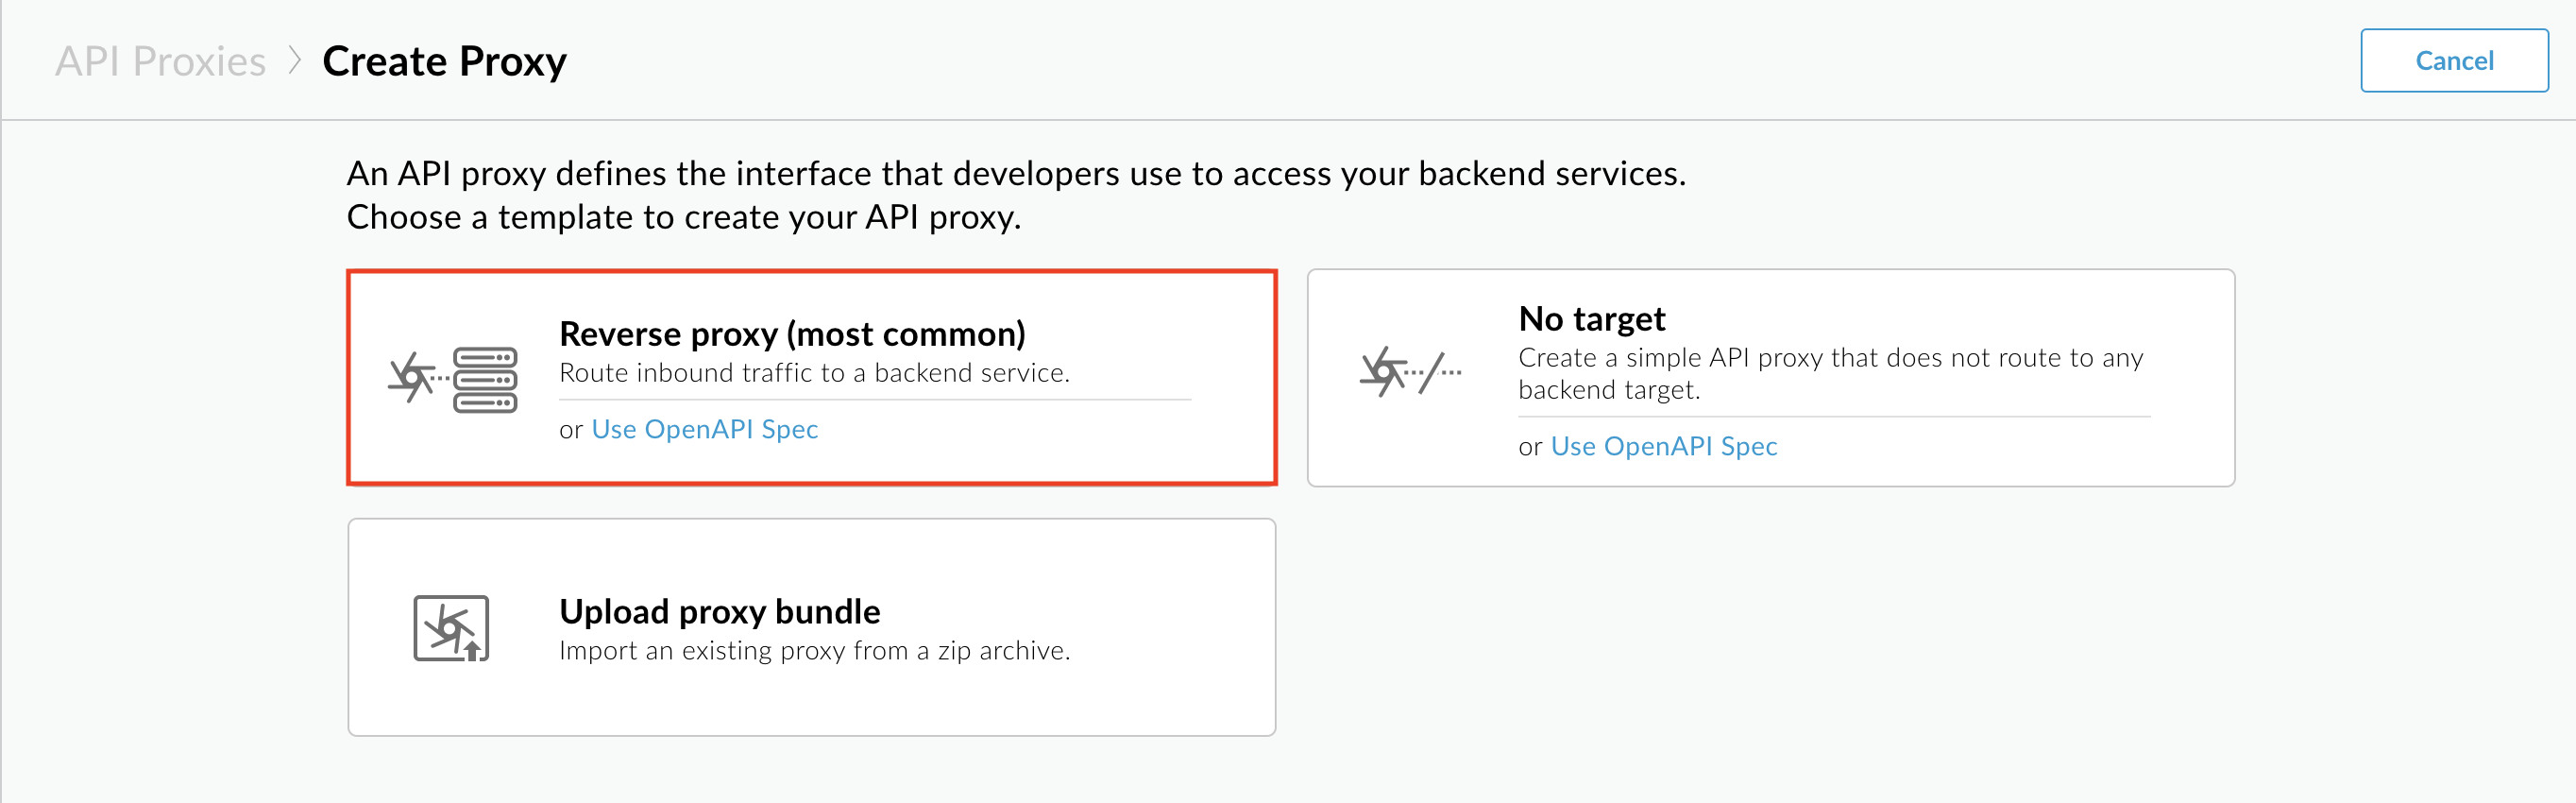
Wizard Create Proxy akan dimulai.
Klik Reverse proxy (paling umum).
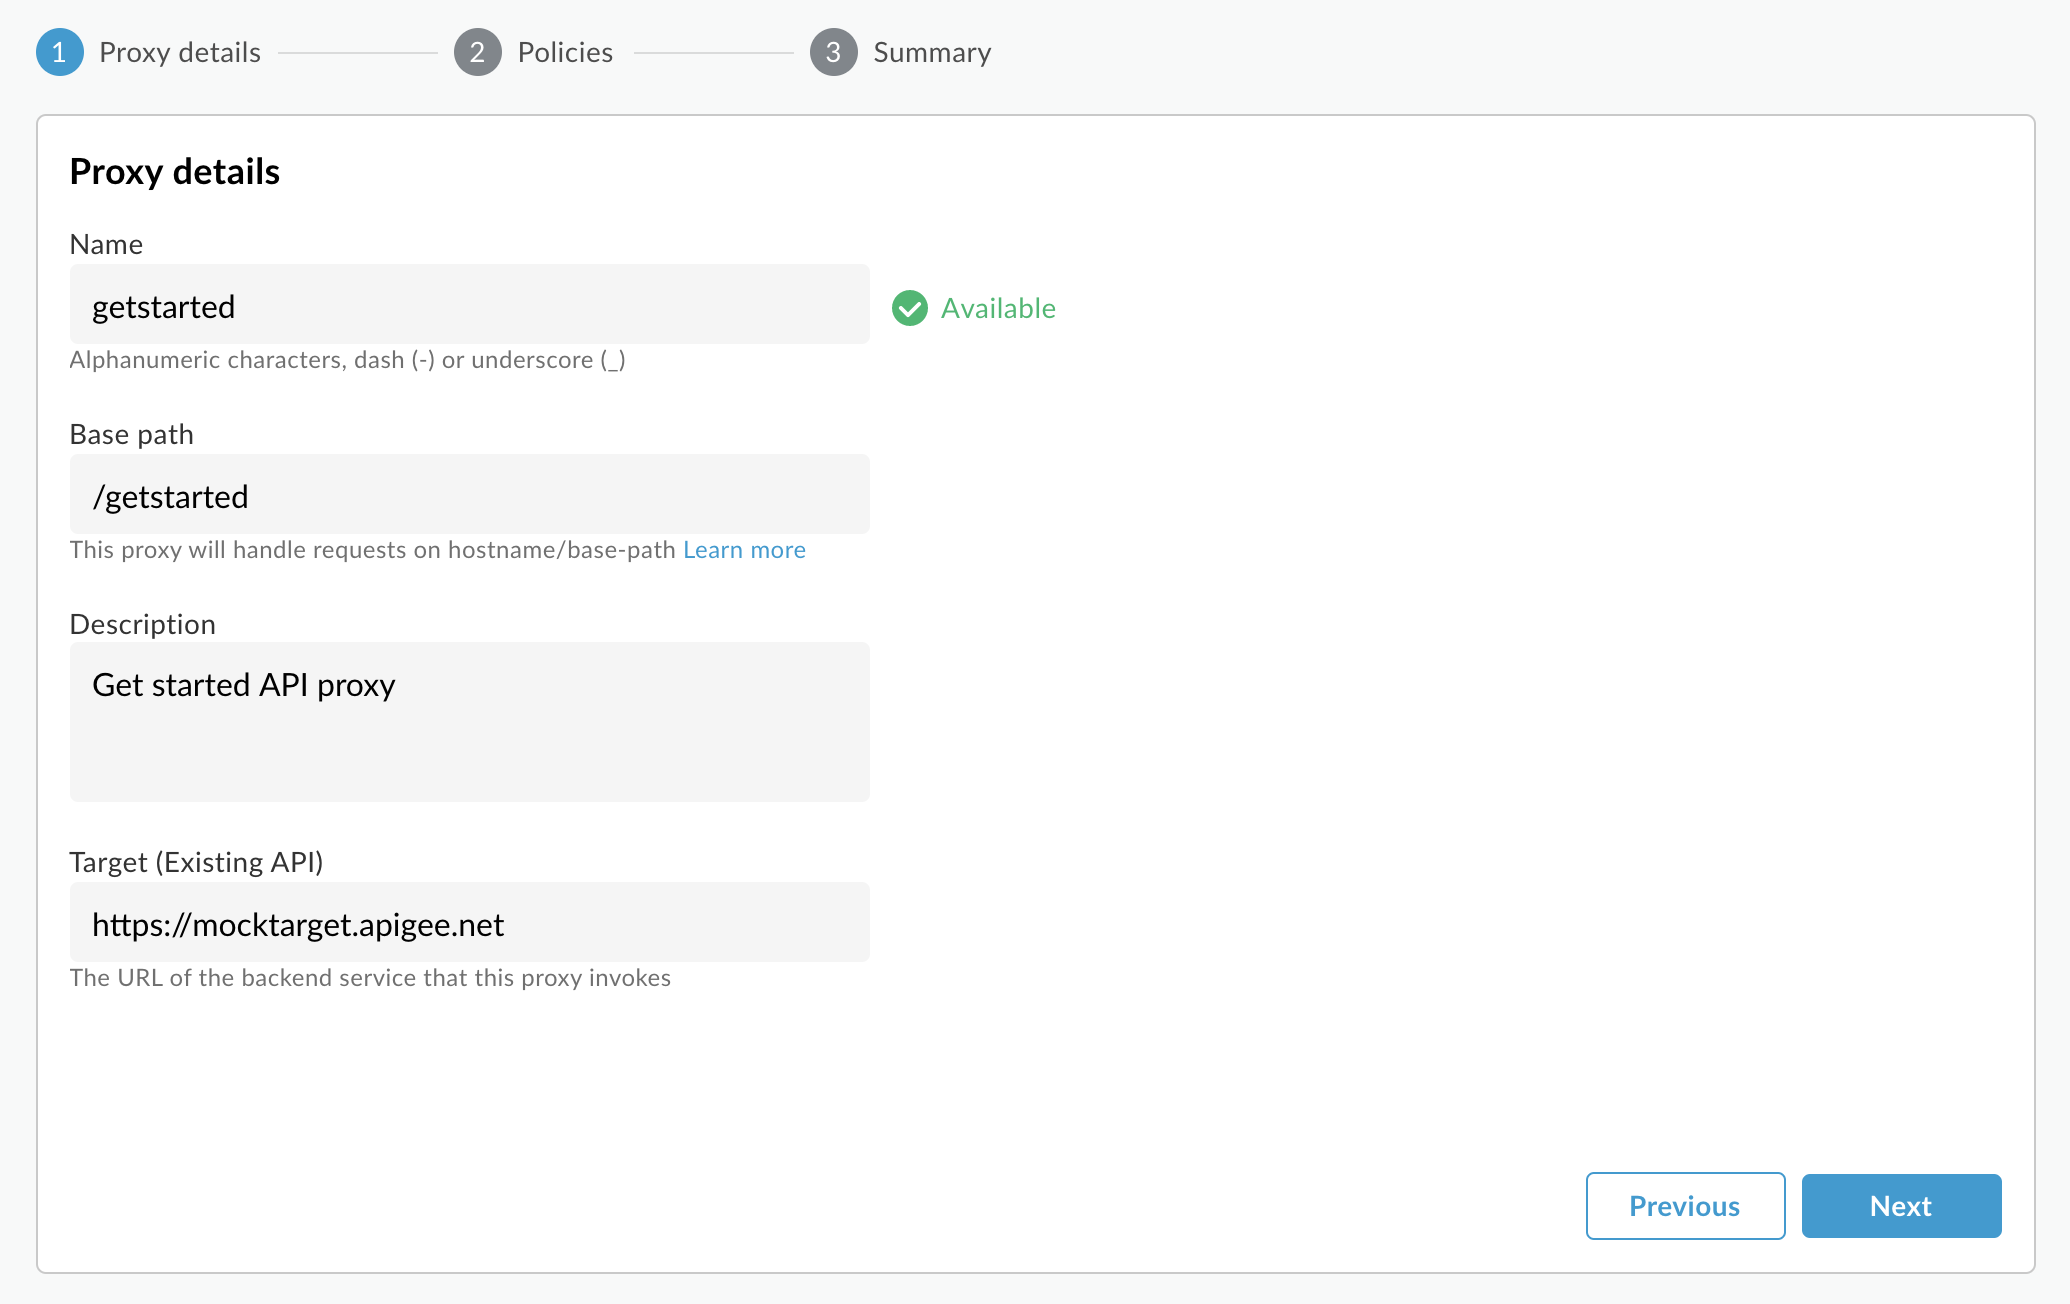
Halaman Proxy details akan ditampilkan.
Konfigurasi proxy Anda dengan setelan berikut:
Nama: Masukkan getstarted. Jika proxy dengan nama ini sudah ada,
pilih nama lain.
Jalur Dasar: Biarkan setelan ini ditetapkan ke /getstarted. Jalur
Dasar adalah bagian dari URL yang digunakan untuk membuat permintaan ke API Anda. Apigee menggunakan URL untuk
mencocokkan dan merutekan permintaan masuk ke proxy API yang sesuai.
Deskripsi (Opsional): Masukkan deskripsi untuk proxy API baru Anda, seperti
Get started API proxy.
Target (API yang Ada): Masukkan https://mocktarget.apigee.net. Ini menentukan
URL target yang dipanggil Apigee pada permintaan ke proxy API. Layanan mocktarget dihosting di Apigee dan menampilkan data sederhana. Tidak memerlukan kunci API atau token akses.
Detail proxy API Anda akan terlihat seperti berikut:
Klik Berikutnya.
Di tampilan Kebijakan umum, di bagian Keamanan:
Otorisasi, pilih Teruskan (tanpa otorisasi).
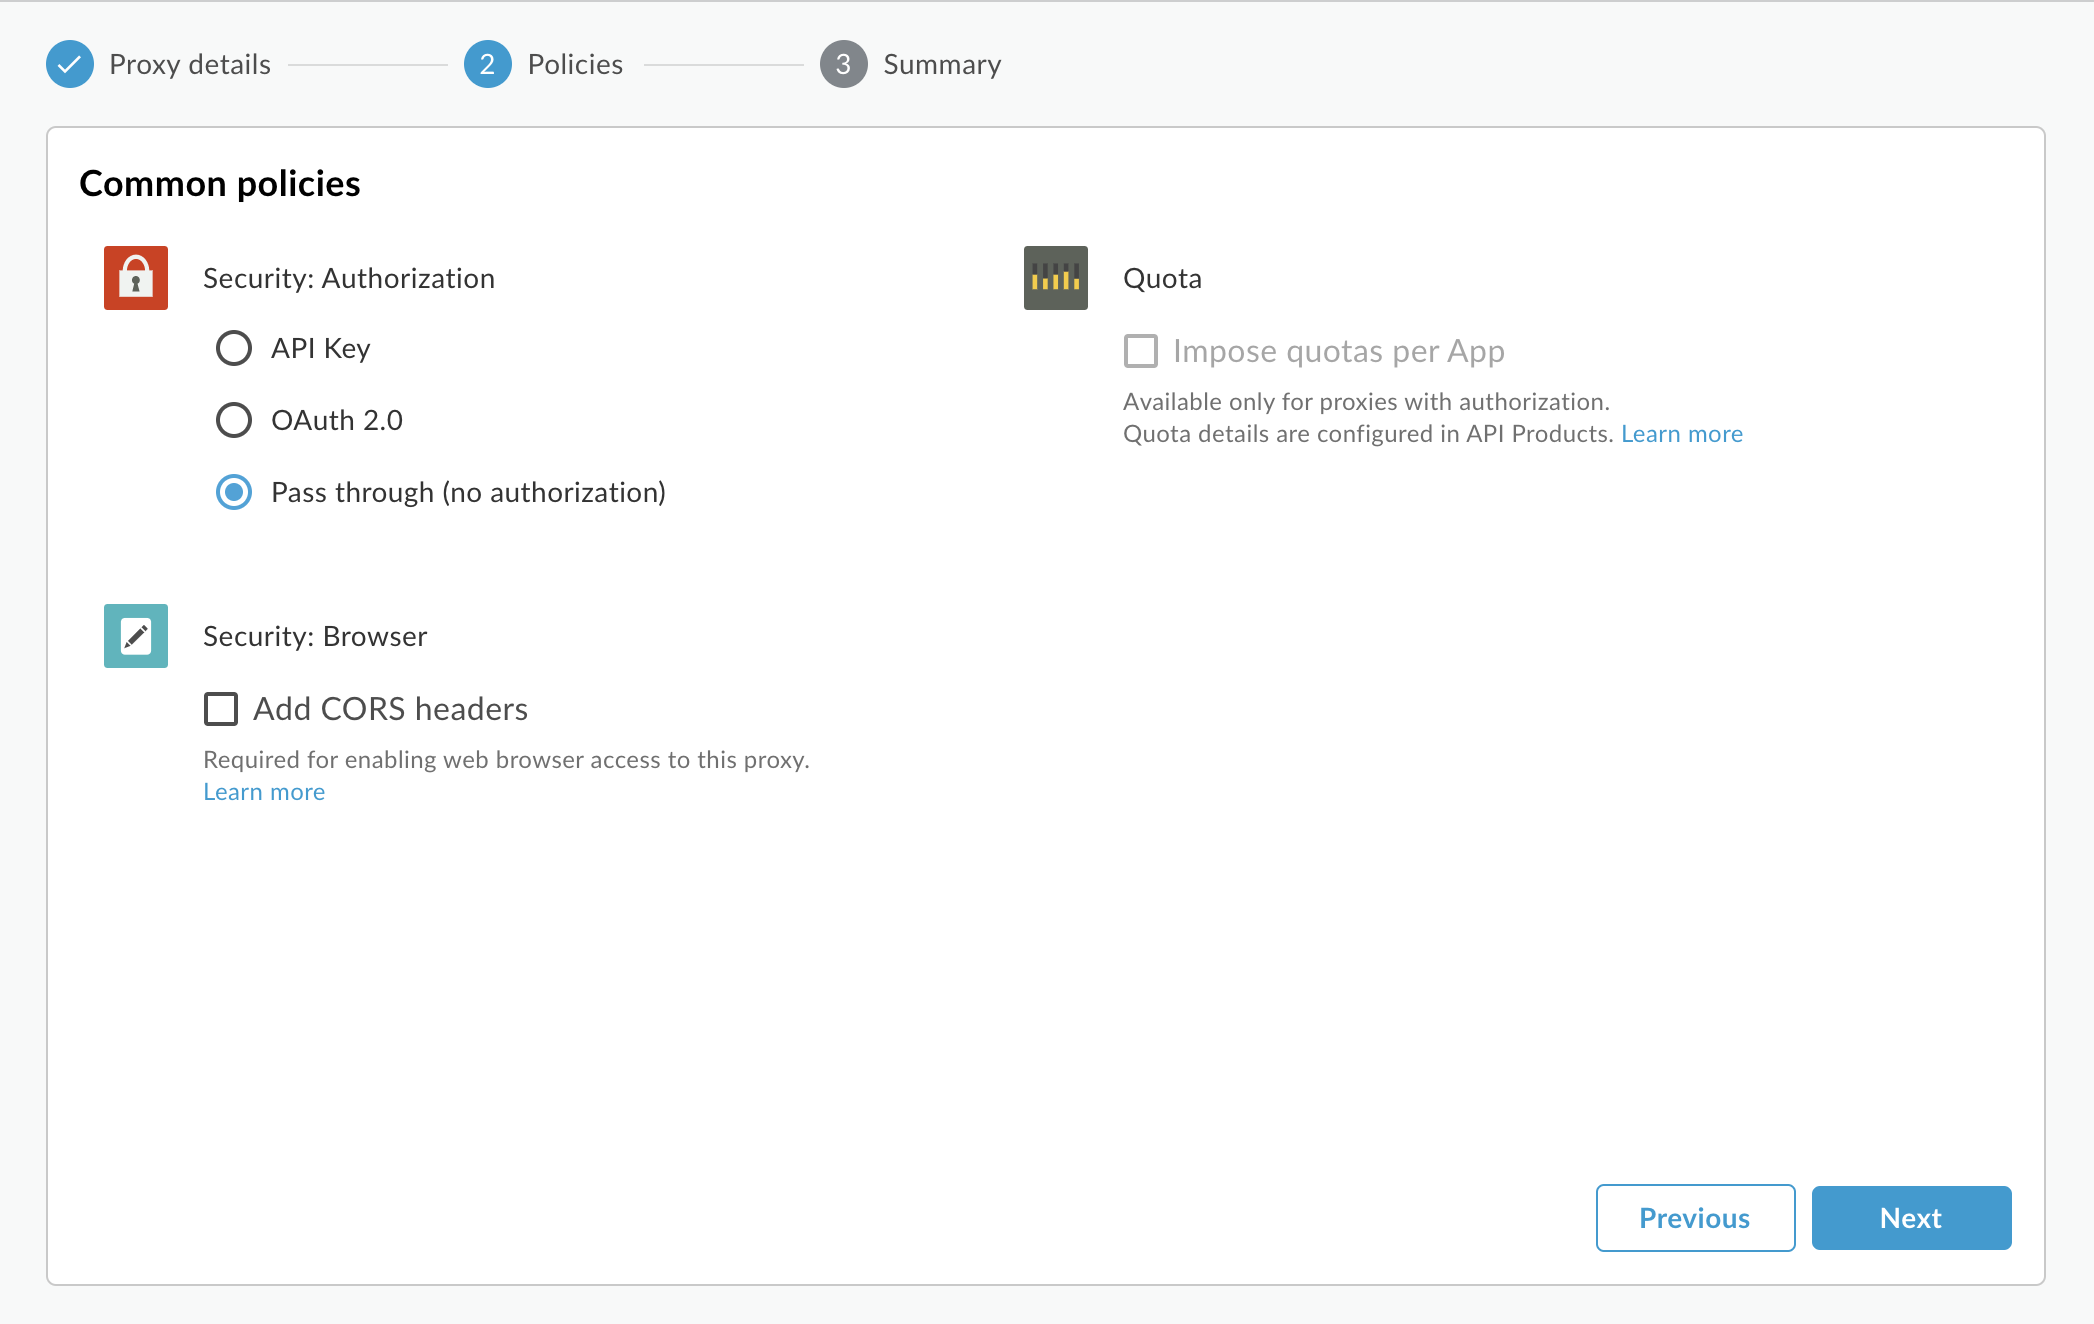
Klik Berikutnya.
Di halaman Summary, pilih lingkungan deployment, jika diinginkan,
lalu klik Create and deploy.
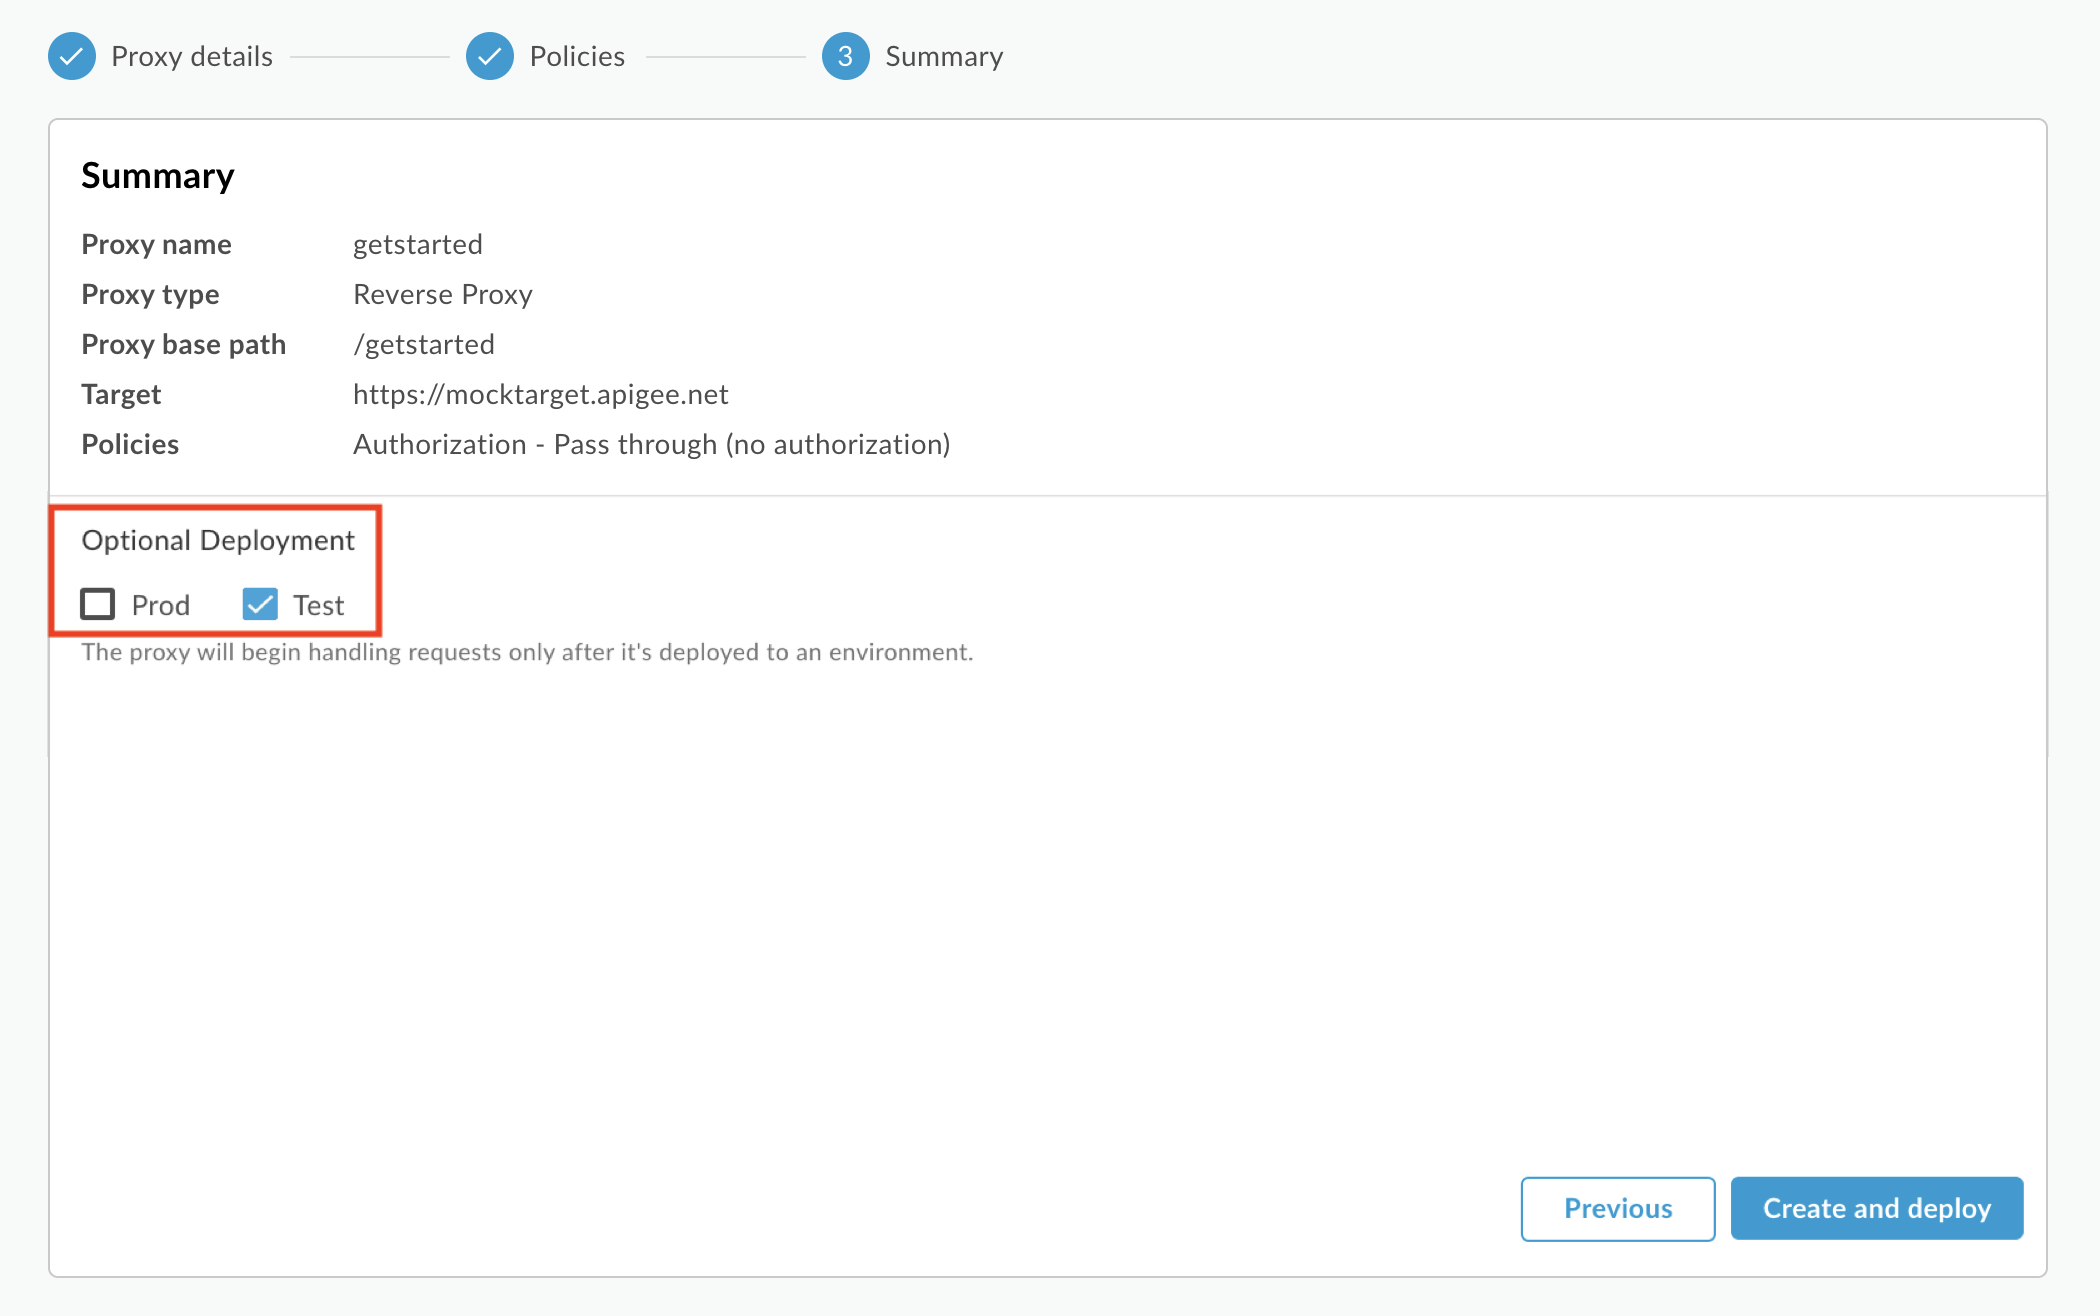
Proxy API baru Anda dibuat
dan di-deploy di lingkungan yang dipilih.
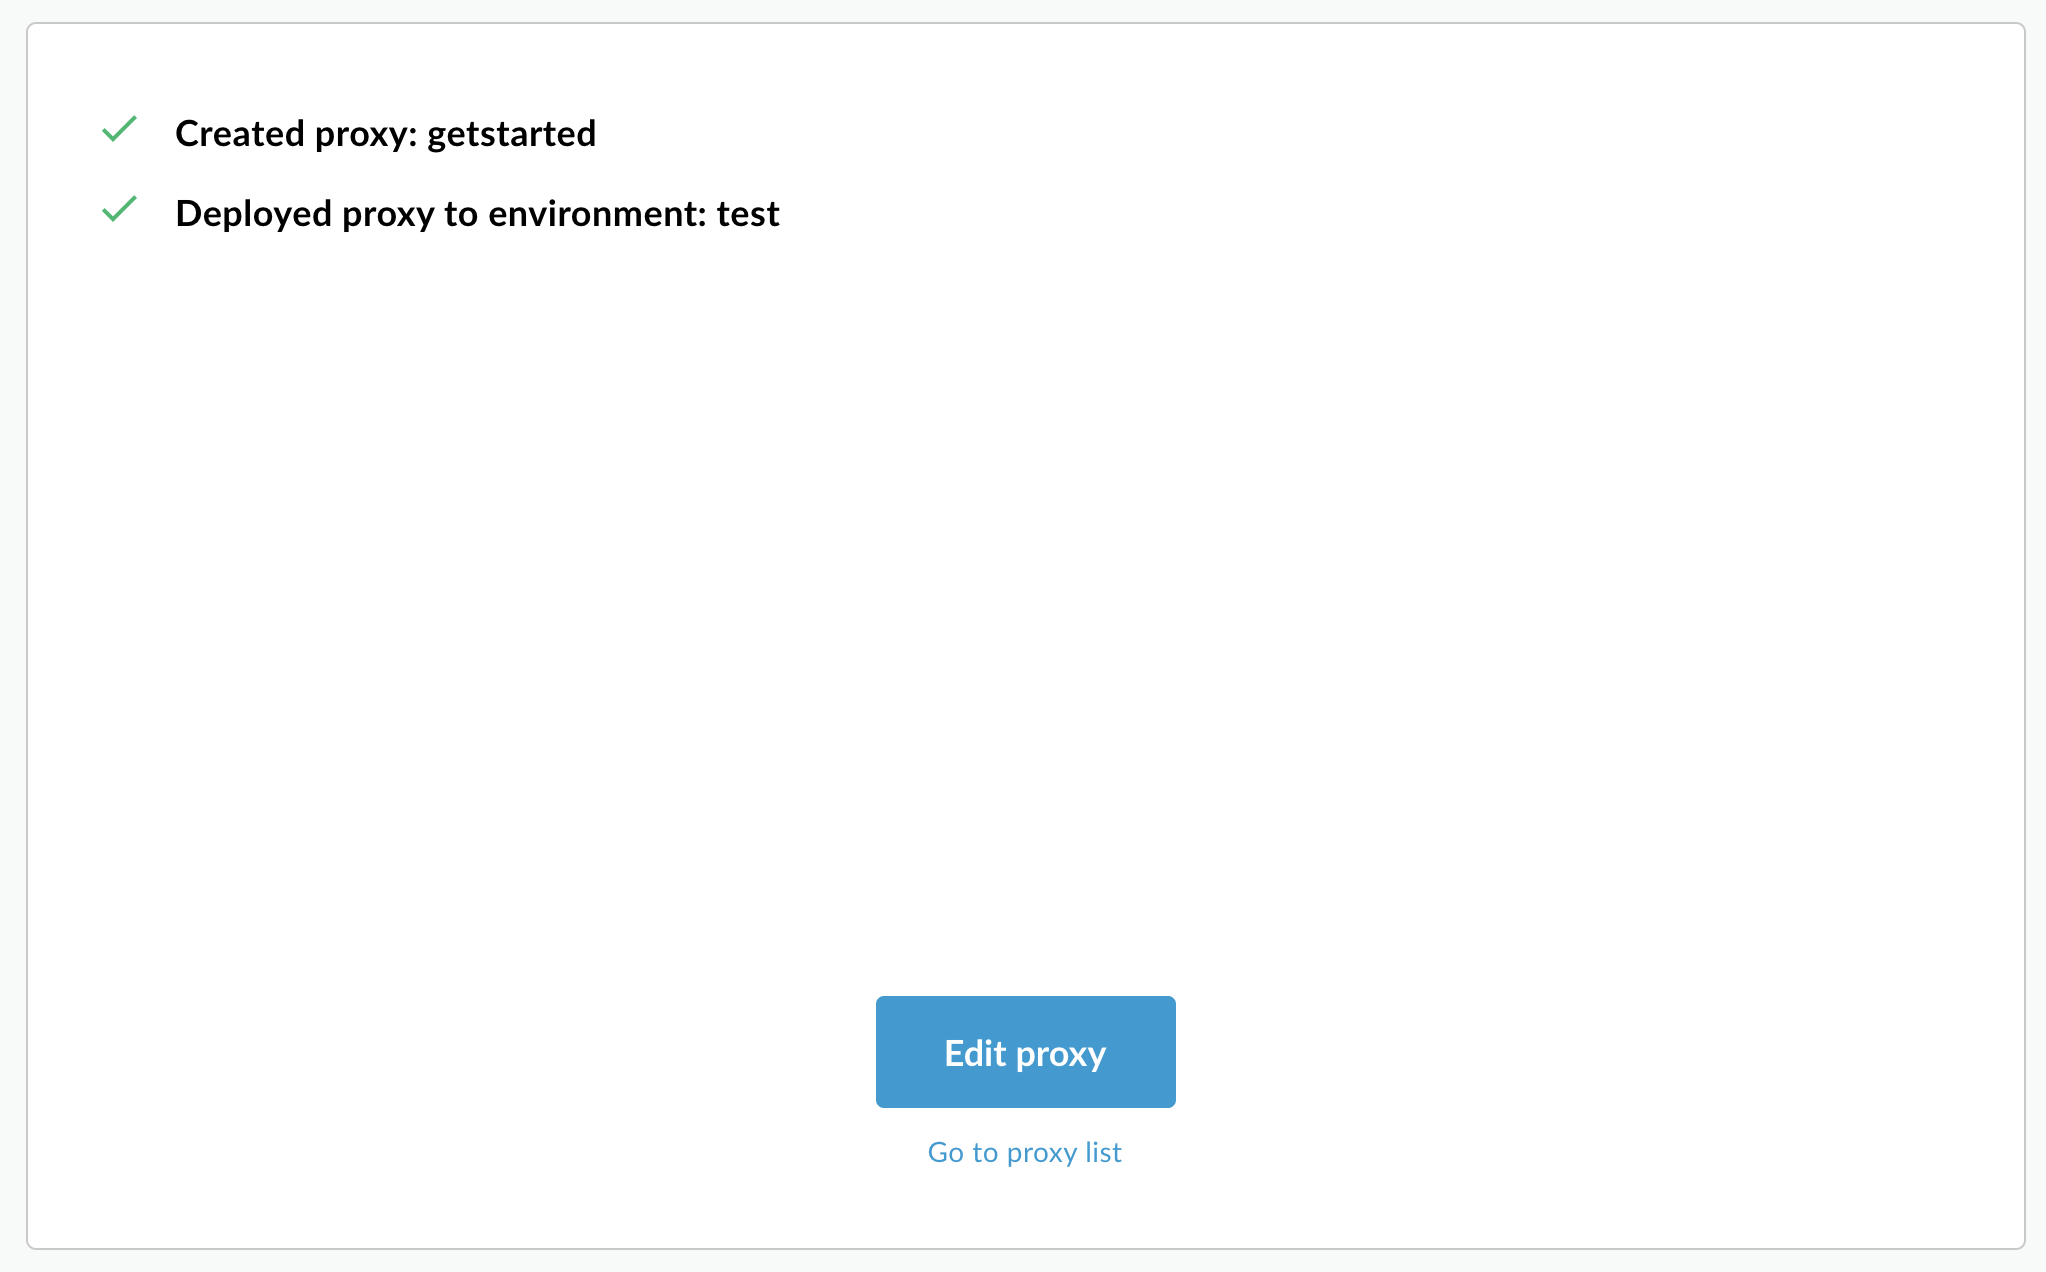
Klik Edit proxy untuk menampilkan
tab Ringkasan di Editor Proxy.
Dalam daftar proxy API, status deployment proxy API getstarted adalah hijau untuk lingkungan test.
Apigee API
Buat proxy API di organisasi Apigee Anda dengan mengirimkan permintaan POST
ke resource berikut:
Anda harus menentukan nama proxy API menggunakan parameter kueri name. Batasi
karakter yang digunakan dalam nama hanya untuk karakter berikut: A-Za-z0-9._\-$ %
Secara opsional, Anda dapat mengimpor paket konfigurasi proxy API dengan melakukan langkah-langkah berikut:
Tetapkan parameter kueri action ke import
Tetapkan header Content-type ke multipart/form-data
Teruskan nama paket konfigurasi proxy API di sistem file lokal Anda
Contoh berikut menunjukkan cara membuat proxy API dengan mengimpor paket konfigurasi proxy API (helloworld-config.zip) di sistem file lokal menggunakan API.
Untuk mengetahui informasi selengkapnya tentang cara membuat proxy API, lihat metode apis.create
di Apigee API. Untuk melihat semua metode yang tersedia untuk proxy API, lihat API proxy API.
Langkah berikutnya
Setelah membuat proxy API sederhana, Anda biasanya melakukan salah satu hal berikut:
Tambahkan kebijakan, keamanan, dan fitur platform Apigee lainnya, seperti yang dijelaskan dalam
Memahami API dan
proxy API.
[[["Mudah dipahami","easyToUnderstand","thumb-up"],["Memecahkan masalah saya","solvedMyProblem","thumb-up"],["Lainnya","otherUp","thumb-up"]],[["Sulit dipahami","hardToUnderstand","thumb-down"],["Informasi atau kode contoh salah","incorrectInformationOrSampleCode","thumb-down"],["Informasi/contoh yang saya butuhkan tidak ada","missingTheInformationSamplesINeed","thumb-down"],["Masalah terjemahan","translationIssue","thumb-down"],["Lainnya","otherDown","thumb-down"]],["Terakhir diperbarui pada 2025-09-05 UTC."],[[["\u003cp\u003eThis page outlines the process of creating API proxies in Apigee and Apigee hybrid, which includes instructions for using the Apigee UI, API, and Cloud console.\u003c/p\u003e\n"],["\u003cp\u003eWhen creating an API proxy, key fields include the proxy name, which must be unique within the organization and consist of alphanumeric characters, dashes, or underscores, and the base path, which defines the URI for routing incoming requests, and must also be unique.\u003c/p\u003e\n"],["\u003cp\u003eWildcards (\u003ccode\u003e/*/\u003c/code\u003e) can be used in API proxy base paths to allow flexibility for future expansions without creating new API proxies, such as \u003ccode\u003ehttps://[host]/team/blue/members\u003c/code\u003e and \u003ccode\u003ehttps://[host]/team/green/members\u003c/code\u003e from basepath \u003ccode\u003e/team/*/members\u003c/code\u003e.\u003c/p\u003e\n"],["\u003cp\u003eAPI proxies can be created through the Apigee UI in the Cloud console or the classic Apigee UI, and by sending a POST request to the Apigee API, offering flexibility in proxy creation methods.\u003c/p\u003e\n"],["\u003cp\u003eAfter creating a simple API proxy, you can add policies, security, and other features of the Apigee platform, as well as deploy it to your cluster.\u003c/p\u003e\n"]]],[],null,["# Creating an API proxy\n\n*This page\napplies to **Apigee** and **Apigee hybrid**.*\n\n\n*View [Apigee Edge](https://docs.apigee.com/api-platform/get-started/what-apigee-edge) documentation.*\n\n| **Note:** In environments enabled for [archive deployments](/apigee/docs/api-platform/fundamentals/environments-overview#deployment-types), you cannot develop API proxies using the Apigee UI, API, or gcloud. To develop API proxies for archive deployments using Apigee in VS Code,see [Developing API proxies](/apigee/docs/api-platform/local-development/vscode/develop-apiproxies) using Apigee in VS Code.\n\nCreate a proxy in the Apigee UI, or using the API, as described in the following sections.\n\nAPI proxy primary fields\n------------------------\n\nFollow these guidelines when creating an API proxy:\n\nSteps to create an API proxy\n----------------------------\n\nTo create an API proxy using the UI or APIs: \n\n### Apigee in Cloud console\n\nTo create a proxy in Apigee in Cloud console:\n\n1. In the Google Cloud console, go to the **Proxy development \\\u003e API proxies** page.\n\n [Go to API proxies](https://console.cloud.google.com/apigee/proxies)\n| **Note:** If you see the **Welcome to Apigee API Management** page, you need to [provision\n| your Apigee organization](/apigee/docs/api-platform/get-started/provisioning-intro) before proceeding further.\n|\n| \u003cbr /\u003e\n|\n| After you have provisioned Apigee, close the UI and reopen the\n| [Apigee UI in Cloud console](https://console.cloud.google.com/apigee).\n2. In the **API Proxies** pane, click **+ Create**.\n3. In the **Create a proxy** pane, under **Proxy template** , select **Reverse proxy (Most common)**.\n4. Under **Proxy details** , enter the following:\n - **Proxy name:** Enter a name for the proxy, such as `myproxy`.\n - **Base Path** : Automatically set to the value you enter for `Proxy name`. The **Base\n Path** is part of the URL used to make requests to your API. Apigee uses the URL to match and route incoming requests to the appropriate API proxy.\n - **Description (Optional)**: Enter a description for your new API proxy, such as \"Testing Apigee with a simple proxy.\"\n - **Target (Existing API):** Enter `https://mocktarget.apigee.net`. This defines the target URL that Apigee invokes on a request to the API proxy. The mocktarget service is hosted at Apigee and returns simple data. It requires no API key or access token.\n - **Space (Optional)** : If your organization has Apigee Spaces enabled, you can associate the API proxy with a Space selected from the list of available options. For more information, see [Apigee Spaces overview](/apigee/docs/api-platform/system-administration/spaces/apigee-spaces-overview).\n - Click **Next**.\n5. **Deploy (optional)** :\n - **Deployment environments** : Optional. Use the checkboxes to select one or more environments in which to deploy your proxy. If you prefer not to deploy the proxy at this point, leave the **Deployment environments** field empty. You can always deploy the proxy later.\n - **Service Account**: Optional. Attach a service account to your deployment to enable your proxy to access Google Cloud services, as specified in the service account's role and permissions.\n6. Click **Create**.\n\nApigee creates the new proxy and displays a summary of the proxy details in the\n**Proxy summary** view.\n\nIf you choose to deploy the proxy, the **Deployments** section displays the **Revision**\nnumber, which is 1 when you first deploy. The **Status** column displays the\nenvironments in which the proxy is deployed with a green status indicator.\n\n### Classic Apigee\n\nTo create a simple API proxy in the classic Apigee UI:\n\n1. Sign in to the [Apigee UI](https://apigee.google.com).\n2. Click **API Proxies** in the main view.\n3. From the **Environment** drop-down list, select the environment in which you want to create a new API proxy.\n\n The hybrid UI displays a list of API proxies for that environment. If you haven't created any\n proxies yet, the list is empty.\n4. Click **Create New** .\n\n The Create Proxy wizard starts.\n5. Click **Reverse proxy (most common)** .\n\n The **Proxy details** page is displayed.\n6. Configure your proxy with the following settings:\n - **Name:** Enter `getstarted`. If a proxy already exists with this name, choose a different name.\n - **Base Path:** Leave this set to `/getstarted`. The **Base\n Path** is part of the URL used to make requests to your API. Apigee uses the URL to match and route incoming requests to the appropriate API proxy.\n - **Description** (Optional): Enter a description for your new API proxy, such as `Get started API proxy`.\n - **Target (Existing API):** Enter `https://mocktarget.apigee.net`. This defines the target URL that Apigee invokes on a request to the API proxy. The mocktarget service is hosted at Apigee and returns simple data. It requires no API key or access token.\n\n Your API proxy's details should look like the following:\n\n7. Click **Next**.\n8. In the **Common policies** view, under **Security:\n Authorization** select **Pass through (no authorization)** .\n\n9. Click **Next**.\n10. On the **Summary** page, select the deployment environments, if desired, and click **Create and deploy** .\n\n | **Note:** If you don't select an environment below **Optional Deployment** , the button at the lower right is just labeled **Create**.\n | **Note:** After you deploy an API proxy revision, you cannot edit it. To edit the API proxy, you must create and deploy a new revision.\n |\n | For this reason, you may choose to create the API proxy without deploying it to any\n | environment. You can edit the API proxy and deploy the API proxy later, as described in\n | [Next steps](#next-steps).\n\n Your new API proxy is created\n and deployed in the selected environment.\n\n11. Click **Edit proxy** to display the Overview tab in the Proxy Editor.\n12. \n\n\nIn the API proxies list, the `getstarted` API proxy deployment status is **green** for the `test` environment.\n\n### Apigee API\n\nCreate an API proxy in your Apigee organization by issuing a `POST`\nrequest to the following resource: \n\n```\nhttps://apigee.googleapis.com/v1/organizations/$ORG/apis\n```\n\nYou must define the name of the API proxy using the `name` query parameter. Restrict\nthe characters used in the name to the following: `A-Za-z0-9._\\-$ %`\n\nOptionally, you can import an API proxy configuration bundle by performing the following steps:\n\n- Set the `action` query parameter to `import`\n- Set the `Content-type` header to `multipart/form-data`\n- Pass the name of the API proxy configuration bundle on your local file system\n\nThe following example demonstrates how to create an API proxy by importing an API proxy\nconfiguration bundle (`helloworld-config.zip`) on your local file system using the\nAPI. \n\n```\ncurl \"https://apigee.googleapis.com/v1/organizations/$ORG/apis?name=helloworld&action=import\" \\\n -X POST \\\n -H \"Authorization: Bearer $TOKEN\" \\\n -H \"Content-type: multipart/form-data\" \\\n -F \"file=@helloworld-config.zip\"\n```\n\nWhere `$TOKEN` is set to your OAuth 2.0 access token, as described in\n[Obtaining an OAuth 2.0 access token](/apigee/docs/api-platform/get-started/api-get-started#oauth20). For information about the `curl` options used in this example, see\n[Using curl](/apigee/docs/api-platform/get-started/api-get-started#curl). For a description of environment variables you can use, see\n[Setting\nenvironment variables for Apigee API requests](/apigee/docs/api-platform/get-started/api-get-started#api-environment-variables).\n\nThe following provides an example of the response output: \n\n```carbon\n{\n \"basepaths\": [\n \"/helloworld\"\n ],\n \"configurationVersion\": {\n \"majorVersion\": 4\n },\n \"createdAt\": \"1559145292799\",\n \"displayName\": \"helloworld\",\n \"entityMetaDataAsProperties\": {\n \"bundle_type\": \"zip\",\n \"subType\": \"Proxy\",\n \"lastModifiedAt\": \"1559145292799\",\n \"createdAt\": \"1559145292799\"\n },\n \"lastModifiedAt\": \"1559145292799\",\n \"name\": \"helloworld\",\n \"policies\": [\n \"verify-api-key\",\n \"remove-query-param-apikey\",\n \"OAuth-v20-1\"\n ],\n \"proxies\": [\n \"default\"\n ],\n \"proxyEndpoints\": [\n \"default\"\n ],\n \"resourceFiles\": {},\n \"targetEndpoints\": [\n \"default\"\n ],\n \"targets\": [\n \"default\"\n ],\n \"type\": \"Application\",\n \"revision\": \"1\",\n \"description\": \"Hello world\"\n}\n```\n\nFor more information on creating an API proxy, see the [`apis.create` method](/apigee/docs/reference/apis/apigee/rest/v1/organizations.apis/create)\nin the Apigee API. To see all the methods available for API proxies, see the [API proxies API](/apigee/docs/reference/apis/apigee/rest/v1/organizations.apis).\n\nNext steps\n----------\n\nAfter you create a simple API proxy, you typically do one of the following:\n\n- Add policies, security, and other features of the Apigee platform, as described in [Understanding APIs and\n API proxies](/apigee/docs/api-platform/fundamentals/understanding-apis-and-api-proxies).\n- Deploy it to your cluster, as described in [Deploy an API proxy](/apigee/docs/api-platform/deploy/ui-deploy-new)."]]