Cette page s'applique à Apigee et à Apigee hybrid.
Consultez la documentation d'Apigee Edge.
La règle GraphQL peut analyser les charges utiles de requêtes GraphQL dans des variables de flux de messages, vérifier la requête par rapport à un schéma GraphQL, ou les deux.
La règle GraphQL peut analyser les charges utiles GraphQL dans des variables de flux de messages, vérifier les requêtes GraphQL par rapport à un schéma, ou les deux.
Vous pouvez utiliser la règle GraphQL pour :
- Assurez-vous que vos API ne traitent que les requêtes conformes au schéma que vous fournissez.
- Imposer des restrictions sur la charge utile en définissant un nombre maximal de fragments autorisés.
- Associer GraphQL aux produits d'API.
- Utiliser les fonctionnalités des règles OAuth2, VerifyAPIKey et Quota exactement comme dans REST.
GraphQL est compatible avec les types de charges utiles suivants :
- POST des charges utiles graphQL avec
Content-Type : application/graphql - POST des charges utiles graphQL avec
Content-Type: applcation/json - GET des charges utiles graphQL où la charge utile est un paramètre de requête.
Pour obtenir un résumé rapide des options de la règle GraphQL, consultez la section Options GraphQL ci-dessous.
Pour en savoir plus sur GraphQL, consultez la page GraphQL.org.
Exemple
L'exemple suivant montre comment importer un schéma GraphQL dans Apigee puis l'utiliser pour valider les requêtes avec du contenu GraphQL.
Créer un fichier de schéma
Pour exécuter l'exemple, commencez par créer un fichier de schéma GraphQL avec le contenu suivant :
type Query {
  allPersons(last: Int): [Person!]!
}

type Mutation {
  createPerson(name: String!, age: Int!): Person!
}

type Subscription {
  newPerson: Person!
}

type Person {
  name: String!
  sex: String!
  age: Int!
  posts: [Post!]!
}

type Post {
  title: String!
  author: Person!
}
Enregistrez le fichier avec le nom que vous souhaitez utiliser, suivi de l'extension .graphql.
Ajouter la règle GraphQL dans l'interface utilisateur d'Apigee
Nouvel éditeur de proxys
Commencez par créer la règle GraphQL comme suit :
- Connectez-vous à l'UI Apigee.
- Dans la barre de navigation, sélectionnez Développer > Proxys d'API.
- Dans la liste des proxys, sélectionnez le proxy d'API pour lequel vous souhaitez utiliser la règle GraphQL.
- Cliquez sur l'onglet DÉVELOPPER.
- Dans le volet de gauche, cliquez sur le bouton + à côté du dossier Policies (Règles).
Dans la boîte de dialogue Create policy (Créer une règle), cliquez dans le champ Select policy type (Sélectionner un type de règle) et faites défiler la page jusqu'à Mediation (Médiation), puis sélectionnez GraphQL.
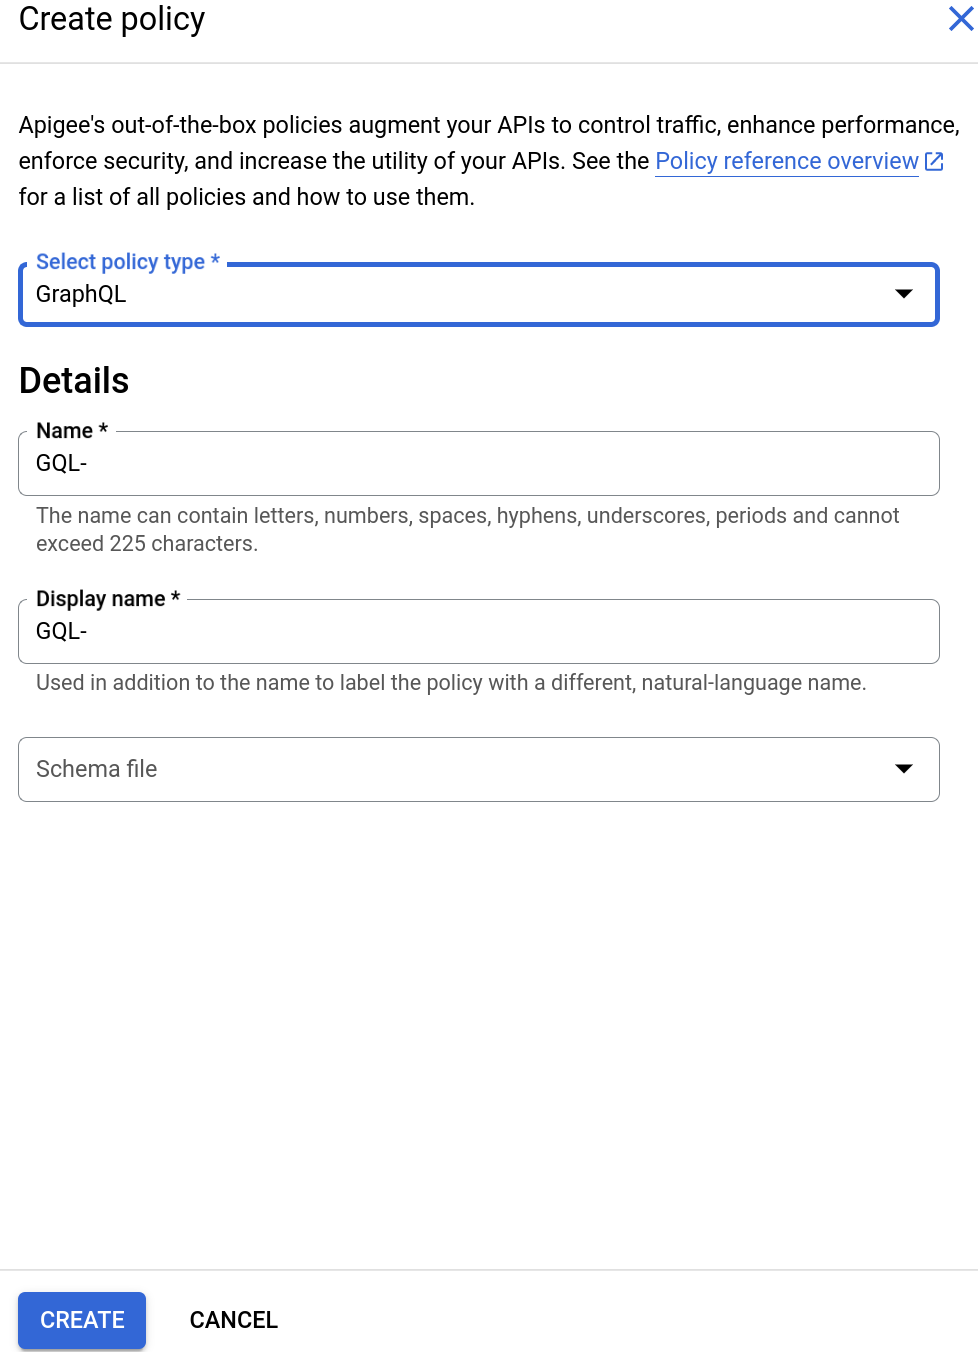
Saisissez un nom à afficher et un nom.
Sélectionnez ensuite un fichier de schéma GraphQL comme suit :
- Cliquez sur le champ Fichier de schéma. Les options suivantes s'affichent :
- Aucun schéma. Si vous sélectionnez cette option, Apigee n'utilisera pas de schéma pour valider les requêtes.
- Importer le schéma GraphQL (.graphql)
Sélectionnez Importer le schéma GraphQL (.graphql). Les éléments suivants s'affichent :
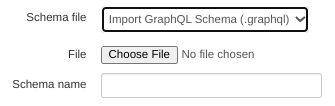
Cliquez sur Sélectionner un fichier, puis sélectionnez le fichier de schéma que vous avez créé précédemment (qui doit avoir l'extension
.graphql). Le fichier apparaît dans le nom du schéma.
- Cliquez sur le champ Fichier de schéma. Les options suivantes s'affichent :
- Cliquez sur Create (Créer) pour créer la règle.
Maintenant que vous avez créé la règle GraphQL, vous pouvez l'associer à une étape du PreFlow :
- Sélectionnez Proxy Endpoints > default > PreFlow (Points de terminaison du proxy > Par défaut > PreFlow) dans le volet de gauche :
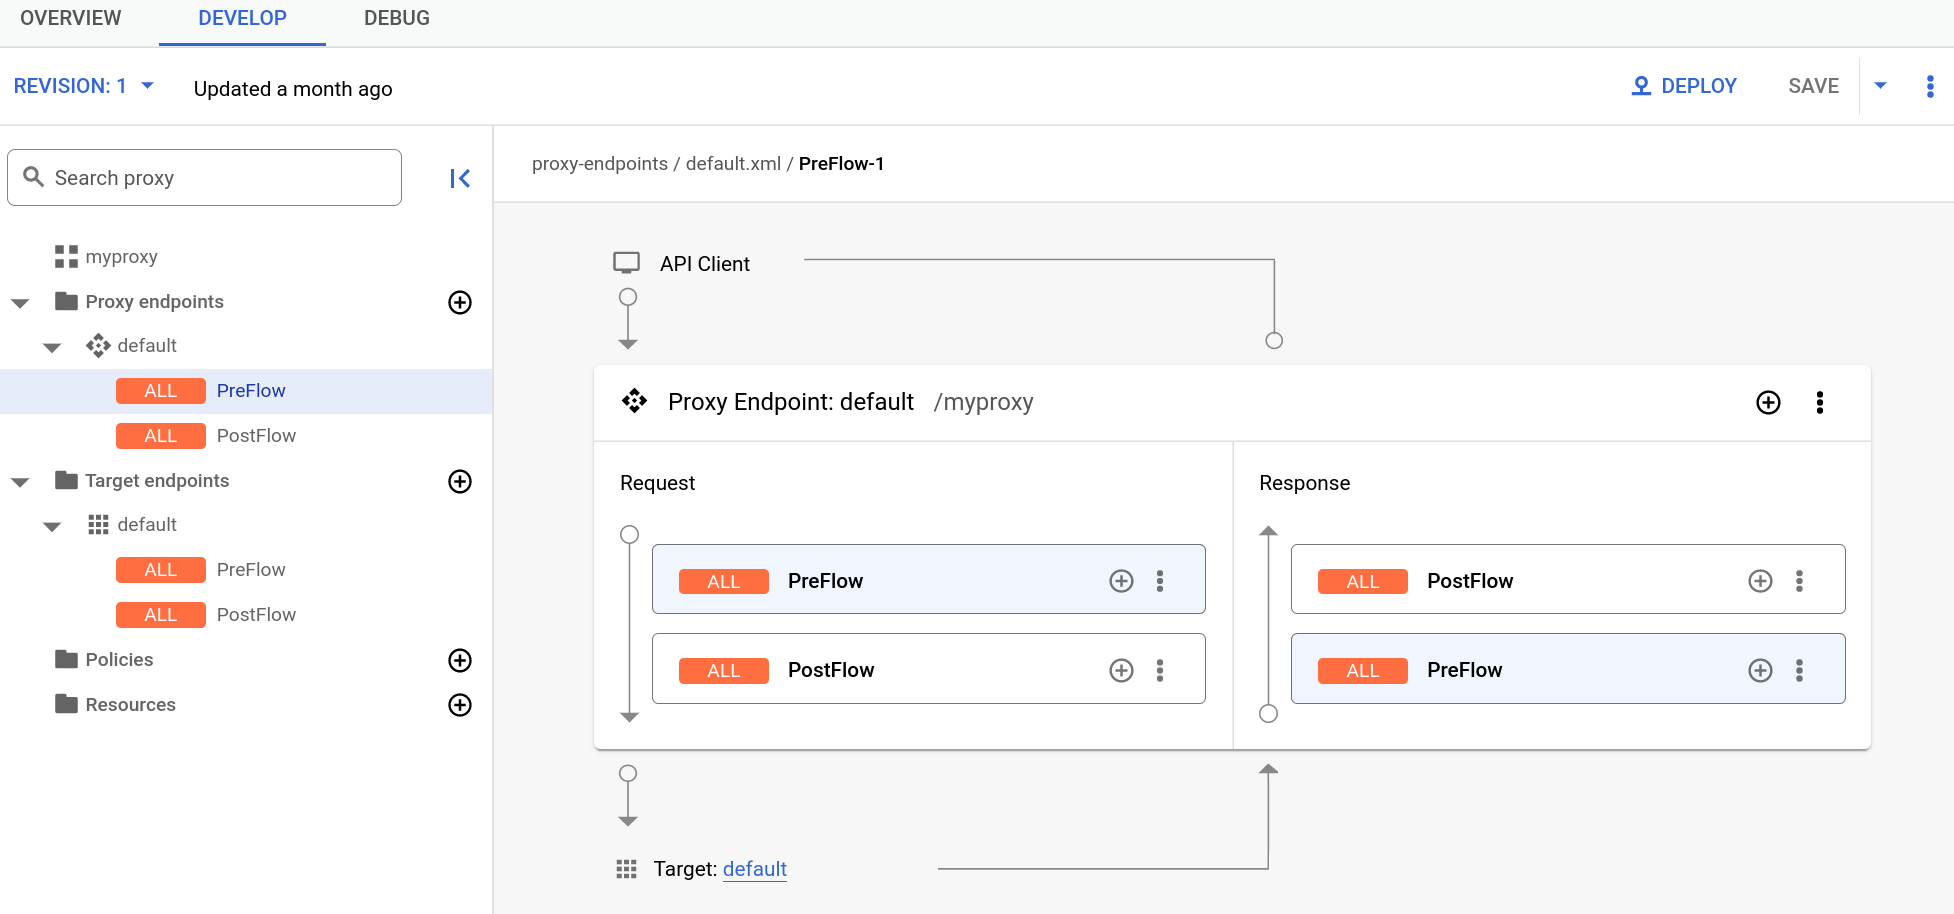
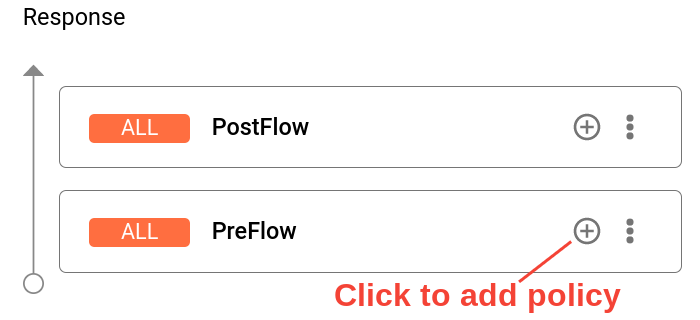
- Cliquez sur le bouton + à côté de PreFlow dans le volet Réponse en bas à droite de l'éditeur visuel :
- Dans la boîte de dialogue Ajouter une étape de règle, sélectionnez la règle GQL-.
- Cliquez sur Ajouter pour associer la règle.
- Cliquez sur Save (Enregistrer) pour enregistrer vos modifications dans la révision actuelle.
- Pour déployer vos modifications, cliquez sur l'onglet Overview (Présentation) et sélectionnez Deploy (Déployer).
Consultez les options GraphQL ci-dessous pour découvrir les options que vous pouvez définir pour la règle GraphQL.
Éditeur de proxy classique
- Connectez-vous à l'UI Apigee.
- Dans la barre de navigation, sélectionnez Développer > Proxys d'API.
- Dans la liste des proxys, sélectionnez le proxy d'API pour lequel vous souhaitez utiliser la règle GraphQL.
- Cliquez sur l'onglet DÉVELOPPER.
Dans le volet Flow: PreFlow (Flux : PreFlow), cliquez sur le bouton + Step (Ajouter une étape).

Dans le volet Add Step (Ajouter une étape), faites défiler la page jusqu'en bas de la section Mediation (Médiation) puis sélectionnez GraphQL.
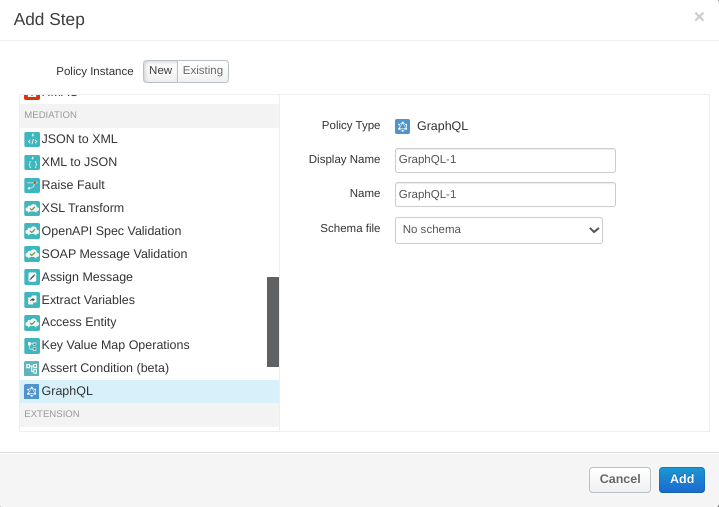
Le volet Add Step (Ajouter une étape) affiche les options suivantes :
- Nom à afficher : nom à afficher de la règle.
- Nom : nom interne de la règle.
- Fichier de schéma : option permettant d'importer un fichier contenant un schéma GraphQL qui permettra à Apigee de valider les requêtes avec du contenu GraphQL.
Pour utiliser un schéma, procédez comme suit :
- Cliquez sur le champ Fichier de schéma. Les options suivantes s'affichent :
- Aucun schéma. Si vous sélectionnez cette option, Apigee n'utilisera pas de schéma pour valider les requêtes.
- Importer le schéma GraphQL (.graphql)
Sélectionnez Importer le schéma GraphQL (.graphql). Les éléments suivants s'affichent :
Cliquez sur Sélectionner un fichier, puis sélectionnez le fichier de schéma que vous avez créé précédemment (qui doit avoir l'extension
.graphql). Le fichier apparaît dans le champ nom du schéma.
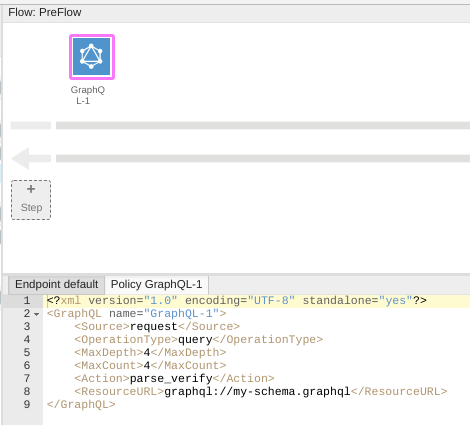
Cliquez sur Ajouter. Le volet Flow: PreFlow (Flux : PreFlow) s'affiche désormais comme suit :
Consultez les options GraphQL ci-dessous pour découvrir les options que vous pouvez définir pour la règle GraphQL. Pour cet exemple, laissez-les telles quelles.
Pour déployer votre proxy, cliquez sur l'onglet Overview (Présentation) et sélectionnez Deploy (Déployer).

Vous pouvez maintenant tester la règle GraphQL avec la commande curl suivante :
curl --location --request POST 'https://PROXY_BASEPATH/HOST_NAME' --data-raw 'query query_name {allPersons {name}}' -kOù PROXY_BASEPATH est le chemin de base de proxy et HOST_NAME est le nom de votre proxy (dernier numéro de révision inclus). Lorsque vous exécutez la commande, Apigee valide la requête par rapport au schéma et renvoie le résultat suivant.
{
  "query query_name {allPersons {name}}": "",
  "id": 101
}
Voici un autre exemple de requête :
curl --location --request POST 'https://PROXY_BASEPATH/HOST_NAME' --data-raw 'query ilovegql {DEADBEEF}' -kCette fois, la validation de la requête échoue avec le message d'erreur suivant.
{"fault":{"faultstring":"steps.graphQL.SchemaValidationFailed","detail":{"errorcode":"steps.graphQL.SchemaValidationFailed"}}}Options GraphQL
GraphPolicy propose les options suivantes :
OperationType: type d'opération. Les options disponibles sont les suivantes :query: équivalent GraphQL de l'opération RESTGET.mutation: équivalent GraphQL de l'opération RESTPUT.query_mutation:queryetmutation.
MaxDepth: profondeur maximale de la requête lorsqu'elle est représentée sous forme d'arborescence.MaxDepthvous permet de bloquer les requêtes avancées dans la charge utile afin qu'Apigee n'ait pas besoin de créer des variables de flux très volumineuses pour contenir les valeurs. Cependant, la charge utile est envoyée telle quelle, quelle que soit la valeur deMaxDepth.MaxCount: nombre maximal de fragments dans la charge utile. Cela permet d'empêcher le serveur de backend GraphQL du client d'exécuter des requêtes très complexes, ce qui oblige les clients à fractionner leur logique en charges utiles plus petites.Action: une des actions GraphQL suivantes :parse: Apigee analyse la charge utile GraphQL dans les variables de flux. Vous pouvez ensuite utiliser le contenu des variables de flux dans des règles telles que JavaCallout. Notez queparsevérifie également la charge utile.verify: Apigee vérifie que la charge utile GraphQL est conforme au schéma importé dans le proxy. Vous pouvez utiliserverifypour vous assurer que vous n'obtenez pas de requêtes non conformes à votre schéma. Cela peut vous faire gagner un temps CPU précieux dans le backend.parse_verify: analyse et vérification de la charge utile.
ResourceURL: chemin d'accès au fichier de schéma GraphQL utilisé par Apigee pour vérifier la requête GraphQL.
Pour en savoir plus sur ces options, consultez la page de référence des règles GraphQL.