Il criterio GraphQL può
analizzare i payload delle richieste GraphQL in variabili di flusso di messaggi,
verificare la richiesta rispetto a uno schema GraphQL o entrambe le cose.
Il criterio GraphQL può analizzare i payload GraphQL in variabili di flusso di messaggi, verificare le richieste GraphQL rispetto a uno schema o entrambe le cose.
Puoi utilizzare il criterio GraphQL per:
Assicurati che le tue API elaborino solo le richieste conformi allo schema che fornisci.
Impostare limitazioni sul payload impostando un numero massimo di frammenti consentiti.
Associa GraphQL ai prodotti API.
Utilizza le funzionalità Oauth2, VerifyAPIKey e Quota
policy, come in REST.
GraphQL supporta i seguenti tipi di payload:
POST di payload GraphQL con Content-Type : application/graphql
POST di payload GraphQL con Content-Type: applcation/json
GET dei payload GraphQL in cui il payload è un parametro di query
Per un rapido riepilogo delle opzioni per il criterio GraphQL, consulta la sezione Opzioni
GraphQL di seguito.
Per saperne di più su GraphQL,
visita GraphQL.org.
Esempio
L'esempio seguente mostra come caricare uno schema GraphQL su Apigee e utilizzarlo per convalidare le richieste con contenuti GraphQL.
Crea un file di schema
Per eseguire l'esempio, crea prima un file di schema GraphQL con i seguenti contenuti:
type Query {
allPersons(last: Int): [Person!]!
}
type Mutation {
createPerson(name: String!, age: Int!): Person!
}
type Subscription {
newPerson: Person!
}
type Person {
name: String!
sex: String!
age: Int!
posts: [Post!]!
}
type Post {
title: String!
author: Person!
}
Salva il file con il nome che preferisci, seguito dall'estensione .graphql.
Aggiungi il criterio GraphQL nell'interfaccia utente Apigee
Nuovo editor proxy
Innanzitutto, crea la policy GraphQL nel seguente modo:
Nella barra di navigazione, seleziona Sviluppa > Proxy API.
Nell'elenco dei proxy, seleziona il proxy API per il quale vuoi utilizzare il criterio GraphQL.
Fai clic sulla scheda SVILUPPA.
Nel riquadro a sinistra, fai clic sul pulsante + accanto alla cartella Criteri.
Nella finestra di dialogo Crea criterio, fai clic sul campo Seleziona tipo di criterio e
scorri verso il basso fino a Mediazione e seleziona
GraphQL.
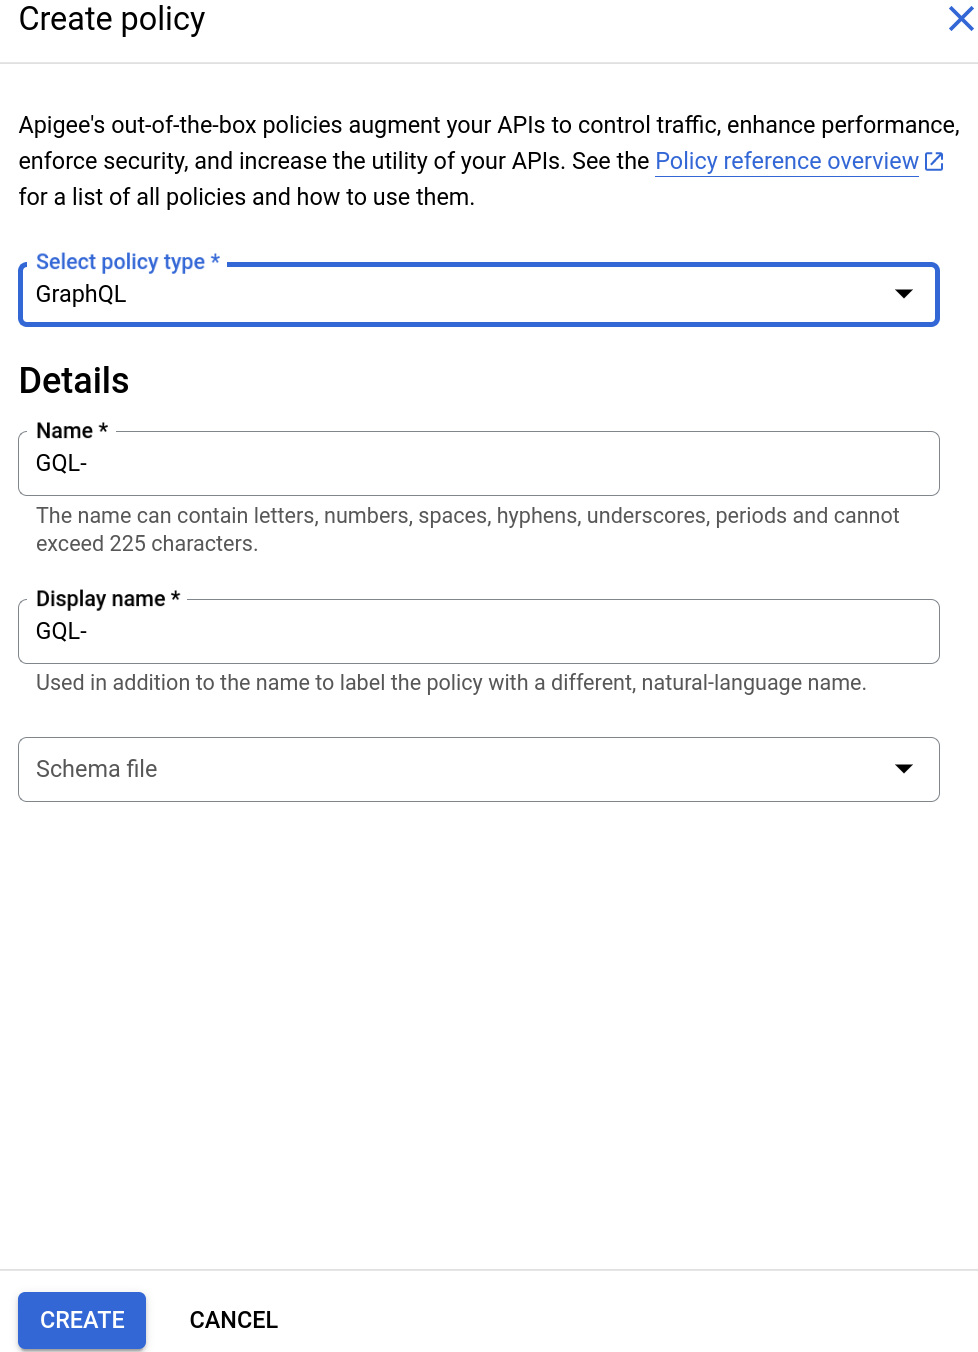
Inserisci un Nome visualizzato e un Nome.
Successivamente, seleziona un file schema GraphQL come segue:
Fai clic sul campo File schema. Vengono visualizzate le seguenti opzioni:
Nessuno schema. Se selezioni questa opzione, Apigee non utilizzerà uno schema per
convalidare le richieste.
Importa schema GraphQL (.graphql)
Seleziona Importa schema GraphQL (.graphql). Vengono visualizzati i seguenti elementi:
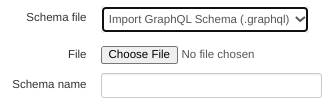
Fai clic su Scegli file e seleziona il file dello schema che hai creato in precedenza
(che deve avere l'estensione .graphql).
Il file viene visualizzato nel campo Nome schema.
Fai clic su Crea per creare la policy.
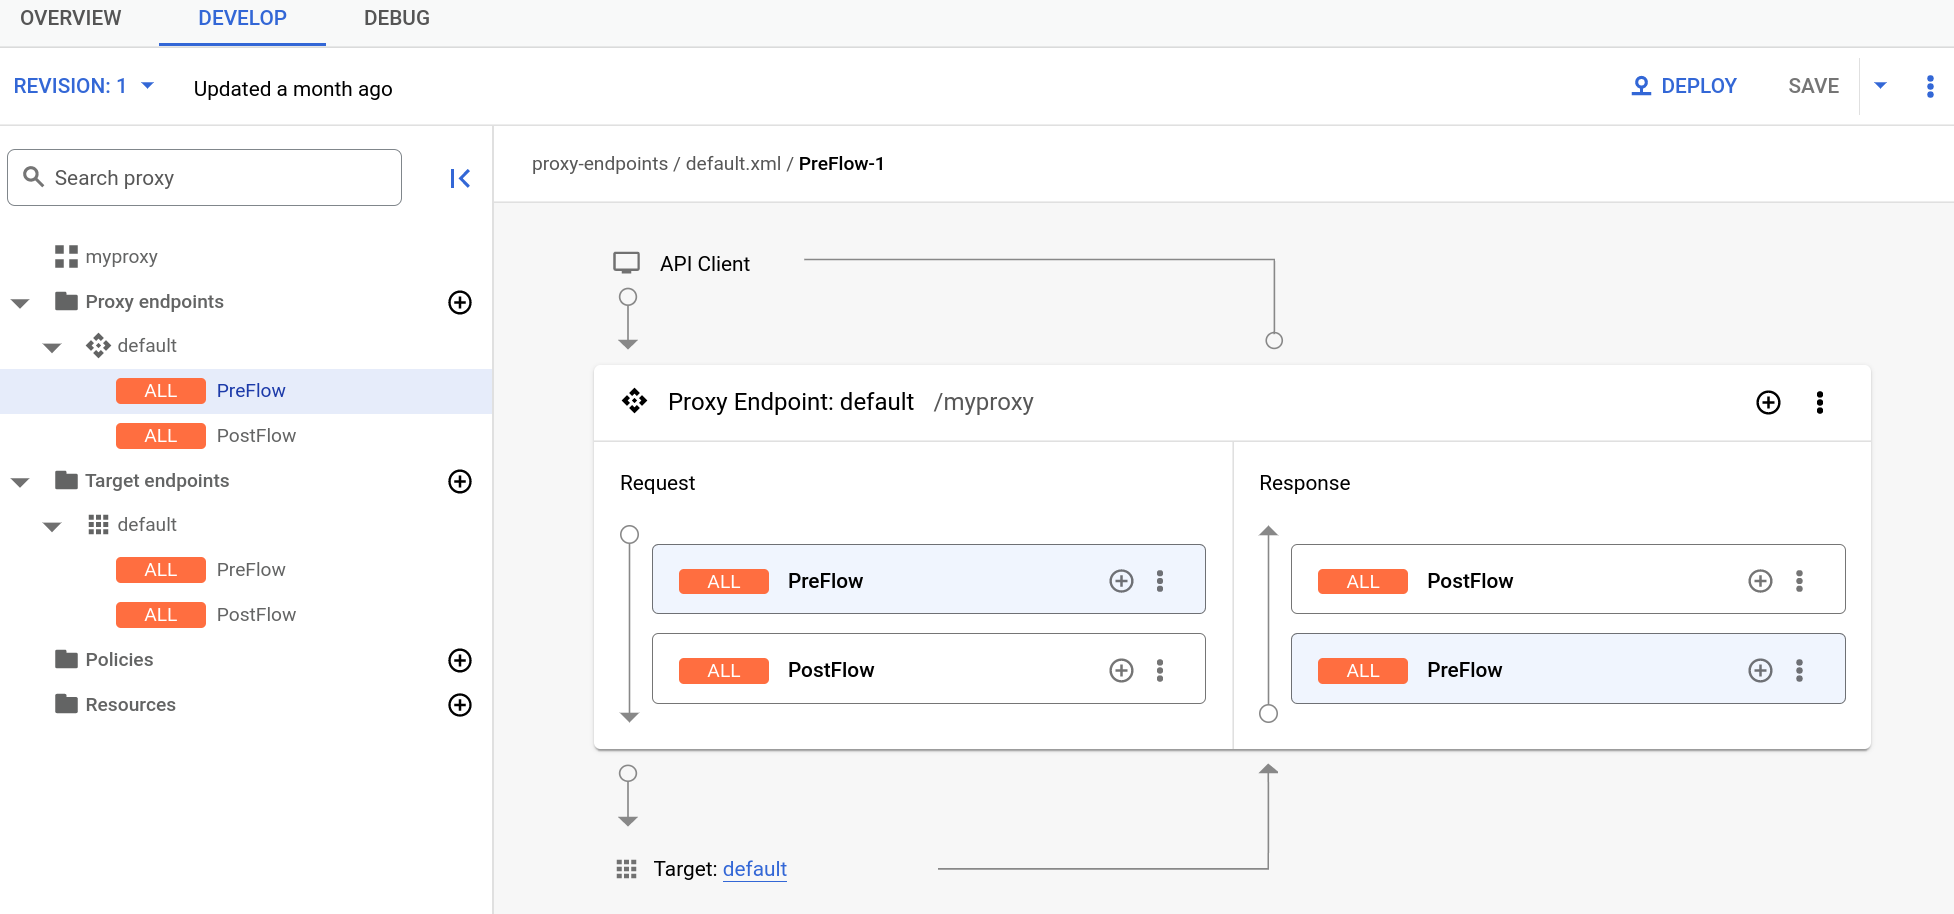
Ora che hai creato la norma GraphQL, puoi collegarla a un passaggio del
PreFlow:
Seleziona Proxy Endpoints > default > PreFlow nel riquadro a sinistra:
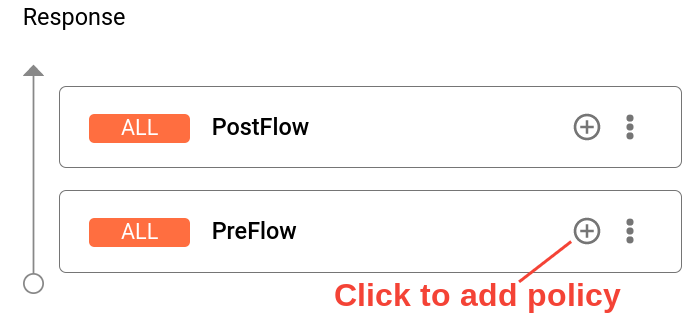
Fai clic sul pulsante + accanto a PreFlow nel riquadro Risposta
in basso a destra dell'editor visivo:
Nella finestra di dialogo Aggiungi passaggio norma, seleziona la norma GQL-.
Fai clic su Aggiungi per allegare la policy.
Fai clic su Salva per salvare la revisione corrente con le modifiche.
Per implementare le modifiche, fai clic sulla scheda Panoramica e seleziona Implementa.
Consulta le opzioni GraphQL di seguito per le opzioni che puoi impostare per
i criteri GraphQL.
Nella barra di navigazione, seleziona Sviluppa > Proxy API.
Nell'elenco dei proxy, seleziona il proxy API per il quale vuoi utilizzare il criterio GraphQL.
Fai clic sulla scheda SVILUPPA.
Nel riquadro Flusso: PreFlow, fai clic sul pulsante + Passaggio.
Nel riquadro Aggiungi passaggio, scorri verso il basso fino
alla parte inferiore della sezione Mediazione e seleziona GraphQL.
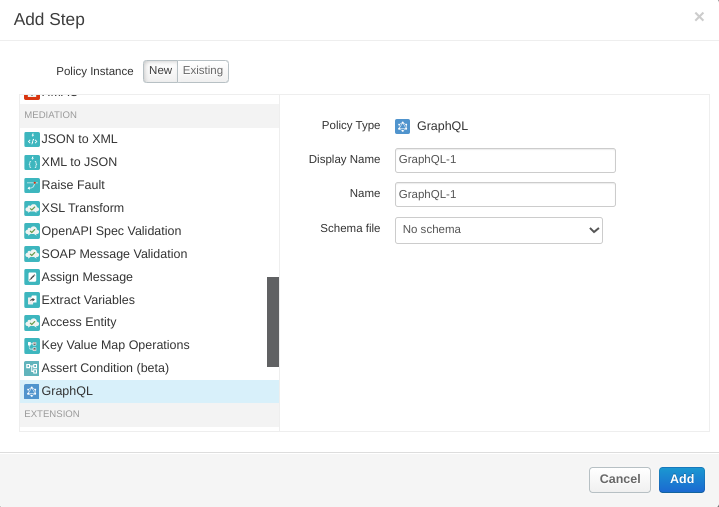
Il riquadro Aggiungi passaggio mostra le seguenti opzioni:
Nome visualizzato: nome visualizzato della policy.
Nome: il nome interno della policy.
File schema: opzione per caricare un file contenente uno schema GraphQL
che Apigee utilizzerà per convalidare le richieste con contenuti GraphQL.
Per utilizzare uno schema:
Fai clic sul campo File schema. Vengono visualizzate le seguenti opzioni:
Nessuno schema. Se selezioni questa opzione, Apigee non utilizzerà uno schema per
convalidare le richieste.
Importa schema GraphQL (.graphql)
Seleziona Importa schema GraphQL (.graphql). Vengono visualizzati i seguenti elementi:
Fai clic su Scegli file e seleziona il file schema che hai
creato in precedenza
(che deve avere l'estensione .graphql).
Il file viene visualizzato nel campo Nome schema.
Fai clic su Aggiungi. Ora viene visualizzato il riquadro Flusso: PreFlow, come mostrato di seguito:
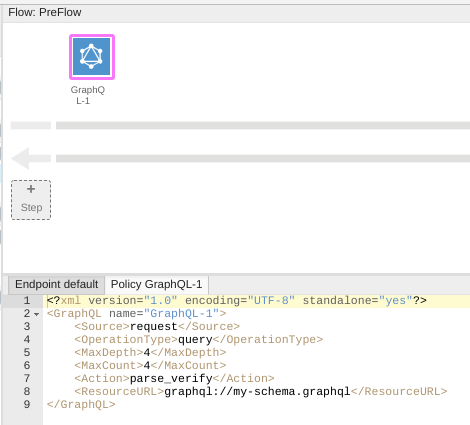
Consulta le opzioni GraphQL di seguito per le opzioni che puoi impostare per
i criteri GraphQL. Per questo esempio, lasciali così come sono.
Per eseguire il deployment del proxy, fai clic sulla scheda Panoramica e seleziona Esegui il deployment.
Ora puoi testare la policy GraphQL con il seguente comando curl:
Dove PROXY_BASEPATH è il percorso di base del proxy e HOST_NAME è il nome
del proxy, incluso il numero di revisione più recente. Quando esegui il comando, Apigee convalida la richiesta in base allo schema e restituisce il seguente output.
MaxDepth: la profondità massima della query, se rappresentata come un albero.
MaxDepth ti consente di bloccare le query approfondite nel payload,
in modo che Apigee non debba creare variabili di flusso molto grandi per contenere i valori.
Tuttavia, il payload viene inviato così com'è, indipendentemente dal valore di MaxDepth.
MaxCount: il numero massimo di frammenti che possono essere presenti nel payload.
Puoi utilizzare questa funzionalità per impedire al server di backend GraphQL del cliente di eseguire query molto complesse, costringendo i client a suddividere la logica in payload più piccoli.
Action: una delle seguenti azioni GraphQL:
parseApigee analizza il payload GraphQL nelle variabili di flusso. Puoi quindi utilizzare i contenuti delle variabili di flusso in criteri come JavaCallout. Tieni presente che
parse verifica anche il payload.
verify: Apigee verifica che il payload GraphQL sia conforme allo schema
caricato nel proxy. Puoi utilizzare verify per assicurarti di non ricevere
richieste non conformi al tuo schema. In questo modo, puoi risparmiare tempo prezioso della CPU nel backend.
parse_verify: analizza e verifica il payload.
ResourceURL: il percorso del file dello schema GraphQL che Apigee utilizza per verificare
la richiesta GraphQL.
[[["Facile da capire","easyToUnderstand","thumb-up"],["Il problema è stato risolto","solvedMyProblem","thumb-up"],["Altra","otherUp","thumb-up"]],[["Difficile da capire","hardToUnderstand","thumb-down"],["Informazioni o codice di esempio errati","incorrectInformationOrSampleCode","thumb-down"],["Mancano le informazioni o gli esempi di cui ho bisogno","missingTheInformationSamplesINeed","thumb-down"],["Problema di traduzione","translationIssue","thumb-down"],["Altra","otherDown","thumb-down"]],["Ultimo aggiornamento 2025-09-04 UTC."],[[["\u003cp\u003eThe GraphQL policy in Apigee and Apigee hybrid allows parsing GraphQL request payloads into message flow variables, verifying requests against a GraphQL schema, or both.\u003c/p\u003e\n"],["\u003cp\u003eThis policy enables ensuring that APIs process only schema-conforming requests, setting limits on the number of fragments, and associating GraphQL with API products.\u003c/p\u003e\n"],["\u003cp\u003eApigee supports various GraphQL payload types, including POST with \u003ccode\u003eapplication/graphql\u003c/code\u003e or \u003ccode\u003eapplication/json\u003c/code\u003e, and GET with the payload as a query parameter.\u003c/p\u003e\n"],["\u003cp\u003eSchema validation is a resource-intensive operation, and only one schema per policy can be included, requiring multiple policies for multiple schemas, and the schema file needs to be uploaded during policy creation.\u003c/p\u003e\n"],["\u003cp\u003eThe GraphQL policy options include actions such as \u003ccode\u003eparse\u003c/code\u003e, \u003ccode\u003everify\u003c/code\u003e, and \u003ccode\u003eparse_verify\u003c/code\u003e, along with parameters like \u003ccode\u003eOperationType\u003c/code\u003e, \u003ccode\u003eMaxDepth\u003c/code\u003e, and \u003ccode\u003eMaxCount\u003c/code\u003e to manage GraphQL operations and payload complexity.\u003c/p\u003e\n"]]],[],null,["# Using GraphQL\n\n*This page\napplies to **Apigee** and **Apigee hybrid**.*\n\n\n*View [Apigee Edge](https://docs.apigee.com/api-platform/get-started/what-apigee-edge) documentation.*\n\nThe [GraphQL policy](/apigee/docs/api-platform/reference/policies/graphql-policy) can\nparse GraphQL request payloads into message flow\nvariables, verify the request against a GraphQL schema, or both.\n\nThe GraphQL policy can parse GraphQL payloads into message flow\nvariables, verify GraphQL requests against a schema, or both.\n\nYou can use the GraphQL policy to:\n\n- Ensure that your APIs only process requests that conform to the schema you provide.\n- Impose restrictions on the payload by setting a maximum on the number of fragments allowed.\n- Associate GraphQL with API products.\n- Leverage the Oauth2, VerifyAPIKey, and Quota policy features, just as in REST.\n\nGraphQL supports the following types of payloads:\n\n- POST of graphQL payloads with `Content-Type : application/graphql`\n- POST of graphQL payloads with `Content-Type: applcation/json`\n- GET of graphQL payloads where the payload is a query parameter\n\n| **Note:** For `application/json` payloads of the form \n|\n| ```\n| {\n| \"query\": \"...\",\n| \"operationName\": \"...\",\n| \"variables\": { \"myVariable\": \"someValue\", ... }\n| }\n| ```\n| Apigee currently ignores the optional `operationName` and `variables` fields.\n\nFor a quick summary of the options for the GraphQL policy, see [GraphQL\noptions](#graphql-options) below.\n\nTo learn more about GraphQL,\nsee [GraphQL.org](https://graphql.org/).\n\nExample\n-------\n\nThe following example shows how to upload a GraphQL schema to Apigee, and use it to\nvalidate requests with GraphQL content.\n| **Caution:** Verifying the payload against the schema is generally an expensive operation, and we recommend choosing to perform schema validation with care. Schema validation operations can be CPU intensive, especially when the payload and the schema are complex, and can result in significant latencies.\n| **Note:** You can only provide one schema per policy. If you need to include multiple schemas, add multiple GraphQL policies to your proxy.\n| **Notes:** For the classic Proxy Editor only:\n|\n| - You can only upload a GraphQL schema file when you add a GraphQL policy. You *cannot* upload it in the **Resources** pane in the Proxy Editor.\n| - After uploading a GraphQL schema file, you cannot view or edit it in the Proxy Editor.\n|\n| These limitations do not apply to the new Proxy Editor.\n\n### Create a schema file\n\nTo run the example, first create a GraphQL schema file with the following contents: \n\n```\ntype Query {\n allPersons(last: Int): [Person!]!\n}\n\ntype Mutation {\n createPerson(name: String!, age: Int!): Person!\n}\n\ntype Subscription {\n newPerson: Person!\n}\n\ntype Person {\n name: String!\n sex: String!\n age: Int!\n posts: [Post!]!\n}\n\ntype Post {\n title: String!\n author: Person!\n}\n```\n\nSave the file with whatever name you'd like to use, followed by the extension `.graphql`.\n\n### Add the GraphQL policy in the Apigee UI\n\n| **Note:** Apigee is introducing a new version of the Proxy\n| Editor, which will make it easier to manage proxies.\n|\n| The instructions in the first two tabs below explain how to\nuse either the new Proxy Editor or the classic Proxy Editor. \n\n### New Proxy Editor\n\nFirst, create the GraphQL policy as follows:\n\n1. Sign in to the [Apigee UI](https://apigee.google.com).\n2. In the navigation bar, select **Develop \\\u003e API Proxies**.\n3. In the list of proxies, select the API proxy for which you want to use the GraphQL policy.\n4. Click the **DEVELOP** tab.\n5. In the left-hand pane, click the **+** button next to the **Policies** folder.\n6. In the **Create policy** dialog, click in the **Select policy type** field and\n scroll down to **Mediation** and select\n [**GraphQL**](/apigee/docs/api-platform/reference/policies/graphql-policy).\n\n Enter a **Display name** and **Name**.\n\n Next, select a GraphQL schema file as follows:\n 1. Click the **Schema File** field. This displays the following choices:\n - **No Schema**. If you select this option, Apigee will not use a schema to validate requests.\n - **Import GraphQL schema (.graphql)**\n 2. Select **Import GraphQL schema (.graphql)**. This displays the\n following:\n\n 3. Click **Choose File** and select the schema file you created previously\n (which must have the extension `.graphql`).\n The file appears in the **Schema name** field.\n\n7. Click **Create** to create the policy.\n\nNow that you have created the **GraphQL** policy, you can attach it to a step in\nthe PreFlow:\n\n1. Select **Proxy Endpoints \\\u003e default \\\u003e PreFlow** in the left-hand pane:\n\n2. Click the **+** button next to **PreFlow** in the **Response** pane at the bottom-right of the Visual Editor:\n\n3. In the **Add policy step** dialog, select the **GQL-** policy. **Note:** This example uses the default name, **GQL** , for the GraphQL policy. You can change the name in the **DisplayName** element in the XML for the policy, by adding a descriptive phrase after **GQL-** . See [Change the policy name](/apigee/docs/api-platform/get-started/add-policy#change-the-policy-name).\n4. Click **Add** to attach the policy.\n5. Click **Save** to save the current revision with your changes.\n6. To deploy your changes, click the **Overview** tab and select **Deploy**.\n\nSee [GraphQL options](#graphql-options) below for the options you can set for\nthe GraphQL policy.\n\n### Classic Proxy Editor\n\n1. Sign in to the [Apigee UI](https://apigee.google.com).\n2. In the navigation bar, select **Develop \\\u003e API Proxies**.\n3. In the list of proxies, select the API proxy for which you want to use the GraphQL policy.\n4. Click the **DEVELOP** tab.\n5. In the **Flow: PreFlow** pane, click the **+ Step** button.\n\n6. In the **Add Step** pane, scroll down to\n the bottom of the **Mediation** section, and select **GraphQL**.\n\n The **Add Step** pane displays the following options:\n - **Display Name**: Display name of the policy.\n - **Name**: Internal name of the policy.\n - **Schema file**: Option to upload a file containing a GraphQL schema that Apigee will use to validate requests with GraphQL content.\n\n To use a schema, do the following:\n 1. Click the **Schema File** field. This displays the following choices:\n - **No Schema**. If you select this option, Apigee will not use a schema to validate requests.\n - **Import GraphQL schema (.graphql)**\n 2. Select **Import GraphQL schema (.graphql)**. This displays the\n following:\n\n 3. Click **Choose File** and select the schema file you\n [created previously](#create-a-schema-file)\n (which must have the extension `.graphql`).\n The file appears in the **Schema name** field.\n\n7. Click **Add** . The **Flow: PreFlow** pane now appears as shown below:\n\n\n See [GraphQL options](#graphql-options) below for the options you can set for\n the GraphQL policy. For this example, leave them as they are.\n8. To deploy your proxy, click the **Overview** tab and select **Deploy**.\n\n\nNow you can test the GraphQL policy with the following `curl` command: \n\n```\ncurl --location --request POST 'https://PROXY_BASEPATH/HOST_NAME' --data-raw 'query query_name {allPersons {name}}' -k\n```\n\nWhere \u003cvar translate=\"no\"\u003ePROXY_BASEPATH\u003c/var\u003e is the proxy basepath and \u003cvar translate=\"no\"\u003eHOST_NAME\u003c/var\u003e is the name of\nyour proxy, including the latest revision number. When you\nrun the command, Apigee validates the request against the schema and returns the following\noutput. \n\n```\n{\n \"query query_name {allPersons {name}}\": \"\",\n \"id\": 101\n}\n```\n\nHere's another example of a request: \n\n```\ncurl --location --request POST 'https://PROXY_BASEPATH/HOST_NAME' --data-raw 'query ilovegql {DEADBEEF}' -k\n```\n\nThis time the request validation fails with the following error message. \n\n```\n{\"fault\":{\"faultstring\":\"steps.graphQL.SchemaValidationFailed\",\"detail\":{\"errorcode\":\"steps.graphQL.SchemaValidationFailed\"}}}\n```\n\nGraphQL options\n---------------\n\nThe GraphPolicy has the following options:\n\n- `OperationType`: The operation type. The options are:\n - `query`: The GraphQL equivalent of the REST `GET` operation.\n - `mutation`: The GraphQL equivalent of the REST `PUT` operation.\n - `query_mutation`: Both `query` and `mutation`.\n- `MaxDepth`: The maximum depth of the query, when represented as a tree. `MaxDepth` allows you to block deep queries in the payload, so that Apigee does not need to create very large flow variables to hold the values. However, the payload is sent as is, regardless of the value of `MaxDepth`.\n- `MaxCount`: The maximum number of fragments that can be in the payload. You can use this to prevent the GraphQL back-end server of the customer from executing highly complex queries, forcing clients to break their logic into smaller payloads.\n- `Action`: One the following GraphQL actions:\n - `parse`Apigee parses the GraphQL payload into the flow variables. You can then use the contents of the flow variables in policies such as JavaCallout. Note that `parse` also verifies the payload.\n - `verify`: Apigee verifies that the GraphQL payload conforms to the schema uploaded to the proxy. You can use `verify` to ensure that you do not get requests that don't conform to your schema. This can save valuable CPU time in the backend.\n - `parse_verify`: Parse and verify the payload.\n- `ResourceURL`: The path to the GraphQL schema file that Apigee uses to verify the GraphQL request.\\`\n\nTo learn more about these options, see the\n[GraphQL policy reference\npage](/apigee/docs/api-platform/reference/policies/graphql-policy)."]]