本頁內容適用於 Apigee 和 Apigee Hybrid。
查看
Apigee Edge 說明文件。

如要為 API Proxy 新增以政策為準的功能,請按照下列兩個步驟操作:
- 設定政策類型的執行個體。
- 將政策執行個體附加至流程。
下圖顯示政策和流程之間的關係。如您所見,政策會以處理步驟的形式附加至流程。如要為 API 設定所需行為,您需要稍微瞭解流程。(本主題已在設定流程中說明)。
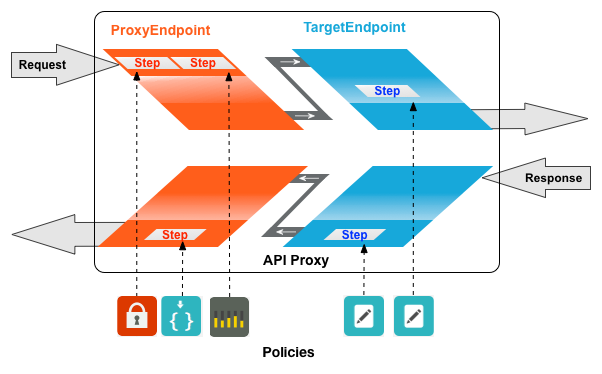
SpikeArrest 政策是常見的政策類型。SpikeArrest 可防止訊息流量突然增加,導致後端服務不堪負荷。
將政策附加至流程
Cloud 控制台中的 Apigee
如要將政策附加至流程,請按照下列步驟操作:
- 選取 API Proxy,然後前往「開發」檢視畫面。
- 在左側窗格中,按一下「政策」列中的「+」按鈕。
在「建立政策」對話方塊中,按一下「選取政策類型」欄位,然後向下捲動至「流量管理」,並選取「SpikeArrest」。
視需要變更政策的顯示名稱和名稱。

完成後,按一下「建立」即可建立政策。
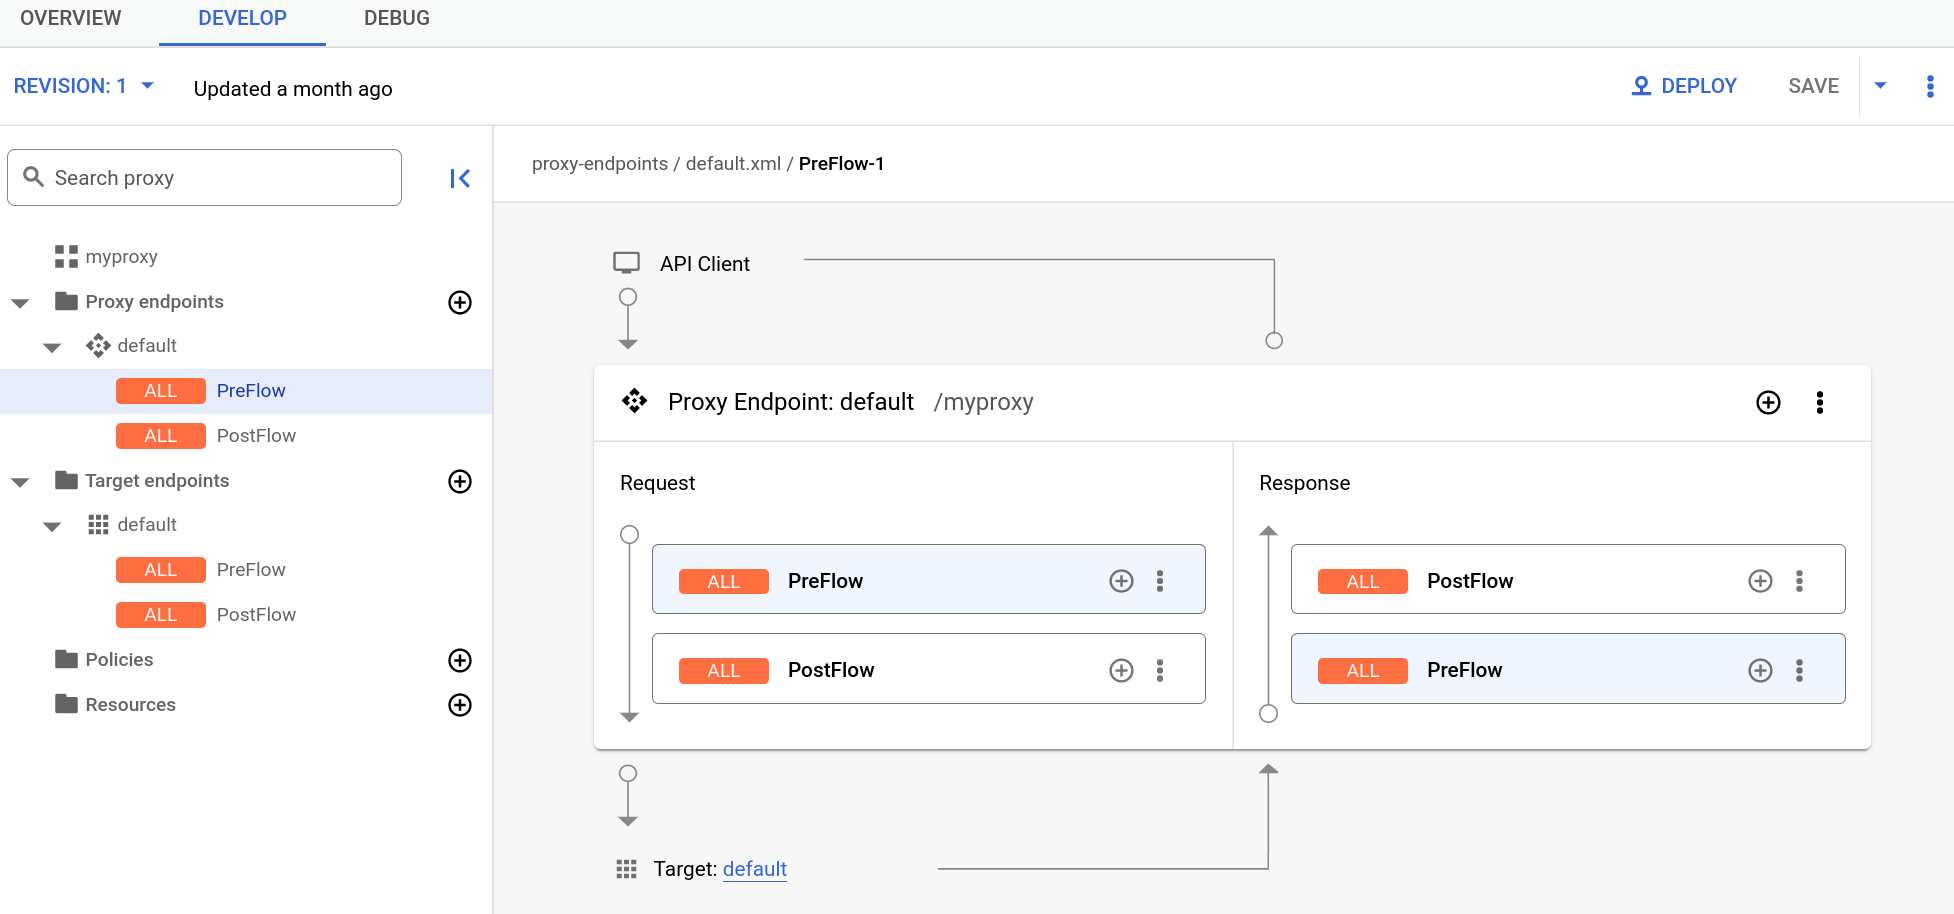
- 您已建立 Spike Arrest 政策,現在可以將其附加至 PreFlow 中的步驟。如要這麼做,請在左側窗格中依序選取「Proxy Endpoints」>「default」>「PreFlow」:
- 在 Visual Editor 右下方的「Response」(回覆) 窗格中,按一下「PreFlow」(前置流程) 旁的「+」按鈕:

- 在「Add policy step」(新增政策步驟) 對話方塊中,選取「Spike Arrest」(尖峰流量防範) 政策。
按一下「新增」附加政策。
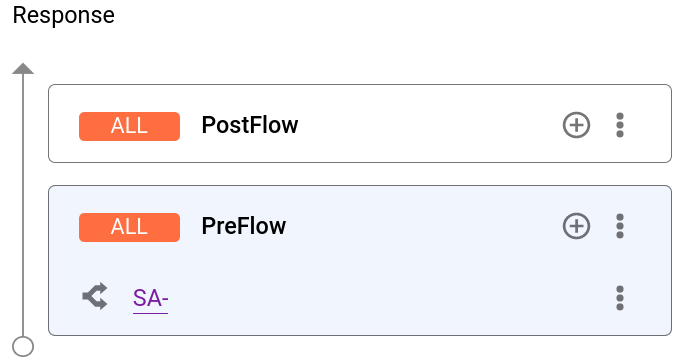
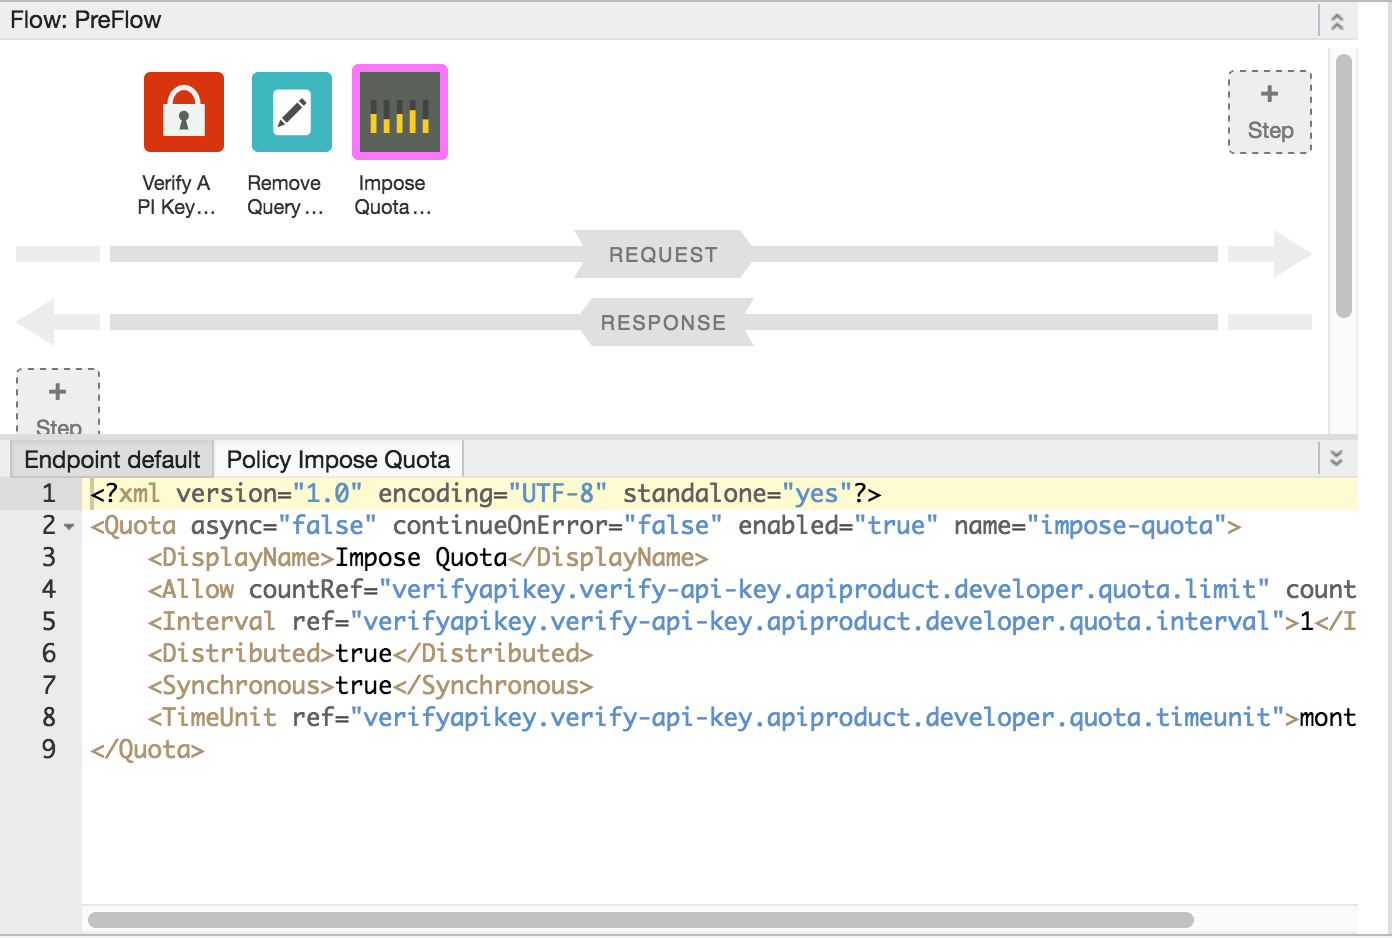
「Response」(回應) 窗格現在會顯示「Spike Arrest」(尖峰流量防範) 政策:
文字編輯器會顯示下列 Proxy 的 XML 程式碼:
<ProxyEndpoint name="default">
  <PreFlow name="PreFlow">
    <Request/>
    <Response>
      <Step><
        <Name>SA-</Name>
      </Step>
    </Response>
  </PreFlow>
  <Flows/>
  <PostFlow name="PostFlow">
    <Request/>
    <Response/>
  </PostFlow>
  <HTTPProxyConnection>
    <BasePath>/myproxy</BasePath>
  </HTTPProxyConnection>
  <RouteRule name="default">
    <TargetEndpoint>default</TargetEndpoint>
  </RouteRule>
</ProxyEndpoint>
Detaching policies from a flow
To detach a policy from a flow, click the three-dot menu next to the flow and select Delete policy step
Classic UI
To attach a policy to a flow:
- Select an API proxy and navigate to the Develop view.
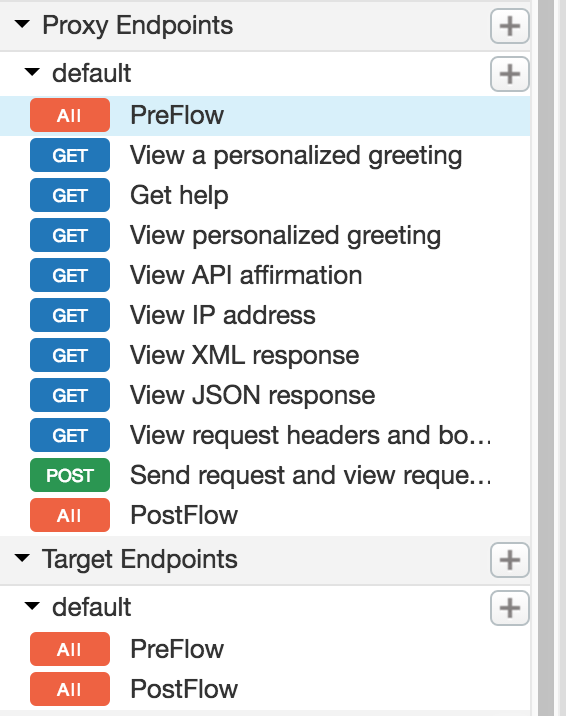
- In the API Proxy Editor, select the flow to which you want to attach a policy in the
Navigator pane.
For example, the PreFlow flow is selected for the default API proxy endpoint in the following figure:
- In the Design view, click +Step associated with the request or response
flow to attach a policy. For example:

The Add Step dialog opens displaying a categorized list of policies.
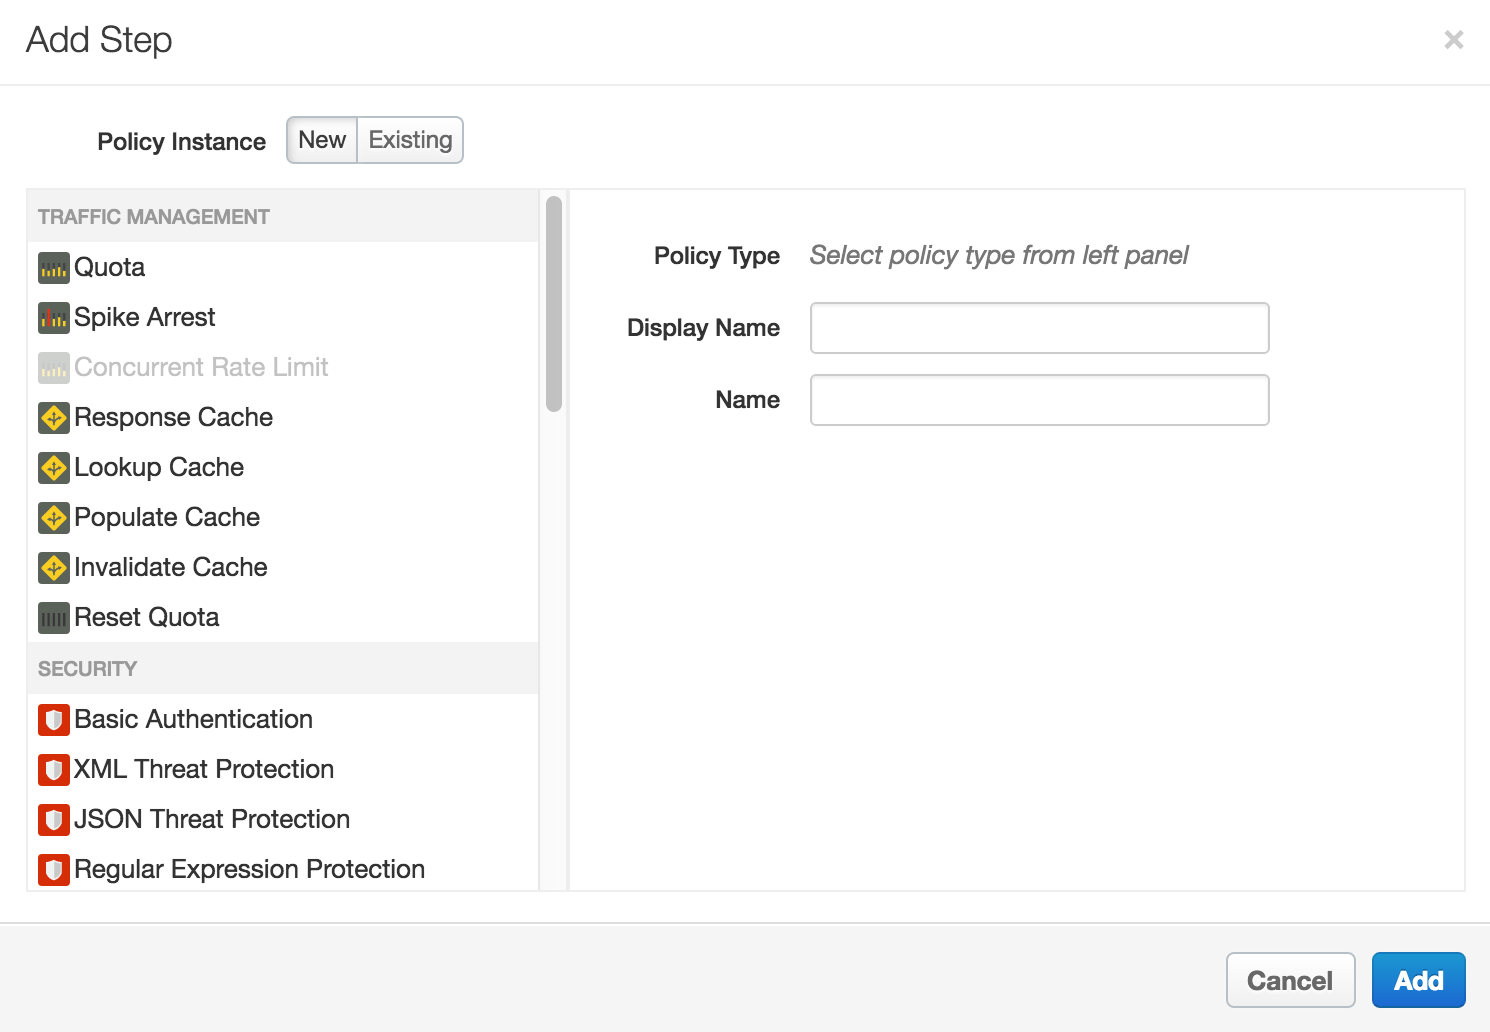
- Scroll and select the policy type that you want to attach to the selected flow.
- Modify the following fields.
-
Display Name: Unique display name for the policy. The UI will generate a default name, but it is advisable to create a descriptive name for the policy. This will ensure that other developers in your organization have an easy time understanding what the policy is intended to do.
-
Name: Unique name for the policy. The policy name matches the display name with the following exceptions:
-
Spaces are replaced by dashes.
-
Consecutive dashes are replaced by a single dash.
-
Except for dashes, underscores, and spaces (which are replaced, as noted above), characters that are not alphanumeric, such as pound signs, percent signs, ampersands, and so on, are removed.
-
-
- Click Add.
The policy is attached to the selected flow.
After the policy is attached, you’ll see the policy displayed in the Designer view for the flow, in this example the PreFlow of the default proxy endpoint, and in the Policies list in the Navigation pane. The Code view, which displays the XML for the newly attached policy, displays below the Designer view. Apigee generates an instance of the policy that contains a set of reasonable default values.
Adding a policy without attaching it to a flow
To add a policy without attaching it to a flow, which is useful for Handling faults, click + in the Policies bar in the Navigator view to open the Add Policy dialog and add the policy (as described in steps 4 through 6 in the previous section).
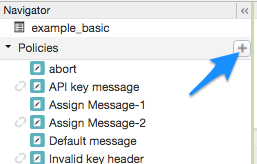
A policy that is not attached to any flow is flagged with the detached icon in the Policies list, as shown adjacent to the API key message policy shown in the previous figure.
After you create the policy, you can attach it to a flow by dragging and dropping it from the Policies list to the desired flow in the Designer view.
Detaching policies from a flow
To detach a policy from a Flow, select the Flow. Mouse over the icon for the policy in the Designer view of the Flow. Click the X in the circle that appears in the icon.
Deleting a policy instance
To delete a policy instance, mouse over the entry for the policy in the Navigator view. Click the X in the circle that appears to the right of the entry.
Configuring policies in the UI
When the UI generates a policy instance, it applies reasonable default values for common settings. You may need to modify these settings to meet your requirements.
For example:<?xml version="1.0" encoding="UTF-8" standalone="yes"?> <SpikeArrest async="false" continueOnError="false" enabled="true" name="spikearrest-1"> <DisplayName>SpikeArrest-1</DisplayName> <FaultRules/> <Properties/> <Identifier ref="request.header.some-header-name"/> <MessageWeight ref="request.header.weight"/> <Rate>30ps</Rate> </SpikeArrest>
您可以在「程式碼」檢視畫面中直接編輯 XML 設定,藉此設定政策。舉例來說,Spike Arrest 政策的尖峰訊息速率一開始會設為每秒 30 則訊息。如要變更尖峰速率,請在政策的 XML 中變更 <Rate> 元素值。如要進一步瞭解如何設定政策,請參閱政策參考資料。
您也可以將政策剪下並貼到「程式碼」檢視畫面。這是從 GitHub 上的範例重複使用政策的絕佳方式。
在「程式碼」檢視畫面中變更政策定義時,變更會反映在「屬性檢查器」中。反之亦然,在「Property Inspector」中進行變更後,這些變更會顯示在「Code」檢視畫面中的 XML 中。
如要參閱本主題使用的配額政策專屬說明文件,請參閱「配額政策」。
使用 Gemini Code Assist 程式碼說明功能時須遵守政策
如果您有 Gemini Code Assist,可以直接在 Cloud 控制台的 Apigee UI 中,使用這項工具瞭解政策和政策元素。
如要使用 Gemini Code Assist 程式碼說明功能,請遵守下列政策:
- 在「程式碼」檢視畫面中編輯政策時,請醒目顯示政策程式碼的一部分,例如 XML 元素或屬性。你也可以醒目顯示多個元素。
- 點選下方的 Gemini Code Assist 圖示。 側邊面板會顯示政策和您醒目顯示的元素相關資訊。
