This tutorial shows you how to build a serverless continuous integration/continuous deployment (CI/CD) pipeline for Salesforce using Salesforce Developer Experience (SFDX) and Cloud Build. Cloud Build pipelines use containerization. The pipelines run builds as a series of build steps, where each build step is run in a Docker container. The pipeline can scale up and down in response to load with no need to pre-provision servers, and it offers fast, consistent, automated builds.
This tutorial is intended for anyone who is responsible for designing, developing, and maintaining DevOps workflows in an organization. These roles can include architects, DevOps teams, and engineers. Different sections of the document illustrate parts of the pipeline for different roles. For example, one part is for administrators and DevOps leads, and another part is for Salesforce developers.
The document assumes that you're familiar with Salesforce DX, the Salesforce CLI, Git, GitHub, Docker, Google Cloud products such as Cloud Build, and containerization concepts. It also assumes that you have a GitHub account.
Software development lifecycles can vary widely; this tutorial assumes that you follow an agile release methodology.
Objectives
- Set up Salesforce Developer Experience.
- Set up a Git branching strategy.
- Configure Cloud Build.
- Run the CI/CD pipeline for Salesforce using Google Cloud build tools and GitHub.
Costs
This tutorial uses the following billable components of Google Cloud:
Use the Pricing Calculator to generate a cost estimate based on your projected usage.
You might also incur Salesforce costs. In the tutorial, you use a Salesforce Developer Edition org, which might be free. For more information, see the Salesforce page about Developer Edition.
Before you begin
-
In the Google Cloud console, on the project selector page, select or create a Google Cloud project.
-
Make sure that billing is enabled for your Google Cloud project.
-
Enable the Cloud Build API.
-
In the Google Cloud console, activate Cloud Shell.
- Make sure that you have a Salesforce account that can assume the role of the Dev Hub org. If you don't have an org, then you can create a Developer Edition account on the Salesforce developer site.
When you finish this tutorial, you can avoid continued billing by deleting the resources you created. For more information, see Cleaning up
Architecture
The following diagram illustrates the architecture of the CI/CD workflow that you create in this tutorial. In this architecture, projects are organized as releases. Developers who want to work on a feature create a new feature branch from a release branch.

The diagram illustrates the following flow:
- Developers create feature branches in GitHub for the features that they are developing.
- Developers complete development work and run unit tests in Salesforce scratch orgs.
- Developers commit and push their development work to their source code repository (GitHub in this tutorial).
- Developers create a pull request to merge their work into the release branch.
- The creation of a pull request automatically triggers a Cloud Build job to run tests.
- Responsible personnel (usually team leads) review and approve pull requests to merge development work into the release branch.
- A merge into the release branch automatically triggers a Cloud Build job to deploy the codebase to QA or to other Salesforce environments.
- Optionally, manual tests and reviews are performed in a QA environment.
- Responsible personnel create a pull request to merge code into the
mainbranch. - The pull request to the
mainbranch triggers a Cloud Build job to deploy code to production.
Developers who want to work on projects start by cloning the project repository from the enterprise source control tool (GitHub in this tutorial). The following diagram represents this strategy as a graph.

As illustrated in the diagram, the branching strategy consists of the following:
- A main branch. The code in the main branch reflects the current version of the code that's running in production.
- A release branch. A release branch is a relatively longer-lived branch (compared to a feature branch) that coordinates all changes and code that's pertinent to a release. An organization creates a new release branch for each new release.
- One or more feature branches. Feature branches help to isolate work that's in progress from the most up-to-date version of code in the main branch. Typically, several feature branches make up a release branch. It's a good practice for developers to create feature branches for bug fixes.
After developers clone a project repository, they develop on their local machine or in a Salesforce scratch org. They can use a scratch org to run unit tests on the changes they make. If the unit tests pass, they commit their code and push the code into the source code repository. They then generate a pull request for their code to be merged into the parent release branch.
The pull request automatically triggers a Cloud Build job that does the following:
- Creates a new scratch org to run unit tests.
- Updates the pull request with the result of the tests.
At this point, team leads and product owners can review the pull request. If the request is approved, the changes are merged into the release branch.
Depending on your software development lifecycle, you can have additional automated steps that are triggered based on a merge to the release branch. Examples of automated steps are deploying the validated code to a higher sandbox, such as quality assurance or system integration testing sandboxes.
You can also configure Cloud Build to send build notifications and perform additional actions using Cloud Functions, Cloud Run, or other Google Cloud tools. (These additional actions are not covered in this tutorial.) This approach provides the flexibility to tailor the pipeline to suit your enterprise DevOps framework.
For simplicity, in this tutorial you deploy the sample codebase to a single Salesforce org (Dev Hub). When you build a CI/CD pipeline for production, you use the architecture illustrated earlier and automate deployments to sandboxes that are part of your software development lifecycle.
Personas who are typically involved in software development
Every organization is different and each has its own array of roles and teams. The following table lists key personas (roles) that typically interact with Salesforce DevOps pipelines like the one described in this tutorial.
People in different roles have different responsibilities for setting up Salesforce pipelines. Therefore, the tutorial has two paths. One path is for administrators and DevOps leads, and the other path is for developers.
| Persona | Responsibilities |
|---|---|
| Administrator or DevOps lead |
|
| Salesforce developer |
|
| QA lead |
|
| Release lead |
|
Setting up pipelines for Salesforce administrators and DevOps leads
This section describes the tasks that administrators and DevOps teams follow to set up the CI/CD workflow.
Enable the Dev Hub org
- Sign in to your Salesforce production org.
In the Setup tab, in the Quick Find box, enter
Dev Hub, and then select Dev Hub.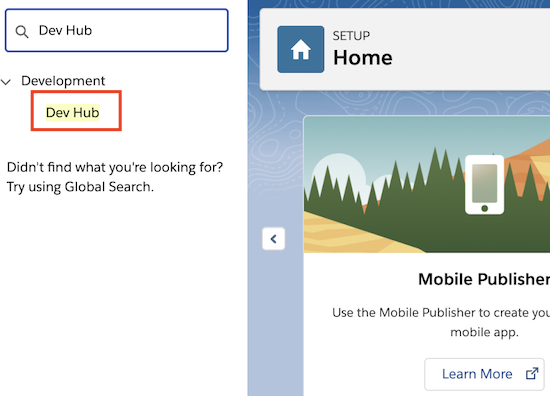
Enable Dev Hub.
This step lets you set up a scratch org. You use the scratch org to deploy the sample code in the tutorial to a Salesforce Developer Edition org.
Create a certificate and key pair
After you enable the Dev Hub org, you need to generate a certificate and key pair that can be used to authenticate to the Salesforce Dev Hub org. You use this certificate and key pair when you configure Cloud Build in later steps.
For production CI/CD pipelines, you need to generate additional certificates to authenticate to Salesforce sandboxes. (You don't create these additional certificates as part of this tutorial.) When you generate certificates and key pairs for each environment, make sure that you give them identifiable names, as in the following examples:
- Production (Dev Hub org):
salesforce.keyandsalesforce.crt. You use these names in the procedure that follows. - Quality Assurance sandbox (QA):
salesforce_qa.keyandsalesforce_qa.crt. - Integrated Development sandbox (IDEV):
salesforce_dev.keyandsalesforce_dev.crt.
To generate a certificate and key pair, follow these steps:
In Cloud Shell, generate a certificate and key pair so Cloud Build can authenticate to your Salesforce Dev Hub org from the Salesforce CLI:
openssl req -x509 -sha256 -nodes -days 36500 -newkey \
rsa:2048 -keyout salesforce.key -out \
salesforce.crt
You're prompted to enter details to identify the certificate. For this tutorial, these values aren't important, so press Enter to accept the defaults.
Notice that in the command, you're using the names
salesforce.keyandsalesforce.crt, because you're creating the certificate and key pair for the Dev Hub org.Click More and select Download File.
In the Fully qualified file path box, enter the following filename and then click Download:
salesforce.crtThis step downloads the certificate that you generated to your local machine. You upload the certificate to your Salesforce org in the next section.
Create connected apps in Salesforce
In this section, you create a connected application that Cloud Build can use to deploy your Salesforce code. For this tutorial, you deploy code only to the Dev Hub org. In a production environment, you deploy code for each sandbox and for the production org where you want Cloud Build to deploy your Salesforce code for the DevOps pipeline.
As part of this process, you use the certificate and key pair that you generated in the previous section. The certificate is the public key for authenticating the Salesforce client in a Cloud Shell session to the Salesforce Dev Hub org (Salesforce sandbox). The certificate is also used to authenticate Cloud Build for automated deployments.
The details of some of the steps in the following procedure depend on what edition of Salesforce you're using. Make sure that you use the correct certificate and key pairs for the selected environment.
If you're using Salesforce Lightning Experience, use the App Manager to create connected apps. From Setup in your Salesforce org, do the following:
- In the Quick Find box, enter
App. - Select App Manager.
- Click New Connected App.
If you're using Salesforce Classic, from Setup in your Salesforce org, do the following:
- In the Quick Find box, enter
Apps. - Under Build > Create, select Apps.
- Under Connected Apps, click New.
- In the Quick Find box, enter
For the name of your application, enter
Google Cloud DevOps.This fills
Google_Cloud_DevOpsinto the API Name box.Enter the contact email information and any other information that's appropriate for your application.
Select Enable OAuth Settings.
For the Callback URL value, enter the following URL:
http://localhost:1717/OauthRedirectTo enable the option to use digital signatures, click Choose File, and then select the
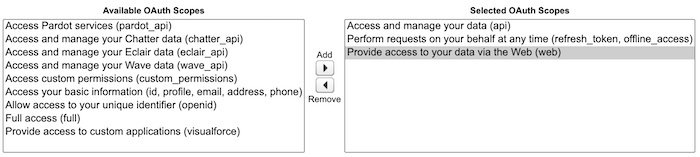
salesforce.crtfile that you downloaded earlier.Add the following OAuth scopes to Selected OAuth Scopes:
- Access and manage your data (api)
- Perform requests on your behalf at any time (refresh_token, offline_access)
- Provide access to your data via the web (web)
Click Save and then click Continue.
Make a note of the Consumer Key value that's displayed in the API section; you need it later when you set up the Cloud Build manifest.
If you're working in a production environment, you have a key for each deployment environment.
Click Manage, and then to change OAuth policies, click Edit Policies.
Set Permitted users to Admin Approved Users are Pre-Authorized and confirm the choice.
Set IP relaxation to Relax IP Restrictions.
Click Save.
Click Manage Profiles and select the System Administrator option.
After this step, users who assume this profile can sign in to the Salesforce CLI.
Click Save.
Initialize the Google Cloud environment
In Cloud Shell, set the project that you created or selected as the default project:
gcloud config set project PROJECT_IDReplace PROJECT_ID with the ID of your Google Cloud project.
Assign settings for region and zone:
gcloud config set compute/region us-central1
gcloud config set compute/zone us-central1-a
In this tutorial, you use
us-central1as the region andus-central1-aas the zone.Export the current Google project ID to an environment variable named
GCP_PROJECT_NUMBER:export GCP_PROJECT_NUMBER=$(gcloud projects describe $DEVSHELL_PROJECT_ID --format='value(projectNumber)')
Upload Salesforce keys to Cloud Storage
In Cloud Shell, create a Cloud Storage bucket in your build project to store the Salesforce private key files:
gsutil mb -p ${DEVSHELL_PROJECT_ID} -l us-central1 \
    gs://salesforce-ref-${DEVSHELL_PROJECT_ID}
The bucket must have a globally unique name. This command creates a bucket name that includes your Google Cloud project ID.
Copy the Salesforce private keys that you generated in the Enabling the Dev Hub org section to the new Cloud Storage bucket:
gsutil cp salesforce.key gs://salesforce-ref-${DEVSHELL_PROJECT_ID}
Create your GitHub repository
In Cloud Shell, clone the repository that's associated with this tutorial:
git clone https://github.com/GoogleCloudPlatform/salesforce-serverless-cicd-cloudbuildCreate a new GitHub repository named
DEV_REPO_NAME.Replace DEV_REPO_NAME with the name you want to assign to the repository locally.
This is the repository that developers pull code from or push code to. For the purposes of this tutorial, you create this repository in your own GitHub account.
Go to the cloned repository:
cd salesforce-serverless-cicd-cloudbuildAdd your developer GitHub repository as a remote repository:
git remote add github DEV_REPO_NAME
Configure Cloud Build
In this section, you complete the setup steps that are required in order to trigger Cloud Build jobs when developers generate pull requests to merge their work into a release branch.
You set up two triggers for the CI/CD pipeline that you create in this tutorial:
- A trigger that runs a Cloud Build job when a developer creates a pull request to merge code into the release branch. A typical use for this trigger is to run unit tests.
- A trigger that runs a Cloud Build job when a pull request is merged into the release branch. A typical use for this trigger is to deploy changes to a destination sandbox (Dev Hub in this tutorial).
Build a base image that includes Salesforce DX
Cloud Build runs your build as a set of steps, where each step runs in a Docker container. You build a base Docker container image that includes the Salesforce CLI, and Cloud Build uses Salesforce CLI commands to run the job.
In Cloud Shell, create a Dockerfile for the image you need to build:
cat <<EOF > Dockerfile
FROM debian:buster
RUN apt-get update && \
apt-get install -y wget xz-utils
RUN wget https://developer.salesforce.com/media/salesforce-cli/sfdx-linux-amd64.tar.xz && \
mkdir sfdx && \
tar xJf sfdx-linux-amd64.tar.xz -C sfdx --strip-components 1 && \
./sfdx/install
ENTRYPOINT [ "sfdx" ]
EOF
Export the name of the Docker image to an environment variable named
SFDX_BASE_IMAGE:export SFDX_BASE_IMAGE="gcr.io/${DEVSHELL_PROJECT_ID}/salesforcedx-base-image:1"Build your container with Cloud Build and publish the image to Container Registry:
gcloud builds submit --tag ${SFDX_BASE_IMAGE}
Configure the Cloud Build job
You define a Cloud Build job by editing a
cloudbuild.yaml file.
In Cloud Shell, create a
cloudbuild.yamlfile to define the job steps to run when Cloud Build deploys code to your Salesforce Dev Hub org:cat <<EOF > cloudbuild.yaml steps: - name: gcr.io/cloud-builders/gsutil args: ['cp', 'gs://\${_BUCKET_NAME}/salesforce.key', 'salesforce.key'] - name: "${SFDX_BASE_IMAGE}" args: - force:auth:jwt:grant - --setdefaultusername - -u - \${_SF_USERNAME} - -f - ./salesforce.key - -i - \${_CONSUMER_KEY} - name: "${SFDX_BASE_IMAGE}" args: ['force:source:deploy', '-p', './force-app/'] substitutions: _BUCKET_NAME: __BUCKET_NAME__ _SF_USERNAME: __USERNAME__ _CONSUMER_KEY: __CONSUMER_KEY__ EOFThe file configures Cloud Build to do the following:
- Download the
salesforce.keyfile that Cloud Build uses to authenticate to the Dev Hub org. - Start a Docker container that has the Salesforce CLI installed and then connect to the Dev Hub org by using a JWT grant. Cloud Build uses configuration parameters such as the consumer key and the Salesforce username that's in the Cloud Build trigger definition.
- Deploy the code pushed by the developer to the Dev Hub org or to another destination sandbox in production CI/CD pipelines.
- Download the
Create another file called cloudbuild_pr.yaml to define the job steps
to run when Cloud Build deploys code from a pull request to a
temporary Salesforce scratch org or sandbox for testing:
cat <<EOF > cloudbuild_pr.yaml
steps:
- name: gcr.io/cloud-builders/gsutil
  args: ['cp', 'gs://\${_BUCKET_NAME}/salesforce.key', 'salesforce.key']
- name: "${SFDX_BASE_IMAGE}"
  args:
  - force:auth:jwt:grant
  - -u
  - \${_SF_USERNAME}
  - -f
  - ./salesforce.key
  - -i
  - \${_CONSUMER_KEY}
- name: "${SFDX_BASE_IMAGE}"
  args:
  - force:org:create
  - --setdefaultusername
  - --definitionfile
  - config/project-scratch-def.json
  - --targetdevhubusername
  - \${_SF_USERNAME}
  - --setalias
  - testing org
- name: "${SFDX_BASE_IMAGE}"
  args: ['force:source:push']
- name: "${SFDX_BASE_IMAGE}"
  args: ['force:apex:test:run', '--resultformat', 'tap', '--codecoverage']
- name: "${SFDX_BASE_IMAGE}"
  args: ['force:org:delete', '--noprompt']
substitutions:
  _BUCKET_NAME: __BUCKET_NAME__
  _SF_USERNAME: __USERNAME__
  _CONSUMER_KEY: __CONSUMER_KEY__
EOF
The file configures Cloud Build to do the following:
- Download the
salesforce.keyfile that Cloud Build uses to authenticate to the Dev Hub org. - Start a Docker container that has the Salesforce DX CLI installed and connect to the Dev Hub org by using a JWT grant. Cloud Build uses configuration parameters such as the consumer key and the Salesforce username in the Cloud Build trigger definition.
- Create a new scratch org to deploy the developer's code for automated testing.
- Run Apex texts in the scratch org.
- Output the Apex text outcome, which becomes available in the GitHub pull request summary.
- Delete the temporary scratch org.
Push your repository to GitHub
In Cloud Shell, add the new
cloudbuild yamlfile and the Dockerfile to the repository and push the files into the main branch of the DEV_REPO_NAME repository. When you're prompted, log in to GitHub.git add . git commit -m "Added cloud build configuration" git push github mainCreate a release branch that developers can pull code from or push code to. For this tutorial, name the branch
release-sample.git checkout -b release-samplePush the branch to GitHub:
git push github release-sample
Connect your GitHub repository to Cloud Build
- Go to the Cloud Build Application page on the GitHub marketplace.
- Scroll down and click Setup with Google Cloud Build. If you're prompted, sign in to GitHub.
- Connect your repository to Cloud Build:
- Select Only select repositories.
- In the Select repositories list, select repository.
- Click Install.
Sign in to Google Cloud.
The Authorization page is displayed, where you're prompted to authorize the Google Cloud Build application to connect to Google Cloud.
Click Authorize Google Cloud Build by GoogleCloudBuild.
You're redirected to the Google Cloud console.
Select your Google Cloud project.
If you agree, accept the terms and then click Next.
In the Select repository page, select the DEV_REPO_NAME GitHub repository.
Click Connect repository.
Click Create Push Trigger.
Update the Cloud Build trigger definition
You define the details for the new trigger that was created when you clicked Create Push Trigger in the previous section.
In the Google Cloud console, open the Cloud Build Triggers page.
Click Menu for the new trigger and then click Edit.
Set Name to
pull-request-to-release-branch.Change the description to
Run unit tests when a pull request is created from a feature branch.Change Event to Pull Request (GitHub App only).
For Source, in the Base branch text box, enter the following expression:
^release.*For Configuration, select Cloud Build configuration file (yaml or json) and enter
cloudbuild_pr.yamlin the text box.Under Substitution variables, create three variables. For each variable, do the following:
- Click Add Item.
Set the Variable and Value fields as listed in the following table:
Variable Value _BUCKET_NAMEThe name of the Cloud Storage bucket for the Salesforce key file, in the following format:
salesforce-ref-PROJECT_ID
Replace PROJECT_ID with the ID of your Google Cloud project._CONSUMER_KEYThe consumer key in the connected application that you created in the Salesforce Dev Hub org. _SF_USERNAMEThe Salesforce username for the Dev Hub org.
Click Save.
Don't close this page. You do further work in this page in the next procedure.
Create a second Cloud Build trigger
The next step is to create another trigger to start Cloud Build jobs when commits are made to the release branch. This trigger invokes a Cloud Build job to push the changes to your Dev Hub org. In your DevOps pipeline, you must make sure that only authorized personnel and processes are able to commit changes to the release branch.
- In the Cloud Build Triggers page, click Create Trigger to create a new trigger.
- Set Name to
commits-to-release-branch. - For Trigger Type, select Push to a Branch.
- In the Repository list, select your GitHub Salesforce repository.
In the Branch (regex) text box, enter the following expression:
^release.*For Build Configuration, select Cloud Build configuration file and enter
cloudbuild.yaml.Under Substitution variables, create three variables. For each variable, do the following:
- Click Add Item.
Set the Variable and Value fields as listed in the following table.
Variable Value _BUCKET_NAMEEnter the name of the bucket for the Salesforce key file, in the following format:
salesforce-ref-PROJECT_ID
Replace PROJECT_ID with the ID of your Google Cloud project._CONSUMER_KEYThe consumer key in the connected application that you created in the Salesforce Dev Hub org. _SF_USERNAMEThe Salesforce username for the Dev Hub org.
Click Save.
Add permissions to allow Cloud Build to read Salesforce keys
In Cloud Shell, add permissions to your Cloud Build service account to allow the account to read Salesforce keys from the Cloud Storage bucket that you created:
gsutil iam ch serviceAccount:$GCP_PROJECT_NUMBER@cloudbuild.gserviceaccount.com:objectViewer \
    gs://salesforce-ref-${DEVSHELL_PROJECT_ID}
Setting up pipelines for Salesforce developers
The tasks described in this section are for Salesforce developers.
If you performed the steps in the earlier part of this tutorial that are in the section for administrators and leads, make sure that you use a different set of credentials to run the steps in this section.
The Salesforce DX CLI installation steps might vary based on the OS you're using. The steps in this section describe the steps for Debian Linux. For instructions for macOS and Windows, see Install the Salesforce CLI in the Salesforce documentation.
Setting up Salesforce DX CLI
In this section, you install the Salesforce CLI and set up authorization for it.
On your local machine (not in Cloud Shell), go to the home directory:
cd $HOMEInstall the
xz-utilsandwgettools:sudo apt-get install --assume-yes xz-utils wgetInstall the Salesforce CLI:
wget https://developer.salesforce.com/media/salesforce-cli/sfdx-linux-amd64.tar.xzCreate an
sfdxdirectory:mkdir sfdxExtract the downloaded tar file:
tar xJf sfdx-linux-amd64.tar.xz -C sfdx --strip-components 1Install the CLI:
./sfdx/installThe Salesforce CLI is installed in
/usr/local/bin/sfdx.Verify that the CLI has been set up correctly:
sfdxThe output is similar to the following:
VERSION
sfdx-cli/7.8.1-8f830784cc linux-x64 node-v10.15.3

USAGE
$ sfdx [COMMAND]

COMMANDS
commands  list all the commands
force     tools for the Salesforce developer
help      display help for sfdx
plugins   add/remove/create CLI plug-ins
update    update the sfdx CLI
which     show which plugin a command is in

TOPICS
Run help for each topic below to view subcommands

commands  list all the commands
force     tools for the Salesforce developer
plugins   add/remove/create CLI plug-ins
Connect your local development environment to your Salesforce Dev Hub org
From your local machine, log into your Salesforce org using credentials for a developer role:
sfdx force:auth:web:login --setalias YOUR_HUB_ORGReplace YOUR_HUB_ORG with an appropriate alias for your Dev Hub org.
This command opens a web browser on your local machine, so you can't run it on a VM that you're connected to.
Clone the GitHub repository
Clone the GitHub repository that was created by your Salesforce administrator:
git clone DEV_REPO_NAME -o githubGo to the directory of the cloned repository:
cd DEV_REPO_NAME
Push the Salesforce codebase and metadata to a scratch org
In this section, you push the codebase and metadata to a scratch org so it can be unit-tested.
On your local machine, export your Dev Hub username to an environment variable named
SALESFORCE_USERNAME:export SALESFORCE_USERNAME=YOUR_DEVHUB_USERNAMEReplace YOUR_DEVHUB_USERNAME with the username that you set up earlier.
Create a scratch org to test the repository that you cloned for this tutorial:
sfdx force:org:create \
    --setdefaultusername \
    --definitionfile config/project-scratch-def.json \
    --targetdevhubusername ${SALESFORCE_USERNAME} \
    --setalias feature-test-scratch-org
Push the metadata and code to the scratch org:
sfdx force:source:pushGenerate a URL for the scratch org and navigate to it in a browser window:
sfdx force:org:open
Typically the next step in a project's lifecycle is for you to run unit tests and validate features that you've developed. You won't do that in this tutorial because you're working with pre-validated sample code.
Push your code to a source code repository
On your local machine, create a new branch named
feature-1:git checkout -b feature-1Push the changes to a source code repository:
git add .
git commit -m "Feature 1 changes"
git push github feature-1
For this tutorial, you use GitHub as the source code tool.
Test the deployment
This section describes tests that you can run to verify that the triggers you created are functional. The repository that your Salesforce administrator created contains a sample test class.
On your local machine (not in the Cloud Shell), create a new Git branch:
git checkout -b feature-1Using a text editor, open the following file:
./force-app/main/default/classes/SampleTest.clsTo make the test fail, in the
System.assertEqualsstatement, change the value101to102. After you make the change, save the file, but keep it open because you change it again later in this procedure.@isTest public class SampleTest { static testmethod void testAddOne() { Test.startTest(); System.assertEquals(Sample.addOne(100), 102); // Change to 102 from 101 Test.stopTest(); } }Add and commit the change to the feature branch:
git add .
git commit -m "Changed test case"
git push github feature-1
Create a pull request to merge your code into the release-sample branch.
A new Cloud Build job is triggered. However, the job fails because the unit test fails.
To view the status of the build, open the Cloud Build page.
Go to the History section of the Cloud Build page.
You see the following build log for the job, which shows that the test assertion failed.
Step #4: not ok 1 SampleTest.testAddOne
Step #4: # System.AssertException: Assertion Failed: Expected: 101, Actual: 102
Step #4: # Class.SampleTest.testAddOne: line 24, column 1
Step #4: # Run "sfdx force:apex:test:report -i 7076300001gEzne --resultformat <format>" to retrieve test results in a different format.
[. . .]
Finished Step #4
ERROR
ERROR: build step 4 "gcr.io/serverless-devops-sf/salesforcedx-base-image:1" failed: step exited with non-zero status: 100
To make the test pass, in the
./force-app/main/default/classes/SampleTest.clsfile, change the value102back to101:@isTest public class SampleTest { static testmethod void testAddOne() { Test.startTest(); System.assertEquals(Sample.addOne(100), 101); //Change back to 101 from 102 Test.stopTest(); } }Add and commit the change to the feature branch:
git add .
git commit -m "Changed test case to make it pass"
git push github feature-1
The commit operation triggers a Cloud Build job.
When the job completes, review the pull request in GitHub and merge it into the
release-samplebranch.In production workflows, the authority to merge pull requests is typically limited to DevOps leads and administrators. For more information about how you can set this up, see Defining the mergeability of pull requests on the GitHub site.
In the Google Cloud console, review the Cloud Build job that is automatically triggered when you merge the pull request into the release-sample branch.
When the job completes, log into your Dev Hub org. You can log on either as a developer or as an administrator.
The developer's code modifications are available in this Salesforce org. To see them, go to the Setup page and look under Custom Code/Apex classes.
Clean up
To avoid incurring charges to your Google Cloud account for the resources used in this tutorial, either delete the project that contains the resources, or keep the project and delete the individual resources.
Delete the project
- In the Google Cloud console, go to the Manage resources page.
- In the project list, select the project that you want to delete, and then click Delete.
- In the dialog, type the project ID, and then click Shut down to delete the project.
Delete Salesforce resources
You can also delete the Salesforce Developer Edition org and the associated scratch org that you created for this tutorial.
Deactivate your Developer Edition org
- Go to the Salesforce Dev Hub org.
- From Setup, in the Quick Find box, enter
Company, and then select Company Information. - Click Company Information.
Click the Deactivate Org button.

Delete the scratch org
In Cloud Shell, run the following command to delete your Salesforce scratch org:
sfdx force:org:delete -u feature-test-scratch-org
Delete the GitHub repository
Go to GitHub and delete the repository that you created in your personal account for this tutorial.
What's next
For more reference architectures, diagrams, and best practices, explore the Cloud Architecture Center.