In this tutorial, you perform backups on a Compute Engine SQL Server instance. The tutorial shows you how to manage these backups and store them in Cloud Storage and how to restore a database to a point in time.
This tutorial is useful if you are a sysadmin, developer, engineer, database admin, or devops engineer who wants to back up SQL Server data.
The tutorial assumes that you are familiar with the following:
- Microsoft Windows
- Microsoft SQL Server
- SQL Server full, differential, and transaction log backups
- Compute Engine
- Cloud Storage
Objectives
- Launch a SQL Server instance and create a database.
- Perform full, differential, and transaction log backups.
- Upload the backups to Cloud Storage.
- Restore the database from a Cloud Storage backup.
Costs
In this document, you use the following billable components of Google Cloud:
- Compute Engine
- Networking
- Cloud Storage
- SQL Server (premium with compute engine)
To generate a cost estimate based on your projected usage,
use the pricing calculator.
Before you begin
- Sign in to your Google Cloud account. If you're new to Google Cloud, create an account to evaluate how our products perform in real-world scenarios. New customers also get $300 in free credits to run, test, and deploy workloads.
-
In the Google Cloud console, on the project selector page, select or create a Google Cloud project.
-
Make sure that billing is enabled for your Google Cloud project.
-
Enable the Compute Engine API.
-
In the Google Cloud console, on the project selector page, select or create a Google Cloud project.
-
Make sure that billing is enabled for your Google Cloud project.
-
Enable the Compute Engine API.
- Install a Remote Desktop Protocol (RDP) client of your choice. For more information, see Microsoft Remote Desktop clients. If you already have an RDP client installed, you can skip this task.
When you finish the tasks that are described in this document, you can avoid continued billing by deleting the resources that you created. For more information, see Clean up.
Preparing the SQL Server instance
In this section, you launch the SQL Server instance, prepare the database, and configure an encryption key.
Launch the SQL Server instance
Your first task is to launch a SQL Server instance and create the backup folder.
Open Cloud Shell:
Launch a SQL Server instance:
gcloud compute instances create sqlserver \
    --zone=us-central1-c \
    --machine-type=n1-standard-1 \
    --image-family=sql-std-2019-win-2019 \
    --image-project=windows-sql-cloud \
    --boot-disk-size=50GB \
    --boot-disk-type=pd-standard \
    --tags=sqlserver \
    --scopes=https://www.googleapis.com/auth/cloud-platform
Go to the VM instances page in the Google Cloud console and find the Windows instance you want to connect to:
Set the initial password for the instance. Store the password in a safe place.
In the Compute Engine section of the Google Cloud console, click the RDP dropdown and select the Download the RDP file option to download the RDP file for your instance. Use this file to connect to the instance using an RDP client. For more information, see Microsoft Remote Desktop clients.
Install SQL Server Management Studio
Install Microsoft SQL Server Management Studio (SSMS) by doing the following:
In your RDP session, minimize all windows, and start the Windows PowerShell ISE app.
At the PowerShell prompt, download and execute the SSMS installer:
Start-BitsTransfer `
    -Source "https://aka.ms/ssmsfullsetup" `
    -Destination "$env:Temp\ssms-setup.exe"
& $env:Temp\ssms-setup.exe
Accept the prompt to allow changes to be made.
In the SSMS installer, click Install.
When the installation is finished, click Restart to restart the remote machine. This closes the RDP session.
To reconnect, in the RDP window, click Connect. If the remote machine has not finished restarting, wait a few moments and then try connecting again.
Enter your username and the password you saved earlier (leave the Domain field blank), and then click OK to reconnect.
Prepare the backup and restore folders
In the RDP session, minimize all windows, and then open Google Cloud SDK Shell (not the same as Cloud Shell) on the Windows desktop.
Create a backup folder:
mkdir c:\backupCreate a restore folder:
mkdir c:\restore
Prepare the database
In Cloud Shell, on the instance, create a test database:
osql -E -Q "create database testdb"Create a test table:
osql -E -Q "create table testdb.dbo.testtable(status varchar(255))"
Configure the encryption key
In Cloud Shell, create a primary database key:
osql -E -Q "USE master;CREATE MASTER KEY ENCRYPTION BY PASSWORD = 'MyPassword!';"Create a backup certificate:
osql -E -Q "USE master; CREATE CERTIFICATE testdbcert WITH SUBJECT = 'testdb certificate';"
Performing backups
SQL Server 2019 and earlier
In this section, you create full, differential, and transaction log backups while changing the database between each one.
Add a row to the test table:
osql -E -Q "insert into testdb.dbo.testtable ([status]) VALUES ('Initial')"In Cloud Shell, perform a full backup:
osql -E -Q "BACKUP DATABASE testdb TO DISK='c:\backup\testdb.bak' WITH INIT, COMPRESSION, ENCRYPTION ( ALGORITHM = AES_256, SERVER CERTIFICATE = testdbcert ) "Add a row to the test table:
osql -E -Q "insert into testdb.dbo.testtable ([status]) VALUES ('After Full Backup')"Perform a differential backup:
osql  -E -Q "BACKUP DATABASE testdb TO DISK='c:\backup\testdb-diff.bak' WITH DIFFERENTIAL,
COMPRESSION,
ENCRYPTION
    (
    ALGORITHM = AES_256,
    SERVER CERTIFICATE = testdbcert
    ) "
Add a row to the test table:
osql -E -Q "insert into testdb.dbo.testtable ([status]) VALUES ('After Diff Backup')"Perform a transaction log backup:
osql  -E -Q "BACKUP LOG testdb TO DISK='c:\backup\testdb-log.bak' WITH COMPRESSION,
ENCRYPTION
    (
    ALGORITHM = AES_256,
    SERVER CERTIFICATE = testdbcert
    ) "
Add a row to the test table:
osql -E -Q "insert into testdb.dbo.testtable ([status]) VALUES ('Bad Row')"Verify the rows in the table:
osql -E -Q "select * from testdb.dbo.testtable"The output resembles the following:
Initial

After Full Backup

After Diff Backup

Bad Row
SQL Server 2022
In this section, you create full, differential, and transaction log backups while changing the database between each one. You use the built-in backup and restore commands with Cloud Storage.
SQL Server 2022 (16.x) supports extended object storage integration by introducing
a new connector that uses a REST API to connect to any provider of S3-compatible
object storage. You can use the BACKUP TO URL and RESTORE FROM URL commands
in SQL Server 2022 with any S3-compatible storage destination as the URL.
SQL Server uses credentials to connect to resources outside of itself. A credential is a record containing authentication information. To authenticate and authorize your access to the Cloud Storage S3 interface, you must create and use an Access Key and a Secret Key. You then store these keys in your SQL Server credential.
Create an Access Key and Secret Key for your user account to your Cloud Storage bucket:
- Go to Cloud Storage.
- Go to Settings.
- Go to INTEROPERABILITY.
- Go to Access keys for your user account.
- Scroll down and click Create a key to create a new Access key and a Secret key.
Create a credential in your SQL Server 2022 instance:
Run the following code sample to create a credential. Choose a name for your credential. Replace the
ACCESS_KEYandSECRETfields with the values you generated in the previous step.osql -E -Q " CREATE CREDENTIAL [CREDENTIAL_NAME] WITH IDENTITY = 'S3 Access Key', SECRET = 'ACCESS_KEY:SECRET' "Add a row to the test table:
osql -E -Q "insert into testdb.dbo.testtable ([status]) VALUES ('Initial')"Perform the
BACKUPoperation to the Cloud Storage bucket:Run the backup database command having your Cloud Storage bucket URI set as the
URLparameter value and the name of the credential you defined earlier as the value of theWITH CREDENTIALoption. This command will enable SQL Server to create the backup file and upload it at the same time to the Cloud Storage bucket, with no need for extra local disk space.osql -E -Q " BACKUP DATABASE testdb TO URL = 's3://storage.googleapis.com/BUCKET_NAME/FOLDER_NAME/testdb.bak' WITH CREDENTIAL = 'CREDENTIAL_NAME', FORMAT, STATS = 10, MAXTRANSFERSIZE = 10485760, BLOCKSIZE = 65536, COMPRESSION; "
The following list explains the parameters of the WITH statement:
- FORMAT: Overwrites any existing backups and creates a new media set.
- STATS: Tells SQL Server to provide information about the progress of the backup.
- COMPRESSION: Tells SQL Server to compress the backup file, making it smaller and faster to upload to Cloud Storage.
- MAXTRANSFERSIZE = 10485760, BLOCKSIZE = 65536 options help avoid I/O device errors with larger backup files.
Add a row to the test table:
osql -E -Q "insert into testdb.dbo.testtable ([status]) VALUES ('After Full Backup')"Perform a differential backup:
osql -E -Q "
    BACKUP DATABASE testdb
    TO URL = 's3://storage.googleapis.com/BUCKET_NAME/FOLDER_NAME/testdb-diff.bak'
    WITH
        DIFFERENTIAL,
        CREDENTIAL = 'CREDENTIAL_NAME',
        STATS = 10,
        MAXTRANSFERSIZE = 10485760,
        BLOCKSIZE = 65536,
        COMPRESSION;
    "
Add a row to the test table:
osql -E -Q "insert into testdb.dbo.testtable ([status]) VALUES ('After Diff Backup')"Perform a transaction log backup:
osql -E -Q "
    BACKUP LOG testdb
    TO URL = 's3://storage.googleapis.com/BUCKET_NAME/FOLDER_NAME/testdb-log.bak'
    WITH
        CREDENTIAL = 'CREDENTIAL_NAME',
        STATS = 10,
        MAXTRANSFERSIZE = 10485760,
        BLOCKSIZE = 65536,
        COMPRESSION;
    "
Add a row to the test table:
osql -E -Q "insert into testdb.dbo.testtable ([status]) VALUES ('Bad Row')"Verify the rows in the table:
osql -E -Q "select * from testdb.dbo.testtable"The output looks like this:
Initial

After Full Backup

After Diff Backup

Bad Row
Managing your backups
In this section, you store your backups remotely in Cloud Storage, configure your Cloud Storage bucket to prune old backups automatically, and schedule your backups. If you're running multiple database servers, consider creating multiple directories in your Cloud Storage bucket to represent different servers.
Upload your backups to Cloud Storage
SQL Server 2019 and earlier
Now that you have a few backup files, you can upload your backups to Cloud Storage.
In Cloud Shell, create a Cloud Storage bucket. Bucket names must be globally unique across Google Cloud. To ensure that your bucket name is unique, consider namespacing it with your project name, as shown here:
gsutil mb "gs://${DEVSHELL_PROJECT_ID}-sql-backups"In the shell window in the RDP session, copy your files to your Cloud Storage bucket. In the following command, replace
BUCKET_NAMEwith the name of the bucket you just created.gsutil cp -n c:\backup\testdb*.bak gs://BUCKET_NAMEYou can use the
gsutil cpcommand to create entire directory structures and to upload multiple files at a time.
SQL Server 2022
The backup files are already on your bucket as SQL Server 2022 supports the backup directly to the Cloud Storage.
Set up automatic file pruning in Cloud Storage
Older backups eventually outlive their usefulness, so you need to remove them. To help automate this process, Cloud Storage has a lifecycle management mechanism that you can use to manage the lifecycle of your backup files.
To configure lifecycle management for the objects in your bucket:
In Cloud Shell, create a JSON lifecycle configuration file. This file instructs Cloud Storage to delete files after 30 days:
bash -c 'cat <<EOF >  lifecycle.json
{
    "lifecycle": {
        "rule": [{
            "action": { "type": "Delete" },
            "condition": { "age": 30 }
        }]
    }
}
EOF'
Set the lifecycle configuration for your Cloud Storage bucket. Replace
BUCKET_NAMEwith the name of your bucket:gsutil lifecycle set lifecycle.json gs://BUCKET_NAME
Schedule your backups
In general, it's a good practice to take a full backup periodically and perform differential backups until the next full backup. On Windows, one way to schedule backups is by using scheduled tasks.
If you create a backup script that takes a series of backups, make sure to include some logical validation steps at each point to verify successful completion. If validation fails, make sure the script raises a Windows alert. In addition, to avoid filling up the local disk, make sure the script removes the local backup file after successfully uploading to Cloud Storage.
Restoring from backup
In this section, you restore your SQL Server database from backup files that you stored in Cloud Storage.
SQL Server 2019 and earlier
In Cloud Shell in your RDP session, download your backup files from Cloud Storage. Replace
BUCKET_NAMEwith the name of your SQL Server backup storage bucket:gsutil cp gs://BUCKET_NAME/testdb*.bak c:\restoreOpen the SQL Server Management console.
Click the Start button, and then click Microsoft SQL Server Tools 18 > Microsoft SQL Server Management Studio 18.
Leave the Connection fields as is, and then click Connect.
- In the left-hand pane, expand Databases.
- Right-click
testdb, and in pop-up the menu, click Tasks > Restore > Database. - Import the backup files to the console:
- For Source, select Device.
- Click the more_horiz button.
- In the dialog that opens, click Add, select all the files under
C:\restore, and then click OK. - Click OK.
To view point-in-time restore options:
- Click Timeline.
- Under Restore to, click Specific date and time.
- For Timeline Interval, select hour.
- Choose a time in the Transaction Log Backup range.
Click Cancel to leave the timeline screen.
In this tutorial, you restore the database to its state before the transaction log backup. In order to do that, in the backups list, clear the transaction log row:
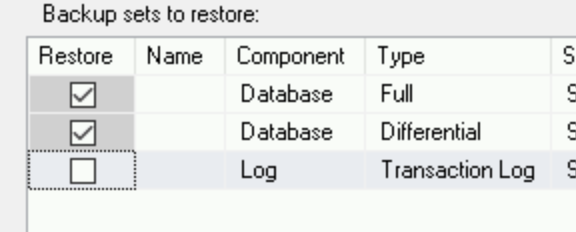
Start the restore process:
- Click OK.
- Wait for the database to finish the restore process, and when
you see the message,
Database 'testdb' restored successfully, click OK.
List the rows in the test table:
osql -E -Q "select * from testdb.dbo.testtable;"The output shows two rows:
"Initial
"After Full Backup"
You see all the lines you inserted into the table before taking the transaction log backup.
SQL Server 2022
You can perform the RESTORE operation. Set the Cloud Storage file path as the URL parameter value. For example, this T-SQL script restores the full backup directly from Cloud Storage:
```
osql -E -Q "
RESTORE DATABASE testdb
FROM
    URL = 's3://storage.googleapis.com/BUCKET_NAME/FOLDER_NAME/testdb.bak'
WITH
    CREDENTIAL = 'CREDENTIAL_NAME';
    "
```
- Open the SQL Server Management console.
- Click the Start button, and then click Microsoft SQL Server Tools 19 > Microsoft SQL Server Management Studio 19.
- Leave the Connection fields as is, and then click Connect.
- In the left-hand pane, expand Databases.
- Right-click
testdb, and in pop-up the menu, click Tasks > Restore > Database. Import the backup files to the console:
- For Source, select Device.
- Click the more_horiz button.
- In the dialog that opens, click Backup media type, and select S3 URL
In the dialog that opens, click Add. Add the three locations of your backup files on the Cloud Storage bucket and the Secret Key and Access Key you provided when you created the credential.
Click OK.
To view point-in-time restore options:
- Click Timeline.
- Under Restore to, click Specific date and time.
- For Timeline Interval, select hour.
- Choose a time in the Transaction Log Backup range.
Click Cancel to leave the timeline screen.
In this tutorial, you restore the database to its state before the transaction log backup. In order to do that, in the backups list, clear the transaction log row:
Start the restore process:
- Click OK.
- Wait for the database to finish the restore process, and when
you see the message,
Database 'testdb' restored successfully, click OK.
List the rows in the test table:
osql -E -Q "select * from testdb.dbo.testtable;"The output shows two rows:
"Initial
"After Full Backup"
You see all the lines you inserted into the table before taking the transaction log backup.
Clean up
Delete the project
- In the Google Cloud console, go to the Manage resources page.
- In the project list, select the project that you want to delete, and then click Delete.
- In the dialog, type the project ID, and then click Shut down to delete the project.
What's next
- Read about SQL Server best practices on Google Cloud.
- Read about configuring SQL Server availability groups.
- Read the disaster recovery planning guide for Google Cloud.
- Explore reference architectures, diagrams, and best practices about Google Cloud. Take a look at our Cloud Architecture Center.