In this tutorial, you use Striim to migrate Oracle® Database Enterprise Edition 18c or later from either an on-premises environment or a cloud environment to a Cloud SQL for PostgreSQL instance on Google Cloud. The tutorial uses tables in the Oracle HR sample schema.
This tutorial is for enterprise database architects, database engineers, and data owners who plan to use Striim to migrate or replicate Oracle databases to Cloud SQL for PostgreSQL. You should have a basic understanding of how to use Striim to build pipelines. You should also be familiar with the Striim web UI, Striim's key concepts, and how to create an application using Striim's Flow Designer.
Striim is a Google Cloud database migration technology partner. Striim simplifies online migrations by using a drag-and-drop interface to set up continuous data movement between databases. For migrations to Google Cloud, Striim offers a non-intrusive streaming platform for extract, transform, and load (ETL) that's efficient to deploy and straightforward to iterate. To build the migration pipeline, you use Striim's Flow Designer throughout this tutorial.
If database migration is not something you are familiar with, see this tech talk from Cloud Next '19.
Architecture
Database migration using Striim involves two stages of sequential data movement:
- Stage 1: A one-time, initial replication of the Oracle database.
- Stage 2: The continuous replication of every change committed on the source database system thereafter by using change data capture (CDC).
The following diagram illustrates a basic deployment architecture:

This architecture involves running the Striim application on a Compute Engine instance. It connects to an Oracle database that's hosted on-premises or in the cloud, and writes data to a Cloud SQL for PostgreSQL instance on Google Cloud.
To avoid any network or connectivity issues between the Striim and Cloud SQL instances, use the same network for both instances. You can deploy Striim from Google Cloud Marketplace on a Compute Engine instance or, if you need high-availablilty, you can deploy Striim as a cluster.
For this tutorial, deploy from Cloud Marketplace.
The advantage of deploying Striim from Cloud Marketplace is that it lets you connect to various databases and data sources using their built-in adapters. You can connect the adapters by using Flow Designer, Striim's interactive, drag-and-drop interface, to form an acyclic graph. This graph is also known as a Striim pipeline or a Striim application.
The migration use case in this tutorial uses three Striim adapters:
- Database Reader: Reads data from the Oracle source database during the initial load stage.
- Oracle Reader: Reads data using LogMiner from the Oracle source database during the continuous data replication stage.
- Database Writer: Writes data to the Cloud SQL for PostgreSQL database during the initial load and during the continuous data replication.
Objectives
Prepare your Oracle database as a source database for migration or replication.
Prepare a Cloud SQL for PostgreSQL database as the target database for migration or replication.
Fulfill the prerequisites for installing and running Striim.
Convert the schema of the Oracle database to the corresponding schema in PostgreSQL.
Perform the initial load from your Oracle database to Cloud SQL for PostgreSQL.
Set up the continuous replication from your Oracle database to Cloud SQL for PostgreSQL.
Costs
In this document, you use the following billable components of Google Cloud:
To generate a cost estimate based on your projected usage,
use the pricing calculator.
The Striim solution in Cloud Marketplace offers a limited-term free-trial license. When the trial expires, usage charges are billed to your Google Cloud account. You can also obtain Striim licenses directly from Striim for on-premises deployment and in a Compute Engine virtual machine (VM). You also might incur costs that are associated with running an Oracle database outside Google Cloud.
Before you begin
- Sign in to your Google Cloud account. If you're new to Google Cloud, create an account to evaluate how our products perform in real-world scenarios. New customers also get $300 in free credits to run, test, and deploy workloads.
-
In the Google Cloud console, on the project selector page, select or create a Google Cloud project.
-
Make sure that billing is enabled for your Google Cloud project.
-
In the Google Cloud console, on the project selector page, select or create a Google Cloud project.
-
Make sure that billing is enabled for your Google Cloud project.
This tutorial assumes you already have the following:
- An Oracle Database Enterprise Edition 18c or later for Linux x86-64 that you want to migrate.
- A Compute Engine running CentOS that has Striim installed. You can deploy Striim through the Google Cloud Marketplace solution.
Preparing the Oracle database
The following sections discuss configuration changes that you might need to connect to your Oracle database and migrate it with Striim. For configuration details, see Basic Oracle Configuration Task.
Choose the source for Oracle CDC
While there are different Oracle CDC sources, this tutorial uses LogMiner. You can read about alternate options in Alternate Oracle CDC sources.
Prepare the Oracle Database Enterprise Edition 18c (or later)
To prepare the Oracle database, follow the instructions on Striim documentation page for the following steps:
- Enable Striim's
archivelog. - Enable Striim supplemental log data.
- Enable Striim primary key logging.
Create an Oracle user with LogMiner privileges for Striim.
To run these steps, you must be connected to the container database (CDB), regardless of whether you're migrating a CDB or a pluggable database (PDB). We recommend installing and using SQL*Plus to interact with the Oracle database.
Create a Striim
quiescemarkertable.Striim's Oracle Reader adapter for CDC needs a table for storing metadata when it quiesces an application. If you use LogMiner as a source for CDC (as this tutorial does), then you need the quiescemarker table. You must be connected to the CDB when following the steps to create the table.
Establish network connectivity between your Oracle database and the Striim instance.
By default, the Oracle listener is on port
1521. Ensure that the IP address for the Striim instance is allowed to connect to the Oracle listener port and that no firewall rules block it. The port on which the Oracle listener is configured is in the$ORACLE_HOME/network/admin/tnsnames.orafile.Note the system change number (SCN) for the Oracle database.
The SCN is an internal timestamp that's used to reference changes made to a database.
On your Oracle database, get the oldest SCN:
SELECT MIN(start_scn) FROM gv$transaction;Copy this number. You'll need it later in the continuous replication pipeline steps.
Preparing the Striim instance
For information about the operating systems that Striim supports, see system requirements. To use the Oracle Reader with LogMiner, put the Oracle JDBC driver in the Java classpath in your Striim instance. Perform the following steps on each Striim server that runs an Oracle Reader adapter:
- Log in to
your Oracle account,
and then
download the
ojdbc8.jarfile on your local machine.- If you don't have an Oracle account, create one.
Click the Download link for the
ojdbc8.jarfile.- Click I reviewed and accept the Oracle License Agreement to download the file, if you accept the license terms.
In Cloud Shell, create a Cloud Storage bucket, and upload the
.jarfile to it:gsutil mb -b on -l REGION gs://BUCKET_NAME gsutil cp PATH/ojdbc8.jar gs://BUCKET_NAMEReplace the following:
- REGION: the region where you want to create the Cloud Storage Bucket
- BUCKET_NAME: the name of the Cloud Storage bucket where you
want to store the
ojdbc8.jarfile - PATH: the path to where you downloaded the
ojdbc8.jarfile
After the file is saved on your local machine, we recommend that you upload the
.jarfile to a Cloud Storage bucket so that you can download it to any instance.Open an SSH session with your Striim instance, and then download the
.jarfile onto your Striim instance and place it in the/opt/striim/libdirectory:sudo su - striim gsutil cp gs://BUCKET_NAME/ojdbc8.jar /opt/striim/libVerify that the
ojdbc8.jarfile has the correct file permissions:sudo ls -l /opt/striim/lib/ojdbc8.jarThe output should appear as follows:
-rwxrwx--- striim striim(Optional) If the
.jarfile doesn't have the preceding permissions, set the correct permissions:sudo chmod 770 /opt/striim/lib/ojdbc8.jar sudo chown striim /opt/striim/lib/ojdbc8.jar sudo chgrp striim /opt/striim/lib/ojdbc8.jarStop and restart Striim.
After making any configuration changes (such as the preceding permission changes), you must restart Striim.
If you're using the CentOS 7 Linux distribution, stop Striim:
sudo systemctl stop striim-node
sudo systemctl stop striim-dbms
If you're using the CentOS 7 Linux distribution, start Striim:
sudo systemctl start striim-dbms
sudo systemctl start striim-node
If you want to learn more about stopping and restarting Striim for a different operating system, see Starting and stopping Striim
Install the psql client on the Striim instance.
You use this client to connect to the Cloud SQL instance and create schemas later in this tutorial.
Preparing the Cloud SQL for PostgreSQL schema
When you copy or continuously replicate tabular data from one database to another, Striim typically requires that the target database contains corresponding tables with the correct schema. Google Cloud doesn't have a utility to prepare the schema, but you can use the schema conversion utility from Striim or an open source utility like ora2pg.
Maintain foreign keys during the initial load
During the initial load phase, pay attention to the treatment of foreign keys. Foreign keys establish the relationship between the tables in a relational database. The out-of-order creation or insertion of a foreign key into the target database might destroy the relationship between the two tables. If the integrity between the two databases is compromised, errors might occur. Therefore, it's important to output all foreign key declarations into a separate file during the schema export later in this section.
During continuous replication in CDC pipelines, the source database events are propagated to the target database in the order they occur. If you correctly maintain foreign keys on your source, foreign key operations replicate from the source to the target database in the same order.
In contrast, the initial load pipeline defaults to loading your tables in alphabetical order. If you don't disable foreign keys before the initial load, foreign key violation errors occur. To replicate data during the initial load from the source database tables to the target tables on Cloud SQL for PostgreSQL, you must disable foreign key constraints on the tables. Otherwise, the constraints might be violated during the replication process.
As of June 2021, Cloud SQL for PostgreSQL doesn't support configuration options to disable foreign key constraints.
To handle foreign key constraints:
- Output all foreign key declarations into a separate file during the schema export.
- Create table schemas in the Cloud SQL for PostgreSQL database without the foreign key constraints.
- Complete the initial data replication.
- Apply the foreign key constraints on the tables.
- Create the continuous replication pipeline.
This tutorial offers two options for schema conversion, which the following sections explain:
- The Striim schema conversion utility (recommended)
- The Oracle to PostgreSQL database schema converter (Ora2Pg)
Convert the schema using Striim's schema conversion utility
Use Striim's schema conversion utility to prepare Cloud SQL for PostgreSQL to integrate data with the target schema and create tables that reflect the source Oracle database.
The Striim schema conversion tool converts the following source objects into equivalent target objects:
- Tables
- Primary keys
- Data types
- Unique constraints
NOT NULLconstraints- Foreign keys
Using Striim's schema conversion utility, you can analyze the source database and generate DDL scripts to create equivalent schemas in the target database.
We recommend that you manually create the schema in the target database by using the generated DDL scripts. It's easiest to select a subset of your tables, export the schema, and then import the schema into your target Cloud SQL for PostgreSQL database.
The following example demonstrates how to get your target Cloud SQL for PostgreSQL database ready for the initial load by importing your schema using Striim's schema conversion utility:
Open an SSH connection to your Striim instance.
Go to the
/opt/striimdirectory:cd /opt/striimList all arguments:
bin/schemaConversionUtility.sh --helpRun the schema conversion utility and include the flags that are appropriate for your use case:
bin/schemaConversionUtility.sh \
-s=oracle \
-d=SOURCE_DATABASE_CONNECTION_URL \
-u=SOURCE_DATABASE_USERNAME \
-p=SOURCE_DATABASE_PASSWORD \
-b=SOURCE_TABLES_TO_CONVERT \
-t=postgres \
-f=false
Replace the following:
- SOURCE_DATABASE_CONNECTION_URL: connection URL for Oracle
database—for example,
"jdbc:oracle:thin:@12.123.123.12:1521/APPSPDB.WORLD"or"jdbc:oracle:thin:@12.123.123.12:1521:XE" - SOURCE_DATABASE_USERNAME: Oracle username to use to connect to the Oracle database
- SOURCE_DATABASE_PASSWORD: Oracle password to use to connect to the Oracle database
- SOURCE_TABLES_TO_CONVERT: table names from the source database that are used to convert schemas
Make sure that you use the
-f=falseargument. This argument exports the foreign key declarations into a separate file.The output folder might contain some or all of the following files. For more details on these files, see Striim's schema conversion utility documentation.
Output filename Description converted_tables.sqlContains all the converted tables that don't require any coercion converted_tables_with_striim_intelligence.sqlContains all the converted tables that have been converted with some coercion conversion_failed_tables.sqlContains tables where conversion was attempted, but a mapping was not obtained converted_foreignkey.sqlContains all foreign key constraint declarations conversion_failed_foreignkey.sqlContains all failed foreign key conversions conversion_report.txtContains a verbose report of the schema conversion In this tutorial, you use the
converted_tables.sqlfile to create equivalent tables in the Cloud SQL for PostgreSQL database without any foreign key constraints. After the initial replication, you use theconverted_foreignkey.sqlfile to apply the foreign key constraints.- SOURCE_DATABASE_CONNECTION_URL: connection URL for Oracle
database—for example,
Convert the schema using Ora2Pg
Another option for converting Oracle table schemas to equivalent PostgreSQL schemas is the Ora2Pg utility. You can install this utility on a separate Google Cloud VM.
The Ora2Pg utility converts the Oracle schema and exports the DDL statements
that are required to create equivalent tables in the PostgreSQL database. These
DDL statements are exported in an output file that is named output.sql.
By default, the Ora2Pg utility exports Oracle tables with the NOLOGGING attribute set to UNLOGGED tables. To avoid losing data from unlogged tables if your database crashes, we recommend that you deactivate this feature.
If you chose to use this feature, then to export all tables as NORMAL tables, set the value for this attribute to 1.
During the schema export, you export and save all foreign key declarations into a separate file by using the following flag in the Ora2Pg configuration file:
FILE_PER_FKEYS 1
By default, foreign keys are exported into the main output file (output.sql).
When you enable the FILE_PER_FKEYS flag (1), foreign keys are exported into
a separate file named FKEYS_output.sql.
In this tutorial, you use the output.sql file to create equivalent tables in
the Cloud SQL for PostgreSQL database without any foreign key constraints.
After the initial replication, you use the FKEY_output.sql file to apply the
foreign key constraints.
Preparing the Cloud SQL for PostgreSQL instance
To enable Striim to write data to a Cloud SQL for PostgreSQL instance, you need to create a Cloud SQL instance. You also need to create the database tables and the schema that Striim writes to:
In Cloud Shell, create a Cloud SQL for PostgreSQL instance. We recommend that you configure Cloud SQL to use a private IP address. Use the
--networkparameter to configure this address:$INSTANCE_NAME=INSTANCE_NAME gcloud beta sql instances create INSTANCE_NAME \ --database-version=POSTGRES_12 \ --network=NETWORK \ --cpu=NUMBER_CPUS \ --memory=MEMORY_SIZE \ --region=REGIONReplace the following:
- INSTANCE_NAME: the instance name
- NETWORK: the name of the VPC network that you use for this instance
- NUMBER_CPUS: number of vCPUs in the instance
- MEMORY_SIZE: amount of memory for the instance. For example, 3072MiB or 9GiB. GiB is assumed if you do not specify the unit.
- REGION: the region where you created the Cloud Storage bucket
Create a username and password on the Cloud SQL instance:
CLOUD_SQL_USERNAME=CLOUD_SQL_USERNAME

gcloud sql users create $CLOUD_SQL_USERNAME \
  --instance=$INSTANCE_NAME \
  --password=CLOUD_SQL_PASSWORD
Replace the following:
- CLOUD_SQL_USERNAME: a username for your Cloud SQL instance
- CLOUD_SQL_PASSWORD: the password for the Cloud SQL username
This user is granted ownership of the PostgreSQL tables. Striim also uses this user's credentials to connect to the Cloud SQL for PostgreSQL database.
The schema files that are exported during the schema conversion step might have a DDL statement that grants ownership to a user, as in the following example:
CREATE SCHEMA <SCHEMA_NAME>;
ALTER SCHEMA <SCHEMA_NAME> OWNER TO <USER>;
You might need to replace
SCHEMA_NAMEwithCLOUD_SQL_SCHEMAandUSERwith theCLOUD_SQL_USERNAMEcreated earlier.Create a PostgreSQL database
CLOUD_SQL_DATABASE_NAME=CLOUD_SQL_DATABASE_NAME

gcloud sql databases create $CLOUD_SQL_DATABASE_NAME \
  --instance=$INSTANCE_NAME
Replace the following:
- CLOUD_SQL_DATABASE_NAME: PostgreSQL database name
Configure the Cloud SQL for PostgreSQL database to allow access from the Striim instance. Connectivity options depend on whether you configured the Cloud SQL instance to use a public or private IP address.
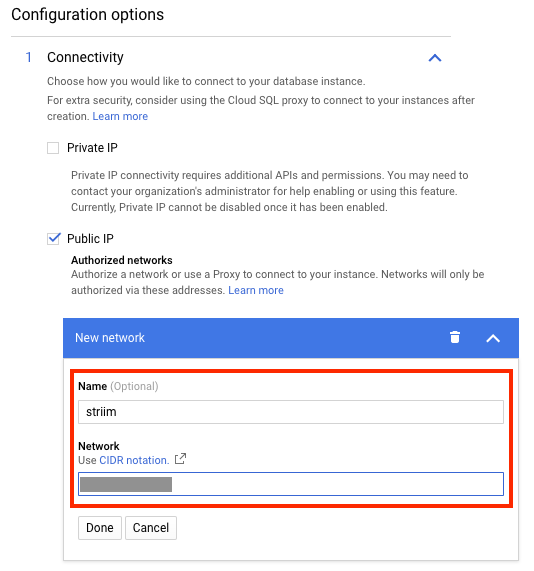
If you configured a public IP address, add the Striim's instance IP address as an authorized address on the Cloud SQL instance. The following screenshot shows how to do that from the Google Cloud console:
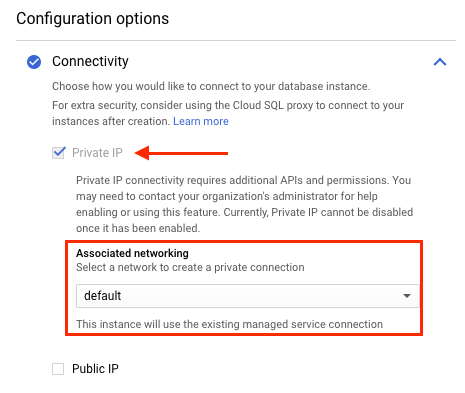
If you configured a private IP address, the available connectivity options depend on whether or not the Cloud SQL instance and the Striim instance are on the same VPC network.
If your Striim instance is on the same VPC network as your Cloud SQL instance, the Striim instance can establish connection with the Cloud SQL instance.
The following screenshot shows that the Cloud SQL instance is associated with the default VPC network. If the Striim instance was also created on the default VPC network, it can privately connect with the Cloud SQL instance.
If your Striim instance is on a different VPC network than your Cloud SQL instance, configure private service access on your Striim instance's VPC network.
Create table schemas without foreign key constraints in the Cloud SQL for PostgreSQL database.
To export
output.sqlduring the schema conversion step, use theoutput.sqlfile to create the schemas.To export
converted_tables.sqlduring the schema conversion step, use theconverted_tables.sqlfile to create the schemas.You can run either script by using any PostgreSQL client with connectivity to the Cloud SQL for PostgreSQL instance. However, we recommend using the PostgreSQL client you installed earlier on the Striim instance.
Create the schemas:
psql -h HOSTNAME -p CLOUD_SQL_PORT -d CLOUD_SQL_DATABASE_NAME -U CLOUD_SQL_USERNAME -f PATH_TO_MAIN_SQL_FILEReplace the following:
- HOSTNAME: IP address of the Cloud SQL instance
- CLOUD_SQL_PORT: port of the Cloud SQL instance to connect
to—by default this port is
5432 - PATH_TO_MAIN_SQL_FILE: path to the main script on the Striim instance
For example:
psql -h 12.123.123.123 -d testdb -U hr -p 5432 -f output.sql
Verify that the tables were created:
Connect to the Cloud SQL for PostgreSQL database:
psql -h HOSTNAME -p 5432 -d CLOUD_SQL_DATABASE_NAME -U
CLOUD_SQL_USERNAME
List the tables in this database:
\dtThe output is a list of tables that the table schema conversion script created in the previous step.
Create a checkpointing table on the Cloud SQL for PostgreSQL database:
Connect to the Cloud SQL for PostgreSQL database:
psql -h HOSTNAME -p 5432 -d CLOUD_SQL_DATABASE_NAME -U
CLOUD_SQL_USERNAME
Create the table:
CREATE TABLE chkpoint (
id character varying(100) primary key,
sourceposition bytea,
pendingddl numeric(1),
ddl text);
Striim needs this table to maintain checkpoints during the continuous replication process.
Loading the Oracle database to Cloud SQL for PostgreSQL database
This section describes the one-time, initial replication of the Oracle database to the Cloud SQL for PostgreSQL database.
Establish a connection to Oracle from Striim
Follow the guidance in Running Striim in Google Cloud. For the initial load, you use the Striim Database Reader adapter to connect to Oracle from Striim. You can also use Striim's CDC wizard.
In the Striim Database Reader adapter, go to Sources, and then search for and select Database from the list.
Set the following properties in the Database window:
- Name: identify this component of the migration pipeline.
- Adapter:
DatabaseReader Connection URL: enter a unique string to connect to the Oracle database:
jdbc:oracle:thin:@HOSTNAME:ORACLE_PORT:SIDOR
jdbc:oracle:thin:@HOSTNAME:ORACLE_PORT/PDB_OR_CDB_SERVICE_NAMEReplace the following:
- ORACLE_PORT: Oracle database port (
1521by default) - SID: Oracle database SID
- PDB_OR_CDB_SERVICE_NAME: Oracle PDB or CDB service name: If your
tables are in a PDB, use
PDB_SERVICE_NAME; if they are in a CDB, useCDB_SERVICE_NAME.
You can find the port and service name in the
tnsnames.orafile located at$ORACLE_HOME/network/admin/tnsnames.oraon the Oracle instance.- ORACLE_PORT: Oracle database port (
Username and password: Use the Oracle user (
c##striimuser) you created in the prerequisite steps. Striim uses this username and password to connect to your Oracle database and read the tables.Tables: For Oracle, the Database Reader also needs a list of table names to replicate. This property is specified in the Tables field under Show optional properties. The format for this property is as follows:
ORACLE_SCHEMA.ORACLE_TABLE_NAMEReplace the following:
- ORACLE_SCHEMA: Oracle schema name
- ORACLE_TABLE_NAME: Oracle table names in that schema
You might also specify multiple tables and materialized views as a list separated by semicolons, or with the following wildcards:
%: any series of characters_: any single characterFor example,
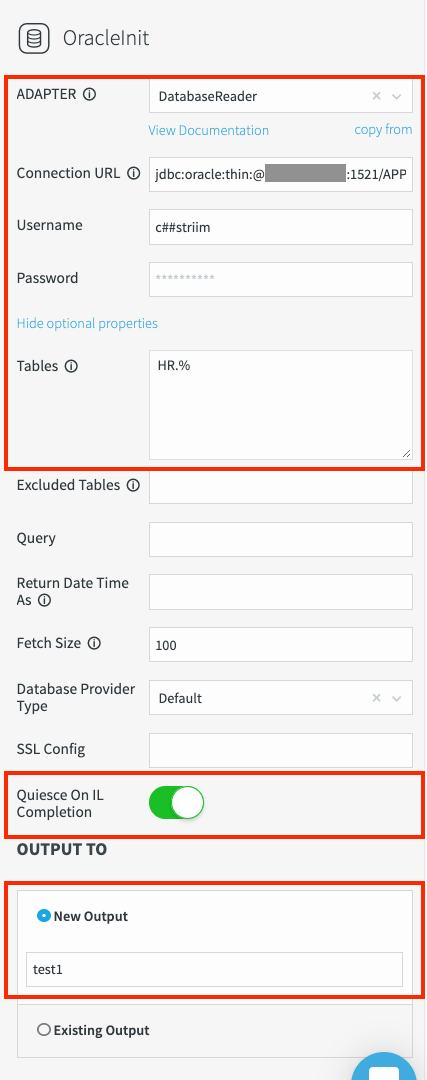
HR.%reads all tables in the HR schema. At least one table must match the wildcard. Otherwise, the Database Reader fails with the following error:Could not find tables specified in the databaseQuiesce On IL Completion: Toggle this field to green by sliding it to the right to pause the pipeline when the initial load is complete.
Output To: Name the output of this adapter. Use a case-sensitive string without special characters or spaces.
Click Save. The adapter properties display:
Test the connection
Now that you have connected to Oracle from Striim, test the connection.
Click the Created drop-down list to test Striim connectivity to the Oracle database.
Click Deploy App.
Select the output of this adapter, and then click Preview to display the data in real time as Striim reads it from the source.

Click the Deployed drop-down list and then click Start App.
(Optional) Click the Deployed drop-down list and then click Undeploy App to fix any errors that occur.
(Optional) Click Resume App after all errors are fixed to restart the app.
Click the default deployment group.
Verify that the Validate table mappings option is toggled on, and then click Deploy.
The preview data pane and the pipeline status change to Quiesced.
At this point in the tutorial, you have successfully verified that Striim is able to establish a connection to your Oracle database and to read the data within it.
Add a Cloud SQL for PostgreSQL database as a target
For this migration, you write data to the Cloud SQL for PostgreSQL instance. Striim provides a generic database writer adapter, called Database Writer, that you can use for the migration.
- In Striim Flow Designer, go to Targets. Search for and select Cloud SQL Postgres from the list.
- Drag Database Writer to the pipeline.
Set the following properties:
Adapter:
DatabaseWriterConnection URL: Enter a unique string to establish a connection to the Cloud SQL instance:
jdbc:postgresql://CLOUD_SQL_IP_ADDRESS:CLOUD_SQL_PORT/CLOUD_SQL_DATABASE_NAME?stringtype=unspecifiedReplace the following:
- CLOUD_SQL_IP_ADDRESS: IP address of the Cloud SQL instance
For example:
jdbc:postgresql://12.123.12.12:5432/postgres?stringtype=unspecifiedUsername and password: Enter the Cloud SQL username and password that you created earlier.
Tables: Create a mapping from your Oracle database table names to to Cloud SQL table names. Specify which Oracle database table is written to which Cloud SQL table. This mapping uses the following format:
ORACLE_SCHEMA.ORACLE_TABLE_NAME,CLOUD_SQL_SCHEMA.CLOUD_SQL_TABLE_NAMEReplace the following:
- CLOUD_SQL_SCHEMA: PostgreSQL schema name
- CLOUD_SQL_TABLE_NAME: PostgreSQL table name
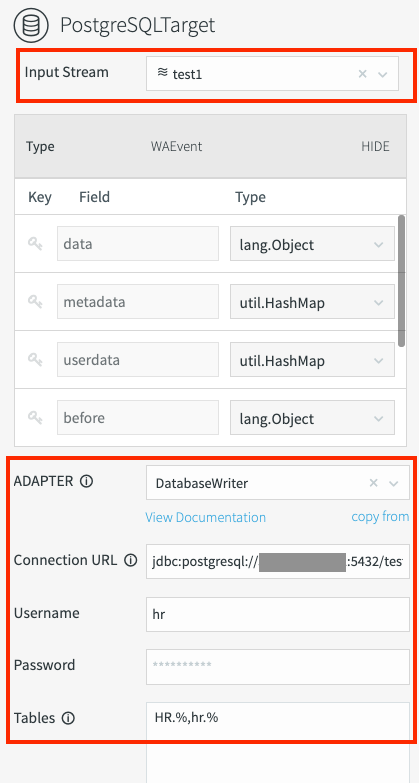
To map multiple tables, you can use the wildcard symbol (%) in the Tables field—for example:
HR.%,hr.%The required fields for Database Writer are marked in the following screenshot:
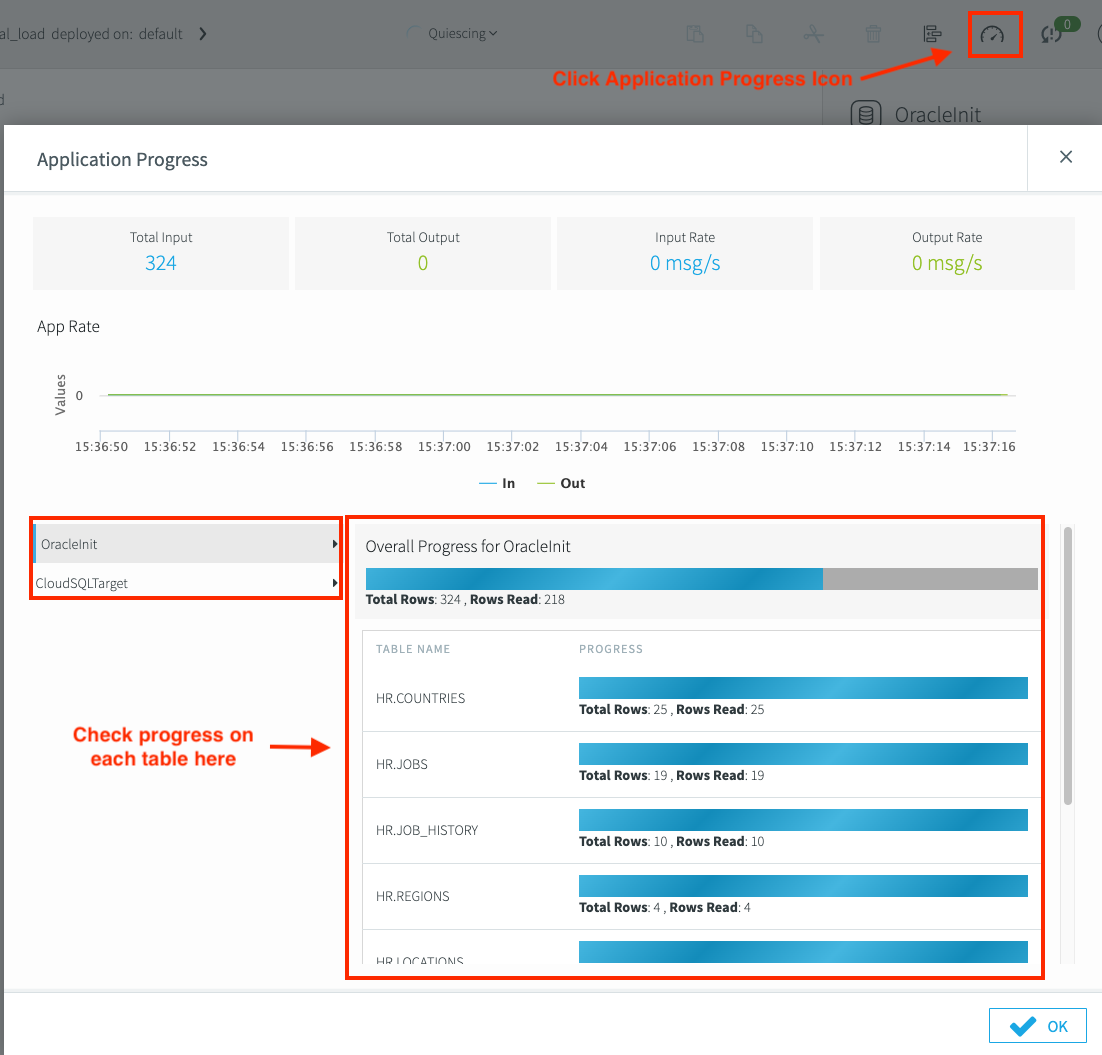
Deploy the migration pipeline
After the migration pipeline is ready, deploy it from the Striim Flow Designer and start the application. You can also preview the data being replicated in real time. Use Monitor reports to track the progress of the replication. To track the progress, select the Application Progress icon.
In the Striim Flow Designer, deploy the migration pipeline. Click the Created drop-down list, and then click Deploy App. After the initial load is complete, the pipeline status changes to
Quiesced.Click Undeploy the app to roll back the deployment.
Verify that the data load succeeded by checking the row count:
SELECT COUNT(*) FROM <TARGET CLOUD SQL TABLE>;You should see a non-zero output. If you don't, the data load failed.
The initial data load from the Oracle database to Cloud SQL for PostgreSQL is atomic. Either the entire data load succeeds or the entire data load fails. If the initial load fails, you must load the data again.
Enabling foreign key constraints on the Cloud SQL for PostgreSQL tables
After the initial load is complete, enable the foreign key constraints on the
target tables. Use the file with foreign key declarations (FKEY_output.sql or
converted_foreignkey.sql) that you created during the
schema conversion.
In Striim, open an SSH session.
Create foreign key constraints on the tables:
psql -h HOSTNAME -d CLOUD_SQL_DATABASE_NAME -U CLOUD_SQL_USERNAME -p
CLOUD_SQL_PORT -f PATH_TO_FOREIGN_KEY_FILE
Replace the following:
- CLOUD_SQL_USERNAME: Cloud SQL for PostgreSQL username
PATH_TO_FOREIGN_KEY_FILE: : path to the script with foreign key constraints on the Striim instance
For example:
psql -h 12.123.123.123 -d testdb -U hr -p 5432 -f output.sql
Continuously replicating the Oracle database to Cloud SQL for PostgreSQL
After you complete your initial data load, create a separate pipeline to replicate changes to the Oracle database. As long as it remains running, this pipeline also keeps the source database in sync with the target database.
Establish a connection to Oracle from Striim
For continuous replication, you use the Striim Oracle Reader adapter to connect from Striim to the Oracle database. This Striim adapter can read CDC data from Oracle.
- In the Striim Oracle Reader adapter, navigate to Sources.
Search for Oracle, and select Oracle CDC from the list that populates.
Set the following properties:
Connection URL:
HOSTNAME:ORACLE_PORT/SIDOR
HOSTNAME:ORACLE_PORT/CDB_SERVICE_NAMEReplace the following:
- CDB_SERVICE_NAME: Oracle's CDB service name
The connection URL is a unique string that's used to connect to the Oracle database. Unlike the Database Reader adapter used for the initial load, you use the CDB service name, regardless of whether your database tables are in a PDB or CDB.
For example:
12.123.123.12:1521/ORCLCDB.WORLD.Username/password: Use the Oracle username (
c##striimuser) you created in the prerequisite steps.This Oracle user must have the privileges to read your tables.
Tables: You also need a list of table names to replicate. The name is specified in the following format, based on whether the tables are in a CDB or PDB.
For the CDB table:
ORACLE_SCHEMA.ORACLE_TABLE_NAMEFor the PDB table:
PDB_NAME.ORACLE_SCHEMA.ORACLE_TABLE_NAMEReplace the following:
- PDB_NAME: Oracle PDB name
This command replicates your CDB or PDB tables. You can find your
PDB_NAMEin the filetnsnames.oralocated at$ORACLE_HOME/network/admin/tnsnames.oraon the Oracle instance.Remember,
PDB_NAMEandPDB_SERVICE_NAMEare different. You used thePDB_SERVICE_NAMEearlier in the section. View thetnsnames.orafile to get the PDB name:sudo su - oracle // Login as oracle user cat ORACLE_HOME/network/admin/tnsnames.oraThe following is an example of the
PDB_NAME(APPSPDB) in thetnsnames.orafile:APPSPDB = (DESCRIPTION = (ADDRESS_LIST = (ADDRESS = (PROTOCOL = TCP) (HOST = orainst) (PORT = 1521)) ) (CONNECT_DATA = (SERVICE NAME = APPSPDB.WORLD) ) )To specify multiple tables and materialized views as a list, separate the the table names or view names by semicolons or wildcards. At least one table must match the wildcard; otherwise the Oracle Reader fails with a
Could not find tables specified in the databaseerror.Start SCN: For the continuous pipeline, you need to provide the Oracle database SCN. Striim needs it to start replicating all transactions. Enter the SCN value you generated earlier.
Support PDB and CDB: You can use a CDB or a PDB; expand Show optional properties and toggle the switch to the right.
Quiesce marker table: Use the table name you created earlier.
The following screenshot provides an overview of the required fields for the Oracle Reader adapter:
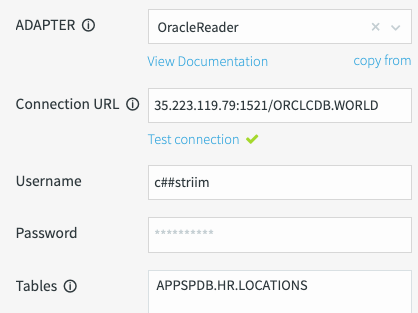
Test connection: Click Test connection. The connection URL, username, and password are required to test database connectivity. If Striim is successfully able to establish a connection, a green check mark appears.
Test Striim's ability to read the Oracle database tables:
- In the Oracle Reader adapter, select Deploy app.
- Select the default deployment group.
- Click Deploy.
Click the wave (Output) icon for this adapter. The eye (Preview) icon that appears is used to preview the data in real time as Striim reads it from the source.
Click Start App in the Deployed dropdown.
If any errors occur, select Undeploy App from the same dropdown and fix the errors. After you fix the errors, click Resume App to restart the application.
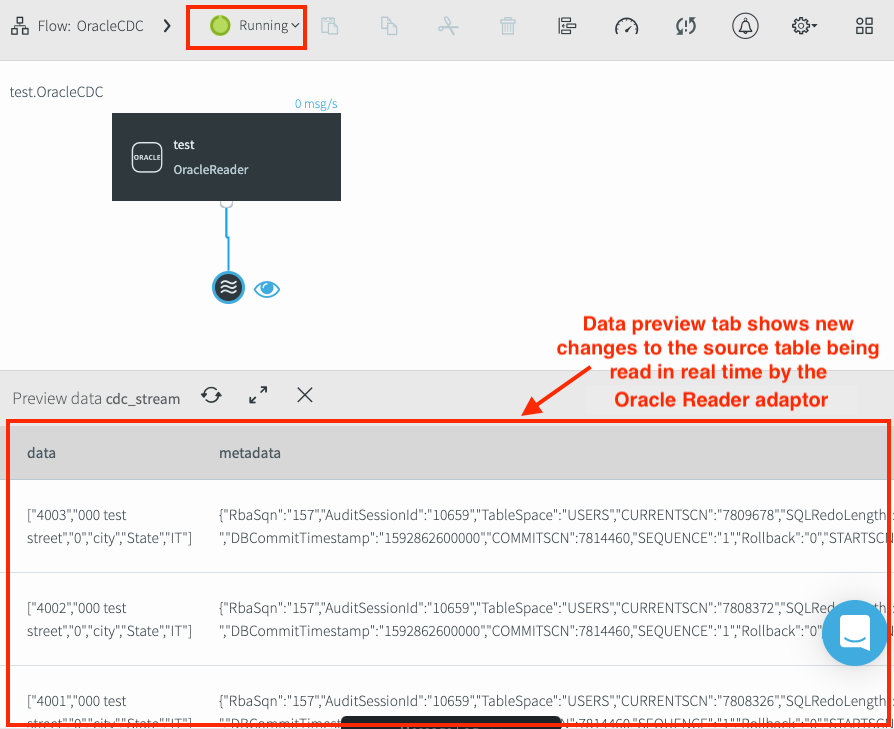
When the pipeline starts, the pipeline status updates to Running. Any new changes to the source table display in the preview window. Because the Oracle Reader adapter uses CDC, the only table changes that appear in the preview data pane are those that occur after the application was launched.
Verify the ability to read CDC data from Oracle
To test if the adapter is able to read new changes, follow these instructions:
- Use SQL statements to insert new transactions in the Oracle source tables.
- Verify that the new transactions appear in the Preview data tab of Oracle Reader adapter.
- Stop the application and click Undeploy. Now you are ready to move to the next step.
Up to this point you haven't added a target adapter to the pipeline. No data is copied unless you add a target adapter. In the next section, you add a target adapter.
Add a Cloud SQL for PostgreSQL database as a target
In order to write data to the Cloud SQL for PostgreSQL database, you need to add a Database Writer adapter to your pipeline. For the continuous replication pipeline, you use the same adapter that you used in the initial load pipeline.
- In Striim Flow Designer, go to Targets, and search for and select Cloud SQL Postgres from the list.
- Drag Database Writer to the pipeline.
Set the following properties:
Adapter:
DatabaseWriter.Connection URL: Enter the connection URL you entered to establish a connection to the Cloud SQL instance:
jdbc:postgresql://CLOUD_SQL_IP_ADDRESS:CLOUD_SQL_PORT/CLOUD_SQL_DATABASE_NAME?stringtype=unspecifiedFor example:
jdbc:postgresql://12.123.12.12:5432/postgres?stringtype=unspecifiedUsername and password: Enter the Cloud SQL username and password that you created earlier.
Tables: Create a mapping from your Oracle database table names to Cloud SQL table names. Specify which Oracle database table is written to which Cloud SQL table. This mapping uses the following format:
ORACLE_SCHEMA.ORACLE_TABLE_NAME,CLOUD_SQL_SCHEMA.CLOUD_SQL_TABLE_NAMETo map multiple tables, you can use the wildcard symbol (%) in the Tables field. For example:
HR.%,hr.%In addition to those properties, you also need to set the following properties for the continuous replication pipeline:
Click Show optional properties.
Select the following value for the Ignorable Exception Code field:
23505,NO_OP_UPDATE,NO_OP_DELETESince you're starting the CDC pipeline from a historical point, there might be duplicates. Striim deduplicates on your target by using the previous ignorable exception code properties. Details on the exception codes can be found in the following table:
Exception code Details 23505Duplicate primary key value violates unique constraint NO_OP_UPDATECouldn't update a row in the target (typically because there was no corresponding primary key) NO_OP_DELETECouldn't delete a row in the target (typically because there was no corresponding primary key) Enter
chkpointin the Check Point Table field. Striim uses this table to store metadata associated with checkpointing the continuous replication pipeline.
Enabling recovery and encryption
Before you deploy the CDC pipeline, we strongly recommend that you enable recovery. If the Striim application or the VM goes down, enabling recovery helps ensure that Striim can continue processing. This step also helps ensure exactly- once processing semantics. These semantics track the last-known-good read checkpoint on the source database, and the last-known-good write checkpoint on the target database. If an application or VM fails, Striim coordinates the two checkpoints to help ensure that no data was lost or duplicated. Recovery doesn't apply to initial load applications.
Enable recovery
- In Striim Flow Designer, click the Configuration icon and then select App Settings.
- Click Recovery Interval.
- Type
5and select Second from the drop-down list. - Click enable encryption. Striim encrypts all streams that move data between Striim servers, or from a forwarding agent, to a Striim server.
Enable encryption
- In Striim Flow Designer, click the Configuration icon, select App Settings, and then under Encryption, select the checkbox.
See the Striim website to learn more about Striim's recovery methods.
Enable logging exceptions
Before you deploy the continuous replication pipeline, we recommend that you enable the exception store in Striim. As part of the CDC application, there might be duplicates written by the initial load application. The Striim application ignores those errors, writes them to a store (for you to review and process) and continues processing.
- In Striim Flow Designer, select the Exceptions icon. The icon shows an exclamation point between two curved arrows.
- Click Turn on.
Deploy the pipeline
After the pipeline is ready, you can deploy it and start the application. You can also preview the data as it's replicated in real time and view monitor reports. When the pipeline successfully starts the continuous replication, the pipeline status changes to Running.
- In the Oracle Reader adapter, select Deploy app.
- Select the default deployment group.
- Click Deploy.
You can keep the pipeline running for as long as you want to keep the Oracle tables in sync with the Cloud SQL tables.
You have finished the tutorial. If you are interested in learning about other Oracle CDC sources, the following section discusses them.
Alternate Oracle CDC sources
In addition to LogMiner, Striim's adapter can read Oracle databases from either XStream or Oracle Golden Gate trail files.
To read from XStream, use Striim's Oracle Reader adapter. XStream may have better performance, but it requires a Golden Gate license and is only supported for Oracle Database 11.2.0.4.
To read Golden Gate trail files, use Striim's GG Trail Reader adapter.
The following table describes differences between LogMiner and XStream:
| Oracle database CDC features |
Supported by LogMiner? |
Supported by XStream Out? |
|---|---|---|
Reading data definition language (DDL), ROLLBACK, and
uncommitted transactions |
Yes | No |
Using the DATA() and BEFORE() functions |
Yes | No |
Using QUIESCE (see Console commands)
|
Yes | No |
| Receiving CDC events | Receives events in batches as defined by Oracle Reader's
FetchSize property |
Continuous reception of change data events |
| Reading from tables containing unsupported types | Won't read the table | Reads the columns of supported types |
Clean up
To avoid incurring charges to your Google Cloud account for the resources used in this tutorial, either delete the project that contains the resources, or keep the project and delete the individual resources.
- In the Google Cloud console, go to the Manage resources page.
- In the project list, select the project that you want to delete, and then click Delete.
- In the dialog, type the project ID, and then click Shut down to delete the project.
What's next
- Check out the Striim documentation: Oracle to Google Cloud PostgreSQL Migration Guide
- Watch the video on migrating Oracle Databases to Cloud SQL PostgreSQL.
- For more reference architectures, diagrams, and best practices, explore the Cloud Architecture Center.
Oracle, Java, and MySQL are registered trademarks of Oracle and/or its affiliates. Other names may be trademarks of their respective owners.