This guide shows you how to use Terraform to deploy an SAP HANA scale-out system that includes the SAP HANA host auto-failover fault-recovery solution. By using Terraform, you can deploy a system that meets SAP support requirements and adheres to both SAP and Compute Engine best practices.
The resulting SAP HANA system includes a master host, up to 15 worker hosts, and up to 3 standby hosts all within a single Compute Engine zone.
The system also includes the
Google Cloud storage manager for SAP HANA standby nodes (storage manager for SAP HANA), which
manages the transfer of storage devices to the standby node during a failover.
The storage manager for SAP HANA is installed in the SAP HANA /shared volume.
For information about the storage manager for SAP HANA and required IAM permissions,
see The storage manager for SAP HANA.
For more information from SAP about the host auto-failover solution, see Host Auto-Failover
Do not use this guide if you do not need the host auto-failover feature. Instead, use the Terraform: SAP HANA deployment guide.
If you need to deploy SAP HANA in a Linux high-availability cluster, use one of the following guides:
- The Terraform: SAP HANA HA cluster configuration guide
- The HA cluster configuration guide for SAP HANA on RHEL
- The HA cluster configuration guide for SAP HANA on SLES
This guide is intended for advanced SAP HANA users who are familiar with SAP scale-out configurations that include standby hosts for high-availability, as well as network file systems.
Prerequisites
Before you create the SAP HANA high availability scale-out system, make sure that the following prerequisites are met:
- You have read the SAP HANA planning guide and the SAP HANA high-availability planning guide.
- You or your organization has a Google Cloud account and you have created a project for the SAP HANA deployment. For information about creating Google Cloud accounts and projects, see Setting up your Google account in the SAP HANA Deployment Guide.
- If you require your SAP workload to run in compliance with data residency, access control, support personnel, or regulatory requirements, then you must create the required Assured Workloads folder. For more information, see Compliance and sovereign controls for SAP on Google Cloud.
- The SAP HANA installation media is stored in a Cloud Storage bucket that is available in your deployment project and region. For information about how to upload SAP HANA installation media to a Cloud Storage bucket, see Creating a Cloud Storage bucket. in the SAP HANA Deployment Guide.
- You have an NFS solution, such as the managed
Filestore
solution, for sharing the SAP HANA
/hana/sharedand/hanabackupvolumes among the hosts in the scale-out SAP HANA system. You specify the mount points for the NFS servers in the Terraform configuration file before you can deploy the system. To deploy Filestore NFS servers, see Creating instances. Communication must be allowed between all VMs in the SAP HANA subnetwork that host an SAP HANA scale-out node.
If OS login is enabled in your project metadata, you need to disable OS login temporarily until your deployment is complete. For deployment purposes, this procedure configures SSH keys in instance metadata. When OS login is enabled, metadata-based SSH key configurations are disabled, and this deployment fails. After deployment is complete, you can enable OS login again.
For more information, see:
Creating a network
For security purposes, create a new network. You can control who has access by adding firewall rules or by using another access control method.
If your project has a default VPC network, don't use it. Instead, create your own VPC network so that the only firewall rules in effect are those that you create explicitly.
During deployment, VM instances typically require access to the internet to download Google Cloud's Agent for SAP. If you are using one of the SAP-certified Linux images that are available from Google Cloud, the VM instance also requires access to the internet in order to register the license and to access OS vendor repositories. A configuration with a NAT gateway and with VM network tags supports this access, even if the target VMs do not have external IPs.
To create a VPC network for your project, complete the following steps:
-
Create a custom mode network. For more information, see Creating a custom mode network.
-
Create a subnetwork, and specify the region and IP range. For more information, see Adding subnets.
Setting up a NAT gateway
If you need to create one or more VMs without public IP addresses, you need to use network address translation (NAT) to enable the VMs to access the internet. Use Cloud NAT, a Google Cloud distributed, software-defined managed service that lets VMs send outbound packets to the internet and receive any corresponding established inbound response packets. Alternatively, you can set up a separate VM as a NAT gateway.
To create a Cloud NAT instance for your project, see Using Cloud NAT.
After you configure Cloud NAT for your project, your VM instances can securely access the internet without a public IP address.
Adding firewall rules
By default, an implied firewall rule blocks incoming connections from outside your Virtual Private Cloud (VPC) network. To allow incoming connections, set up a firewall rule for your VM. After an incoming connection is established with a VM, traffic is permitted in both directions over that connection.
You can also create a firewall rule to allow external access to specified ports,
or to restrict access between VMs on the same network. If the default
VPC network type is used, some additional default rules also
apply, such as the default-allow-internal rule, which allows connectivity
between VMs on the same network on all ports.
Depending on the IT policy that is applicable to your environment, you might need to isolate or otherwise restrict connectivity to your database host, which you can do by creating firewall rules.
Depending on your scenario, you can create firewall rules to allow access for:
- The default SAP ports that are listed in TCP/IP of All SAP Products.
- Connections from your computer or your corporate network environment to your Compute Engine VM instance. If you are unsure of what IP address to use, talk to your company's network administrator.
- Communication between VMs in the SAP HANA subnetwork, including communication between nodes in an SAP HANA scale-out system or communication between the database server and application servers in a 3-tier architecture. You can enable communication between VMs by creating a firewall rule to allow traffic that originates from within the subnetwork.
To create the firewall rules for your project, see Creating firewall rules.
Creating an SAP HANA scale-out system with standby hosts
In the following instructions, you complete the following actions:
- Create the SAP HANA system by invoking Terraform with a configuration file that you complete.
- Verify deployment.
- Test the standby host(s) by simulating a host failure.
Some of the steps in the following instructions use Cloud Shell to
enter the gcloud commands. If you have the latest version of Google Cloud SDK
installed, you can enter the gcloud commands from a local terminal instead.
Define and create the SAP HANA system
In the following steps, you download and complete a Terraform configuration file, use the standard Terraform commands to initialize your current working directory and download the Terraform provider plugin and module files for Google Cloud, and apply the configuration, which deploys the VMs, persistent disks, and SAP HANA instances.
Confirm that your current quotas for project resources, such as persistent disks and CPUs, are sufficient for the SAP HANA system you are about to install. If your quotas are insufficient, deployment fails. For the SAP HANA quota requirements, see Pricing and quota considerations for SAP HANA.
Open Cloud Shell.
Download the
sap_hana_scaleout.tfconfiguration file for the SAP HANA high-availability scale-out system to your working directory:wget https://storage.googleapis.com/cloudsapdeploy/terraform/latest/terraform/sap_hana_scaleout/terraform/sap_hana_scaleout.tf
Open the
sap_hana_scaleout.tffile in the Cloud Shell code editor.To open the Cloud Shell code editor, click the pencil icon in the upper right corner of the Cloud Shell terminal window.
In the
sap_hana_scaleout.tffile, update the following argument values by replacing the contents inside the double quotation marks with the values for your installation. For example, you might replace "ZONE" with "us-central1-f".Argument Data type Description sourceString Specifies the location and version of the Terraform module to use during deployment.
The
sap_hana_scaleout.tfconfiguration file includes two instances of thesourceargument: one that is active and one that is included as a comment. Thesourceargument that is active by default specifieslatestas the module version. The second instance of thesourceargument, which by default is deactivated by a leading#character, specifies a timestamp that identifies a module version.If you need all of your deployments to use the same module version, then remove the leading
#character from thesourceargument that specifies the version timestamp and add it to thesourceargument that specifieslatest.project_idString Specify the ID of your Google Cloud project in which you are deploying this system. For example, my-project-x.zoneString Specify the zone in which you are deploying your SAP system. The zone must be in the same region that you selected for your subnet.
For example, if your subnet is deployed in the
us-central1region, then you can specify a zone such asus-central1-a.machine_typeString Specify the type of Compute Engine virtual machine (VM) on which you need to run your SAP system. If you need a custom VM type, then specify a predefined VM type with a number of vCPUs that is closest to the number you need while still being larger. After deployment is complete, modify the number of vCPUs and the amount of memory. For example,
n1-highmem-32.subnetworkString Specify the name of the subnetwork that you created in a previous step. If you are deploying to a shared VPC, then specify this value as SHARED_VPC_PROJECT_ID/SUBNETWORK. For example,myproject/network1.linux_imageString Specify the name of the Linux operating system image on which you want to deploy your SAP system. For example, rhel-9-2-sap-haorsles-15-sp5-sap. For the list of available operating system images, see the Images page in the Google Cloud console.linux_image_projectString Specify the Google Cloud project that contains the image that you have specified for the argument linux_image. This project might be your own project or a Google Cloud image project. For a Compute Engine image, specify eitherrhel-sap-cloudorsuse-sap-cloud. To find the image project for your operating system, see Operating system details.instance_nameString Specify a name for the host VM instance. The name can contain lowercase letters, numbers, and hyphens. The VM instances for the worker and standby hosts use the same name with a wand the host number appended to the name.sap_hana_shared_nfsString Specify the NFS mount point for the /hana/sharedvolume. For example,10.151.91.122:/hana_shared_nfs.sap_hana_backup_nfsString Specify the NFS mount point for the /hanabackupvolume. For example,10.216.41.122:/hana_backup_nfs.sap_hana_deployment_bucketString To automatically install SAP HANA on the deployed VMs, specify the path of the Cloud Storage bucket that contains the SAP HANA installation files. Do not include gs://in the path; include only the bucket name and the names of any folders. For example,my-bucket-name/my-folder.The Cloud Storage bucket must exist in the Google Cloud project that you specify for the
project_idargument.sap_hana_sidString To automatically install SAP HANA on the deployed VMs, specify the SAP HANA system ID. The ID must consist of three alpha-numeric characters and begin with a letter. All letters must be in uppercase. For example, ED1.sap_hana_instance_numberInteger Optional. Specify the instance number, 0 to 99, of the SAP HANA system. The default is 0.sap_hana_sidadm_passwordString To automatically install SAP HANA on the deployed VMs, specify a temporary SIDadmpassword for the installation scripts to use during deployment. The password must contain at least 8 characters and include at least one uppercase letter, one lowercase letter, and a number.Instead of specifying password as plain text, we recommend that you use a secret. For more information, see Password management.
sap_hana_sidadm_password_secretString Optional. If you are using Secret Manager to store the SIDadmpassword, then specify the Name of the secret that corresponds to this password.In Secret Manager, make sure that the Secret value, which is the password, contains at least 8 characters and includes at least one uppercase letter, one lowercase letter, and a number.
For more information, see Password management.
sap_hana_system_passwordString To automatically install SAP HANA on the deployed VMs, specify a temporary database superuser password for the installation scripts to use during deployment. The password must contain at least 8 characters and include at least one uppercase letter, one lowercase letter, and a number. Instead of specifying password as plain text, we recommend that you use a secret. For more information, see Password management.
sap_hana_system_password_secretString Optional. If you are using Secret Manager to store the database superuser password, then specify the Name of the secret that corresponds to this password. In Secret Manager, make sure that the Secret value, which is the password, contains at least 8 characters and includes at least one uppercase letter, one lowercase letter, and a number.
For more information, see Password management.
sap_hana_double_volume_sizeBoolean Optional. To double the HANA volume size, specify true. This argument is useful when you want to deploy multiple SAP HANA instances or a disaster-recovery SAP HANA instance on the same VM. By default, the volume size is automatically calculated to be the minimum size required for the size of your VM, while still meeting the SAP certification and support requirements. The default value isfalse.sap_hana_sidadm_uidInteger Optional. Specify a value to override the default value of the SID_LCadm user ID. The default value is 900. You can change this to a different value for consistency within your SAP landscape.sap_hana_sapsys_gidInteger Optional. Overrides the default group ID for sapsys. The default value is79.sap_hana_worker_nodesInteger Specify the number of additional SAP HANA worker hosts that you need. You can specify 1 to 15 worker hosts. Do not use the quotation marks with the value. The default is value is 1. sap_hana_standby_nodesInteger Specify the number of additional SAP HANA standby hosts that you need. You can specify 1 to 3 standby hosts. Do not use the quotation marks with the value. The default value is 1. network_tagsString Optional. Specify one or more comma-separated network tags that you want to associate with your VM instances for firewall or routing purposes. If you specify
public_ip = falseand do not specify a network tag, then make sure to provide another means of access to the internet.nic_typeString Optional. Specify the network interface to use with the VM instance. You can specify the value GVNICorVIRTIO_NET. To use a Google Virtual NIC (gVNIC), you need to specify an OS image that supports gVNIC as the value for thelinux_imageargument. For the OS image list, see Operating system details.If you do not specify a value for this argument, then the network interface is automatically selected based on the machine type that you specify for the
This argument is available inmachine_typeargument.sap_hanamodule version202302060649or later.disk_typeString Optional. Specify the default type of Persistent Disk or Hyperdisk volume that you want to deploy for the SAP data and log volumes in your deployment. For information about the default disk deployment performed by the Terraform configurations provided by Google Cloud, see Disk deployment by Terraform. The following are valid values for this argument:
pd-ssd,pd-balanced,hyperdisk-extreme,hyperdisk-balanced, andpd-extreme.You can override this default disk type and the associated default disk size and default IOPS using some advanced arguments. For more information, navigate to your working directory, then run the
terraform initcommand, and then see the/.terraform/modules/sap_hana_scaleout/variables.tffile. Before you use these arguments in production, make sure to test them in a non-production environment.use_single_shared_data_log_diskBoolean Optional. The default value is false, which directs Terraform to deploy a separate persistent disk or Hyperdisk for each of the following SAP volumes:/hana/data,/hana/log,/hana/shared, and/usr/sap. To mount these SAP volumes on the same persistent disk or Hyperdisk, specifytrue.public_ipBoolean Optional. Determines whether or not a public IP address is added to your VM instance. The default value is true.service_accountString Optional. Specify the email address of a user-managed service account to be used by the host VMs and by the programs that run on the host VMs. For example, svc-acct-name@project-id.iam.gserviceaccount.com.If you specify this argument without a value, or omit it, then the installation script uses the Compute Engine default service account. For more information, see Identity and access management for SAP programs on Google Cloud.
sap_deployment_debugBoolean Optional. Only when Cloud Customer Care asks you to enable debugging for your deployment, specify true, which makes the deployment generate verbose deployment logs. The default value isfalse.reservation_nameString Optional. To use a specific Compute Engine VM reservation for this deployment, specify the name of the reservation. By default, the installation script selects any available Compute Engine reservation based on the following conditions. For a reservation to be usable, regardless of whether you specify a name or the installation script selects it automatically, the reservation must be set with the following:
-
The
specificReservationRequiredoption is set totrueor, in the Google Cloud console, the Select specific reservation option is selected. -
Some Compute Engine machine types support CPU platforms that are not
covered by the SAP certification of the machine type. If the target
reservation is for any of the following machine types, then the reservation
must specify the minimum CPU platforms as indicated:
n1-highmem-32: Intel Broadwelln1-highmem-64: Intel Broadwelln1-highmem-96: Intel Skylakem1-megamem-96: Intel Skylake
The minimum CPU platforms for all of the other machine types that are
certified by SAP for use on Google Cloud conform to the SAP minimum CPU
requirement.
vm_static_ipString Optional. Specify a valid static IP address for the VM instance. If you don't specify one, then an IP address is automatically generated for your VM instance. This argument is available in
sap_hana_scaleoutmodule version202306120959or later.worker_static_ipsList(String) Optional. Specify an array of valid static IP addresses for the worker instances in your scale-out system. If you don't specify a value for this argument, then an IP address is automatically generated for each worker VM instance. For example, [ "1.0.0.1", "2.3.3.4" ].The static IP addresses are assigned in the order of instance creation. For example, if you choose to deploy 3 worker instances but specify only 2 IP addresses for the argument
worker_static_ips, then these IP addresses are assigned to the first two VM instances that the Terraform configuration deploys. For the third worker VM instance, the IP address is automatically generated.This argument is available in
sap_hana_scaleoutmodule version202306120959or later.standby_static_ipsList(String) Optional. Specify an array of valid static IP addresses for the standby instances in your scale-out system. If you don't specify a value for this argument, then an IP address is automatically generated for each standby VM instance. For example, [ "1.0.0.1", "2.3.3.4" ].The static IP addresses are assigned in the order of instance creation. For example, if you choose to deploy 3 standby instances but specify only 2 IP addresses for the argument
standby_static_ips, then these IP addresses are assigned to the first two VM instances that the Terraform configuration deploys. For the third standby VM instance, the IP address is automatically generated.This argument is available in
sap_hana_scaleoutmodule version202306120959or later.The following example shows a completed configuration file that deploys an SAP HANA scale-out system with three worker hosts and one standby host in the
us-central1-fzone. Each host is installed on ann2-highmem-32VM that is running a Linux operating system provided by a Compute Engine public image. The NFS volumes are provided by Filestore. Temporary passwords are used during deployment and configuration processing only.For clarity, comments in the configuration file are omitted in the example.
# ... module "hana_scaleout" { source = "https://storage.googleapis.com/cloudsapdeploy/terraform/latest/terraform/sap_hana_scaleout/sap_hana_scaleout_module.zip" # # By default, this source file uses the latest release of the terraform module # for SAP on Google Cloud. To fix your deployments to a specific release # of the module, comment out the source property above and uncomment the source property below. # # source = "https://storage.googleapis.com/cloudsapdeploy/terraform/YYYYMMDDHHMM/terraform/sap_hana_scaleout/sap_hana_scaleout_module.zip" # # ... # project_id = "example-project-123456" zone = "us-central1-f" machine_type = "n2-highmem-32" subnetwork = "example-sub-network-sap" linux_image = "sles-15-sp4-sap" linux_image_project = "suse-sap-cloud" instance_name = "hana-scaleout-w-failover" sap_hana_shared_nfs = "10.74.146.58:/hana_shr" sap_hana_backup_nfs = "10.188.249.170:/hana_bup" # ... sap_hana_deployment_bucket = "hana2-sp5-rev53" sap_hana_sid = "HF0" sap_hana_instance_number = 00 sap_hana_sidadm_password = "TempPa55word" sap_hana_system_password = "TempPa55word" # ... sap_hana_worker_nodes = 3 sap_hana_standby_nodes = 1 vm_static_ip = "10.0.0.1" worker_static_ips = ["10.0.0.2", "10.0.0.3", "10.0.0.4"] standby_static_ips = ["10.0.0.5"] # ... }-
The
Initialize your current working directory and download the Terraform provider plugin and module files for Google Cloud:
terraform init
The
terraform initcommand prepares your working directory for other Terraform commands.To force a refresh of the provider plugin and configuration files in your working directory, specify the
--upgradeflag. If the--upgradeflag is omitted and you don't make any changes in your working directory, Terraform uses the locally cached copies, even iflatestis specified in thesourceURL.Optionally, create the Terraform execution plan:
terraform plan
The
terraform plancommand shows the changes required by your current configuration. If you skip this step, theterraform applycommand automatically creates a new plan and prompts you to approve it.Apply the execution plan:
terraform apply
When you are prompted to approve the actions, enter
yes.The
terraform applycommand sets up the Google Cloud infrastructure. When the Compute Engine machine boots, the Google Cloud infrastructure invokes startup scripts that configure the operating system and install SAP HANA.While Terraform has control, status messages are written to the Cloud Shell. After the scripts are invoked, status messages are written to Logging and are viewable in the Google Cloud console, as described in Check the Logging logs.
Time to completion can vary, but the entire process usually takes 45 minutes to 1 hour.
Verifying the deployment
To verify deployment, you check the deployment logs in Cloud Logging, check the disks and services on the VMs of the primary and worker hosts, display the system in SAP HANA Studio, and test the takeover by a standby host.
Check the logs
In the Google Cloud console, open Cloud Logging to monitor installation progress and check for errors.
Filter the logs:
Logs Explorer
In the Logs Explorer page, go to the Query pane.
From the Resource drop-down menu, select Global, and then click Add.
If you don't see the Global option, then in the query editor, enter the following query:
resource.type="global"
"Deployment"
Click Run query.
Legacy Logs Viewer
- In the Legacy Logs Viewer page, from the basic selector menu, select Global as your logging resource.
Analyze the filtered logs:
- If
"--- Finished"is displayed, then the deployment processing is complete and you can proceed to the next step. If you see a quota error:
On the IAM & Admin Quotas page, increase any of your quotas that do not meet the SAP HANA requirements that are listed in the SAP HANA planning guide.
Open Cloud Shell.
Go to your working directory and delete the deployment to clean up the VMs and persistent disks from the failed installation:
terraform destroy
When you are prompted to approve the action, enter
yes.Rerun your deployment.
- If
Connect to the VMs to check the disks and SAP HANA services
After deployment is complete, confirm that the disks and SAP HANA services have deployed properly by checking the disks and services of the master host and one worker host.
On the Compute Engine VM instances page, connect to the VM of the master host and the VM of one worker host by clicking the SSH button on the row of each of the two VM instances.
When connecting to the worker host, make sure that you aren't connecting to a standby host. The standby hosts use the same naming convention as the worker hosts, but have the highest numbered worker-host suffix before the first takeover. For example, if you have three worker hosts and one standby host, before the first takeover the standby host has a suffix of "w4".
In each terminal window, change to the root user.
sudo su -
In each terminal window, display the disk file system.
df -h
On the master host, you should see output similar to the following:
hana-scaleout-w-failover:~ # df -h
Filesystem                      Size  Used Avail Use% Mounted on
devtmpfs                        4.0M  8.0K  4.0M   1% /dev
tmpfs                           189G  4.0K  189G   1% /dev/shm
tmpfs                            51G   18M   51G   1% /run
tmpfs                           4.0M     0  4.0M   0% /sys/fs/cgroup
/dev/sdb3                        45G  6.4G   39G  15% /
/dev/sdb2                        20M  3.0M   17M  15% /boot/efi
10.74.146.58:/hana_shr          2.5T   41G  2.3T   2% /hana/shared
/dev/mapper/vg_hana_data-data   422G   12G  411G   3% /hana/data/HF0/mnt00001
/dev/mapper/vg_hana_log-log     128G  7.8G  121G   7% /hana/log/HF0/mnt00001
tmpfs                            26G     0   26G   0% /run/user/174
10.188.249.170:/hana_bup        2.5T     0  2.4T   0% /hanabackup
tmpfs                            26G     0   26G   0% /run/user/900
tmpfs                            26G     0   26G   0% /run/user/1000
On a worker host, notice that the
/hana/dataand/hana/logdirectories have different mounts:hana-scaleout-w-failoverw1:~ # df -h Filesystem Size Used Avail Use% Mounted on devtmpfs 4.0M 8.0K 4.0M 1% /dev tmpfs 189G 4.0K 189G 1% /dev/shm tmpfs 51G 9.4M 51G 1% /run tmpfs 4.0M 0 4.0M 0% /sys/fs/cgroup /dev/sda3 45G 6.4G 39G 15% / /dev/sda2 20M 3.0M 17M 15% /boot/efi tmpfs 26G 0 26G 0% /run/user/0 10.74.146.58:/hana_shr 2.5T 41G 2.3T 2% /hana/shared 10.188.249.170:/hana_bup 2.5T 0 2.4T 0% /hanabackup /dev/mapper/vg_hana_data-data 422G 593M 422G 1% /hana/data/HF0/mnt00002 /dev/mapper/vg_hana_log-log 128G 3.2G 125G 3% /hana/log/HF0/mnt00002 tmpfs 26G 0 26G 0% /run/user/1000
On a standby host, the data and log directories are not mounted until the standby host takes over for a failed host:
hana-scaleout-w-failoverw4:~ # df -h
Filesystem                      Size  Used Avail Use% Mounted on
devtmpfs                        4.0M  8.0K  4.0M   1% /dev
tmpfs                           189G  4.0K  189G   1% /dev/shm
tmpfs                            51G  9.4M   51G   1% /run
tmpfs                           4.0M     0  4.0M   0% /sys/fs/cgroup
/dev/sda3                        45G  6.4G   39G  15% /
/dev/sda2                        20M  3.0M   17M  15% /boot/efi
tmpfs                            26G     0   26G   0% /run/user/0
10.74.146.58:/hana_shr          2.5T   41G  2.3T   2% /hana/shared
10.188.249.170:/hana_bup        2.5T     0  2.4T   0% /hanabackup
tmpfs                            26G     0   26G   0% /run/user/1000
In each terminal window, change to the SAP HANA operating system user. Replace SID_LC with the
sap_hana_sidvalue that you specified in the configuration file. The SID_LC value must be in lowercase.su - SID_LCadm
In each terminal window, ensure that SAP HANA services, such as
hdbnameserver,hdbindexserver, and others, are running on the instance.HDB info
On the master host, you should see output similar to the output in the following truncated example:
hana-scaleout-w-failover:~ # su - hf0adm
hf0adm@hana-scaleout-w-failover:/usr/sap/HF0/HDB00> HDB info
USER          PID     PPID  %CPU        VSZ        RSS COMMAND
hf0adm      25987    25986   0.4      15248       6312 -sh
hf0adm      26049    25987   0.0      10448       4036  \_ /bin/sh /usr/sap/HF0/HDB00/HDB info
hf0adm      26084    26049   0.0      19892       3864      \_ ps fx -U hf0adm -o user:8,pid:8,ppid:8,pcpu:5,vsz:10,rss:10,args
hf0adm      22386    22385   0.0      15248       6248 -sh
hf0adm      19164        1   0.0      13604       3124 sapstart pf=/hana/shared/HF0/profile/HF0_HDB00_hana-scaleout-w-failover
hf0adm      19171    19164   0.0     481188      84340  \_ /usr/sap/HF0/HDB00/hana-scaleout-w-failover/trace/hdb.sapHF0_HDB00 -d -nw -f /usr/sap/HF0/HDB00/hana-scaleout-w-failover/daemon.ini pf=/usr/sap/HF0/SYS/profile/HF0_HDB00_hana-scaleout-w-failover
hf0adm      19193    19171   3.4    9616860    3970304      \_ hdbnameserver
hf0adm      19583    19171   0.3    4636456     206500      \_ hdbcompileserver
hf0adm      19586    19171   0.3    4883932     235764      \_ hdbpreprocessor
hf0adm      19624    19171   5.9    9896896    4193620      \_ hdbindexserver -port 30003
hf0adm      19627    19171   1.2    7920208    1605448      \_ hdbxsengine -port 30007
hf0adm      20072    19171   0.5    6825984     531884      \_ hdbwebdispatcher
hf0adm      15053        1   0.0     590628      33208 hdbrsutil  --start --port 30003 --volume 3 --volumesuffix mnt00001/hdb00003.00003 --identifier 1689854702
hf0adm      14420        1   0.0     590560      33308 hdbrsutil  --start --port 30001 --volume 1 --volumesuffix mnt00001/hdb00001 --identifier 1689854671
hf0adm      14155        1   0.1     554820      33320 /usr/sap/HF0/HDB00/exe/sapstartsrv pf=/hana/shared/HF0/profile/HF0_HDB00_hana-scaleout-w-failover -D -u hf0adm
hf0adm      14030        1   0.0      57024      11060 /usr/lib/systemd/systemd --user
hf0adm      14031    14030   0.0     243164       4036  \_ (sd-pam)
On a worker host, you should see output similar to the output in the following truncated example:
hana-scaleout-w-failoverw1:~ # su - hf0adm
hf0adm@hana-scaleout-w-failoverw1:/usr/sap/HF0/HDB00> HDB info
USER          PID     PPID  %CPU        VSZ        RSS COMMAND
hf0adm      16442    16441   0.0      15248       6276 -sh
hf0adm      17317    16442   0.0      10448       4032  \_ /bin/sh /usr/sap/HF0/HDB00/HDB info
hf0adm      17352    17317   0.0      19892       3816      \_ ps fx -U hf0adm -o user:8,pid:8,ppid:8,pcpu:5,vsz:10,rss:10,args
hf0adm      11873        1   0.0      13604       3244 sapstart pf=/hana/shared/HF0/profile/HF0_HDB00_hana-scaleout-w-failoverw1
hf0adm      11880    11873   0.0     477076      84260  \_ /usr/sap/HF0/HDB00/hana-scaleout-w-failoverw1/trace/hdb.sapHF0_HDB00 -d -nw -f /usr/sap/HF0/HDB00/hana-scaleout-w-failoverw1/daemon.ini pf=/usr/sap/HF0/SYS/profile/HF0_HDB00_hana-scaleout-w-failoverw1
hf0adm      11902    11880   0.8    7738216     784912      \_ hdbnameserver
hf0adm      12140    11880   0.4    4245828     199884      \_ hdbcompileserver
hf0adm      12143    11880   0.4    4758024     235448      \_ hdbpreprocessor
hf0adm      12176    11880   0.6    6046020     534448      \_ hdbwebdispatcher
hf0adm      12210    11880   2.0    8363976    1743196      \_ hdbindexserver -port 30003
hf0adm      10452        1   0.0     525100      33640 hdbrsutil  --start --port 30003 --volume 4 --volumesuffix mnt00002/hdb00004.00003 --identifier 1689855202
hf0adm      10014        1   0.1     554696      31992 /hana/shared/HF0/HDB00/exe/sapstartsrv pf=/hana/shared/HF0/profile/HF0_HDB00_hana-scaleout-w-failoverw1 -D -u hf0adm
On a standby host, you should see output similar to the output in the following truncated example:
hana-scaleout-w-failoverw4:~ # su - hf0adm
hf0adm@hana-scaleout-w-failoverw4:/usr/sap/HF0/HDB00> HDB info
USER          PID     PPID  %CPU        VSZ        RSS COMMAND
hf0adm      15597    15596   0.5      15248       6272 -sh
hf0adm      15659    15597   0.0      10448       4004  \_ /bin/sh /usr/sap/HF0/HDB00/HDB info
hf0adm      15694    15659   0.0      19892       3860      \_ ps fx -U hf0adm -o user:8,pid:8,ppid:8,pcpu:5,vsz:10,rss:10,args
hf0adm      10285        1   0.0      13604       3244 sapstart pf=/hana/shared/HF0/profile/HF0_HDB00_hana-scaleout-w-failoverw4
hf0adm      10292    10285   0.0     478076      84540  \_ /usr/sap/HF0/HDB00/hana-scaleout-w-failoverw4/trace/hdb.sapHF0_HDB00 -d -nw -f /usr/sap/HF0/HDB00/hana-scaleout-w-failoverw4/daemon.ini pf=/usr/sap/HF0/SYS/profile/HF0_HDB00_hana-scaleout-w-failoverw4
hf0adm      10314    10292   0.6    7468320     729308      \_ hdbnameserver
hf0adm      10492    10292   0.3    3851320     191636      \_ hdbcompileserver
hf0adm      10495    10292   0.3    4493296     227884      \_ hdbpreprocessor
hf0adm      10528    10292   0.4    5381616     509368      \_ hdbwebdispatcher
hf0adm       9750        1   0.0     620748      32796 /hana/shared/HF0/HDB00/exe/sapstartsrv pf=/hana/shared/HF0/profile/HF0_HDB00_hana-scaleout-w-failoverw4 -D -u hf0adm
If you are using RHEL for SAP 9.0 or later, then make sure that the packages
chkconfigandcompat-openssl11are installed on your VM instance.For more information from SAP, see SAP Note 3108316 - Red Hat Enterprise Linux 9.x: Installation and Configuration .
Connect SAP HANA Studio
Connect to the master SAP HANA host from SAP HANA Studio.
You can connect from an instance of SAP HANA Studio that is outside of Google Cloud or from an instance on Google Cloud. You might need to enable network access between the target VMs and SAP HANA Studio.
To use SAP HANA Studio on Google Cloud and enable access to the SAP HANA system, see Installing SAP HANA Studio on a Compute Engine Windows VM.
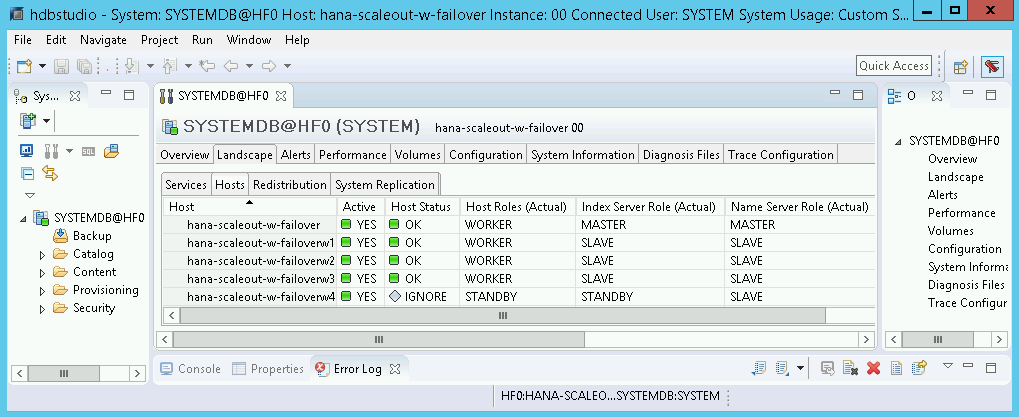
In SAP HANA Studio, click the Landscape tab on the default system administration panel. You should see a display similar to the following example.
Clean up and retry deployment
If any of the deployment verification steps in the preceding sections show that the installation wasn't successful, then you must undo your deployment and retry it by completing the following steps:
Resolve any errors to ensure that your deployment doesn't fail again for the same reason. For information about checking the logs, or resolving quota related errors, see Check the logs.
Open Cloud Shell or, if you installed the Google Cloud CLI on your local workstation, then open a terminal.
Go to the directory that contains the Terraform configuration file that you used for this deployment.
Delete all resources that are part of your deployment by running the following command:
terraform destroy
When you are prompted to approve the action, enter
yes.Retry your deployment as instructed earlier in this guide.
Performing a failover test
After you have confirmed that the SAP HANA system deployed successfully, test the failover function.
The following instructions trigger a failover by switching to the SAP HANA
operating system user and entering the HDB stop command. The HDB stop
command initiates a graceful shutdown of SAP HANA and detaches the disks from
the host, which enables a relatively quick failover.
To perform a failover test:
Connect to the VM of a worker host by using SSH. You can connect from the Compute Engine VM instances page by clicking the SSH button for each VM instance, or you can use your preferred SSH method.
Switch to the SAP HANA operating system user. In the following command, replace SID_LC with the value that you specified for the
sap_hana_sidargument in your Terraform configuration file.su - SID_LCadm
Simulate a failure by stopping SAP HANA:
HDB stop
The
HDB stopcommand initiates a shutdown of SAP HANA, which triggers a failover. During the failover, the disks are detached from the failed host and reattached to the standby host. The failed host is restarted and becomes a standby host.After allowing time for the takeover to complete, connect to the host that took over for the failed host by using SSH.
Switch to the root user:
sudo su -
Display the disk file system information:
df -h
You should see an output similar to the following. Note that the
/hana/dataand/hana/logdirectories from the failed host are now mounted to the host that took over.hana-scaleout-w-failoverw4:~ # df -h Filesystem Size Used Avail Use% Mounted on devtmpfs 4.0M 8.0K 4.0M 1% /dev tmpfs 189G 4.0K 189G 1% /dev/shm tmpfs 51G 9.4M 51G 1% /run tmpfs 4.0M 0 4.0M 0% /sys/fs/cgroup /dev/sda3 45G 6.4G 39G 15% / /dev/sda2 20M 3.0M 17M 15% /boot/efi tmpfs 26G 0 26G 0% /run/user/0 10.74.146.58:/hana_shr 2.5T 41G 2.3T 2% /hana/shared 10.188.249.170:/hana_bup 2.5T 0 2.4T 0% /hanabackup tmpfs 26G 0 26G 0% /run/user/1000 /dev/mapper/vg_hana_data-data 422G 593M 422G 1% /hana/data/HF0/mnt00002 /dev/mapper/vg_hana_log-log 128G 3.2G 125G 3% /hana/log/HF0/mnt00002
In SAP HANA Studio, open the Landscape view of the SAP HANA system to confirm that the failover over was successful:
- The status of the hosts involved in the failover should be
INFO. - The Index Server Role (Actual) column should show the failed host as the new standby host.
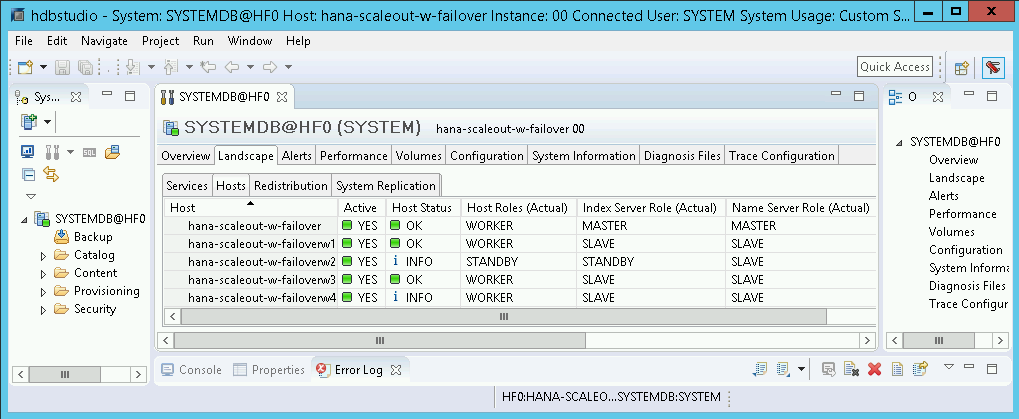
- The status of the hosts involved in the failover should be
Validate your installation of Google Cloud's Agent for SAP
After you have deployed a VM and installed your SAP system, validate that Google Cloud's Agent for SAP is functioning properly.
Verify that Google Cloud's Agent for SAP is running
To verify that the agent is running, follow these steps:
Establish an SSH connection with your Compute Engine instance.
Run the following command:
systemctl status google-cloud-sap-agent
If the agent is functioning properly, then the output contains
active (running). For example:google-cloud-sap-agent.service - Google Cloud Agent for SAP Loaded: loaded (/usr/lib/systemd/system/google-cloud-sap-agent.service; enabled; vendor preset: disabled) Active: active (running) since Fri 2022-12-02 07:21:42 UTC; 4 days ago Main PID: 1337673 (google-cloud-sa) Tasks: 9 (limit: 100427) Memory: 22.4 M (max: 1.0G limit: 1.0G) CGroup: /system.slice/google-cloud-sap-agent.service └─1337673 /usr/bin/google-cloud-sap-agent
If the agent isn't running, then restart the agent.
Verify that SAP Host Agent is receiving metrics
To verify that the infrastructure metrics are collected by Google Cloud's Agent for SAP and sent correctly to the SAP Host Agent, follow these steps:
- In your SAP system, enter transaction
ST06. In the overview pane, check the availability and content of the following fields for the correct end-to-end setup of the SAP and Google monitoring infrastructure:
- Cloud Provider:
Google Cloud Platform - Enhanced Monitoring Access:
TRUE - Enhanced Monitoring Details:
ACTIVE
- Cloud Provider:
Set up monitoring for SAP HANA
Optionally, you can monitor your SAP HANA instances using Google Cloud's Agent for SAP. From version 2.0, you can configure the agent to collect the SAP HANA monitoring metrics and send them to Cloud Monitoring. Cloud Monitoring lets you create dashboards to visualize these metrics, set up alerts based on metric thresholds, and more.
For more information about the collection of SAP HANA monitoring metrics using Google Cloud's Agent for SAP, see SAP HANA monitoring metrics collection.
Enable SAP HANA Fast Restart
Google Cloud strongly recommends enabling SAP HANA Fast Restart for each instance of SAP HANA, especially for larger instances. SAP HANA Fast Restart reduces restart time in the event that SAP HANA terminates, but the operating system remains running.
As configured by the automation scripts that Google Cloud provides,
the operating system and kernel settings already support SAP HANA Fast Restart.
You need to define the tmpfs file system and configure SAP HANA.
To define the tmpfs file system and configure SAP HANA, you can follow
the manual steps or use the automation script that
Google Cloud provides to enable SAP HANA Fast Restart. For more
information, see:
For the complete authoritative instructions for SAP HANA Fast Restart, see the SAP HANA Fast Restart Option documentation.
Manual steps
Configure the tmpfs file system
After the host VMs and the base SAP HANA systems are successfully deployed,
you need to create and mount directories for the NUMA nodes in the tmpfs
file system.
Display the NUMA topology of your VM
Before you can map the required tmpfs file system, you need to know how
many NUMA nodes your VM has. To display the available NUMA nodes on
a Compute Engine VM, enter the following command:
lscpu | grep NUMA
For example, an m2-ultramem-208 VM type has four NUMA nodes,
numbered 0-3, as shown in the following example:
NUMA node(s):        4
NUMA node0 CPU(s):   0-25,104-129
NUMA node1 CPU(s):   26-51,130-155
NUMA node2 CPU(s):   52-77,156-181
NUMA node3 CPU(s):   78-103,182-207
Create the NUMA node directories
Create a directory for each NUMA node in your VM and set the permissions.
For example, for four NUMA nodes that are numbered 0-3:
mkdir -pv /hana/tmpfs{0..3}/SID
chown -R SID_LCadm:sapsys /hana/tmpfs*/SID
chmod 777 -R /hana/tmpfs*/SID
Mount the NUMA node directories to tmpfs
Mount the tmpfs file system directories and specify
a NUMA node preference for each with mpol=prefer:
SID specify the SID with uppercase letters.
mount tmpfsSID0 -t tmpfs -o mpol=prefer:0 /hana/tmpfs0/SID
mount tmpfsSID1 -t tmpfs -o mpol=prefer:1 /hana/tmpfs1/SID
mount tmpfsSID2 -t tmpfs -o mpol=prefer:2 /hana/tmpfs2/SID
mount tmpfsSID3 -t tmpfs -o mpol=prefer:3 /hana/tmpfs3/SID
Update /etc/fstab
To ensure that the mount points are available after an operating system
reboot, add entries into the file system table, /etc/fstab:
tmpfsSID0 /hana/tmpfs0/SID tmpfs rw,relatime,mpol=prefer:0
tmpfsSID1 /hana/tmpfs1/SID tmpfs rw,relatime,mpol=prefer:1
tmpfsSID1 /hana/tmpfs2/SID tmpfs rw,relatime,mpol=prefer:2
tmpfsSID1 /hana/tmpfs3/SID tmpfs rw,relatime,mpol=prefer:3
Optional: set limits on memory usage
The tmpfs file system can grow and shrink dynamically.
To limit the memory used by the tmpfs file system, you
can set a size limit for a NUMA node volume with the size option.
For example:
mount tmpfsSID0 -t tmpfs -o mpol=prefer:0,size=250G /hana/tmpfs0/SID
You can also limit overall tmpfs memory usage for all NUMA nodes for
a given SAP HANA instance and a given server node by setting the
persistent_memory_global_allocation_limit parameter in the [memorymanager]
section of the global.ini file.
SAP HANA configuration for Fast Restart
To configure SAP HANA for Fast Restart, update the global.ini file
and specify the tables to store in persistent memory.
Update the [persistence] section in the global.ini file
Configure the [persistence] section in the SAP HANA global.ini file
to reference the tmpfs locations. Separate each tmpfs location with
a semicolon:
[persistence]
basepath_datavolumes = /hana/data
basepath_logvolumes = /hana/log
basepath_persistent_memory_volumes = /hana/tmpfs0/SID;/hana/tmpfs1/SID;/hana/tmpfs2/SID;/hana/tmpfs3/SID
The preceding example specifies four memory volumes for four NUMA nodes,
which corresponds to the m2-ultramem-208. If you were running on
the m2-ultramem-416, you would need to configure eight memory volumes (0..7).
Restart SAP HANA after modifying the global.ini file.
SAP HANA can now use the tmpfs location as persistent memory space.
Specify the tables to store in persistent memory
Specify specific column tables or partitions to store in persistent memory.
For example, to turn on persistent memory for an existing table, execute the SQL query:
ALTER TABLE exampletable persistent memory ON immediate CASCADE
To change the default for new tables add the parameter
table_default in the indexserver.ini file. For example:
[persistent_memory]
table_default = ON
For more information on how to control columns, tables and which monitoring views provide detailed information, see SAP HANA Persistent Memory.
Automated steps
The automation script that Google Cloud provides to enable
SAP HANA Fast Restart
makes changes to directories /hana/tmpfs*, file /etc/fstab, and
SAP HANA configuration. When you run the script, you might need to perform
additional steps depending on whether this is the initial deployment of your
SAP HANA system or you are resizing your machine to a different NUMA size.
For the initial deployment of your SAP HANA system or resizing the machine to increase the number of NUMA nodes, make sure that SAP HANA is running during the execution of automation script that Google Cloud provides to enable SAP HANA Fast Restart.
When you resize your machine to decrease the number of NUMA nodes, make sure that SAP HANA is stopped during the execution of the automation script that Google Cloud provides to enable SAP HANA Fast Restart. After the script is executed, you need to manually update the SAP HANA configuration to complete the SAP HANA Fast Restart setup. For more information, see SAP HANA configuration for Fast Restart.
To enable SAP HANA Fast Restart, follow these steps:
Establish an SSH connection with your host VM.
Switch to root:
sudo su -
Download the
sap_lib_hdbfr.shscript:wget https://storage.googleapis.com/cloudsapdeploy/terraform/latest/terraform/lib/sap_lib_hdbfr.sh
Make the file executable:
chmod +x sap_lib_hdbfr.sh
Verify that the script has no errors:
vi sap_lib_hdbfr.sh
./sap_lib_hdbfr.sh -help
If the command returns an error, contact Cloud Customer Care. For more information about contacting Customer Care, see Getting support for SAP on Google Cloud.
Run the script after replacing SAP HANA system ID (SID) and password for the SYSTEM user of the SAP HANA database. To securely provide the password, we recommend that you use a secret in Secret Manager.
Run the script by using the name of a secret in Secret Manager. This secret must exist in the Google Cloud project that contains your host VM instance.
sudo ./sap_lib_hdbfr.sh -h 'SID' -s SECRET_NAME
Replace the following:
SID: specify the SID with uppercase letters. For example,AHA.SECRET_NAME: specify the name of the secret that corresponds to the password for the SYSTEM user of the SAP HANA database. This secret must exist in the Google Cloud project that contains your host VM instance.
Alternatively, you can run the script using a plain text password. After SAP HANA Fast Restart is enabled, make sure to change your password. Using plain text password is not recommended as your password would be recorded in the command-line history of your VM.
sudo ./sap_lib_hdbfr.sh -h 'SID' -p 'PASSWORD'
Replace the following:
SID: specify the SID with uppercase letters. For example,AHA.PASSWORD: specify the password for the SYSTEM user of the SAP HANA database.
For a successful initial run, you should see an output similar to the following:
INFO - Script is running in standalone mode
ls: cannot access '/hana/tmpfs*': No such file or directory
INFO - Setting up HANA Fast Restart for system 'TST/00'.
INFO - Number of NUMA nodes is 2
INFO - Number of directories /hana/tmpfs* is 0
INFO - HANA version 2.57
INFO - No directories /hana/tmpfs* exist. Assuming initial setup.
INFO - Creating 2 directories /hana/tmpfs* and mounting them
INFO - Adding /hana/tmpfs* entries to /etc/fstab. Copy is in /etc/fstab.20220625_030839
INFO - Updating the HANA configuration.
INFO - Running command: select * from dummy
DUMMY
"X"
1 row selected (overall time 4124 usec; server time 130 usec)

INFO - Running command: ALTER SYSTEM ALTER CONFIGURATION ('global.ini', 'SYSTEM') SET ('persistence', 'basepath_persistent_memory_volumes') = '/hana/tmpfs0/TST;/hana/tmpfs1/TST;'
0 rows affected (overall time 3570 usec; server time 2239 usec)

INFO - Running command: ALTER SYSTEM ALTER CONFIGURATION ('global.ini', 'SYSTEM') SET ('persistent_memory', 'table_unload_action') = 'retain';
0 rows affected (overall time 4308 usec; server time 2441 usec)

INFO - Running command: ALTER SYSTEM ALTER CONFIGURATION ('indexserver.ini', 'SYSTEM') SET ('persistent_memory', 'table_default') = 'ON';
0 rows affected (overall time 3422 usec; server time 2152 usec)
Connecting to SAP HANA
Note that because these instructions don't use an external IP for SAP HANA, you can only connect to the SAP HANA instances through the bastion instance using SSH or through the Windows server using SAP HANA Studio.
To connect to SAP HANA through the bastion instance, connect to the bastion host, and then to the SAP HANA instance(s) by using an SSH client of your choice.
To connect to the SAP HANA database through SAP HANA Studio, use a remote desktop client to connect to the Windows Server instance. After connection, manually install SAP HANA Studio and access your SAP HANA database.
Performing post-deployment tasks
Before using your SAP HANA instance, we recommend that you perform the following post-deployment steps. For more information, see SAP HANA Installation and Update Guide.
Change the temporary passwords for the SAP HANA system administrator and database superuser.
Update the SAP HANA software with the latest patches.
If your SAP HANA system is deployed on a VirtIO network interface, then we recommend that you ensure the value of the TCP parameter
/proc/sys/net/ipv4/tcp_limit_output_bytesis set to1048576. This modification helps improve the overall network throughput on the VirtIO network interface without affecting the network latency.Install any additional components such as Application Function Libraries (AFL) or Smart Data Access (SDA).
If you are upgrading an existing SAP HANA system, load the data from the existing system either by using standard backup and restore procedures or by using SAP HANA system replication.
Configure and backup your new SAP HANA database. For more information, see the SAP HANA operations guide.
Evaluate your SAP HANA workload
To automate continuous validation checks for your SAP HANA workloads running on Google Cloud, you can use Workload Manager.
Workload Manager allows you to automatically scan and evaluate your SAP HANA workloads against best practices from SAP, Google Cloud, and OS vendors. This helps improve the quality, performance, and reliability of your workloads.
For information about the best practices that Workload Manager supports for evaluating SAP HANA workloads running on Google Cloud, see Workload Manager best practices for SAP. For information about creating and running an evaluation using Workload Manager, see Create and run an evaluation.
What's next
- For more information about VM administration of and monitoring, see the SAP HANA Operations Guide.