On Google Cloud, the recommended way to implement a virtual IP address (VIP) for an OS-based high-availability (HA) cluster for SAP is to use the failover support of an internal TCP/UDP load balancer.
If you have an existing Red Hat Enterprise Linux (RHEL) HA cluster for SAP on Google Cloud that uses a VIP that is implemented with an alias IP, you can migrate the VIP to use an internal load balancer instead.
If you used the sap_hana_ha Deployment Manager template,
which is no longer supported, to deploy an SAP HANA scale-up system
in an HA cluster on RHEL,
your VIP is implemented with an alias IP.
These instructions show how to migrate a VIP in a RHEL HA cluster.
Prerequisites
These instructions assume that you already have a properly-configured HA cluster on Google Cloud that uses an alias IP for the VIP implementation.
Overview of steps
- Configure and test a load balancer by using a temporary forwarding rule and a temporary IP address in place of the VIP.
- Set your cluster to maintenance mode and, if you can, stop your SAP application server instances to avoid any unexpected behavior.
- Deallocate the alias IP address from the primary host. This address becomes the VIP with the load balancer.
- In the Pacemaker cluster configuration:
- Change the class of the existing VIP resource.
- Replace the existing parameters for alias IP with the parameters for the health check service.
Confirm the existing VIP address
As root, on the primary VM instance, display your existing alias-IP-based cluster configuration:
$ pcs configure showIn the resource definition, the VIP address range appears
on the alias and IPaddr2 resources. If you need to change the VIP address,
you need to update both resources. See the following example:
Resource rsc_alias (class=ocf provider=heartbeat type=gcp-vpc-move-vip) \
               Attributes: alias_ip=10.10.0.90/32
               Operations: monitor interval=60s timeout=60s (vip_hkn_00-monitor-interval-60s)
               start interval=0s timeout=600s
               stop interval=0s timeout=20s
Resource rsc_vip(class=ocf provider=heartbeat type=IPaddr2) \
               Attributes: cidr_netmask=32 ip=10.10.0.90 nic=eth0
               Operations: monitor interval=10s timeout=20s (vip_hkn_00-monitor-interval-10s)
               start interval=0s timeout=20s (vip_hkn_00-start-interval-0s)
               stop interval=0s timeout=20s (vip_hkn_00-stop-interval-0s)
In the Google Cloud console, confirm that the IP address that is being used with the alias IP is reserved. The IP address can be the IP address that was used for the alias IP or it can be a new IP address.
$ gcloud compute addresses list --filter="region:( cluster-region )"If the IP address is reserved and allocated to the primary VM instance,
its status shows as IN_USE. When you re-allocate
the IP to your load balancer, you first deallocate it from the active primary
instance, at which point, its status changes to RESERVED.
If the address is not included in the IP addresses that are returned by the list command, reserve it now to prevent addressing conflicts in the future:
$ gcloud compute addresses create vip-name \
  --region cluster-region --subnet cluster-subnet \
  --addresses vip-address
List your addresses again to confirm that the IP address shows up as
RESERVED.
Configure the Cloud Load Balancing failover support
The internal passthrough Network Load Balancer service with failover support routes traffic to the active host in an SAP HANA cluster based on a health check service.
To avoid conflicts and allow for testing before the migration is complete, these instructions have you create a temporary forwarding rule with a placeholder IP address from the same subnet as the VIP address. When you are ready to switch over the VIP implementation, you create a new, final forwarding rule with the VIP address.
Reserve a temporary IP address for the virtual IP
The VIP address follows the active SAP HANA system. The load balancer routes traffic that is sent to the VIP to the VM that is currently hosting the active SAP HANA system.
Open Cloud Shell:
Reserve a temporary IP address for in the same subnet as the alias IP for testing purposes. If you omit the
--addressesflag, an IP address in the specified subnet is chosen for you:$gcloud compute addresses create VIP_NAME \ --region CLUSTER_REGION --subnet CLUSTER_SUBNET \ --addresses VIP_ADDRESSFor more information about reserving a static IP, see Reserving a static internal IP address.
Confirm IP address reservation:
$gcloud compute addresses describe VIP_NAME \ --region CLUSTER_REGIONYou should see output similar to the following example:
address: 10.0.0.19
addressType: INTERNAL
creationTimestamp: '2020-05-20T14:19:03.109-07:00'
description: ''
id: '8961491304398200872'
kind: compute#address
name: vip-for-hana-ha
networkTier: PREMIUM
purpose: GCE_ENDPOINT
region: https://www.googleapis.com/compute/v1/projects/example-project-123456/regions/us-central1
selfLink: https://www.googleapis.com/compute/v1/projects/example-project-123456/regions/us-central1/addresses/vip-for-hana-ha
status: RESERVED
subnetwork: https://www.googleapis.com/compute/v1/projects/example-project-123456/regions/us-central1/subnetworks/example-subnet-us-central1
Create instance groups for your host VMs
In Cloud Shell, create two unmanaged instance groups and assign the primary master host VM to one and the secondary master host VM to the other:
$gcloud compute instance-groups unmanaged create PRIMARY_IG_NAME \ --zone=PRIMARY_ZONE$gcloud compute instance-groups unmanaged add-instances PRIMARY_IG_NAME \ --zone=PRIMARY_ZONE \ --instances=PRIMARY_HOST_NAME$gcloud compute instance-groups unmanaged create SECONDARY_IG_NAME \ --zone=SECONDARY_ZONE$gcloud compute instance-groups unmanaged add-instances SECONDARY_IG_NAME \ --zone=SECONDARY_ZONE \ --instances=SECONDARY_HOST_NAMEConfirm the creation of the instance groups:
$gcloud compute instance-groups unmanaged listYou should see output similar to the following example:
NAME          ZONE           NETWORK          NETWORK_PROJECT        MANAGED  INSTANCES
hana-ha-ig-1  us-central1-a  example-network  example-project-123456 No       1
hana-ha-ig-2  us-central1-c  example-network  example-project-123456 No       1
Create a Compute Engine health check
In Cloud Shell, create the health check. For the port used by the health check, choose a port that is in the private range, 49152-65535, to avoid clashing with other services. The check-interval and timeout values are slightly longer than the defaults so as to increase failover tolerance during Compute Engine live migration events. You can adjust the values, if necessary:
$gcloud compute health-checks create tcp HEALTH_CHECK_NAME --port=HEALTHCHECK_PORT_NUM \ --proxy-header=NONE --check-interval=10 --timeout=10 --unhealthy-threshold=2 \ --healthy-threshold=2Confirm the creation of the health check:
$gcloud compute health-checks describe HEALTH_CHECK_NAMEYou should see output similar to the following example:
checkIntervalSec: 10
creationTimestamp: '2020-05-20T21:03:06.924-07:00'
healthyThreshold: 2
id: '4963070308818371477'
kind: compute#healthCheck
name: hana-health-check
selfLink: https://www.googleapis.com/compute/v1/projects/example-project-123456/global/healthChecks/hana-health-check
tcpHealthCheck:
 port: 60000
 portSpecification: USE_FIXED_PORT
 proxyHeader: NONE
timeoutSec: 10
type: TCP
unhealthyThreshold: 2
Create a firewall rule for the health checks
Define a firewall rule for a port in the private range that allows access
to your host VMs from the IP ranges that are used by Compute Engine
health checks, 35.191.0.0/16 and 130.211.0.0/22. For more information,
see Creating firewall rules for health checks.
If you don't already have one, add a network tag to your host VMs. This network tag is used by the firewall rule for health checks.
$gcloud compute instances add-tags PRIMARY_HOST_NAME \ --tags NETWORK_TAGS \ --zone PRIMARY_ZONE$gcloud compute instances add-tags SECONDARY_HOST_NAME \ --tags NETWORK_TAGS \ --zone SECONDARY_ZONEIf you don't already have one, create a firewall rule to allow the health checks:
$gcloud compute firewall-rules create RULE_NAME \ --network NETWORK_NAME \ --action ALLOW \ --direction INGRESS \ --source-ranges 35.191.0.0/16,130.211.0.0/22 \ --target-tags NETWORK_TAGS \ --rules tcp:HLTH_CHK_PORT_NUMFor example:
gcloud compute firewall-rules create  fw-allow-health-checks \
--network example-network \
--action ALLOW \
--direction INGRESS \
--source-ranges 35.191.0.0/16,130.211.0.0/22 \
--target-tags cluster-ntwk-tag \
--rules tcp:60000
Configure the load balancer and failover group
Create the load balancer backend service:
$gcloud compute backend-services create BACKEND_SERVICE_NAME \ --load-balancing-scheme internal \ --health-checks HEALTH_CHECK_NAME \ --no-connection-drain-on-failover \ --drop-traffic-if-unhealthy \ --failover-ratio 1.0 \ --region CLUSTER_REGION \ --global-health-checksAdd the primary instance group to the backend service:
$gcloud compute backend-services add-backend BACKEND_SERVICE_NAME \ --instance-group PRIMARY_IG_NAME \ --instance-group-zone PRIMARY_ZONE \ --region CLUSTER_REGIONAdd the secondary, failover instance group to the backend service:
$gcloud compute backend-services add-backend BACKEND_SERVICE_NAME \ --instance-group SECONDARY_IG_NAME \ --instance-group-zone SECONDARY_ZONE \ --failover \ --region CLUSTER_REGIONCreate a temporary forwarding rule. For the IP address, specify the temporary IP address that you reserved for testing. If you need to access the SAP HANA system from outside of the region that is specified below, include the flag
--allow-global-accessin the definition:$gcloud compute forwarding-rules create RULE_NAME \ --load-balancing-scheme internal \ --address VIP_ADDRESS \ --subnet CLUSTER_SUBNET \ --region CLUSTER_REGION \ --backend-service BACKEND_SERVICE_NAME \ --ports ALLFor more information about cross-region access to your SAP HANA high-availability system, see Internal TCP/UDP Load Balancing.
Test the load balancer configuration
Even though your backend instance groups won't register as healthy until later, you can test the load balancer configuration by setting up a listener to respond to the health checks. After setting up a listener, if the load balancer is configured correctly, the status of the backend instance groups changes to healthy.
The following sections present different methods that you can use to test the configuration.
Testing the load balancer with the socat utility
You can use the socat utility to temporarily listen on the health check
port.
On both host VMs, install the
socatutility:$sudo yum install -y socatStart a
socatprocess to listen for 60 seconds on the health check port:$sudo timeout 60s socat - TCP-LISTEN:HLTH_CHK_PORT_NUM,forkIn Cloud Shell, after waiting a few seconds for the health check to detect the listener, check the health of your backend instance groups:
$gcloud compute backend-services get-health BACKEND_SERVICE_NAME \ --region CLUSTER_REGIONYou should see output similar to the following:
---
backend: https://www.googleapis.com/compute/v1/projects/example-project-123456/zones/us-central1-a/instanceGroups/hana-ha-ig-1
status:
 healthStatus:
 ‐ healthState: HEALTHY
   instance: https://www.googleapis.com/compute/v1/projects/example-project-123456/zones/us-central1-a/instances/hana-ha-vm-1
   ipAddress: 10.0.0.35
   port: 80
 kind: compute#backendServiceGroupHealth
---
backend: https://www.googleapis.com/compute/v1/projects/example-project-123456/zones/us-central1-c/instanceGroups/hana-ha-ig-2
status:
 healthStatus:
 ‐ healthState: HEALTHY
   instance: https://www.googleapis.com/compute/v1/projects/example-project-123456/zones/us-central1-c/instances/hana-ha-vm-2
   ipAddress: 10.0.0.34
   port: 80
 kind: compute#backendServiceGroupHealth
Testing the load balancer using port 22
If port 22 is open for SSH connections on your host VMs, you can temporarily edit the health checker to use port 22, which has a listener that can respond to the health checker.
To temporarily use port 22, follow these steps:
Click your health check in the console:
Click Edit.
In the Port field, change the port number to 22.
Click Save and wait a minute or two.
In Cloud Shell, check the health of your backend instance groups:
$gcloud compute backend-services get-health BACKEND_SERVICE_NAME \ --region CLUSTER_REGIONYou should see output similar to the following:
---
backend: https://www.googleapis.com/compute/v1/projects/example-project-123456/zones/us-central1-a/instanceGroups/hana-ha-ig-1
status:
 healthStatus:
 ‐ healthState: HEALTHY
   instance: https://www.googleapis.com/compute/v1/projects/example-project-123456/zones/us-central1-a/instances/hana-ha-vm-1
   ipAddress: 10.0.0.35
   port: 80
 kind: compute#backendServiceGroupHealth
---
backend: https://www.googleapis.com/compute/v1/projects/example-project-123456/zones/us-central1-c/instanceGroups/hana-ha-ig-2
status:
 healthStatus:
 ‐ healthState: HEALTHY
   instance: https://www.googleapis.com/compute/v1/projects/example-project-123456/zones/us-central1-c/instances/hana-ha-vm-2
   ipAddress: 10.0.0.34
   port: 80
 kind: compute#backendServiceGroupHealth
When you are done, change the health check port number back to the original port number.
Migrate the VIP implementation to use the load balancer
The following steps edit the Pacemaker cluster configuration and the load balancer forwarding rule to complete the VIP migration.
Prepare the system for editing
If you can, stop the SAP application from connecting to the SAP HANA database, because you will interrupt the connection briefly to exchange the IP addresses. The NetWeaver work processes are able to reconnect to the database, but you might experience failures or hanging situations, which interrupting the connection can avoid. Ensure that your IP is registered in an internal range that is part of your VPC in the target region.
As root on the active primary instance, put the cluster into maintenance mode:
$pcs property set maintenance-mode="true"Backup the cluster configuration:
$pcs config show > clusterconfig.backup
Deallocate the alias IP
In the Cloud Shell, confirm the alias IP ranges that are assigned to the primary instance of SAP HANA:
$gcloud compute instances describe \ primary-host-name \ --zone primary-zone \ --format="flattened(name,networkInterfaces[].aliasIpRanges)"In the Google Cloud console, update the network interface. If you don't need to retain any alias IPs, specify
--aliases "":$gcloud compute instances network-interfaces update primary-host-name \ --zone primary-zone \ --aliases "ip-ranges-to-retain"
Create the VIP forwarding rule and clean up
In the Google Cloud console, create a new front-end forwarding rule for the load balancer, specifying the IP address that was previously used for the alias-IP as the IP address. This is your VIP.
$gcloud compute forwarding-rules create rule-name \ --load-balancing-scheme internal \ --address vip-address \ --subnet cluster-subnet \ --region cluster-region \ --backend-service backend-service-name \ --ports ALLConfirm creation of the forwarding rule and note the name of the temporary forwarding rule for deletion:
$gcloud compute forwarding-rules listDelete the temporary forwarding rule:
$gcloud compute forwarding-rules delete rule-name --region=cluster-regionRelease the temporary IP address that you reserved:
$gcloud compute addresses delete temp-ip-name --region=cluster-region
Install listeners and create a health check resource
To configure a health check resource, you need to install the listeners first.
Install a listener
The load balancer uses a listener on the health-check port of each host to determine where the primary instance of the SAP HANA cluster is running. 1. As root on the master instance on the primary and secondary systems, install a TCP listener. These instructions install and use HAProxy as the listener.
# yum install haproxyOpen the configuration file
haproxy.cfgfor editing:#vi /etc/haproxy/haproxy.cfgIn the defaults section of the
haproxy.cfg, change themodetotcp.After the defaults section, create a new section by adding:
#---------------------------------------------------------------------
# Health check listener port for SAP HANA HA cluster
#---------------------------------------------------------------------
listen healthcheck
  bind *:healthcheck-port-num
The bind port is the same port that you used when you created the health check.
When you are done, your updates should look similar to the following example:
#---------------------------------------------------------------------
# common defaults that all the 'listen' and 'backend' sections will
# use if not designated in their block
#---------------------------------------------------------------------
defaults
  mode                    tcp
  log                     global
  option                  tcplog
  option                  dontlognull
  option http-server-close
  # option forwardfor       except 127.0.0.0/8
  option                  redispatch
  retries                 3
  timeout http-request    10s
  timeout queue           1m
  timeout connect         10s
  timeout client          1m
  timeout server          1m
  timeout http-keep-alive 10s
  timeout check           10s
  maxconn                 3000

#---------------------------------------------------------------------
# Set up health check listener for SAP HANA HA cluster
#---------------------------------------------------------------------
listen healthcheck
 bind *:60000
On each host as root, start the service to confirm it is correctly configured:
#systemctl start haproxy.serviceOn the Load balancer page in the Google Cloud console, click your load balancer entry:
In the Backend section on the Load balancer details page, if the HAProxy service is active on both hosts, you see
1/1in the Healthy column of each instance group entry.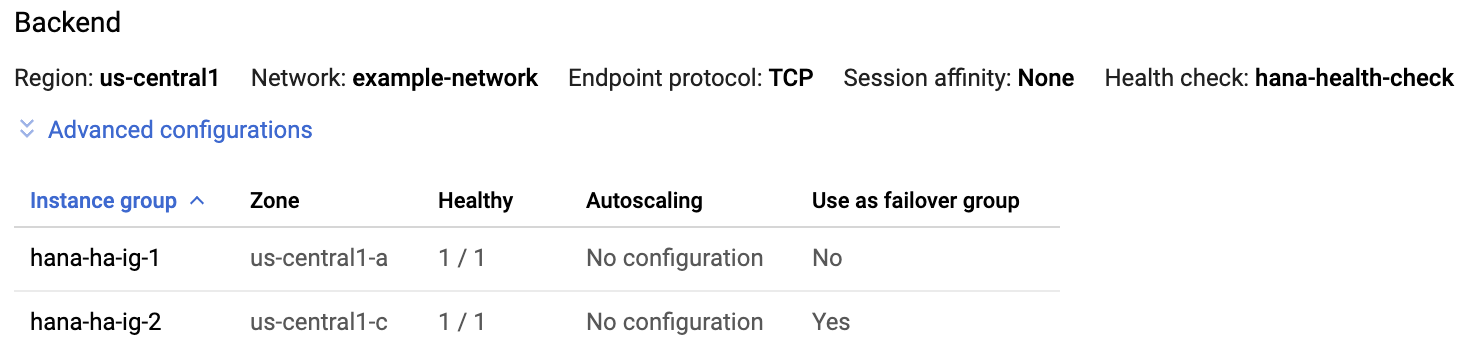
On each host, stop the HAProxy service:
#systemctl stop haproxy.serviceAfter you stop the HAProxy service on each host,
0/1displays in the Healthy column of each instance group.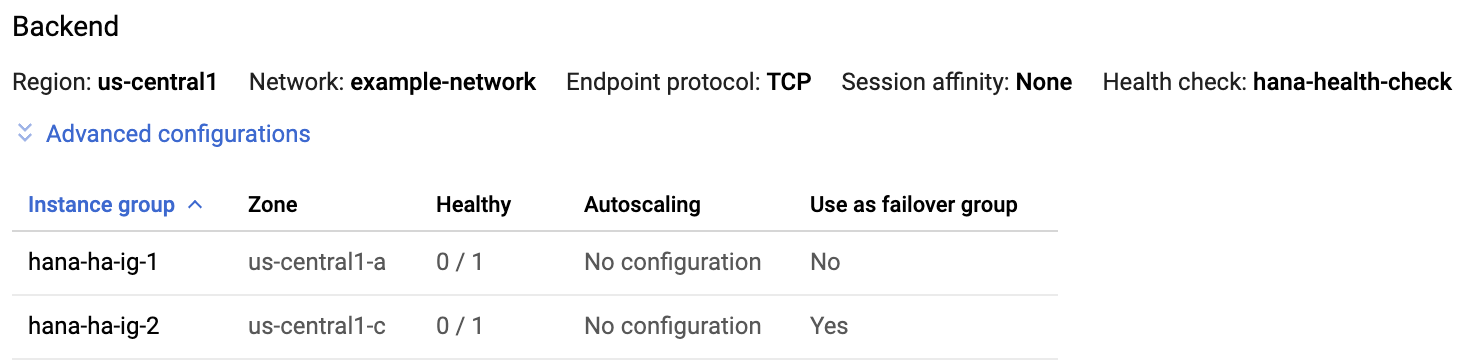
Later, when the health check is configured, the cluster restarts the listener on the master node.
Create the health check resource
On either host as root, create a health check resource for the HAProxy service:
#pcs resource create healthcheck_resource_name service:haproxy op monitor interval=10s timeout=20s
Edit the cluster configuration to use the health check resource and remove the alias resource
Remove the
Colocation Constraintsfor the existing group that contains the alias IP resource mapped to the primary instance of SAP HANA:#pcs constraint remove colocation-alias-vip-group-sap_hana_resource_nameCreate a new resource group that groups the VIP and health check resources together:
#pcs resource group add rsc-group-namehealthcheck_resource_namevip_resource_nameThis command replaces the previous group name of the alias IP and VIP resources with the new resource group name in the cluster configuration.
Verify the new resource group name in the cluster configuration:
#pcs config showYou should see output similar to the following example:
Group: ilb-vip-group
Resource: vip_hkn_00 (class=ocf provider=heartbeat type=IPaddr2)
 Attributes: cidr_netmask=32 ip=10.10.0.90 nic=eth0
 Operations: monitor interval=10s timeout=20s (vip_hkn_00-monitor-interval-10s)
             start interval=0s timeout=20s (vip_hkn_00-start-interval-0s)
             stop interval=0s timeout=20s (vip_hkn_00-stop-interval-0s)
Resource: ilb-health-check (class=service type=haproxy)
 Operations: monitor interval=60 timeout=100 (ilb-health-check-monitor-interval-60)
             start interval=0s timeout=100 (ilb-health-check-start-interval-0s)
             stop interval=0s timeout=100 (ilb-health-check-stop-interval-0s)
Delete the alias resource:
#pcs resource delete alias_resource_nameVerify the cluster status:
#pcs statusYou should see the Resource Group section in the output similar to the following example:
STONITH-hana-ha-vm-1   (stonith:fence_gce):    Started hana-ha-vm-2
STONITH-hana-ha-vm-2   (stonith:fence_gce):    Started hana-ha-vm-1
Clone Set: SAPHanaTopology_HA1_22-clone [SAPHanaTopology_HA1_22]
    Started: [ hana-ha-vm-1 hana-ha-vm-2 ]
Master/Slave Set: SAPHana_HA1_22-master [SAPHana_HA1_22]
    Masters: [ hana-ha-vm-1 ]
    Slaves: [ hana-ha-vm-2 ]
Resource Group: g-primary
    rsc_healthcheck_HA1        (service:haproxy):      Started hana-ha-vm-1
    rsc_vip_HA1_22     (ocf::heartbeat:IPaddr2):       Started hana-ha-vm-1
Take the cluster out of maintenance mode:
#pcs property set maintenance-mode=false
Test the updated HA cluster
From your application instance, confirm that you can reach the database by issuing any of the following commands:
As
sidadmuser:>R3trans -dAs any user:
telnet VIP HANA SQL portor
nc -zv VIP HANA SQL port