This guide shows how to install and configure version 2.0 or 2.1 of the BigQuery Connector for SAP in an SAP LT Replication Server that is running on a host that is on premises, on another cloud provider, or in another environment outside of Google Cloud.
This guide covers how to prepare BigQuery, SAP Landscape Transformation Replication Server (SAP LT Replication Server), and BigQuery Connector for SAP to replicate SAP data from SAP applications directly and securely to BigQuery in real time.
This guide is intended for SAP administrators, Google Cloud administrators, and other SAP and Google Cloud security and data professionals.
Prerequisites
Before you install BigQuery Connector for SAP, make sure that the following prerequisites have been satisfied:
- You have read the BigQuery Connector for SAP planning guide. The planning guide explains BigQuery Connector for SAP options, performance considerations, field mapping, and other information that you need for the optimal configuration of BigQuery Connector for SAP.
If you don't have a Google Cloud project already, create one:
Billing is enabled for your project. Learn how to confirm that billing is enabled for your project. A billing account is required for BigQuery streaming API, BigQuery, and to download BigQuery Connector for SAP.
Maintenance for the installed SAP software is current and the versions of all of the SAP software are compatible with each other, as documented in the SAP Product Availability Matrix.
The versions of the SAP software you are using are supported by the BigQuery Connector for SAP, as documented in Software requirements.
You have the correct SAP licenses that are required to replicate data to any target via the SAP LT Replication Server SDK. For more information about SAP licensing, see SAP Note 2707835.
SAP LT Replication Server is installed. For information about installing SAP LT Replication Server, see the SAP documentation.
The RFC or database connection between SAP LT Replication Server and the source system is configured. If necessary, test the RFC connections by using SAP transaction
SM59. Test database connections by using SAP transactionDBACOCKPIT.
Overview of the installation and configuration process
The following table shows procedures covered in this guide and the roles that typically perform them.
| Procedure | Role |
|---|---|
| If necessary, after validating all appropriate licenses from SAP, follow the SAP instructions to install an SAP Landscape Transformation Replication Server. | SAP administrator. |
| If necessary, install the user interface (UI) add-on for SAP NetWeaver. For more information, see SAP software version requirements. | SAP administrator. |
| Establish a network connection between your SAP system and Google Cloud. | Network administrator. |
| Enable the required Google Cloud APIs. | Google Cloud administrator. |
| Enable private access to the Google Cloud APIs. | Google Cloud network administrator. |
| If necessary, install the gcloud CLI on the SAP LT Replication Server host. | SAP administrator. |
| Create a BigQuery dataset. | Google Cloud administrator or data engineer. |
| Set up Google Cloud authentication and authorization. | Google Cloud security administrator. |
| Download the BigQuery Connector for SAP installation package. | Google Cloud billing account holder. |
| Install BigQuery Connector for SAP. | SAP administrator. |
| Create SAP roles and permissions for BigQuery Connector for SAP. | SAP administrator. |
| Configure replication. | Data engineers or administrators. |
| Test replication. | Data engineers or administrators. |
| Validate replication. | Data engineers or administrators. |
Establish a network connection to Google Cloud
If your SAP workload is not running on Google Cloud, you or a network administrator needs to establish a secure, high-bandwidth, low-latency connection to Google Cloud.
You have the following two connection options:
- Cloud Interconnect (recommended)
- Cloud VPN
To set a connection up, follow the instructions provided by the Google Cloud connection service that you select.
Each connection service has different instructions for different scenarios, so review the service documentation and follow the instructions for your scenario.
Enable the required Google Cloud APIs
Before BigQuery Connector for SAP can access BigQuery, you need to enable the following Google Cloud APIs:
- The BigQuery API
- The IAM Service Account Credentials API
For information about how to enable Google Cloud APIs, see Enabling APIs.
Enable private access to the Google Cloud APIs
If your SAP workload is not running on Google Cloud, after you establish a network connection to Google Cloud, you need to enable private access to the Google Cloud APIs.
To enable private API access, see Configuring Private Google Access for on-premises hosts.
Install the gcloud CLI
For replication to BigQuery, the sidadm
user account must have access to the Google Cloud CLI (gcloud CLI)
on the SAP LT Replication Server host.
An SAP administrator can install the gcloud CLI.
To install the gcloud CLI, complete the following steps:
Follow the gcloud CLI installation instructions.
Authorize the
sidadmuser account to access the gcloud CLI installation directory.Optionally, as
sidadm, set the default project for the gcloud CLI:gcloud config set project PROJECT_ID
Replace
PROJECT_IDwith the ID of the project that contains your BigQuery data set. For example,example-project-123456.If you don't set a default project for the gcloud CLI, the
--projectproperty must be specified on eachgcloudcommand that is issued.
For more information about BigQuery Connector for SAP requirement for the gcloud CLI, see gcloud CLI requirement.
Create a BigQuery dataset
Before you can test Google Cloud authentication and authorization for BigQuery or create target BigQuery tables, you or a data engineer or administrator needs to create a BigQuery dataset.
To create a BigQuery dataset, your user account must have the proper IAM permissions for BigQuery. For more information, see Required permissions.
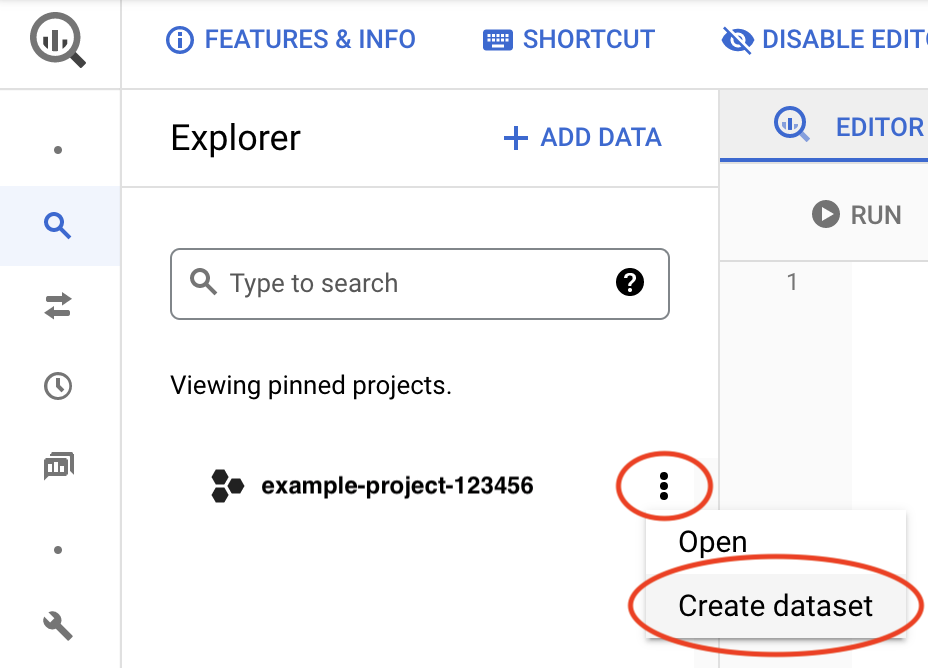
In the Google Cloud console, go to the BigQuery page:
Next to your project ID, click the View actions icon, , and then Create dataset.
In the Dataset ID field, enter a unique name. For more information, see Name datasets.
After you set up Google Cloud authentication and authorization, you test access to Google Cloud by retrieving information about this dataset.
For more information about creating BigQuery datasets, see Creating datasets.
Set up Google Cloud authentication and authorization
For authentication to Google Cloud and authorization to access BigQuery, a Google Cloud security administrator and an SAP administrator need to:
- Create a service account for the BigQuery Connector for SAP.
- Grant the service account the IAM roles that are required to access BigQuery.
- Create a service account key.
- Add the BigQuery Connector for SAP service account as a principal in the BigQuery project.
- Configure security settings for Google Cloud on the
SAP LT Replication Server host:
- Store the service account key on the SAP LT Replication Server host.
- Create an OS command to obtain access tokens.
Create a service account
BigQuery Connector for SAP needs an IAM service account for authentication and authorization to access BigQuery.
This service account must be a principal in the Google Cloud project that contains your BigQuery dataset. If you create the service account in the same project as the BigQuery dataset, the service account is added as a principal to the project automatically.
If you create the service account in a project other than the project that contains the BigQuery dataset, you need to add the service account to the BigQuery dataset project in an additional step.
To create a service account, complete the following steps:
In the Google Cloud console, go to the IAM & Admin Service accounts page.
If prompted, select your Google Cloud project.
Click Create Service Account.
Specify a name for the service account and, optionally, a description.
Click Create and Continue.
If you are creating the service account in the same project as the BigQuery dataset, in the Grant this service account access to project panel, select the following roles:
- BigQuery Data Editor
- BigQuery Job User
If you are creating the service account in a different project than the BigQuery dataset, do not grant any roles to the service account.
Click Continue.
As appropriate, grant other users access to the service account.
Click Done. The service account appears in the list of service accounts for the project.
If you created the service account in a different project than the project that contains the BigQuery dataset, note the name of the service account. You specify the name when you add the service account to the BigQuery project. For more information, see Add the service account to the BigQuery project.
The service account is now listed as a principal on the IAM Permissions page of the Google Cloud project in which the service account was created.
Create a service account key
You need to create a JSON service account key and store it on the SAP LT Replication Server host.
To create a service account key, complete the following steps:
In the Google Cloud console, go to the IAM & Admin Service accounts page.
Select your Google Cloud project.
Click the email address of the service account that you created in the previous section, Create a service account.
Under the service account name, click the Keys tab.
Click the Add Key drop-down menu, and then select Create new key to create a service account key.
Accept JSON as the key type and click Create.
A private key is saved to your computer. Provide this key to your SAP administrator to upload to the SAP LT Replication Server host, as described in Install the service account key on the SAP LT Replication Server host.
Add the service account to the BigQuery project
If you created the service account for BigQuery Connector for SAP in a project other than the project that contains the target BigQuery dataset, you need to add the service account to the BigQuery dataset project.
If you created the service account in the same project as the BigQuery dataset, you can skip this step.
To add an existing service account to the BigQuery dataset project, complete the following steps:
In the Google Cloud console, go to the IAM Permissions page:
Confirm that the name of the project that contains the target BigQuery dataset is displayed near the top of the page. For example:
Permissions for project "
PROJECT_NAME"If it is not, switch projects.
On the IAM page, click Add. The Add principals to "
PROJECT_NAME" dialog opens.In the Add principals to "
PROJECT_NAME" dialog, complete the following steps:- In the New principals field, specify the name of the service account.
- In the Select a role field, specify BigQuery Data Editor.
- Click ADD ANOTHER ROLE. The Select a role field displays again.
- In the Select a role field, specify BigQuery Job User.
- Click Save. The service account appears in the list of project principals on the IAM page.
The service account can now be used to access the BigQuery dataset in this project.
Install the service account key on the SAP LT Replication Server host
Upload the service account key that was created in the previous section to the SAP LT Replication Server host, and then configure the gcloud CLI to use the service account key.
These steps are typically done by an SAP administrator.
To install the service account key, complete the following steps:
Upload the JSON key file to a secure location on the SAP LT Replication Server host.
On the SAP LT Replication Server host, switch to the
sidadmuser:sudo su - sidadm
Configure the gcloud CLI to use the service account key for authentication:
gcloud auth activate-service-account SERVICE_ACCOUNT --key-file=SERVICE_ACCOUNT_KEY
Replace the following:
SERVICE_ACCOUNT: the name of the service account that you created for the BigQuery Connector for SAP in a previous step. For example,bq-connector-for-sap@example-project-123456.iam.gserviceaccount.com.SERVICE_ACCOUNT_KEY: the directory path and file name of the JSON service account key that you uploaded to the SAP LT Replication Server host. For example,PATH_TO_JSON_KEY_FILE/KEY_FILE_NAME.json.
After the gcloud CLI activates the service account, you can delete the
SERVICE_ACCOUNT_KEY. The gcloud CLI stores a copy of the key when the service account is activated.
For more information about authorizing the gcloud CLI, see Authorizing with a service account.
Create an OS command to print access token
You or an SAP administrator needs to configure an operating system command that retrieves an access token from Google Cloud.
The following steps create a script to print an access token and configure
an SAP operating system command to call the script as user
sidadm from the SAP LT Replication Server host.
This task is typically performed by an SAP administrator.
To create an OS command, click the tab for your operating system and follow the procedure:
Linux
On the SAP LT Replication Server host, in a directory that is accessible to
sidadm, create a bash script that contains the following lines:#!/bin/bash /PATH_TO_GCLOUD_CLI/bin/gcloud auth print-access-token | fold -sw 127
Using the SAP GUI, create an external operating system command:
- Enter transaction
SM69. - Click Create.
- In the Command section of the External Command panel, enter
the name of the command. For example,
ZGOOG_SLTBQ. In the Definition section:
- In the Operating System Command field, enter
shfor the script file extension. In the Parameters for Operating System Command field, enter:
/PATH_TO_SCRIPT/FILE_NAME.sh
- In the Operating System Command field, enter
Click Save.
Click Execute to test the script.
Click Execute again.
A Google Cloud token is returned and displayed at the bottom of the SAP GUI panel.
- Enter transaction
Windows
- Log into the Windows host.
Using Windows PowerShell as an administrator, create a Windows PowerShell module in a new PowerShell subdirectory to request and format the access token for the SAP system:
Create a directory and module file in the Windows Server system with the following sequence of commands. Use the same name for the directory and module:
cd C:\Windows\system32\WindowsPowerShell\v1.0\Modules
mkdir MODULE_NAME
cd MODULE_NAME
notepad MODULE_NAME.psm1
Copy and paste the following two function definitions into the
MODULE_NAME.psm1file:Function Fold-Token{ [CmdletBinding()] Param( [Parameter(ValueFromPipeline)] $token ) $token -split "(.{127})" | Where-Object{$_} } Function Get-Token{ gcloud auth print-access-token | Fold-Token } Export-ModuleMember -function Get-Token
In Windows PowerShell, test the command
Get-Token:Get-Token
A Google Cloud access token is displayed in the Windows PowerShell console.
In the SAP GUI, enter transaction
SM69.Click Create.
In the Command section of the External Command panel, enter a name for the command. For example,
ZGOOG_SLTBQ.In the Definition section:
- In the Operating System Command field, enter
powershell. - In the Parameters for Operating System Command field, enter
the name of the function that is defined in the
MODULE_NAME.psm1module that you created in a preceding step:
Get-Token
- In the Operating System Command field, enter
Click Save.
Click Execute to test the script.
Click Execute again.
A Google Cloud token is returned and displayed at the bottom of the SAP GUI panel.
Set up SSL certificates and HTTPS
Communication between BigQuery Connector for SAP and the BigQuery API is secured by using SSL and HTTPS.
Download the following certificates from the Google Trust Services repository:
GTS Root R1GTS CA 1C3
In the SAP GUI, use the
STRUSTtransaction to import both the root and subordinate certificate into theSSL client SSL Client (Standard)PSE folder.For more information from SAP, see SAP Help - Maintain PSE Certification list.
On the SAP LT Replication Server host, confirm that any firewall rules or proxies are configured to allow egress traffic from the HTTPS port to the BigQuery API.
Specifically, SAP LT Replication Server needs to be able to access the following Google Cloud APIs:
- https://bigquery.googleapis.com
- https://iamcredentials.googleapis.com
For more information from SAP about setting up SSL, see SAP Note 510007 - Additional considerations for setting up SSL on Application Server ABAP.
Test Google Cloud authentication and authorization
Confirm that you have configured Google Cloud authentication correctly by requesting an access token and retrieving information about your BigQuery dataset.
Use the following procedure to test your Google Cloud authentication and authorization from the SAP LT Replication Server host:
On the SAP LT Replication Server host, open a command-line shell.
As
sidadm, request an access token from Google Cloud:/home/SIDadm/google-cloud-sdk/bin/gcloud auth print-access-token \ SERVICE_ACCOUNT
Replace the following:
SERVICE_ACCOUNT: the service account that you created for BigQuery Connector for SAP in an earlier step.SID: the SAP system ID.
The metadata server returns an access token that is similar to the following example, in which ACCESS_TOKEN_STRING is an access token string that you copy into the command in the following step:
{"access_token":"ACCESS_TOKEN_STRING","expires_in":3599,"token_type":"Bearer"}Retrieve information about your BigQuery dataset from the BigQuery API:
curl "https://bigquery.googleapis.com/bigquery/v2/projects/PROJECT_ID/datasets/DATASET_NAME" \
 -H "Accept: application/json" -H "Authorization: Bearer ACCESS_TOKEN_STRING"
Replace the following:
PROJECT_ID: the ID of the project that contains your BigQuery dataset.DATASET_NAME: the name of the target dataset as defined in BigQuery.ACCESS_TOKEN_STRING: the access token string returned by Google Cloud in the preceding step.
If your Google Cloud authentication is configured correctly, BigQuery returns information about your dataset.
If you do not receive the dataset information as expected, review the configuration steps. For more troubleshooting information, see BigQuery Connector for SAP troubleshooting.
Download the installation package
Download the BigQuery Connector for SAP installation package from BigQuery Connector for SAP download portal.
You need your Cloud Billing number to complete the download. For information about billing accounts, see Cloud Billing & payments profile.
The installation package includes transport files that you copy into the appropriate transport directory for SAP LT Replication Server.
Install BigQuery Connector for SAP
After you receive the installation package that contains the BigQuery Connector for SAP transport files, your SAP administrator can install BigQuery Connector for SAP by importing the transport files into SAP LT Replication Server.
The SAP transport for BigQuery Connector for SAP contains all of the objects
that are required for BigQuery Connector for SAP, including the /GOOG/
namespace, DDIC objects, the SLT SDK BADI implementation and classes,
report programs, and more.
Before importing the transport files into SAP LT Replication Server, verify that your SAP LT Replication Server is supported by BigQuery Connector for SAP, as documented in Software requirements.
In spite of using a supported version of SAP LT Replication Server, in some cases,
while importing the transport files, you might see the error message,
Requests do not match the component version of the target system. In such
cases, you need to re-import the transport files into
SAP LT Replication Server and while re-importing, on the
Import Transport Request screen > Options tab, select the
Ignore Invalid Component Version checkbox.
The following procedure is a general procedure. Each SAP system is different, so work with your SAP administrator to determine any changes to the procedure that might be required for your SAP system:
Copy BigQuery Connector for SAP transport files into the following SAP LT Replication Server transport import directories:
/usr/sap/trans/cofiles/KXXXXXX.ED1/usr/sap/trans/data/RXXXXXX.ED1
In the preceding examples,
XXXXXXrepresents the numbered file name.In the SAP GUI, use transaction code
STMS_IMPORTorSTMSto import the files into the SAP system.Make sure all objects in
/GOOG/SLT_SDKpackage are active and consistent:- In the SAP interface, enter transaction code
SE80. - In the package selector, select
/GOOG/SLT_SDK. In the Object name field, right-click on the package
/GOOG/SLT_SDK, and then choose Check > Package Check > Objects of Package.A green check in the Result column indicates that all objects passed the package check.
- In the SAP interface, enter transaction code
Confirm that BigQuery Connector for SAP is ready to configure
To further confirm that the transport files have been
imported correctly and that BigQuery Connector for SAP is ready to
configure, confirm that BigQuery Connector for SAP Business Add-In (BAdI)
implementation is active and that BigQuery Connector for SAP
replication applications have entries in the IUUC_REPL_APPL table.
- Check the BAdI implementation:
- Use the transaction SE80 to navigate to and select the
/GOOG/EI_IUUC_REPL_RUNTIME_BQenhancement object folder. - Select Enh. Implementation Elements on the right side of the page.
- Under Runtime Behavior, confirm that Implementation is active is checked.
- Use the transaction SE80 to navigate to and select the
- Check the replication applications:
- Using the SAP Data Browser or transaction
SE16, display theIUUC_REPL_APPLtable. - Confirm that the following applications appear in the
IUUC_REPL_APPLtable:/GOOG/SLT_BQZGOOG_SLT_BQ, for use when the/GOOG/namespace isn't registered
- Using the SAP Data Browser or transaction
Create SAP roles and authorizations for BigQuery Connector for SAP
To work with BigQuery Connector for SAP, in addition to the standard
SAP LT Replication Server authorizations, users need access to the custom
transactions that are provided with BigQuery Connector for SAP:
/GOOG/SLT_SETTINGS and /GOOG/REPLIC_VALID.
By default, users that have access to the custom transactions can modify the settings of any configuration, so if you need to, you can restrict access to specific configurations.
The BigQuery Connector for SAP transport files include the Google BigQuery
Settings Authorization object, ZGOOG_MTID, for authorizations that are
specific to BigQuery Connector for SAP.
To grant access to the custom transactions and restrict access to specific configurations:
Using SAP transaction code
PFCG, define a role for the BigQuery Connector for SAP.Grant the role access to the custom transactions
/GOOG/SLT_SETTINGSand/GOOG/REPLIC_VALID.To limit the access of a role, specify the authorization group of each configuration that the role can access by using the
ZGOOG_MTIDauthorization object. For example:- Authorization object for BigQuery Connector for SAP (
ZGOOG_MTID):Activity 01Authorization Group AUTH_GROUP_1,AUTH_GROUP_N
The
AUTH_GROUP_01andAUTH_GROUP_Nare values that are defined in the SAP LT Replication Server configuration.The authorization groups specified for
ZGOOG_MTIDmust match the authorization groups that are specified for the role in the SAPS_DMIS_SLTauthorization object.- Authorization object for BigQuery Connector for SAP (
Configure replication
To configure replication, you specify both BigQuery Connector for SAP and SAP LT Replication Server settings.
Specify access settings in /GOOG/CLIENT_KEY
Use transaction SM30 to specify settings for access to
BigQuery. BigQuery Connector for SAP stores the settings
as a record in the /GOOG/CLIENT_KEY custom configuration table.
To specify the access settings:
In the SAP GUI, enter transaction code
SM30.Select the
/GOOG/CLIENT_KEYconfiguration table.Enter values for the following table fields:
Field Data type Description Name String Specify a descriptive name for the
CLIENT_KEYconfiguration, such asABAP_SDK_CKEY.A client key name is a unique identifier that is used by the BigQuery Connector for SAP to identify the configurations for accessing BigQuery.
Service Account Name String Leave this field blank.
Scope String Leave this field blank.
Project ID String The ID of the project that contains your target BigQuery dataset. Command name String The name of the external operating system command that you defined in the step Create an OS command to print access token.
Authorization Class String The authorization class to use for replication. Specify
/GOOG/CL_GCP_AUTH.Authorization Field Not applicable Leave this field blank. Token Refresh Seconds Integer Leave this field blank.
Create an SAP LT Replication Server replication configuration
Use SAP transaction LTRC to create an SAP LT Replication Server replication
configuration.
If SAP LT Replication Server is running on a different server than the source SAP system, before you create a replication configuration, confirm that you have an RFC connection between the two systems.
Some of the settings in the replication configuration affect performance. To determine appropriate setting values for your installation, see the Performance Optimization Guide for your version of SAP LT Replication Server in the SAP Help Portal.
The interface and configuration options for SAP LT Replication Server might be slightly different depending on which version you are using.
To configure replication, use the procedure for your version of SAP LT Replication Server:
- Configure replication in DMIS 2011 SP17, DMIS 2018 SP02, or later
- Configure replication in DMIS 2011 SP16, DMIS 2018 SP01, or earlier
Configure replication in DMIS 2011 SP17, DMIS 2018 SP02, or later
The following steps configure replication in later versions of SAP LT Replication Server. If you are using an earlier version, see Configure replication in DMIS 2011 SP16, DMIS 2018 SP01, or earlier.
In the SAP GUI, enter transaction code
LTRC.Click the Create configuration icon. The Create Configuration wizard opens.
In the Configuration Name and Description fields, enter a name and a description for the configuration, and then click Next.
You can specify the Authorization Group for restricting access to a specific authorization group now or specify it later.
In the Source System Connection Details panel:
- Select the RFC Connection radio button.
- In the RFC Destination field, specify the name of the RFC connection to the source system.
- Select the checkboxes for Allow Multiple Usage and Read from Single Client as appropriate. For more information, see the SAP LT Replication Server documentationl.
- Click Next.
These steps are for an RFC connection, but if your source is a database, you can select DB Connection if you have already defined a connection by using transaction
DBACOCKPITinstead.In the Target System Connection Details panel:
- Select the radio button for Other.
- In the Scenario field, select SLT SDK from the drop-down menu.
- Click Next.
On the Specify Transfer Settings panel:
In the Application field of the Data Transfer Settings section, enter
/GOOG/SLT_BQorZGOOG_SLT_BQ.In the Job options section, enter starting values in each of the following fields:
- Number of Data Transfer Jobs
- Number of Initial Load Jobs
- Number of Calculation Jobs
In the Replication Options section, select the Real Time radio button.
Click Next.
After reviewing the configuration, click Save.
Make a note of the three-digit ID in the Mass Transfer column. You use it in a later step.
For more information, see the PDF attached to SAP Note 2652704: Replicating Data Using SLT SDK - DMIS 2011 SP17, DMIS 2018 SP02.pdf.
Configure replication in DMIS 2011 SP16, DMIS 2018 SP01, or earlier
The following steps configure replication in earlier versions of SAP LT Replication Server. If you are using a later version, see Configure replication in DMIS 2011 SP17, DMIS 2018 SP02, or later.
- In the SAP GUI, enter transaction code
LTRC. - Click New. A dialog opens for specifying a new configuration.
- In the step Specify Source System:
- Choose RFC Connection as the connection type.
- Enter the RFC connection name.
- Ensure that the field Allow Multiple Usage is selected.
- In the step Specify Target System:
- Enter the connection data to the target system.
- Choose RFC Connection as the connection type.
- In the field Scenario for RFC Communication, select the value Write Data to Target Using BAdI from the drop-down list. The RFC connection is automatically set to NONE.
- In the step Specify Transfer Settings, press F4 Help. The application that you defined previously is displayed in the Application field.
- Make a note of the three-digit ID in the Mass Transfer column. You use it in a later step.
For more information, see the PDF attached to SAP Note 2652704: Replicating Data Using SLT SDK - DMIS 2011 SP15, SP16, DMIS 2018 SP00, SP01.pdf.
Create a mass transfer configuration for BigQuery
Use the custom /GOOG/SLT_SETTINGS transaction to configure a
mass transfer for BigQuery and specify the table and field
mappings.
Select the initial mass transfer options
When you first enter the /GOOG/SLT_SETTINGS transaction, you select
which part of the BigQuery
mass transfer configuration you need to edit.
To select the part of the mass transfer configuration:
In the SAP GUI, enter the
/GOOG/SLT_SETTINGStransaction preceded by/n:/n/GOOG/SLT_SETTINGSFrom the Settings Table drop-down menu in the launch screen for the
/GOOG/SLT_SETTINGStransaction, select Mass Transfers.For a new mass transfer configuration, leave the Mass Transfer Key field blank.
Click the Execute icon. The BigQuery Settings Maintenance - Mass Transfers screen displays.
Specify table creation and other general attributes
In the initial section of a BigQuery mass transfer configuration, you identify the mass transfer configuration and specify the associated client key, as well as certain properties related to the creation of the target BigQuery table.
SAP LT Replication Server saves the mass transfer configuration as a record in the
/GOOG/BQ_MASTR custom configuration table.
The fields that you specify in the following steps are required.
In the BigQuery Settings Maintenance - Mass Transfers screen, click the Append Row icon.
In the displayed row, specify the following settings:
- In the Mass Transfer Key field, define a name for this transfer. This name becomes the primary key of the mass transfer.
- In the Mass Transfer ID field, enter the three-digit ID that was generated when you create the corresponding SAP LT Replication Server replication configuration.
- To use the labels or short descriptions of the source fields as the names for the target fields in BigQuery, click the Use Custom Names Flag checkbox. For more information about field names, see Default naming options for fields.
To store the type of change that triggered an insert and to enable the validation of record counts between the source table, SAP LT Replication Server statistics, and the BigQuery table, select the Extra Fields Flag checkbox.
When this flag is set, BigQuery Connector for SAP adds columns to the BigQuery table schema. For more information, see Extra fields for record changes and count queries.
To stop sending data when a record with a data error is encountered, click the Break at First Error Flag checkbox, which is recommended. For more information, see The BREAK flag.
When a record with a data error is encountered, to skip the record and continue inserting records into the BigQuery table, click the Skip Invalid Records Flag checkbox. We recommend leaving this unchecked. For more information, see The SKIP flag.
In the Google Cloud Key Name field, enter the name of the corresponding
/GOOG/CLIENT_KEYconfiguration.BigQuery Connector for SAP retrieves the Google Cloud Project Identifier automatically from the
/GOOG/CLIENT_KEYconfiguration.In the BigQuery Dataset field, enter the name of the target BigQuery dataset that you created earlier in this procedure.
In the Is Setting Active Flag field, enable the mass transfer configuration by clicking the checkbox.
Click Save.
A mass transfer record is appended in the
/GOOG/BQ_MASTRtable and the Changed By, Changed On, and Changed At fields are automatically populated.Click Display Table.
The new mass transfer record is displayed followed by the table attribute entry panel.
Specify table attributes
You can specify table attributes, such as table name and table partitioning,
as well as the number of records to include in each transmission or
chunk that is sent to BigQuery, in the second section of the
/GOOG/SLT_SETTINGS transaction.
The settings that you specify are stored as a record in the
/GOOG/BQ_TABLE configuration table.
These settings are optional.
To specify table attributes:
Click the Append row icon.
In the SAP Table Name field, enter the name of the source SAP table.
In the External Table Name field, enter the name of the target BigQuery table. If the target table doesn't already exist, BigQuery Connector for SAP creates the table with this name. For the BigQuery naming conventions for tables, see Table naming.
The Send Uncompressed Flag field disables record compression. Specify this flag only if you need BigQuery Connector for SAP to replicate any empty fields in the source records with the values that the fields were initialized with in the source table. For better performance, do not specify this flag. For more information, see Record compression.
Optionally, in the Chunk Size field, specify the maximum number of records to include in each chunk that is sent to BigQuery. If you can, use the maximum chunk size that BigQuery Connector for SAP allows, which is currently 10,000 records and the default value. If the source records have a large number of fields, the number of fields can increase the overall byte size of the chunks, which can cause chunk errors. If this occurs, try reducing the chunk size to reduce the byte size. For more information, see Chunk size in the BigQuery Connector for SAP.
Optionally, in the Partition Type field, specify an increment of time to use for partitioning. Valid values are
HOUR,DAY,MONTH, orYEAR. For more information, see Table partitioning.Optionally, in the Partition Field field, specify the name of a field in the target BigQuery table that contains a timestamp to use for partitioning. When you specify Partition Field, you must also specify Partition Type. For more information, see Table partitioning.
In the Is Setting Active Flag field, enable the table attributes by clicking the checkbox. If the Is Setting Active Flag box is not checked, BigQuery Connector for SAP creates the BigQuery table with the name of the SAP source table, the default chunk size, and no partitioning.
Click Save.
Your attributes are stored as a record in the
/GOOG/BQ_TABLEconfiguration table and the Changed By, Changed On, and Changed At fields are automatically populated.Click Display Fields.
The new table attribute record is displayed, followed by the field mapping entry panel.
Customize the default field mapping
If the source SAP table contains timestamp fields or booleans, change the default data type mapping to accurately reflect the data type in the target BigQuery table.
You can also change other data types, as well as the names that are used for target fields.
You can edit the default mapping directly in the SAP GUI or you can export the default mapping to a spreadsheet or a text file so that others can edit the values without requiring access to SAP LT Replication Server.
For more information about the default field mapping and the changes you can make, see Field mapping.
To customize the default mapping for the target BigQuery fields:
In the BigQuery Settings Maintenance - Fields page of transaction
/GOOG/SLT_SETTINGS, display the default field mappings for the mass transfer you are currently configuring.Edit the default target data types in the External Data Element column as needed. In particular, change the target data type for the following data types:
- Timestamps. Change the default target data type
from
NUMERICtoTIMESTAMPorTIMESTAMP (LONG). - Booleans. Change the default target data type from
STRINGtoBOOLEAN. - Hexadecimals. Change the default target data type from
STRINGtoBYTES.
To edit the default data type mapping:
- On the row of the field that you need to edit, click the External Data Element field.
- In the dialog for data types, select the BigQuery data type that you need.
- Confirm your changes, and then click Save.
- Timestamps. Change the default target data type
from
If you specified the Custom Names flag in the BigQuery Settings Maintenance page, edit the default target field names in the Temporary Field Name column as needed.
The values that you specify override the default names that are shown in the External Field Name column.
Edit the default target field descriptions in the Field Description column as needed.
Optionally, export the field map for external editing. For instructions, see Edit the BigQuery field map in a CSV file.
After all changes are complete and any externally edited values have been uploaded, confirm that the Is Setting Active Flag checkbox is selected. If Is Setting Active Flag is not selected, BigQuery Connector for SAP creates target tables with the default values.
Click Save.
The changes are stored in the
/GOOG/BQ_FIELDconfiguration table and the Changed By, Changed On, and Changed At fields are automatically populated.
Test replication
Test the replication configuration by starting data provisioning:
Open the SAP LT Replication Server Cockpit (transaction
LTRC) in the SAP GUI.Click on the mass transfer configuration for the table replication that you are testing.
Click Data Provisioning.
In the Data Provisioning panel, start data provisioning:
- Enter the name of the source table.
- Click the radio button for the type of data provisioning that you want to test. For example, Start Load.
Click the Execute icon. The data transfer begins and the progress is displayed on the Participating objects screen.
If the table doesn't exist in BigQuery, the BigQuery Connector for SAP creates the table from a schema that it builds from the table and field attributes that you previously defined with the
/GOOG/SLT_SETTINGStransaction.The length of time that an initial load of a table takes depends on the size of the table and its records.
Messages are written to the SAP LT Replication Server Application Logs section in transaction
LTRC.
Validate replication
You can validate replication using the following methods:
- In SAP LT Replication Server:
- Monitor the replication on the Data Provisioning screen.
- Check for error messages in the Application Logs screen.
- On the table information tab in BigQuery:
- Check the Schema tab to ensure that the schema looks right.
- Check the Preview tab to see a preview of the inserted rows.
- Check the Details tab for the number of rows inserted, the size of the table, and other information.
- If the Extra Fields Flag checkbox was selected when the
BigQuery table was configured, run the Replication
Validation tool by entering the
/GOOG/REPLIC_VALIDcustom transaction.
Check replication in SAP LT Replication Server
Use transaction LTRC to see the progress of initial load or replication jobs
after you start them and to check for error messages.
You can see the status of the load under the Load Statistics tab and the progress of the job under the Data Transfer Monitor tab in SAP LT Replication Server.
On the Application Logs screen of transaction LTRC, you can see all
of the messages that are returned by BigQuery, the
BigQuery Connector for SAP, and SAP LT Replication Server.
Messages that are issued by BigQuery Connector for SAP code in
SAP LT Replication Server start with the prefix /GOOG/SLT. Messages that are
returned from the BigQuery API start with the
prefix /GOOG/MSG.
Messages that are returned by SAP LT Replication Server do not start with
a /GOOG/ prefix.
Check replication in BigQuery
In the Google Cloud console, confirm that the table was created and that BigQuery is inserting data into it.
In the Google Cloud console, go to the BigQuery page.
In the search field of the Explorer section, type the name of the target BigQuery table, and then press
Enter.The table information is displayed under a tab in the content pane on the right side of the page.
In the table information section, click the following headings to check the table and row insertion:
- Preview, which shows the rows and fields that are inserted into the BigQuery table.
- Schema, which shows the field names and data types.
- Details, which shows the table size, the total number of rows, and other details.
Run the Replication Validation tool
If the Extra Fields Flag was selected when the BigQuery table was configured, you can use the Replication Validation tool to generate reports that compare the number of records in the BigQuery table with record counts in the SAP LT Replication Server statistics or the source table.
To run the Replication Validation tool:
In the SAP GUI, enter the
/GOOG/REPLIC_VALIDtransaction preceded by/n:/n/GOOG/REPLIC_VALID
In the Processing Options section, click the Execute Validation radio button.
In the Selection Options section, enter the following specifications:
- From the drop-down menu in the GCP Partner Identifier field, select BigQuery.
- From the drop-down menu in the Check Type field,
select the type of report to generate:
- Initial Load Counts
- Replication Counts
- Current Counts
- If the Check Date field is displayed, specify the date that you need the counts for.
- In the Mass Transfer Key field, enter the mass transfer configuration name.
Run the Replication Validation tool by clicking the Execute icon.
After the validation check is complete, in the Processing Options section, display the report by clicking the Display Report radio button and then clicking the Execute icon.
For more information, see Replication Validation tool.
Troubleshooting
For information about diagnosing and resolving issues that you might encounter when you configure and run loads or replications between SAP and BigQuery with BigQuery Connector for SAP, see BigQuery Connector for SAP troubleshooting guide.
Get support
If you need help resolving problems with replication and the BigQuery Connector for SAP, collect all available diagnostic information and contact Cloud Customer Care. For information about contacting Customer Care, see Getting support for SAP on Google Cloud.