This guide shows you how to automate the deployment of an SAP HANA scale-out system in a SUSE Linux Enterprise Server (SLES) high-availability (HA) cluster on Google Cloud.
This guide uses Terraform to deploy a multi-host SAP HANA scale-out system, a virtual IP address (VIP) with an internal passthrough Network Load Balancer implementation, and an OS-based HA cluster, all according to the best practices from Google Cloud, SAP, and SUSE.
One of the SAP HANA systems functions as the primary, active system and the other functions as a secondary, standby system. You deploy both SAP HANA systems within the same region, ideally in different zones.
The deployed cluster includes the following functions and features:
- The Pacemaker high-availability cluster resource manager.
- A Google Cloud fencing mechanism.
- A virtual IP (VIP) that uses a level 4 TCP internal load balancer
implementation, including:
- A reservation of the IP address that you select for the VIP.
- Two Compute Engine instance groups.
- A TCP internal load balancer.
- A Compute Engine health check.
- The SUSE high-availability pattern.
- The SUSE SAPHanaSR resource agent package.
- Synchronous system replication.
- Memory preload.
- Automatic restart of the failed instance as the new secondary instance.
If you need a scale-out system with standby hosts for SAP HANA automatic host failover, then you must instead see Terraform: SAP HANA scale-out system with host auto-failover deployment guide.
To deploy an SAP HANA system without a Linux high-availability cluster or standby hosts, use the Terraform: SAP HANA Deployment Guide.
This guide is intended for advanced SAP HANA users who are familiar with Linux high-availability configurations for SAP HANA.
Prerequisites
Before you create the SAP HANA high availability cluster, make sure that the following prerequisites are met:
- You have read the SAP HANA planning guide and the SAP HANA high-availability planning guide.
- You or your organization has a Google Cloud account and you have created a project for the SAP HANA deployment. For information about creating Google Cloud accounts and projects, see Setting up your Google account.
- If you require your SAP workload to run in compliance with data residency, access control, support personnel, or regulatory requirements, then you must create the required Assured Workloads folder. For more information, see Compliance and sovereign controls for SAP on Google Cloud.
The SAP HANA installation media is stored in a Cloud Storage bucket that is available in your deployment project and region. For information about how to upload SAP HANA installation media to a Cloud Storage bucket, see Creating a Cloud Storage bucket for the SAP HANA installation files.
If OS login is enabled in your project metadata, you need to disable OS login temporarily until your deployment is complete. For deployment purposes, this procedure configures SSH keys in instance metadata. When OS login is enabled, metadata-based SSH key configurations are disabled, and this deployment fails. After deployment is complete, you can enable OS login again.
For more information, see:
If you are using VPC internal DNS, the value of the
vmDnsSettingvariable in your Google Cloud project metadata must be eitherGlobalDefaultorZonalPreferredto enable the resolution of the node names across zones. The default setting ofvmDnsSettingisZonalOnly. For more information, see:
Creating a network
For security purposes, create a new network. You can control who has access by adding firewall rules or by using another access control method.
If your project has a default VPC network, then don't use it. Instead, create your own VPC network so that the only firewall rules in effect are those that you create explicitly.
During deployment, Compute Engine instances typically require access to the internet to download Google Cloud's Agent for SAP. If you are using one of the SAP-certified Linux images that are available from Google Cloud, then the compute instance also requires access to the internet in order to register the license and to access OS vendor repositories. A configuration with a NAT gateway and with VM network tags supports this access, even if the target compute instances don't have external IPs.
To create a VPC network for your project, complete the following steps:
-
Create a custom mode network. For more information, see Creating a custom mode network.
-
Create a subnetwork, and specify the region and IP range. For more information, see Adding subnets.
Setting up a NAT gateway
If you need to create one or more VMs without public IP addresses, then you need to use network address translation (NAT) to enable the VMs to access the internet. Use Cloud NAT, a Google Cloud distributed, software-defined managed service that lets VMs send outbound packets to the internet and receive any corresponding established inbound response packets. Alternatively, you can set up a separate VM as a NAT gateway.
To create a Cloud NAT instance for your project, see Using Cloud NAT.
After you configure Cloud NAT for your project, your VM instances can securely access the internet without a public IP address.
Adding firewall rules
By default, an implied firewall rule blocks incoming connections from outside your Virtual Private Cloud (VPC) network. To allow incoming connections, set up a firewall rule for your VM. After an incoming connection is established with a VM, traffic is permitted in both directions over that connection.
You can also create a firewall rule to allow external access to specified ports,
or to restrict access between VMs on the same network. If the default
VPC network type is used, some additional default rules also
apply, such as the default-allow-internal rule, which allows connectivity
between VMs on the same network on all ports.
Depending on the IT policy that is applicable to your environment, you might need to isolate or otherwise restrict connectivity to your database host, which you can do by creating firewall rules.
Depending on your scenario, you can create firewall rules to allow access for:
- The default SAP ports that are listed in TCP/IP of All SAP Products.
- Connections from your computer or your corporate network environment to your Compute Engine VM instance. If you are unsure of what IP address to use, talk to your company's network administrator.
To create the firewall rules for your project, see Creating firewall rules.
Create a high-availability Linux cluster with SAP HANA installed
The following instructions use a Terraform configuration file to create a SLES cluster with two SAP HANA systems, a primary SAP HANA system and a secondary or standby SAP HANA system in the same Compute Engine region. The SAP HANA systems use synchronous system replication and the standby system preloads the replicated data.
You define configuration options for the SAP HANA high-availability cluster in a Terraform configuration file.
The following instructions use Cloud Shell, but are generally applicable to a local terminal with Terraform installed and configured with the Google Provider.
Confirm that your current quotas for resources such as persistent disks and CPUs are sufficient for the SAP HANA systems you are about to install. If your quotas are insufficient, then your deployment fails.
For the SAP HANA quota requirements, see Pricing and quota considerations for SAP HANA.
Open the Cloud Shell or your local terminal.
Download the
sap_hana_ha.tfconfiguration file to your working directory by running the following command in Cloud Shell or your terminal:$wget https://storage.googleapis.com/cloudsapdeploy/terraform/latest/terraform/sap_hana_ha/terraform/sap_hana_ha.tfOpen the
sap_hana_ha.tffile in the Cloud Shell code editor or, if you are using your terminal, then open the file in a text editor of your choice.To open the Cloud Shell code editor, click the pencil icon in the upper right corner of the Cloud Shell terminal window.
In the
sap_hana_ha.tffile, update the argument values by replacing the contents inside the double quotation marks with the values for your installation. The arguments are described in the following table.Argument Data type Description sourceString Specifies the location and version of the Terraform module to use during deployment.
The
sap_hana_ha.tfconfiguration file includes two instances of thesourceargument: one that is active and one that is included as a comment. Thesourceargument that is active by default specifieslatestas the module version. The second instance of thesourceargument, which by default is deactivated by a leading#character, specifies a timestamp that identifies a module version.If you need all of your deployments to use the same module version, then remove the leading
#character from thesourceargument that specifies the version timestamp and add it to thesourceargument that specifieslatest.project_idString Specify the ID of your Google Cloud project in which you are deploying this system. For example, my-project-x.machine_typeString Specify the type of Compute Engine virtual machine (VM) on which you need to run your SAP system. If you need a custom VM type, then specify a predefined VM type with a number of vCPUs that is closest to the number you need while still being larger. After deployment is complete, modify the number of vCPUs and the amount of memory. For example,
n1-highmem-32.sole_tenant_deploymentBoolean Optional. If you want to provision a sole-tenant node for your SAP HANA deployment, then specify the value
true.The default value is
false.This argument is available in
sap_hana_haversion1.3.704310921or later.sole_tenant_name_prefixString Optional. If you're provisioning a sole-tenant node for your SAP HANA deployment, then you can use this argument to specify a prefix that Terraform sets for the names of the corresponding sole tenant template and sole tenant group.
The default value is
st-SID_LC.For information about sole tenant template and sole tenant group, see Sole tenancy overview.
This argument is available in
sap_hana_haversion1.3.704310921or later.sole_tenant_node_typeString Optional. If you want to provision a sole-tenant node for your SAP HANA deployment, then specify the node type that you want to set for the corresponding node template.
This argument is available in
sap_hana_haversion1.3.704310921or later.networkString Specify the name of the network in which you need to create the load balancer that manages the VIP. If you are using a shared VPC network, you must add the ID of the host project as a parent directory of the network name. For example,
HOST_PROJECT_ID/NETWORK_NAME.subnetworkString Specify the name of the subnetwork that you created in a previous step. If you are deploying to a shared VPC, then specify this value as SHARED_VPC_PROJECT_ID/SUBNETWORK. For example,myproject/network1.linux_imageString Specify the name of the Linux operating system image on which you want to deploy your SAP system. For example, sles-15-sp5-sap. For the list of available operating system images, see the Images page in the Google Cloud console.linux_image_projectString Specify the Google Cloud project that contains the image that you have specified for the argument linux_image. This project might be your own project or a Google Cloud image project. For a Compute Engine image, specifysuse-sap-cloud. To find the image project for your operating system, see Operating system details.primary_instance_nameString Specify a name of the VM instance for the primary SAP HANA system. The name can contain lowercase letters, numbers, or hyphens. primary_zoneString Specify a zone in which the primary SAP HANA system is deployed. The primary and secondary zones must be in the same region. For example, us-east1-c.secondary_instance_nameString Specify a name of the VM instance for the secondary SAP HANA system. The name can contain lowercase letters, numbers, or hyphens. secondary_zoneString Specify a zone in which the secondary SAP HANA system is deployed. The primary and secondary zones must be in the same region. For example, us-east1-b.majority_maker_instance_nameString Specify a name for the Compute Engine VM instance that serves as the majority maker.
This argument is available in
sap_hana_hamodule version202307270727or later.majority_maker_instance_typeString Specify the type of Compute Engine virtual machine (VM) that you want to use for the majority maker instance. For example, n1-highmem-32.If you want to use a custom VM type, then specify a predefined VM type with a number of vCPUs that is closest to the number you need while still being larger. After the deployment is complete, modify the number of vCPUs and the amount of memory.
This argument is available in
sap_hana_hamodule version202307270727or later.majority_maker_zoneString Specify a zone in which the majority maker VM instance is deployed. This zone must be in the same region as the primary and secondary zones. For example, us-east1-d.Google Cloud recommends that the majority maker VM instance is deployed in a different zone than the primary and secondary SAP HANA systems.
This argument is available in
sap_hana_hamodule version202307270727or later.sap_hana_deployment_bucketString To automatically install SAP HANA on the deployed VMs, specify the path of the Cloud Storage bucket that contains the SAP HANA installation files. Do not include gs://in the path; include only the bucket name and the names of any folders. For example,my-bucket-name/my-folder.The Cloud Storage bucket must exist in the Google Cloud project that you specify for the
project_idargument.sap_hana_scaleout_nodesInteger Specify the number of worker hosts that you need in your scale-out system. To deploy a scale-out system, you need at least one worker host. Terraform creates the worker hosts in addition to the primary SAP HANA instance. For example, if you specify
3, then four SAP HANA instances are deployed in your scale-out system in both the primary and secondary zones.primary_sap_hana_shared_nfsString Optional. To use an NFS solution to share the
/hana/sharedvolume with the worker hosts in the primary node of your scale-out HA deployment, specify the NFS solution's mount point. For example,10.151.90.120:/hana_shared_nfs.For more information, see File sharing solutions for multi-host scale-out deployments.
This argument is available in
sap_hana_hamodule version1.3.730053050or later.secondary_sap_hana_shared_nfsString Optional. To use an NFS solution to share the
/hana/sharedvolume with the worker hosts in the secondary node of your scale-out HA deployment, specify the NFS solution's mount point. For example,10.151.90.110:/hana_shared_nfs.For more information, see File sharing solutions for multi-host scale-out deployments.
This argument is available in
sap_hana_hamodule version1.3.730053050or later.primary_sap_hana_backup_nfsString Optional. To use an NFS solution to share the
/hanabackupvolume with the worker hosts in the primary node of your scale-out HA deployment, specify the NFS solution's mount point. For example,10.151.90.130:/hana_backup_nfs.For more information, see File sharing solutions for multi-host scale-out deployments.
This argument is available in
sap_hana_hamodule version1.3.730053050or later.secondary_sap_hana_backup_nfsString Optional. To use an NFS solution to share the
/hanabackupvolume with the worker hosts in the secondary node of your scale-out HA deployment, specify the NFS solution's mount point. For example,10.151.90.140:/hana_backup_nfs.For more information, see File sharing solutions for multi-host scale-out deployments.
This argument is available in
sap_hana_hamodule version1.3.730053050or later.sap_hana_sidString To automatically install SAP HANA on the deployed VMs, specify the SAP HANA system ID. The ID must consist of three alpha-numeric characters and begin with a letter. All letters must be in uppercase. For example, ED1.sap_hana_instance_numberInteger Optional. Specify the instance number, 0 to 99, of the SAP HANA system. The default is 0.sap_hana_sidadm_passwordString To automatically install SAP HANA on the deployed VMs, specify a temporary SIDadmpassword for the installation scripts to use during deployment. The password must contain at least 8 characters and include at least one uppercase letter, one lowercase letter, and a number.Instead of specifying password as plain text, we recommend that you use a secret. For more information, see Password management.
sap_hana_sidadm_password_secretString Optional. If you are using Secret Manager to store the SIDadmpassword, then specify the Name of the secret that corresponds to this password.In Secret Manager, make sure that the Secret value, which is the password, contains at least 8 characters and includes at least one uppercase letter, one lowercase letter, and a number.
For more information, see Password management.
sap_hana_system_passwordString To automatically install SAP HANA on the deployed VMs, specify a temporary database superuser password for the installation scripts to use during deployment. The password must contain at least 8 characters and include at least one uppercase letter, one lowercase letter, and a number. Instead of specifying password as plain text, we recommend that you use a secret. For more information, see Password management.
sap_hana_system_password_secretString Optional. If you are using Secret Manager to store the database superuser password, then specify the Name of the secret that corresponds to this password. In Secret Manager, make sure that the Secret value, which is the password, contains at least 8 characters and includes at least one uppercase letter, one lowercase letter, and a number.
For more information, see Password management.
sap_hana_double_volume_sizeBoolean Optional. To double the HANA volume size, specify true. This argument is useful when you want to deploy multiple SAP HANA instances or a disaster-recovery SAP HANA instance on the same VM. By default, the volume size is automatically calculated to be the minimum size required for the size of your VM, while still meeting the SAP certification and support requirements. The default value isfalse.configure_backintBoolean Optional. To use Backint based backup and recovery for your SAP HANA deployment, do the following:
- Specify the argument
configure_backintwith the valuetrue. - Specify the argument
backint_gcs_bucketwith the name of the Cloud Storage bucket where you want to store your database backups.
When you specify these arguments, Terraform enables the Backint feature in the instances of Google Cloud's Agent for SAP in your SAP HANA deployment. For information about Backint based backup and recovery, see Backup and recovery for SAP HANA by using Backint.
The default value of this argument is
false. This argument is available insap_hana_hamodule version1.5.807307812or later.backint_gcs_bucketString Optional. To use Backint based backup and recovery for your SAP HANA deployment, do the following:
- Specify the argument
backint_gcs_bucketwith the name of the Cloud Storage bucket where you want to store your database backups. Don't includegs://in the value; include only the bucket name and the names of any folders. For example,my-bucket/my-folder. - Specify the argument
configure_backintwith the valuetrue.
When you specify these arguments, Terraform enables the Backint feature in the instances of Google Cloud's Agent for SAP in your SAP HANA deployment. For information about Backint based backup and recovery, see Backup and recovery for SAP HANA by using Backint.
This argument is available in
sap_hana_hamodule version1.5.807307812or later.sap_hana_backup_sizeInteger Optional. Specify size of the /hanabackupvolume in GB. If you don't specify this argument or set it to0, then the installation script provisions Compute Engine instance with a HANA backup volume of two times the total memory.sap_hana_volume_encryptionString Optional. During the installation of SAP HANA, if you want to enable the data and log volume encryption, then specify this argument with the value
on.The default value of this argument depends on the version of SAP HANA you're installing:
- For SAP HANA 2.0 SPS 07 or later, the default value for this argument
is
on. - For SAP HANA 2.0 SPS 06 or earlier, the default value for this
argument is
off.
sap_hana_backup_encryptionString Optional. During the installation of SAP HANA, if you want to enable the backup encryption, then specify this argument with the value
on.The default value of this argument depends on the version of SAP HANA you're installing:
- For SAP HANA 2.0 SPS 07 or later, the default value for this argument
is
on. - For SAP HANA 2.0 SPS 06 or earlier, the default value for this
argument is
off.
sap_hana_sidadm_uidInteger Optional. Specify a value to override the default value of the SID_LCadm user ID. The default value is 900. You can change this to a different value for consistency within your SAP landscape.sap_hana_sapsys_gidInteger Optional. Overrides the default group ID for sapsys. The default value is79.sap_vipString Optional. Specify the IP address that you are going to use for your VIP. The IP address must be within the range of IP addresses that are assigned to your subnetwork. The Terraform configuration file reserves this IP address for you.
From version
1.3.730053050of thesap_hana_hamodule, thesap_vipargument is optional. If you don't specify it, then Terraform automatically assigns an available IP address from subnetwork that you specify for thesubnetworkargument.primary_instance_group_nameString Optional. Specify the name of the unmanaged instance group for the primary node. The default name is ig-PRIMARY_INSTANCE_NAME.secondary_instance_group_nameString Optional. Specify the name of the unmanaged instance group for the secondary node. The default name is ig-SECONDARY_INSTANCE_NAME.loadbalancer_nameString Optional. Specify the name of the internal passthrough Network Load Balancer. The default name is lb-SAP_HANA_SID-ilb.network_tagsString Optional. Specify one or more comma-separated network tags that you want to associate with your VM instances for firewall or routing purposes. If you specify
public_ip = falseand do not specify a network tag, then make sure to provide another means of access to the internet.nic_typeString Optional. Specify the network interface to use with the VM instance. You can specify the value GVNICorVIRTIO_NET. To use a Google Virtual NIC (gVNIC), you need to specify an OS image that supports gVNIC as the value for thelinux_imageargument. For the OS image list, see Operating system details.If you do not specify a value for this argument, then the network interface is automatically selected based on the machine type that you specify for the
This argument is available inmachine_typeargument.sap_hanamodule version202302060649or later.disk_typeString Optional. Specify the default type of Persistent Disk or Hyperdisk volume that you want to deploy for the SAP data and log volumes in your deployment. For information about the default disk deployment performed by the Terraform configurations provided by Google Cloud, see Disk deployment by Terraform. The following are valid values for this argument:
pd-ssd,pd-balanced,hyperdisk-extreme,hyperdisk-balanced, andpd-extreme. In SAP HANA scale-up deployments, a separate Balanced Persistent Disk is also deployed for the/hana/shareddirectory.You can override this default disk type and the associated default disk size and default IOPS using some advanced arguments. For more information, navigate to your working directory, then run the
terraform initcommand, and then see the/.terraform/modules/sap_hana_ha/variables.tffile. Before you use these arguments in production, make sure to test them in a non-production environment.If you want to use SAP HANA Native Storage Extension (NSE), then you need to provision larger disks by using the advanced arguments.
use_single_shared_data_log_diskBoolean Optional. The default value is false, which directs Terraform to deploy a separate persistent disk or Hyperdisk for each of the following SAP volumes:/hana/data,/hana/log,/hana/shared, and/usr/sap. To mount these SAP volumes on the same persistent disk or Hyperdisk, specifytrue.enable_data_stripingBoolean Optional. This argument lets you deploy the /hana/datavolume on two disks. The default value isfalse, which directs Terraform to deploy a single disk for hosting your/hana/datavolume.This argument is available in
sap_hana_hamodule version1.3.674800406or later.include_backup_diskBoolean Optional. The default value is true, which directs Terraform to deploy a separate disk to host the/hanabackupdirectory.The disk type is determined by the
backup_disk_typeargument. The size of this disk is determined by thesap_hana_backup_sizeargument.If you set the value for
include_backup_diskasfalse, then no disk is deployed for the/hanabackupdirectory.You can use only one backup option in your Terraform configuration - either disk based backup or Backint based backup. For more information, see Backup management.
enable_fast_restartBoolean Optional. This argument determines whether or not the SAP HANA Fast Restart option is enabled for your deployment. The default value is true. Google Cloud strongly recommends enabling the SAP HANA Fast Restart option.This argument is available in
sap_hana_hamodule version202309280828or later.public_ipBoolean Optional. Determines whether or not a public IP address is added to your VM instance. The default value is true.service_accountString Optional. Specify the email address of a user-managed service account to be used by the host VMs and by the programs that run on the host VMs. For example, svc-acct-name@project-id.iam.gserviceaccount.com.If you specify this argument without a value, or omit it, then the installation script uses the Compute Engine default service account. For more information, see Identity and access management for SAP programs on Google Cloud.
sap_deployment_debugBoolean Optional. Only when Cloud Customer Care asks you to enable debugging for your deployment, specify true, which makes the deployment generate verbose deployment logs. The default value isfalse.primary_reservation_nameString Optional. To use a specific Compute Engine VM reservation for provisioning the VM instance that hosts your HA cluster's primary SAP HANA instance, specify the name of the reservation. By default, the installation script selects any available Compute Engine reservation based on the following conditions. For a reservation to be usable, regardless of whether you specify a name or the installation script selects it automatically, the reservation must be set with the following:
-
The
specificReservationRequiredoption is set totrueor, in the Google Cloud console, the Select specific reservation option is selected. -
Some Compute Engine machine types support CPU platforms that are not
covered by the SAP certification of the machine type. If the target
reservation is for any of the following machine types, then the reservation
must specify the minimum CPU platforms as indicated:
n1-highmem-32: Intel Broadwelln1-highmem-64: Intel Broadwelln1-highmem-96: Intel Skylakem1-megamem-96: Intel Skylake
The minimum CPU platforms for all of the other machine types that are
certified by SAP for use on Google Cloud conform to the SAP minimum CPU
requirement.
secondary_reservation_nameString Optional. To use a specific Compute Engine VM reservation for provisioning the VM instance that hosts your HA cluster's secondary SAP HANA instance, specify the name of the reservation. By default, the installation script selects any available Compute Engine reservation based on the following conditions. For a reservation to be usable, regardless of whether you specify a name or the installation script selects it automatically, the reservation must be set with the following:
-
The
specificReservationRequiredoption is set totrueor, in the Google Cloud console, the Select specific reservation option is selected. -
Some Compute Engine machine types support CPU platforms that are not
covered by the SAP certification of the machine type. If the target
reservation is for any of the following machine types, then the reservation
must specify the minimum CPU platforms as indicated:
n1-highmem-32: Intel Broadwelln1-highmem-64: Intel Broadwelln1-highmem-96: Intel Skylakem1-megamem-96: Intel Skylake
The minimum CPU platforms for all of the other machine types that are
certified by SAP for use on Google Cloud conform to the SAP minimum CPU
requirement.
primary_static_ipString Optional. Specify a valid static IP address for the primary VM instance in your high-availability cluster. If you don't specify one, then an IP address is automatically generated for your VM instance. For example, 128.10.10.10.This argument is available in
sap_hana_hamodule version202306120959or later.secondary_static_ipString Optional. Specify a valid static IP address for the secondary VM instance in your high-availability cluster. If you don't specify one, then an IP address is automatically generated for your VM instance. For example, 128.11.11.11.This argument is available in
sap_hana_hamodule version202306120959or later.primary_worker_static_ipsList(String) Optional. Specify an array of valid static IP addresses for the worker instances in the primary instance of your SAP HANA scale-out HA system. If you don't specify a value for this argument, then an IP address is automatically generated for each worker VM instance. For example, [ "1.0.0.1", "2.3.3.4" ].The static IP addresses are assigned in the order of instance creation. For example, if you choose to deploy 3 worker instances but specify only 2 IP addresses for the argument
primary_worker_static_ips, then these IP addresses are assigned to the first two VM instances that the Terraform configuration deploys. For the third worker VM instance, the IP address is automatically generated.This argument is available in
sap_hana_hamodule version202307270727or later.secondary_worker_static_ipsList(String) Optional. Specify an array of valid static IP addresses for the worker instances in the secondary instance of your SAP HANA scale-out HA system. If you don't specify a value for this argument, then an IP address is automatically generated for each worker VM instance. For example, [ "1.0.0.2", "2.3.3.5" ].The static IP addresses are assigned in the order of instance creation. For example, if you choose to deploy 3 worker instances but specify only 2 IP addresses for the argument
secondary_worker_static_ips, then these IP addresses are assigned to the first two VM instances that the Terraform configuration deploys. For the third worker VM instance, the IP address is automatically generated.This argument is available in
sap_hana_hamodule version202307270727or later.can_ip_forwardBoolean Specify whether sending and receiving of packets with non-matching source or destination IPs is allowed, which enables a VM to act like a router. The default value is
true.If you only intend to use Google's internal load balancers to manage virtual IPs for the deployed VMs, then set the value to
false. An internal load balancer is automatically deployed as part of high availability templates.The following example shows a completed configuration file that defines a high-availability cluster for an SAP HANA scale-out system on SLES. The cluster uses an internal passthrough Network Load Balancer to manage the VIP.
Terraform deploys the Google Cloud resources that are defined in the configuration file and then scripts take over to configure the operating system, install SAP HANA, configure replication, and configure the Linux HA cluster.
For clarity, comments in the following example configuration are omitted.
# ... module "sap_hana_ha" { source = "https://storage.googleapis.com/cloudsapdeploy/terraform/latest/terraform/sap_hana_ha/sap_hana_ha_module.zip" # # By default, this source file uses the latest release of the terraform module # for SAP on Google Cloud. To fix your deployments to a specific release # of the module, comment out the source argument above and uncomment the source argument below. # # source = "https://storage.googleapis.com/cloudsapdeploy/terraform/YYYYMMDDHHMM/terraform/sap_hana_ha/sap_hana_ha_module.zip" # ... project_id = "example-project-123456" machine_type = "n2-highmem-32" network = "example-network" subnetwork = "example-subnet-us-central1" linux_image = "sles-15-sp4-sap" linux_image_project = "suse-sap-cloud" primary_instance_name = "example-ha-vm1" primary_zone = "us-central1-a" secondary_instance_name = "example-ha-vm2" secondary_zone = "us-central1-b" majority_maker_instance_name = "example-ha-mj" majority_maker_instance_type = "n2-highmem-32" majority_maker_zone = "us-central1-c" sap_hana_scaleout_nodes = 2 primary_sap_hana_shared_nfs = "10.74.146.58:/hana_shared_nfs" secondary_sap_hana_shared_nfs = "10.74.146.68:/hana_shared_nfs" primary_sap_hana_backup_nfs = "10.188.249.180:/hana_backup_nfs" secondary_sap_hana_backup_nfs = "10.188.249.190:/hana_backup_nfs" # ... sap_hana_deployment_bucket = "my-hana-bucket" sap_hana_sid = "HA1" sap_hana_instance_number = 00 sap_hana_sidadm_password_secret = "hana_sid_adm_pwd" sap_hana_system_password_secret = "hana_sys_pwd" # ... sap_vip = "10.0.0.100" primary_instance_group_name = "ig-example-ha-vm1" secondary_instance_group_name = "ig-example-ha-vm2" loadbalancer_name = "lb-ha1" # ... network_tags = \["hana-ha-ntwk-tag"\] service_account = "sap-deploy-example@example-project-123456.iam.gserviceaccount.com" primary_static_ip = "10.0.0.1" secondary_static_ip = "10.0.0.2" primary_worker_static_ips = \["10.0.0.3", "10.0.0.4"\] secondary_worker_static_ips = \["10.0.0.5", "10.0.0.6"\] enable_fast_restart = true # ... }- Specify the argument
Initialize your current working directory and download the Terraform provider plugin and module files for Google Cloud:
terraform init
The
terraform initcommand prepares your working directory for other Terraform commands.To force a refresh of the provider plugin and configuration files in your working directory, specify the
--upgradeflag. If the--upgradeflag is omitted and you don't make any changes in your working directory, Terraform uses the locally cached copies, even iflatestis specified in thesourceURL.terraform init --upgrade
Optionally, create the Terraform execution plan:
terraform plan
The
terraform plancommand shows the changes required by your current configuration. If you skip this step, theterraform applycommand automatically creates a new plan and prompts you to approve it.Apply the execution plan:
terraform apply
When you are prompted to approve the actions, enter
yes.The
terraform applycommand sets up the Google Cloud infrastructure and then hands control over to a script that configures the HA cluster and installs SAP HANA according to the arguments defined in the terraform configuration file.While Terraform has control, status messages are written to the Cloud Shell. After the scripts are invoked, status messages are written to Logging and are viewable in the Google Cloud console, as described in Check the logs.
Verify the deployment of your HANA HA system
Verifying an SAP HANA HA cluster involves several different procedures:
- Checking Logging
- Checking the configuration of the VM and the SAP HANA installation
- Checking the cluster configuration
- Checking the load balancer and the health of the instance groups
- Checking the SAP HANA system using SAP HANA Studio
- Performing a failover test
Check the logs
In the Google Cloud console, open Cloud Logging to monitor installation progress and check for errors.
Filter the logs:
Logs Explorer
In the Logs Explorer page, go to the Query pane.
From the Resource drop-down menu, select Global, and then click Add.
If you don't see the Global option, then in the query editor, enter the following query:
resource.type="global"
"Deployment"
Click Run query.
Legacy Logs Viewer
- In the Legacy Logs Viewer page, from the basic selector menu, select Global as your logging resource.
Analyze the filtered logs:
- If
"--- Finished"is displayed, then the deployment processing is complete and you can proceed to the next step. If you see a quota error:
On the IAM & Admin Quotas page, increase any of your quotas that do not meet the SAP HANA requirements that are listed in the SAP HANA planning guide.
Open Cloud Shell.
Go to your working directory and delete the deployment to clean up the VMs and persistent disks from the failed installation:
terraform destroy
When you are prompted to approve the action, enter
yes.Rerun your deployment.
- If
Check the configuration of the VM and the SAP HANA installation
After the SAP HANA system deploys without errors, connect to each VM by using SSH. From the Compute Engine VM instances page, you can click the SSH button for each VM instance, or you can use your preferred SSH method.

Switch to the root user:
sudo su -
At the command prompt, enter:
df -h
The output is similar to the following example. Make sure that your output includes the
/hanadirectories, such as/hana/data.example-ha-vm1:~ # df -h Filesystem Size Used Avail Use% Mounted on devtmpfs 4.0M 8.0K 4.0M 1% /dev tmpfs 189G 48M 189G 1% /dev/shm tmpfs 51G 26M 51G 1% /run tmpfs 4.0M 0 4.0M 0% /sys/fs/cgroup /dev/sda3 30G 6.2G 24G 21% / /dev/sda2 20M 3.0M 17M 15% /boot/efi /dev/mapper/vg_hana_shared-shared 256G 41G 215G 16% /hana/shared /dev/mapper/vg_hana_data-data 308G 12G 297G 4% /hana/data /dev/mapper/vg_hana_log-log 128G 8.8G 120G 7% /hana/log /dev/mapper/vg_hana_usrsap-usrsap 32G 265M 32G 1% /usr/sap /dev/mapper/vg_hanabackup-backup 512G 8.5G 504G 2% /hanabackup tmpfs 26G 0 26G 0% /run/user/174 tmpfs 26G 0 26G 0% /run/user/900 tmpfs 26G 0 26G 0% /run/user/0 tmpfs 26G 0 26G 0% /run/user/1000
Check the status of the new cluster by entering the status command that is specific to your operating system:
crm statusThe output similar to the following the example, in which the VM instances in the primary and secondary SAP HANA systems, and the majority maker instance are started.
example-ha-vm1is the active primary instance.SLES for SAP 15 SP5 or earlier
example-ha-vm1:~ # crm status
Cluster Summary:
* Stack: corosync
* Current DC: example-ha-vm1 (version 2.1.2+20211124.ada5c3b36-150400.4.9.2-2.1.2+20211124.ada5c3b36) - partition with quorum
* Last updated: Sat Jul 15 19:42:56 2023
* Last change:  Sat Jul 15 19:42:21 2023 by root via crm_attribute on example-ha-vm1
* 7 nodes configured
* 23 resource instances configured

Node List:
* Online: [ example-ha-mj example-ha-vm1 example-ha-vm1w1 example-ha-vm1w2 example-ha-vm2 example-ha-vm2w1 example-ha-vm2w2 ]

Full List of Resources:
* STONITH-example-ha-vm1      (stonith:fence_gce):   Started example-ha-mj
* STONITH-example-ha-vm2      (stonith:fence_gce):   Started example-ha-vm1
* STONITH-example-ha-mj       (stonith:fence_gce):   Started example-ha-vm1w1
* STONITH-example-ha-vm1w1    (stonith:fence_gce):   Started example-ha-vm1w2
* STONITH-example-ha-vm2w1    (stonith:fence_gce):   Started example-ha-vm2
* STONITH-example-ha-vm1w2    (stonith:fence_gce):   Started example-ha-vm2w1
* STONITH-example-ha-vm2w2    (stonith:fence_gce):   Started example-ha-mj
* Resource Group: g-primary:
  * rsc_vip_int-primary       (ocf::heartbeat:IPaddr2):        Started example-ha-vm1
  * rsc_vip_hc-primary        (ocf::heartbeat:anything):       Started example-ha-vm1
* Clone Set: cln_SAPHanaTopology_HA1_HDB00 [rsc_SAPHanaTopology_HA1_HDB00]:
  * Started: [ example-ha-vm1 example-ha-vm1w1 example-ha-vm1w2 example-ha-vm2 example-ha-vm2w1 example-ha-vm2w2 ]
  * Stopped: [ example-ha-mj ]
* Clone Set: msl_SAPHana_HA1_HDB00 [rsc_SAPHana_HA1_HDB00] (promotable):
  * Masters: [ example-ha-vm1 ]
  * Slaves: [ example-ha-vm1w1 example-ha-vm1w2 example-ha-vm2 example-ha-vm2w1 example-ha-vm2w2 ]
  * Stopped: [ example-ha-mj ]
SLES for SAP 15 SP6 or later
example-ha-vm1:~ # crm status
Cluster Summary:
* Stack: corosync
* Current DC: example-ha-vm1 (version 2.1.2+20211124.ada5c3b36-150400.4.9.2-2.1.2+20211124.ada5c3b36) - partition with quorum
* Last updated: Mon Oct  7 22:57:59 2024
* Last change:  Mon Oct  7 22:57:03 2024 by root via crm_attribute on example-ha-vm1
* 7 nodes configured
* 30 resources configured

Node list:
* Online: [ example-ha-vm1 example-ha-vm1w1 example-ha-vm1w2 example-ha-vm2 example-ha-vm2w1 example-ha-vmw2 example-ha-mj ]

Full list of resources:
* STONITH-example-ha-vm1   (stonith:fence_gce):  Started example-ha-vm1w2
* STONITH-example-ha-vm1w1 (stonith:fence_gce):  Started example-ha-vm1
* STONITH-example-ha-vm1w2 (stonith:fence_gce):  Started example-ha-vm2
* STONITH-example-ha-mj      (stonith:fence_gce):  Started example-ha-vm1w2
* STONITH-example-ha-vm2   (stonith:fence_gce):  Started example-ha-vm2w1
* STONITH-example-ha-vm2w1 (stonith:fence_gce):  Started example-ha-vm2w2
* STONITH-example-ha-vm2w2 (stonith:fence_gce):  Started example-ha-mj
* Clone Set: cln_SAPHanaTopology_HA1_HDB22 [rsc_SAPHanaTopology_HA1_HDB22]
 * Started: [ example-ha-vm1 example-ha-vm1w1 example-ha-vm1w2 example-ha-vm2 example-ha-vm2w1 example-ha-vm2w2 ]
 * Stopped: [ example-ha-mj ]
* Resource Group: g-primary
 * rsc_vip_int-primary        (ocf::heartbeat:IPaddr2):       Started example-ha-vm1
 * rsc_healthcheck-primary    (ocf::heartbeat:anything):      Started example-ha-vm1
* Clone Set: mst_SAPHana_HA1_HDB22 [rsc_SAPHana_HA1_HDB22] (promotable)
 * Masters: [ example-ha-vm1 ]
 * Slaves: [ example-ha-vm1w1 example-ha-vm1w2 example-ha-vm2 example-ha-vm2w1 example-ha-vm2w2 ]
 * Stopped: [ example-ha-mj ]
* Clone Set: cln_SAPHanaFileSystem_HA1_HDB22 [rsc_SAPHanaFileSystem_HA1_HDB22]
 * Started: [ example-ha-vm1 example-ha-vm1w1 example-ha-vm1w2 example-ha-vm2 example-ha-vm-2w1 example-ha-vm-2w2 ]
 * Stopped: [ example-ha-mj ]
Switch to the SAP admin user by replacing SID_LC in the following command with the
sap_hana_sidvalue that you specified in yoursap_hana_ha.tffile. The SID_LC value must be in lowercase.su - SID_LCadmEnsure that the SAP HANA services, such as
hdbnameserver,hdbindexserver, and others, are running on the instance by entering the following command:HDB info
Check your cluster configuration
After your cluster is successfully deployed, you must check the parameter settings of your cluster. Check both the settings that are displayed by your cluster software and the parameter settings in the cluster configuration file. Compare your settings to the settings in the following example, which has been created by the automation scripts that are used in this guide.
Display your cluster resource configurations:
crm config show
The automation scripts that are used by this guide create the resource configurations that are shown in the following example:
SLES for SAP 15 SP5 or earlier
 node 1: example-ha-vm1 \
   attributes hana_ha1_site=example-ha-vm1 hana_ha1_gra=2.0
 node 2: example-ha-vm2 \
   attributes hana_ha1_site=example-ha-vm2 hana_ha1_gra=2.0
 node 3: example-ha-mj
 node 4: example-ha-vm1w1 \
   attributes hana_ha1_site=example-ha-vm1 hana_ha1_gra=2.0
 node 5: example-ha-vm2w1 \
   attributes hana_ha1_site=example-ha-vm2 hana_ha1_gra=2.0
 node 6: example-ha-vm1w2 \
   attributes hana_ha1_site=example-ha-vm1 hana_ha1_gra=2.0
 node 7: example-ha-vm2w2 \
   attributes hana_ha1_site=example-ha-vm2 hana_ha1_gra=2.0
 primitive STONITH-example-ha-mj stonith:fence_gce \
   params port=example-ha-mj zone="us-central1-c" project="example-project-123456" pcmk_reboot_timeout=300 pcmk_monitor_retries=4 pcmk_delay_max=30 \
   op monitor interval=300s timeout=120s \
   op start interval=0 timeout=60s \
   op stop timeout=15 interval=0s
 primitive STONITH-example-ha-vm1 stonith:fence_gce \
   params port=example-ha-vm1 zone="us-central1-a" project="example-project-123456" pcmk_reboot_timeout=300 pcmk_monitor_retries=4 pcmk_delay_max=30 \
   op monitor interval=300s timeout=120s \
   op start interval=0 timeout=60s \
   op stop timeout=15 interval=0s
 primitive STONITH-example-ha-vm1w1 stonith:fence_gce \
   params port=example-ha-vm1w1 zone="us-central1-a" project="example-project-123456" pcmk_reboot_timeout=300 pcmk_monitor_retries=4 pcmk_delay_max=30 \
   op monitor interval=300s timeout=120s \
   op start interval=0 timeout=60s \
   op stop timeout=15 interval=0s
 primitive STONITH-example-ha-vm1w2 stonith:fence_gce \
   params port=example-ha-vm1w2 zone="us-central1-a" project="example-project-123456" pcmk_reboot_timeout=300 pcmk_monitor_retries=4 pcmk_delay_max=30 \
   op monitor interval=300s timeout=120s \
   op start interval=0 timeout=60s \
   op stop timeout=15 interval=0s
 primitive STONITH-example-ha-vm2 stonith:fence_gce \
   params port=example-ha-vm2 zone="us-central1-b" project="example-project-123456" pcmk_reboot_timeout=300 pcmk_monitor_retries=4 \
   op monitor interval=300s timeout=120s \
   op start interval=0 timeout=60s \
   op stop timeout=15 interval=0s
 primitive STONITH-example-ha-vm2w1 stonith:fence_gce \
   params port=example-ha-vm2w1 zone="us-central1-b" project="example-project-123456" pcmk_reboot_timeout=300 pcmk_monitor_retries=4 \
   op monitor interval=300s timeout=120s \
   op start interval=0 timeout=60s \
   op stop timeout=15 interval=0s
 primitive STONITH-example-ha-vm2w2 stonith:fence_gce \
   params port=example-ha-vm2w2 zone="us-central1-b" project="example-project-123456" pcmk_reboot_timeout=300 pcmk_monitor_retries=4 \
   op monitor interval=300s timeout=120s \
   op start interval=0 timeout=60s \
   op stop timeout=15 interval=0s
 primitive rsc_SAPHanaTopology_HA1_HDB00 ocf:suse:SAPHanaTopology \
   operations $id=rsc_sap2_HA1_HDB00-operations \
   op monitor interval=10 timeout=600 \
   op start interval=0 timeout=600 \
   op stop interval=0 timeout=300 \
   params SID=HA1 InstanceNumber=00
 primitive rsc_SAPHana_HA1_HDB00 ocf:suse:SAPHanaController \
   op start interval=0 timeout=3600 \
   op stop interval=0 timeout=3600 \
   op promote interval=0 timeout=3600 \
   op demote interval=0 timeout=3600 \
   op monitor interval=60 role=Master timeout=700 \
   op monitor interval=61 role=Slave timeout=700 \
   params SID=HA1 InstanceNumber=00 PREFER_SITE_TAKEOVER=true DUPLICATE_PRIMARY_TIMEOUT=7200 AUTOMATED_REGISTER=true
 primitive rsc_vip_hc-primary anything \
   params binfile="/usr/bin/socat" cmdline_options="-U TCP-LISTEN:60000,backlog=10,fork,reuseaddr /dev/null" \
   op monitor timeout=20s interval=10s \
   op_params depth=0 \
   op start timeout=20s interval=0s \
   op stop timeout=20s interval=0s
 primitive rsc_vip_int-primary IPaddr2 \
   params ip=10.1.0.23 cidr_netmask=32 nic=eth0 \
   op monitor interval=3600s timeout=60s \
   op start timeout=20s interval=0s \
   op stop timeout=20s interval=0s
 group g-primary rsc_vip_int-primary rsc_vip_hc-primary \
   meta resource-stickiness=0
 ms msl_SAPHana_HA1_HDB00 rsc_SAPHana_HA1_HDB00 \
   meta clone-node-max=1 master-max=1 interleave=true target-role=Started interleave=true
 clone cln_SAPHanaTopology_HA1_HDB00 rsc_SAPHanaTopology_HA1_HDB00 \
   meta clone-node-max=1 target-role=Started interleave=true
 location LOC_STONITH_example-ha-vm1 STONITH-example-ha-vm1 -inf: example-ha-vm1
 location LOC_STONITH_example-ha-vm1w1 STONITH-example-ha-vm1w1 -inf: example-ha-vm1w1
 location LOC_STONITH_example-ha-vm1w2 STONITH-example-ha-vm1w2 -inf: example-ha-vm1w2
 location LOC_STONITH_example-ha-vm2 STONITH-example-ha-vm2 -inf: example-ha-vm2
 location LOC_STONITH_example-ha-vm2w1 STONITH-example-ha-vm2w1 -inf: example-ha-vm2w1
 location LOC_STONITH_example-ha-vm2w2 STONITH-example-ha-vm2w2 -inf: example-ha-vm2w2
 location SAPHanaCon_not_on_mm msl_SAPHana_HA1_HDB00 -inf: example-ha-mj
 location SAPHanaTop_not_on_mm cln_SAPHanaTopology_HA1_HDB00 -inf: example-ha-mj
 colocation col_saphana_ip_HA1_HDB00 4000: g-primary:Started msl_SAPHana_HA1_HDB00:Master
 order ord_SAPHana_HA1_HDB00 Optional: cln_SAPHanaTopology_HA1_HDB00 msl_SAPHana_HA1_HDB00
 property SAPHanaSR: \
   hana_ha1_glob_mts=true \
   hana_ha1_site_srHook_example-ha-vm2=SOK \
   hana_ha1_site_lss_example-ha-vm1=4 \
   hana_ha1_site_srr_example-ha-vm1=P \
   hana_ha1_site_lss_example-ha-vm2=4 \
   hana_ha1_site_srr_example-ha-vm2=S \
   hana_ha1_glob_srmode=syncmem \
   hana_ha1_glob_upd=ok \
   hana_ha1_site_mns_example-ha-vm1=example-ha-vm1 \
   hana_ha1_site_mns_example-ha-vm2=example-ha-vm2 \
   hana_ha1_site_lpt_example-ha-vm2=30 \
   hana_ha1_site_srHook_example-ha-vm1=PRIM \
   hana_ha1_site_lpt_example-ha-vm1=1689450463 \
   hana_ha1_glob_sync_state=SOK \
   hana_ha1_glob_prim=example-ha-vm1
 property cib-bootstrap-options: \
   have-watchdog=false \
   dc-version="2.1.2+20211124.ada5c3b36-150400.4.9.2-2.1.2+20211124.ada5c3b36" \
   cluster-infrastructure=corosync \
   cluster-name=hacluster \
   maintenance-mode=false \
   stonith-timeout=300s \
   stonith-enabled=true \
   concurrent-fencing=true
 rsc_defaults build-resource-defaults: \
   resource-stickiness=1000 \
   migration-threshold=5000
 op_defaults op-options: \
   timeout=600
SLES for SAP 15 SP6 or later
 node 1: example-ha-vm1 \
   attributes hana_abc_vhost=example-ha-vm1 hana_abc_site=example-ha-vm1
 node 2: example-ha-vm2 \
   attributes hana_abc_vhost=example-ha-vm2 hana_abc_site=example-ha-vm2
 node 3: example-ha-mj \
   attributes hana_abc_vhost=example-ha-mj
 node 4: example-ha-vm1w1 \
   attributes hana_abc_vhost=example-ha-vm1w1 hana_abc_site=example-ha-vm1
 node 5: example-ha-vm2w1 \
   attributes hana_abc_vhost=example-ha-vm2w1 hana_abc_site=example-ha-vm2
 primitive STONITH-example-ha-mj stonith:fence_gce \
   op monitor interval=300s timeout=120s \
   op start interval=0s timeout=60s \
   params port=example-ha-mj zone=us-central1-b project=example-project-123456 pcmk_reboot_timeout=300 pcmk_monitor_retries=4 pcmk_delay_max=30
 primitive STONITH-example-ha-vm1 stonith:fence_gce \
   op monitor interval=300s timeout=120s \
   op start interval=0s timeout=60s \
   params port=example-ha-vm1 zone=us-central1-a project=example-project-123456 pcmk_reboot_timeout=300 pcmk_monitor_retries=4 pcmk_delay_max=30
 primitive STONITH-example-ha-vm1w1 stonith:fence_gce \
   op monitor interval=300s timeout=120s \
   op start interval=0s timeout=60s \
   params port=example-ha-vm1w1 zone=us-central1-a project=example-project-123456 pcmk_reboot_timeout=300 pcmk_monitor_retries=4 pcmk_delay_max=30
 primitive STONITH-example-ha-vm2 stonith:fence_gce \
   op monitor interval=300s timeout=120s \
   op start interval=0s timeout=60s \
   params port=example-ha-vm2 zone=us-central1-c project=example-project-123456 pcmk_reboot_timeout=300 pcmk_monitor_retries=4
 primitive STONITH-example-ha-vm2w1 stonith:fence_gce \
   op monitor interval=300s timeout=120s \
   op start interval=0s timeout=60s \
   params port=example-ha-vm2w1 zone=us-central1-c project=example-project-123456 pcmk_reboot_timeout=300 pcmk_monitor_retries=4
 primitive rsc_SAPHanaFileSystem_ABC_HDB00 ocf:suse:SAPHanaFilesystem \
   operations $id=rsc_sap3_ABC_HDB00-operations \
   op monitor interval=10 timeout=120 \
   op start interval=0 timeout=10 \
   op stop interval=0 timeout=20 \
   params SID=ABC InstanceNumber=00
 primitive rsc_SAPHanaTopology_ABC_HDB00 ocf:suse:SAPHanaTopology \
   operations $id=rsc_sap2_ABC_HDB00-operations \
   op monitor interval=10 timeout=600 \
   op start interval=0 timeout=600 \
   op stop interval=0 timeout=300 \
   params SID=ABC InstanceNumber=00
 primitive rsc_SAPHana_ABC_HDB00 ocf:suse:SAPHanaController \
   operations $id=rsc_sap_ABC_HDB00-operations \
   op start interval=0 timeout=3600 \
   op stop interval=0 timeout=3600 \
   op promote interval=0 timeout=3600 \
   op demote interval=0 timeout=3600 \
   op monitor interval=60 role=Promoted timeout=700 \
   op monitor interval=61 role=Unpromoted timeout=700 \
   params SID=ABC InstanceNumber=00 PREFER_SITE_TAKEOVER=true DUPLICATE_PRIMARY_TIMEOUT=7200 AUTOMATED_REGISTER=true
 primitive rsc_vip_hc-primary anything \
   params binfile="/usr/bin/socat" cmdline_options="-U TCP-LISTEN:60000,backlog=10,fork,reuseaddr /dev/null" \
   op monitor timeout=20s interval=10s \
   op_params depth=0
 primitive rsc_vip_int-primary IPaddr2 \
   params ip=10.128.2.92 cidr_netmask=32 nic=eth0 \
   op monitor interval=3600s timeout=60s
 group g-primary rsc_vip_int-primary rsc_vip_hc-primary \
   meta resource-stickiness=0
 clone cln_SAPHanaFileSystem_ABC_HDB00 rsc_SAPHanaFileSystem_ABC_HDB00 \
   meta clone-node-max=1 interleave=true
 clone cln_SAPHanaTopology_ABC_HDB00 rsc_SAPHanaTopology_ABC_HDB00 \
   meta clone-node-max=1 target-role=Started interleave=true
 clone mst_SAPHana_ABC_HDB00 rsc_SAPHana_ABC_HDB00 \
   meta clone-node-max=1 promotable=true interleave=true
 location LOC_STONITH_example-ha-mj STONITH-example-ha-mj -inf: example-ha-mj
 location LOC_STONITH_example-ha-vm1 STONITH-example-ha-vm1 -inf: example-ha-vm1
 location LOC_STONITH_example-ha-vm1w1 STONITH-example-ha-vm1w1 -inf: example-ha-vm1w1
 location LOC_STONITH_example-ha-vm2 STONITH-example-ha-vm2 -inf: example-ha-vm2
 location LOC_STONITH_example-ha-vm2w1 STONITH-example-ha-vm2w1 -inf: example-ha-vm2w1
 location SAPHanaCon_not_on_mm mst_SAPHana_ABC_HDB00 -inf: example-ha-mj
 location SAPHanaFS_not_on_mm cln_SAPHanaFileSystem_ABC_HDB00 -inf: example-ha-mj
 location SAPHanaTop_not_on_mm cln_SAPHanaTopology_ABC_HDB00 -inf: example-ha-mj
 colocation col_saphana_ip_ABC_HDB00 4000: g-primary:Started mst_SAPHana_ABC_HDB00:Promoted
 order ord_SAPHana_ABC_HDB00 Optional: cln_SAPHanaTopology_ABC_HDB00 mst_SAPHana_ABC_HDB00
 property SAPHanaSR: \
   hana_abc_site_srHook_example-ha-vm2=SOK \
   hana_abc_site_mns_example-ha-vm1=example-ha-vm1 \
   hana_abc_site_mns_example-ha-vm2=example-ha-vm2 \
   hana_abc_site_lpt_example-ha-vm2=30 \
   hana_abc_glob_sec=example-ha-vm2 \
   hana_abc_site_opMode_example-ha-vm2=logreplay \
   hana_abc_site_srHook_example-ha-vm1=PRIM \
   hana_abc_site_lpt_example-ha-vm1=1744257398 \
   hana_abc_glob_topology=ScaleOut \
   hana_abc_site_lss_example-ha-vm1=4 \
   hana_abc_site_srr_example-ha-vm1=P \
   hana_abc_site_lss_example-ha-vm2=4 \
   hana_abc_site_srr_example-ha-vm2=S \
   hana_abc_site_srMode_example-ha-vm2=syncmem \
   hana_abc_site_srMode_=syncmem \
   hana_abc_glob_prim=example-ha-vm1 \
   hana_abc_site_srPoll_example-ha-vm1=PRIM \
   hana_abc_site_srPoll_example-ha-vm2=SOK \
   hana_abc_site_srMode_example-ha-vm1=syncmem \
   hana_abc_site_opMode_example-ha-vm1=logreplay
 property cib-bootstrap-options: \
   have-watchdog=false \
   dc-version="2.1.7+20231219.0f7f88312-150600.6.6.1-2.1.7+20231219.0f7f88312" \
     cluster-infrastructure=corosync \
     cluster-name=hacluster \
     maintenance-mode=false \
     stonith-timeout=300s \
     stonith-enabled=true \
     concurrent-fencing=true
 rsc_defaults build-resource-defaults: \
   resource-stickiness=1000 \
   migration-threshold=5000
 op_defaults op-options: \
   timeout=600
Display your cluster configuration file,
corosync.conf:cat /etc/corosync/corosync.conf
The automation scripts that are used by this guide specify parameters settings in the
corosync.conffile, as shown in the following example:totem { version: 2 secauth: off crypto_hash: sha1 crypto_cipher: aes256 cluster_name: hacluster clear_node_high_bit: yes token: 20000 token_retransmits_before_loss_const: 10 join: 60 max_messages: 20 transport: udpu interface { ringnumber: 0 bindnetaddr: "10.1.0.7" mcastport: 5405 ttl: 1 } } logging { fileline: off to_stderr: no to_logfile: no logfile: /var/log/cluster/corosync.log to_syslog: yes debug: off timestamp: on logger_subsys { subsys: QUORUM debug: off } } quorum { provider: corosync_votequorum } nodelist { node { ring0_addr: example-ha-vm1 nodeid: 1 } node { ring0_addr: example-ha-vm2 nodeid: 2 } node { ring0_addr: example-ha-mj nodeid: 3 } node { ring0_addr: example-ha-vm1w1 nodeid: 4 } node { ring0_addr: example-ha-vm2w1 nodeid: 5 } node { ring0_addr: example-ha-vm1w2 nodeid: 6 } node { ring0_addr: example-ha-vm2w2 nodeid: 7 } }
Check the load balancer and the health of the instance groups
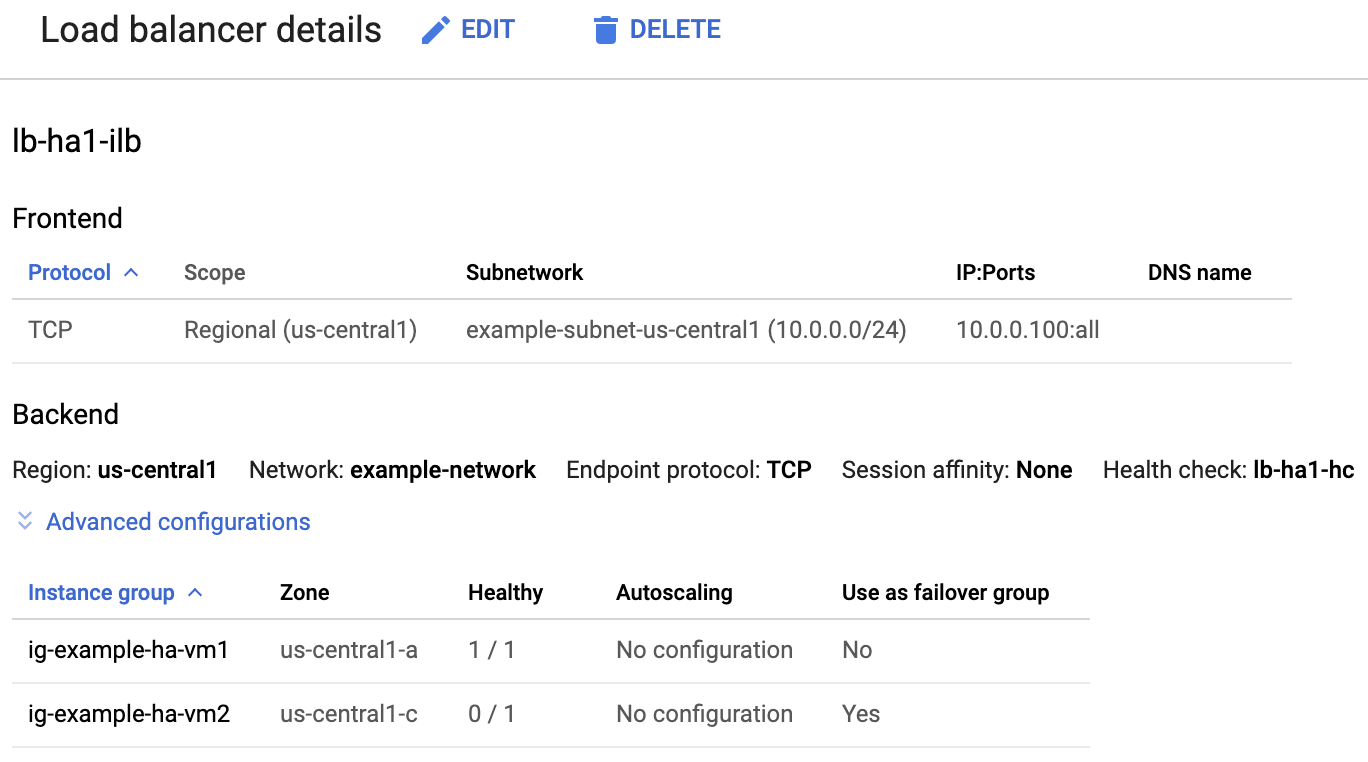
To confirm that the load balancer and health check were set up correctly, check the load balancer and instance groups in the Google Cloud console:
In the Google Cloud console, open the Load balancing page.
In the list of load balancers, confirm that a load balancer was created for your HA cluster.
On the Load balancer details page, under the Backend section, in the Healthy column, confirm that one of the instance groups shows 1 of 1 and the other shows 0 of 1. After a failover, the healthy indicator, 1 of 1, switches to the new active instance group.
Check the SAP HANA system using SAP HANA Studio
You can use either SAP HANA Cockpit or SAP HANA Studio to monitor and manage your SAP HANA systems in a high-availability cluster.
Connect to the HANA system by using SAP HANA Studio. When defining the connection, specify the following values:
- On the Specify System panel, specify the floating IP address as the Host Name.
- On the Connection Properties panel, for database user authentication,
specify the database superuser name and the password that you specified
for the
sap_hana_system_passwordargument in thesap_hana_ha.tffile.
For information from SAP about installing SAP HANA Studio, see SAP HANA Studio Installation and Update Guide.
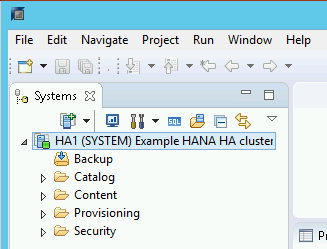
After SAP HANA Studio is connected to your HANA HA system, display the system overview by double-clicking the system name in the navigation pane on the left side of the window.
Under General Information on the Overview tab, confirm the following:
- The Operational Status shows
All services started. - The System Replication Status shows
All services are active and in sync.
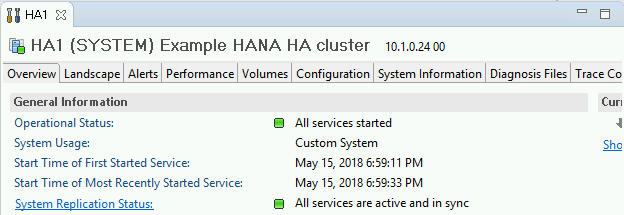
- The Operational Status shows
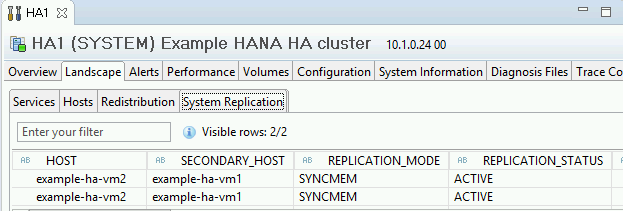
Confirm the replication mode by clicking the System Replication Status link under General Information. Synchronous replication is indicated by
SYNCMEMin the REPLICATION_MODE column on the System Replication tab.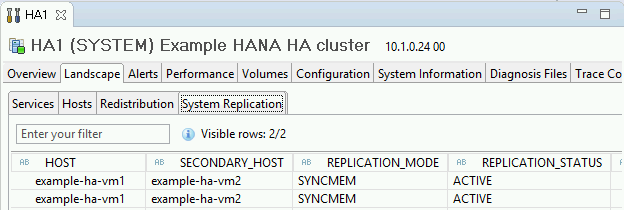
Clean up and retry deployment
If any of the deployment verification steps in the preceding sections show that the installation wasn't successful, then you must undo your deployment and retry it by completing the following steps:
Resolve any errors to ensure that your deployment doesn't fail again for the same reason. For information about checking the logs, or resolving quota related errors, see Check the logs.
Open Cloud Shell or, if you installed the Google Cloud CLI on your local workstation, then open a terminal.
Go to the directory that contains the Terraform configuration file that you used for this deployment.
Delete all resources that are part of your deployment by running the following command:
terraform destroy
When you are prompted to approve the action, enter
yes.Retry your deployment as instructed earlier in this guide.
Perform a failover test
After you verify that the SAP HANA system is deployed successfully, you must test the failover function.
The following instructions use the ip link set eth0 down command to take the
network interface offline. This command validates both failover as well as
fencing.
To perform a failover test, complete the following steps:
In your primary SAP HANA instance, connect to the master node by using SSH. You can connect from the Compute Engine VM instances page by clicking the SSH button for each VM instance, or you can use your preferred SSH method.
At the command prompt, enter the following command:
ip link set eth0 down
The
ip link set eth0 downcommand triggers a failover by severing communications with the primary SAP HANA instance.Connect to any other node in your cluster using SSH and switch to the root user.
Confirm that your primary SAP HANA instance is now active on the VM that used to contain the secondary instance, by running the following command.
crm statusBecause automatic restart is enabled in the cluster, the stopped instance restarts and assumes the role of the secondary instance. The following example shows that the roles on each SAP HANA instance have switched:
SLES for SAP 15 SP5 or earlier
example-ha-vm2:~ # crm status
Cluster Summary:
 * Stack: corosync
 * Current DC: example-ha-vm2 (version 2.1.2+20211124.ada5c3b36-150400.4.9.2-2.1.2+20211124.ada5c3b36) - partition with quorum
 * Last updated: Mon Jul 17 19:47:11 2023
 * Last change:  Mon Jul 17 19:46:56 2023 by root via crm_attribute on example-ha-vm2
 * 7 nodes configured
 * 23 resource instances configured

Node List:
 * Online: [ example-ha-mj example-ha-vm1 example-ha-vm1w1 example-ha-vm1w2 example-ha-vm2 example-ha-vm2w1 example-ha-vm2w2 ]

Full List of Resources:
 * STONITH-example-ha-vm1      (stonith:fence_gce):   Started example-ha-mj
 * STONITH-example-ha-vm2      (stonith:fence_gce):   Started example-ha-vm1w1
 * STONITH-example-ha-mj       (stonith:fence_gce):   Started example-ha-vm1w1
 * STONITH-example-ha-vm1w1    (stonith:fence_gce):   Started example-ha-vm1w2
 * STONITH-example-ha-vm2w1    (stonith:fence_gce):   Started example-ha-vm2
 * STONITH-example-ha-vm1w2    (stonith:fence_gce):   Started example-ha-vm2w1
 * STONITH-example-ha-vm2w2    (stonith:fence_gce):   Started example-ha-mj
 * Resource Group: g-primary:
   * rsc_vip_int-primary       (ocf::heartbeat:IPaddr2):        Started example-ha-vm2
   * rsc_vip_hc-primary        (ocf::heartbeat:anything):       Started example-ha-vm2
 * Clone Set: cln_SAPHanaTopology_HA1_HDB00 [rsc_SAPHanaTopology_HA1_HDB00]:
   * Started: [ example-ha-vm1 example-ha-vm1w1 example-ha-vm1w2 example-ha-vm2 example-ha-vm2w1 example-ha-vm2w2 ]
   * Stopped: [ example-ha-mj ]
 * Clone Set: msl_SAPHana_HA1_HDB00 [rsc_SAPHana_HA1_HDB00] (promotable):
   * Masters: [ example-ha-vm2 ]
   * Slaves: [ example-ha-vm1 example-ha-vm1w1 example-ha-vm1w2 example-ha-vm2w1 example-ha-vm2w2 ]
   * Stopped: [ example-ha-mj ]
SLES for SAP 15 SP6 or later
example-ha-vm2:~ # crm status
Cluster Summary:
 * Stack: corosync
 * Current DC: example-ha-vm2 (version 2.1.2+20211124.ada5c3b36-150400.4.9.2-2.1.2+20211124.ada5c3b36) - partition with quorum
 * Last updated: Mon Oct 7 23:10:11 2024
 * Last change:  Mon Oct 7 23:10:46 2024 by root via crm_attribute on example-ha-vm2
 * 7 nodes configured
 * 30 resource instances configured

Node list:
 * Online: [ example-ha-vm1 example-ha-vm1w1 example-ha-vm1w2 example-ha-vm2 example-ha-vm2w1 example-ha-vm2w2 example-ha-mj ]

Full list of resources:
 * STONITH-example-ha-vm1      (stonith:fence_gce):   Started example-ha-mj
 * STONITH-example-ha-vm2      (stonith:fence_gce):   Started example-ha-vm1w1
 * STONITH-example-ha-mj       (stonith:fence_gce):   Started example-ha-vm1w1
 * STONITH-example-ha-vm1w1    (stonith:fence_gce):   Started example-ha-vm1w2
 * STONITH-example-ha-vm2w1    (stonith:fence_gce):   Started example-ha-vm2
 * STONITH-example-ha-vm1w2    (stonith:fence_gce):   Started example-ha-vm2w1
 * STONITH-example-ha-vm2w2    (stonith:fence_gce):   Started example-ha-mj
 * Resource Group: g-primary:
   * rsc_vip_int-primary       (ocf::heartbeat:IPaddr2):        Started example-ha-vm2
   * rsc_vip_hc-primary        (ocf::heartbeat:anything):       Started example-ha-vm2
 * Clone Set: cln_SAPHanaTopology_HA1_HDB00 [rsc_SAPHanaTopology_HA1_HDB00]:
   * Started: [ example-ha-vm1 example-ha-vm1w1 example-ha-vm1w2 example-ha-vm2 example-ha-vm2w1 example-ha-vm2w2 ]
   * Stopped: [ example-ha-mj ]
 * Clone Set: mst_SAPHana_HA1_HDB22 [rsc_SAPHana_HA1_HDB22] (promotable)
   * Masters: [ example-ha-vm2 ]
   * Slaves: [ example-ha-vm1 example-ha-vm1w1 example-ha-vm1w2 example-ha-vm2w1 example-ha-vm2w2 ]
   * Stopped: [ example-ha-mj ]
 * Clone Set: cln_SAPHanaFileSystem_HA1_HDB22 [rsc_SAPHanaFileSystem_HA1_HDB22]
   * Started: [ example-ha-vm1 example-ha-vm1w1 example-ha-vm1w2 example-ha-vm2 example-ha-vm-2w1 example-ha-vm-2w2 ]
   * Stopped: [ example-ha-mj ]
In the Google Cloud console, on the Load balancer details page, confirm that the new active primary instance shows 1 of 1 in the Healthy column. Refresh the page, if necessary.
For example, see the following image:

In SAP HANA Studio, confirm that you are still connected to the system by double-clicking the system entry in the navigation pane to refresh the system information.
Click the System Replication Status link to confirm that the primary and secondary hosts have switched hosts and are active.
Validate your installation of Google Cloud's Agent for SAP
After your infrastructure is deployed and the SAP HANA system is installed, validate that Google Cloud's Agent for SAP is functioning properly.
Verify that Google Cloud's Agent for SAP is running
To verify that the agent is running, follow these steps:
Establish an SSH connection with your Compute Engine instance.
Run the following command:
systemctl status google-cloud-sap-agent
If the agent is functioning properly, then the output contains
active (running). For example:google-cloud-sap-agent.service - Google Cloud Agent for SAP Loaded: loaded (/usr/lib/systemd/system/google-cloud-sap-agent.service; enabled; vendor preset: disabled) Active: active (running) since Fri 2022-12-02 07:21:42 UTC; 4 days ago Main PID: 1337673 (google-cloud-sa) Tasks: 9 (limit: 100427) Memory: 22.4 M (max: 1.0G limit: 1.0G) CGroup: /system.slice/google-cloud-sap-agent.service └─1337673 /usr/bin/google-cloud-sap-agent
If the agent isn't running, then restart the agent.
Verify that SAP Host Agent is receiving metrics
To verify that the infrastructure metrics are collected by Google Cloud's Agent for SAP and sent correctly to the SAP Host Agent, follow these steps:
- In your SAP system, enter transaction
ST06. In the overview pane, check the availability and content of the following fields for the correct end-to-end setup of the SAP and Google monitoring infrastructure:
- Cloud Provider:
Google Cloud Platform - Enhanced Monitoring Access:
TRUE - Enhanced Monitoring Details:
ACTIVE
- Cloud Provider:
Set up monitoring for SAP HANA
Optionally, you can monitor your SAP HANA instances using Google Cloud's Agent for SAP. From version 2.0, you can configure the agent to collect the SAP HANA monitoring metrics and send them to Cloud Monitoring. Cloud Monitoring lets you create dashboards to visualize these metrics, set up alerts based on metric thresholds, and more.
For more information about the collection of SAP HANA monitoring metrics using Google Cloud's Agent for SAP, see SAP HANA monitoring metrics collection.
Connect to SAP HANA
Note that because these instructions don't use an external IP address for SAP HANA, you can only connect to the SAP HANA instances through the bastion instance using SSH or through the Windows server through SAP HANA Studio.
To connect to SAP HANA through the bastion instance, connect to the bastion host, and then to the SAP HANA instance(s) by using an SSH client of your choice.
To connect to the SAP HANA database through SAP HANA Studio, use a remote desktop client to connect to the Windows Server instance. After connection, manually install SAP HANA Studio and access your SAP HANA database.
Configure HANA Active/Active (Read Enabled)
Starting with SAP HANA 2.0 SPS1, you can configure HANA Active/Active (Read Enabled) in a Pacemaker cluster. For instructions, see Configure HANA Active/Active (Read Enabled) in a SUSE Pacemaker cluster.
Perform post-deployment tasks
Before using your SAP HANA instance, we recommend that you perform the following post-deployment steps. For more information, see SAP HANA Installation and Update Guide.
Change the temporary passwords for the SAP HANA system administrator and database superuser.
Update the SAP HANA software with the latest patches.
If your SAP HANA system is deployed on a VirtIO network interface, then we recommend that you ensure the value of the TCP parameter
/proc/sys/net/ipv4/tcp_limit_output_bytesis set to1048576. This modification helps improve the overall network throughput on the VirtIO network interface without affecting the network latency.Install any additional components such as Application Function Libraries (AFL) or Smart Data Access (SDA).
Configure and backup your new SAP HANA database. For more information, see the SAP HANA operations guide.
Evaluate your SAP HANA workload
To automate continuous validation checks for your SAP HANA high-availability workloads running on Google Cloud, you can use Workload Manager.
Workload Manager allows you to automatically scan and evaluate your SAP HANA high-availability workloads against best practices from SAP, Google Cloud, and OS vendors. This helps improve the quality, performance, and reliability of your workloads.
For information about the best practices that Workload Manager supports for evaluating SAP HANA high-availability workloads running on Google Cloud, see Workload Manager best practices for SAP. For information about creating and running an evaluation using Workload Manager, see Create and run an evaluation.
Troubleshoot
To troubleshoot problems with high-availability configurations for SAP HANA on SLES, see Troubleshooting high-availability configurations for SAP.
Get support
If you need help resolving a problem with high-availability clusters for SAP HANA on SLES, then you must gather the required diagnostic information and contact Cloud Customer Care. For more information, see High-availability clusters on SLES diagnostic information.
What's next
- If you need to use Google Cloud NetApp Volumes instead of Persistent Disk or
Hyperdisk volumes to host SAP HANA directories such as
/hana/sharedor/hanabackup, see the NetApp Volumes deployment information in the SAP HANA planning guide. - For more information about VM administration of and monitoring, see the SAP HANA Operations Guide.